2002 Hyundai Getz steering
[x] Cancel search: steeringPage 330 of 428

2- 4 DRIVING YOUR HYUNDAI
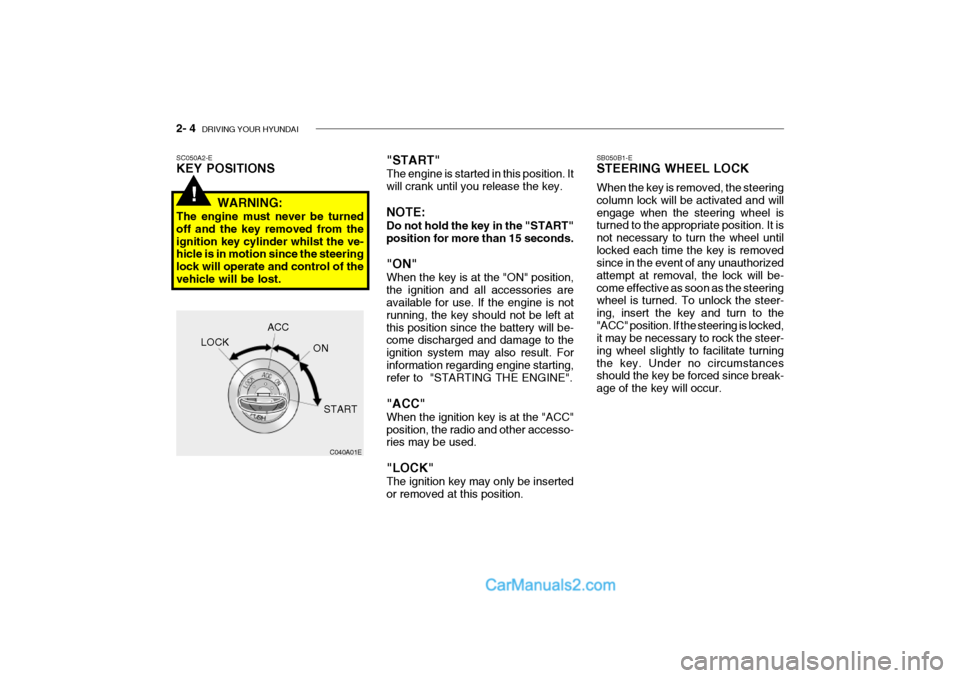
"START" The engine is started in this position. It will crank until you release the key. NOTE: Do not hold the key in the "START" position for more than 15 seconds. "ON" When the key is at the "ON" position, the ignition and all accessories are available for use. If the engine is not running, the key should not be left atthis position since the battery will be- come discharged and damage to the ignition system may also result. Forinformation regarding engine starting, refer to "STARTING THE ENGINE". "ACC" When the ignition key is at the "ACC" position, the radio and other accesso- ries may be used. "LOCK" The ignition key may only be inserted or removed at this position.SC050A2-E KEY POSITIONS
C040A01E
LOCK
ACC
ON
START
!WARNING:
The engine must never be turned off and the key removed from theignition key cylinder whilst the ve- hicle is in motion since the steering lock will operate and control of thevehicle will be lost. SB050B1-E STEERING WHEEL LOCK When the key is removed, the steering column lock will be activated and willengage when the steering wheel is turned to the appropriate position. It is not necessary to turn the wheel untillocked each time the key is removed since in the event of any unauthorized attempt at removal, the lock will be-come effective as soon as the steering wheel is turned. To unlock the steer- ing, insert the key and turn to the"ACC" position. If the steering is locked, it may be necessary to rock the steer- ing wheel slightly to facilitate turningthe key. Under no circumstances should the key be forced since break- age of the key will occur.
Page 343 of 428

DRIVING YOUR HYUNDAI 2- 17
o The formation of snow or ice built up
inside the wheel arches may inter- fere with the road wheels or steeringmechanism. In such instances, un- usual noises or an increase in steer- ing effort may result. Therefore,ensure that the wheel arches are checked periodically and any accu- mulated snow or ice removed.
o It is advisable to carry emergency equipment including, torch, shovel,tow rope, blankets etc., if a journeyis to be undertaken into areas of severe road conditions.
Tongue load Total trailer weight
C190E01L C195F02TB-EAT TOWING ATTACHMENTS It is strongly recommended that only an Hyundai Approved towing attach-ment is used to ensure that the loads placed upon the body structure are correctly distributed. The use of a nonapproved attachment will result in the invalidation of the vehicle warranty. Hyundai towing attachments are de-signed and constructed to ensure maximum towing performance and ease of fitment. A range of accesso-ries including electrical kits are avail- able through the Hyundai dealer net- work. It is of the utmost importance that those areas of the vehicle which aresubjected to greater stress during tow- ing are maintained in accordance with the recommendations given at the endof this book. In addition, the daily oper- ating checks relating to engine oil, transmission oil and tyres must beperformed at each refuelling to ensure maximum reliability and safety.
C190E01TB-EAT TRAILER AND CARAVAN TOW- ING
WARNING:
It is not recommended that the ve- hicle be used for towing until thefirst 1,000 miles of Running In has been completed. All Hyundai MA- TRIX models are suited to towingtrailers and caravans up to the lim- its indicated below. This models fitted with automatic transaxle havea transaxle oil cooler and further transaxle cooling should not be required.
!
Page 357 of 428

WHAT TO DO IN AN EMERGENCY 3- 11
o OK FOR AUTOMATIC OR MANUAL
TRANSAXLE EQUIPPED VEHICLE WITH NO DAMAGE HTB208
HTB151B080A01TB-EAT VEHICLE TOWING OR RECOVERY
CAUTION:
An incorrect tow or recovery could result in serious damage to the ve-hicle. If any damage to the suspen- sion, steering or transaxle is appar- ent or suspected, a towing ambu-lance must be used. o OK FOR AUTOMATIC OR MANUAL
TRANSAXLE EQUIPPED VEHICLE
HTB207
!
SD070K1-E AFTER CHANGING WHEELS The pressure of the spare tyre should be checked at the first available oppor- tunity. If any doubt exists as to the tyre pressure, the vehicle should be drivenslowly to the nearest service station and the tyre pressure checked and adjusted as required.If the valve cap is lost from any of the valves, a replacement should be ob- tained and fitted at the first availableopportunity. The valve cap prevents the ingress of dirt which may cause the valve to stick and therefore leak and ispart of the valve sealing function. Ensure that the spare wheel, jack and wheel nut wrench as well tools are correctly located in the boot of thevehicle to prevent damage and noise.
The vehicle may be towed by the con-ventional method using the towing eye at the front of the vehicle as an attach- ment point. In addition, a suspendedtow with or without an ambulance may be used with either the front or the rear wheels being suspended, provided theabove caution is observed.
Page 358 of 428

3- 12 WHAT TO DO IN AN EMERGENCY
!
CAUTION:
The following restriction must be observed in order to avoid seriousdamage to the transaxle . The vehicle must never be towed from the rear with the front wheelson the ground. The vehicle must not be towed until transaxle fluid has been added tobring the level up to the "HOT" marking on the dipstick. (The level will need to be reduced again aftertowing). The vehicle must not be towed at speeds faster than 25 mph. or dis-tances greater than fifty miles. The general points regarding the steer- ing lock etc. described in the pre-ceding section (Manual transaxle vehicle) should be observed.
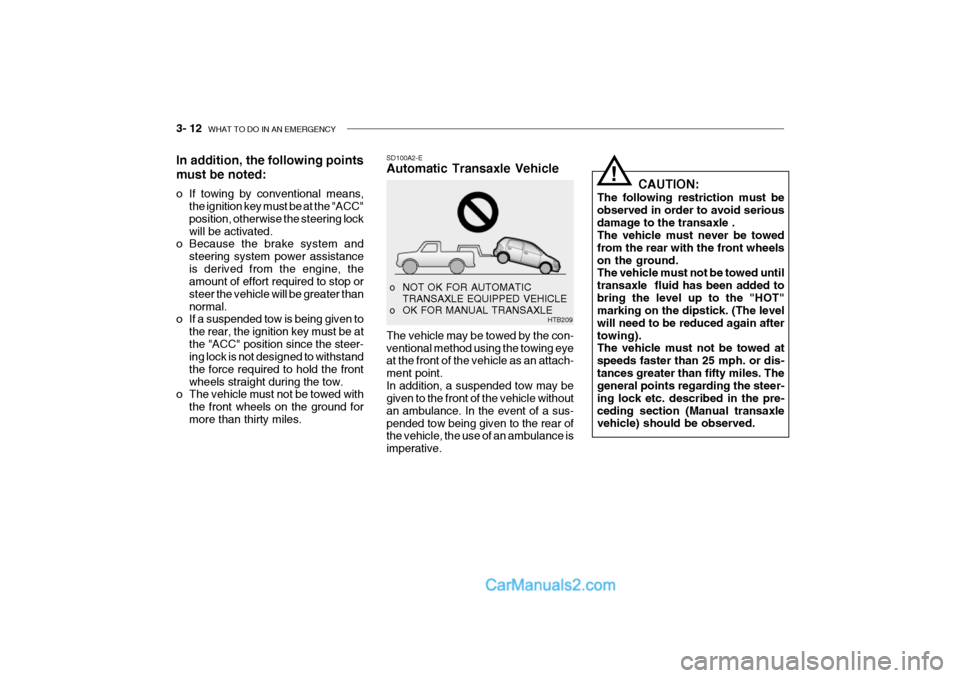
SD100A2-E Automatic Transaxle Vehicle The vehicle may be towed by the con- ventional method using the towing eye at the front of the vehicle as an attach- ment point.In addition, a suspended tow may be given to the front of the vehicle without an ambulance. In the event of a sus-pended tow being given to the rear of the vehicle, the use of an ambulance is imperative.
o NOT OK FOR AUTOMATIC
TRANSAXLE EQUIPPED VEHICLE
o OK FOR MANUAL TRANSAXLE HTB209
In addition, the following points must be noted:
o If towing by conventional means,
the ignition key must be at the "ACC" position, otherwise the steering lockwill be activated.
o Because the brake system and
steering system power assistanceis derived from the engine, the amount of effort required to stop or steer the vehicle will be greater thannormal.
o If a suspended tow is being given to
the rear, the ignition key must be atthe "ACC" position since the steer- ing lock is not designed to withstand the force required to hold the frontwheels straight during the tow.
o The vehicle must not be towed with
the front wheels on the ground formore than thirty miles.
Page 359 of 428

WHAT TO DO IN AN EMERGENCY 3- 13
D120A01A-EAT IF YOU LOSE YOUR KEYS Information about the key of immobi- lizer system will be found on page 1-4.CAUTION:
If the car is being towed with allfour wheels on the ground, it can be towed only from the front. Besure that the transaxle is in neu- tral. Do not tow at speeds greater
than 30 mph (50 km/h) and for more
than 15 miles(25 km). Be sure the steering is unlocked by placing the key in the "ACC" posi- tion. A driver must be in the towed vehicle to operate the steering andbrakes.
!
(3)Attach a tow cable, chain or strap to
one of the tie-down hooks under the front of your car.
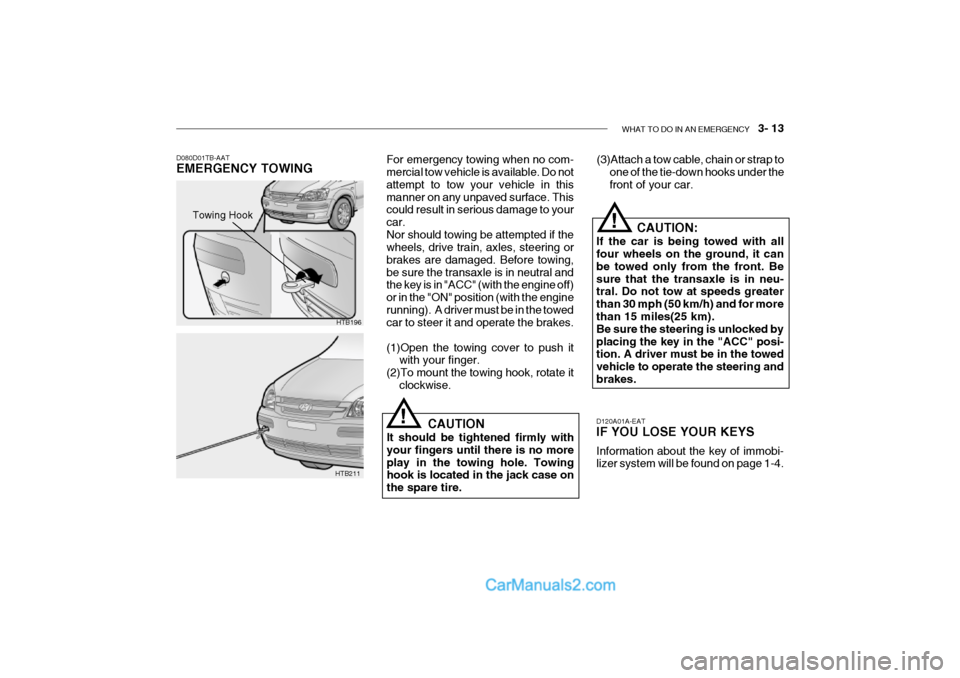
D080D01TB-AAT EMERGENCY TOWING For emergency towing when no com- mercial tow vehicle is available. Do not attempt to tow your vehicle in thismanner on any unpaved surface. This could result in serious damage to your car.Nor should towing be attempted if the wheels, drive train, axles, steering or brakes are damaged. Before towing,be sure the transaxle is in neutral and the key is in "ACC" (with the engine off) or in the "ON" position (with the enginerunning). A driver must be in the towed car to steer it and operate the brakes. (1)Open the towing cover to push it
with your finger.
(2)To mount the towing hook, rotate it clockwise.
HTB196
HTB211 CAUTION
It should be tightened firmly with your fingers until there is no moreplay in the towing hole. Towing hook is located in the jack case on the spare tire.
!
Towing Hook
Page 369 of 428

VEHICLE MAINTENANCE REQUIREMENTS 5- 5
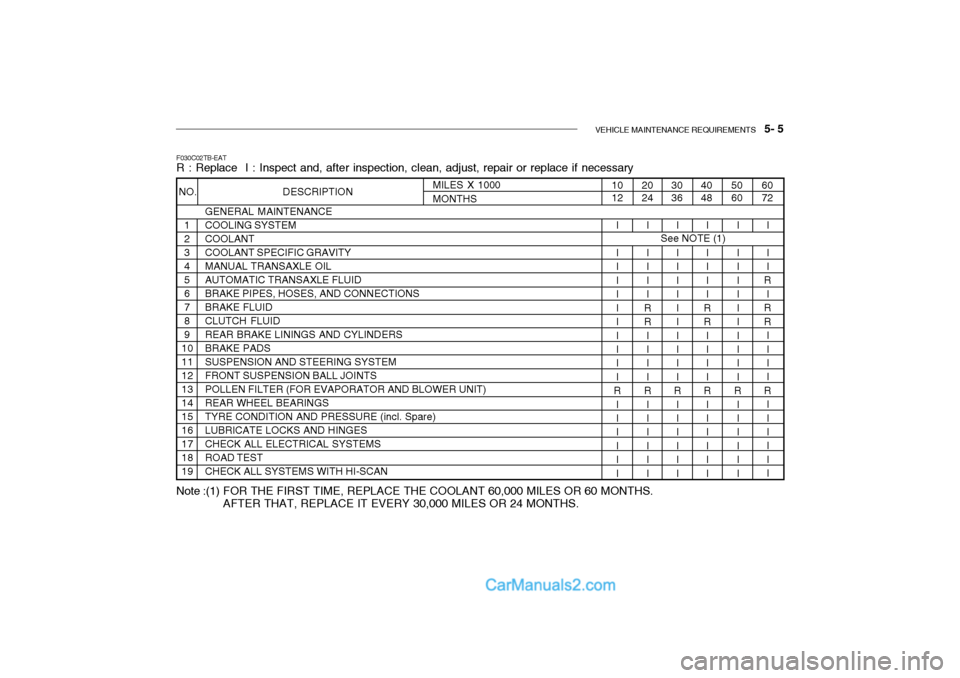
F030C02TB-EAT R : Replace I : Inspect and, after inspection, clean, adjust, repair or replace if necessary
GENERAL MAINTENANCE COOLING SYSTEMCOOLANTCOOLANT SPECIFIC GRAVITYMANUAL TRANSAXLE OILAUTOMATIC TRANSAXLE FLUIDBRAKE PIPES, HOSES, AND CONNECTIONSBRAKE FLUIDCLUTCH FLUIDREAR BRAKE LININGS AND CYLINDERSBRAKE PADSSUSPENSION AND STEERING SYSTEMFRONT SUSPENSION BALL JOINTSPOLLEN FILTER (FOR EVAPORATOR AND BLOWER UNIT)REAR WHEEL BEARINGSTYRE CONDITION AND PRESSURE (incl. Spare)LUBRICATE LOCKS AND HINGESCHECK ALL ELECTRICAL SYSTEMSROAD TESTCHECK ALL SYSTEMS WITH HI-SCAN
60 72
5060
4048
I I I
R
I
RR II I I
R III I II
I I I IIIII I II
R II I III
I I I II
RR I I II
R II I III
30 36
2024
I I I IIIII I II
R II I III
I I I II
RR I I II
R II I III
10 12
I I I IIIII I II
R II I III
MILES X 1000MONTHS
NO. DESCRIPTION
1 23456789
10111213141516171819
See NOTE (1)
Note :(1) FOR THE FIRST TIME, REPLACE THE COOLANT 60,000 MILES OR 60 MONTHS. AFTER THAT, REPLACE IT EVERY 30,000 MILES OR 24 MONTHS.
Page 370 of 428

5- 6 VEHICLE MAINTENANCE REQUIREMENTS
MAINTENANCE UNDER SEVERE USAGE CONDITIONS
The following items must be serviced more frequently on cars normally used under severe driving conditions. Refer to the chart below for the appropriate maintenance intervals. R : REPLACE I : INSPECT AND, AFTER INSPECTION, CLEAN, ADJUST, REPAIR OR REPLACE IF NECESSARY
F040A06A-EAT
SEVERE DRIVING CONDITIONS
A - Repeated short distance driving
B - Extensive idling
C - Driving in dusty, rough roads
D - Driving in areas using salt or other corrosive materials or in very cold weather
ENGINE OIL AND FILTER AIR CLEANER FILTERSPARK PLUGSTIMING BELTBRAKE PADSREAR BRAKE LININGS AND CYLINDERSSUSPENSION AND STEERING SYSTEM MANUAL TRANSAXLE OIL AUTOMATIC TRANSAXLE FLUIDPOLLEN FILTER(FOR EVAPORATOR AND BLOWER UNIT)
EVERY 4,500MILES OR 6 MONTHS
MORE FREQUENTLYMORE FREQUENTLY EVERY 37,000MILES OR 48 MONTHSMORE FREQUENTLY MORE FREQUENTLY MORE FREQUENTLYEVERY 60,000MILES EVERY 27,000MILES
MORE FREQUENTLY
MAINTENANCE OPERATIONMAINTENANCE ITEM
R RR RI II
RR R A, B, C, F, H C, EB, H D, E, F, G C, D, G, HC, D, G, HC, D, E, F A, C, D, E, F, G, H, I, J A, C, E, F, G, H, I C,E
MAINTENANCE INTERVALS
DRIVING
CONDITION
E - Driving in sandy areas
F - More than 50% driving in heavy city traffic during hot weather
above 90°F (32°C)
G - Driving in mountainous areas
H - Towing a trailer
I - Driving for patrol car, taxi, commercial car or vehicle towing
J - Driving over 100MPH
Page 373 of 428

VEHICLE MAINTENANCE REQUIREMENTS 5- 9
6ZF070F1-A
o Brake hoses and lines
Visually check for proper installation, chafing, cracks, deterioration and any leakage. Replace any deteriorated or damaged parts immediately. 6ZF070G2-A
o Brake fluid
Check brake fluid level in the brake fluid reservoir. The level should bebetween "MIN" and "MAX" marks on the side of the reservoir. Use only hydraulic brake fluid conforming toDOT 3 or DOT 4. 6ZF070H1-A
o Rear brake drums and linings/ parking brake
Check the rear brake drums and lin- ings for scoring, burning, leaking fluid,broken parts, and excessive wear. Inspect the parking brake system in- cluding the parking brake lever andcables. For detailed service proce- dures, refer to the Shop Manual. 6ZF070J1-A
o Brake pads, calipers and
rotors
Check the pads for excessive wear,
discs for run out and wear, and cali- pers for fluid leakage.
6ZF070K1-A
o Exhaust pipe and muffler
Visually inspect the exhaust pipes,
muffler and hangers for cracks, dete- rioration, or damage. Start the engine and listen carefully for any exhaustgas leakage. Tighten connections or replace parts as necessary.
6ZF070L1-A
o Suspension mounting bolts
Check the suspension connections
for looseness or damage. Retightento the specified torque. 6ZF070M1-A o Steering gear box, linkage &
boots/lower arm ball joint
With the vehicle stopped and engine off, check for excessive freeplay inthe steering wheel.Check the linkage for bends or dam-age. Check the dust boots and ball joints for deterioration, cracks, or dam- age. Replace any damaged parts. 6ZF070N1-A
o Power steering pump, belt and hoses
Check the power steering pump and hoses for leakage and damage. Re-place any damaged or leaking parts immediately. Inspect the power steer- ing belt for evidence of cuts, cracks,excessive wear, oiliness and proper tension. Replace or adjust it if neces- sary.