2002 Hyundai Atos spare tire
[x] Cancel search: spare tirePage 76 of 249
DRIVING YOUR HYUNDAI
DRIVING YOUR HYUNDAI DRIVING YOUR HYUNDAI
DRIVING YOUR HYUNDAI
DRIVING YOUR HYUNDAI
2- 13
4. To maintain engine braking efficiency andelectrical charging performance, do not use fifth gear (manual transaxle) or overdrive(automatic transaxle).
5. Always secure items in the trailer to prevent load shift while driving.
6. Check the condition and air pressure of all tires on the trailer and your car. Low tirepressure can seriously affect the handling.Also check the spare tire.
7. The vehicle/trailer combination is more af- fected by crosswind and buffeting. When being passed by a large vehicle, keep a constant speed and steer straight ahead.If there is too much wind buffeting slowdown to get out of the other vehicle's airturbulence.
8. When parking your car and trailer, especial- ly on a hill, be sure to follow all the normalprecautions. Turn your front wheel into thecurb, set the parking brake firmly, and putthe transaxle in 1st or Reverse (manual) orPark (automatic). In addition, place wheelchocks at each of the trailer's tires.
9. If the trailer has electric brakes, start your vehicle and trailer moving, and then applythe trailer brake controller by hand to besure the brakes are working. This lets youcheck your electrical connection at the sametime.
10. During your trip, check occasionally to be sure that the load is secure, and that thelights and any trailer brakes are still working.
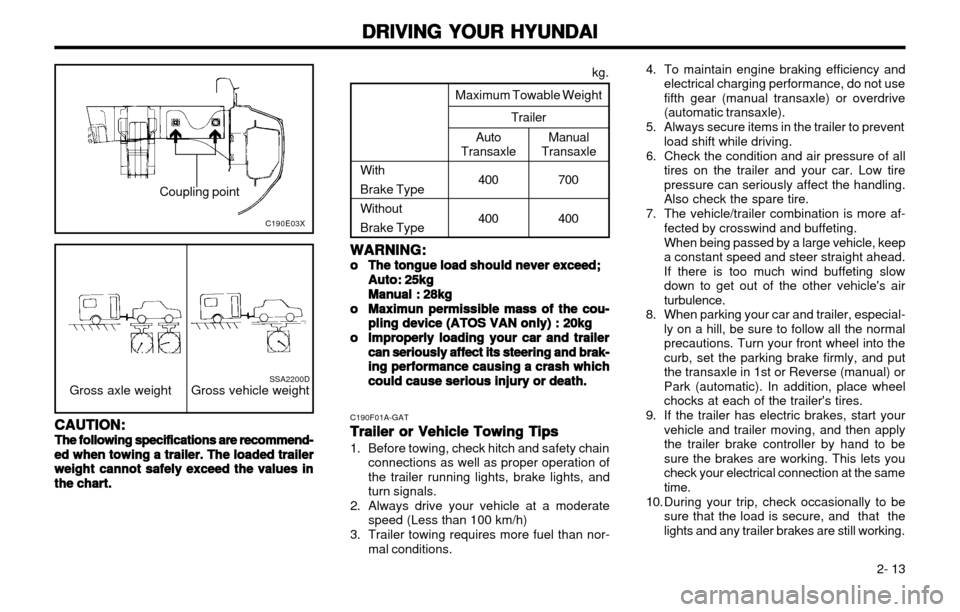
WARNING:
WARNING: WARNING:
WARNING:
WARNING:
oo
oo
o The tongue load should never exceed;
The tongue load should never exceed; The tongue load should never exceed;
The tongue load should never exceed;
The tongue load should never exceed;
Auto: 25kg
Auto: 25kg Auto: 25kg
Auto: 25kg
Auto: 25kg
Manual : 28kg
Manual : 28kg Manual : 28kg
Manual : 28kg
Manual : 28kg
oo
oo
o Maximun permissible mass of the cou-
Maximun permissible mass of the cou- Maximun permissible mass of the cou-
Maximun permissible mass of the cou-
Maximun permissible mass of the cou-
pling device (ATOS VAN only) : 20kg
pling device (ATOS VAN only) : 20kg pling device (ATOS VAN only) : 20kg
pling device (ATOS VAN only) : 20kg
pling device (ATOS VAN only) : 20kg
oo
oo
o Improperly loading your car and trailer
Improperly loading your car and trailer Improperly loading your car and trailer
Improperly loading your car and trailer
Improperly loading your car and trailer
can seriously affect its steering and brak-
can seriously affect its steering and brak- can seriously affect its steering and brak-
can seriously affect its steering and brak-
can seriously affect its steering and brak-
ing performance causing a crash which
ing performance causing a crash which ing performance causing a crash which
ing performance causing a crash which
ing performance causing a crash which
could cause serious injury or death.
could cause serious injury or death. could cause serious injury or death.
could cause serious injury or death.
could cause serious injury or death. kg.
Maximum Towable Weight Trailer
Manual
TransaxleAuto
Transaxle
With Brake TypeWithoutBrake Type 400 400
C190F01A-GAT
Trailer or Vehicle Towing Tips
Trailer or Vehicle Towing Tips Trailer or Vehicle Towing Tips
Trailer or Vehicle Towing Tips
Trailer or Vehicle Towing Tips
1. Before towing, check hitch and safety chain
connections as well as proper operation of the trailer running lights, brake lights, andturn signals.
2. Always drive your vehicle at a moderate speed (Less than 100 km/h)
3. Trailer towing requires more fuel than nor- mal conditions.
Gross axle weight Gross vehicle weightSSA2200D
CAUTION:
CAUTION: CAUTION:
CAUTION:
CAUTION:
The following specifications are recommend-
The following specifications are recommend- The following specifications are recommend-
The following specifications are recommend-
The following specifications are recommend- ed when towing a
ed when towing a ed when towing a
ed when towing a
ed when towing a trailer. The loaded trailer
trailer. The loaded trailer trailer. The loaded trailer
trailer. The loaded trailer
trailer. The loaded trailer
weight cannot safely exceed the values in
weight cannot safely exceed the values in weight cannot safely exceed the values in
weight cannot safely exceed the values in
weight cannot safely exceed the values in
the the
the the
the chart.
chart. chart.
chart.
chart. Coupling point
C190E03X
700 400
Page 80 of 249
WHAT TO DO IN AN EMERGENCY
WHAT TO DO IN AN EMERGENCY WHAT TO DO IN AN EMERGENCY
WHAT TO DO IN AN EMERGENCY
WHAT TO DO IN AN EMERGENCY
3-3
WARNING:
WARNING: WARNING:
WARNING:
WARNING:
While the engine is running, keep hands,
While the engine is running, keep hands, While the engine is running, keep hands,
While the engine is running, keep hands,
While the engine is running, keep hands, long hair
long hair long hair
long hair
long hair
and clothing away from moving
and clothing away from moving and clothing away from moving
and clothing away from moving
and clothing away from moving
parts such as the fan and drive belts to
parts such as the fan and drive belts to parts such as the fan and drive belts to
parts such as the fan and drive belts to
parts such as the fan and drive belts to
prevent
prevent prevent
prevent
prevent
injury.
injury. injury.
injury.
injury.
5. If the water pump drive belt is broken or engine coolant is leaking out, stop the en- gine immediately and call the nearestHyundai dealer for assistance.
WARNING:
WARNING: WARNING:
WARNING:
WARNING:
Do not remove the radiator cap when the
Do not remove the radiator cap when the Do not remove the radiator cap when the
Do not remove the radiator cap when the
Do not remove the radiator cap when the engine is hot. This may allow
engine is hot. This may allow engine is hot. This may allow
engine is hot. This may allow
engine is hot. This may allow coolant to be
coolant to be coolant to be
coolant to be
coolant to be
blown out of the opening and cause serious
blown out of the opening and cause serious blown out of the opening and cause serious
blown out of the opening and cause serious
blown out of the opening and cause serious
burns.
burns. burns.
burns.
burns.
6. If you cannot find the cause of the overheat-
ing, wait until the engine temperature has returned to normal. Then, if engine coolanthas been lost, carefully remove the radiator
cap and add engine coolant to bring the fluidlevel in the reservoir up to the halfway mark.
7. Proceed with caution, keeping alert for fur- ther signs of overheating. If overheating hap-pens again, call a Hyundai dealer for assis-tance.
CAUTION:
CAUTION: CAUTION:
CAUTION:
CAUTION:
Serious loss of engine coolant indicates
Serious loss of engine coolant indicates Serious loss of engine coolant indicates
Serious loss of engine coolant indicates
Serious loss of engine coolant indicates there is a leak in
there is a leak in there is a leak in
there is a leak in
there is a leak in the cooling system and this
the cooling system and this the cooling system and this
the cooling system and this
the cooling system and this
should be checked as soon as possible by a
should be checked as soon as possible by a should be checked as soon as possible by a
should be checked as soon as possible by a
should be checked as soon as possible by a
Hyundai
Hyundai Hyundai
Hyundai
Hyundai dealer.
dealer. dealer.
dealer.
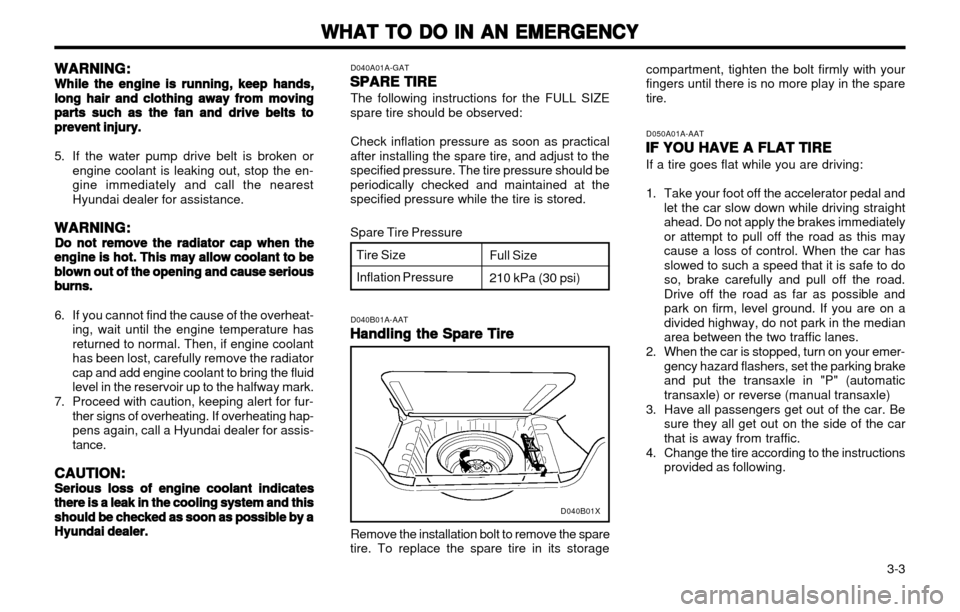
dealer. D040A01A-GAT
SPARE TIRE
SPARE TIRE SPARE TIRE
SPARE TIRE
SPARE TIRE
The following instructions for the FULL SIZE
spare tire should be observed:
Check inflation pressure as soon as practical
after installing the spare tire, and adjust to the specified pressure. The tire pressure should beperiodically checked and maintained at thespecified pressure while the tire is stored.
Tire Size Inflation Pressure Full Size 210 kPa (30 psi)
Spare Tire Pressure
D040B01A-AAT
Handling the Spare Tire
Handling the Spare Tire Handling the Spare Tire
Handling the Spare Tire
Handling the Spare Tire
Remove the installation bolt to remove the spare
tire. To replace the spare tire in its storage D050A01A-AAT
IF YOU HAVE A FLAT TIRE
IF YOU HAVE A FLAT TIRE IF YOU HAVE A FLAT TIRE
IF YOU HAVE A FLAT TIRE
IF YOU HAVE A FLAT TIRE If a tire goes flat while you are driving:
1. Take your foot off the accelerator pedal and
let the car slow down while driving straight ahead. Do not apply the brakes immediatelyor attempt to pull off the road as this may
cause a loss of control. When the car hasslowed to such a speed that it is safe to doso, brake carefully and pull off the road.Drive off the road as far as possible and
park on firm, level ground. If you are on adivided highway, do not park in the medianarea between the two traffic lanes.
2. When the car is stopped, turn on your emer- gency hazard flashers, set the parking brakeand put the transaxle in "P" (automatic
transaxle) or reverse (manual transaxle)
3. Have all passengers get out of the car. Be sure they all get out on the side of the carthat is away from traffic.
4. Change the tire according to the instructions provided as following.
compartment, tighten the bolt firmly with yourfingers until there is no more play in the sparetire.
D040B01X
Page 81 of 249
WHAT TO DO IN AN EMERGENCY
WHAT TO DO IN AN EMERGENCY WHAT TO DO IN AN EMERGENCY
WHAT TO DO IN AN EMERGENCY
WHAT TO DO IN AN EMERGENCY
3-4 D060A01A-AAT
CHANGING A FLAT TIRE
CHANGING A FLAT TIRE CHANGING A FLAT TIRE
CHANGING A FLAT TIRE
CHANGING A FLAT TIRE
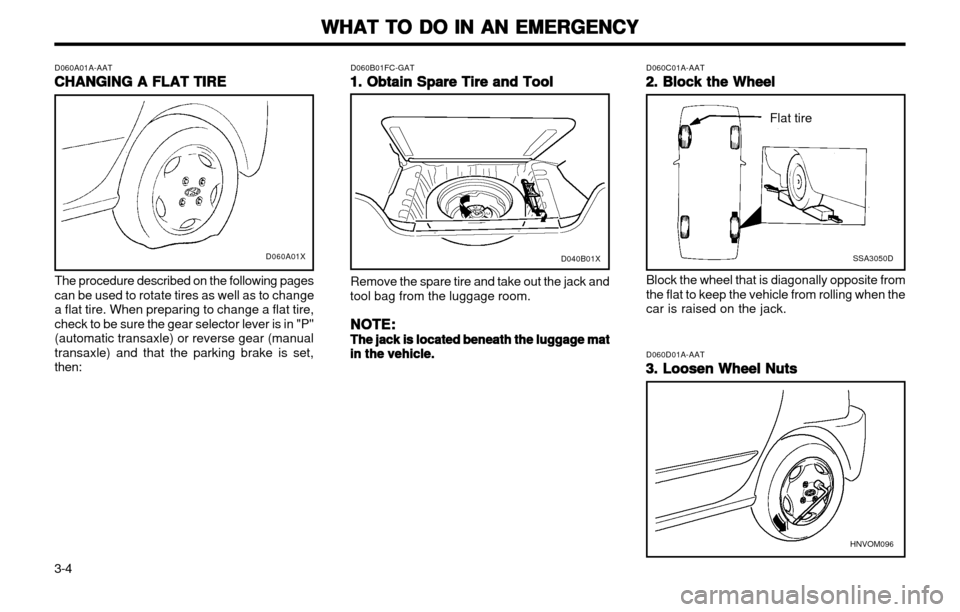
The procedure described on the following pages can be used to rotate tires as well as to change
a flat tire. When preparing to change a flat tire,check to be sure the gear selector lever is in "P"(automatic transaxle) or reverse gear (manualtransaxle) and that the parking brake is set,then: D060B01FC-GAT
1. Obtain Spare Tire and Tool
1. Obtain Spare Tire and Tool 1. Obtain Spare Tire and Tool
1. Obtain Spare Tire and Tool
1. Obtain Spare Tire and Tool
Remove the spare tire and take out the jack and
tool bag from the luggage room.
NOTE:
NOTE: NOTE:
NOTE:
NOTE:
The jack is located beneath the luggage mat
The jack is located beneath the luggage mat The jack is located beneath the luggage mat
The jack is located beneath the luggage mat
The jack is located beneath the luggage mat in the vehicle.
in the vehicle. in the vehicle.
in the vehicle.
in the vehicle. Block the wheel that is diagonally opposite from the flat to keep the vehicle from rolling when thecar is raised on the jack.
D060C01A-AAT
2. Block the Wheel
2. Block the Wheel 2. Block the Wheel
2. Block the Wheel
2. Block the Wheel
SSA3050D
Flat tire
D060D01A-AAT 3. Loosen Wheel Nuts
3. Loosen Wheel Nuts 3. Loosen Wheel Nuts
3. Loosen Wheel Nuts
3. Loosen Wheel Nuts
D060A01X
HNVOM096
D040B01X
Page 82 of 249
WHAT TO DO IN AN EMERGENCY
WHAT TO DO IN AN EMERGENCY WHAT TO DO IN AN EMERGENCY
WHAT TO DO IN AN EMERGENCY
WHAT TO DO IN AN EMERGENCY
3-5
Wheel nut Wrench
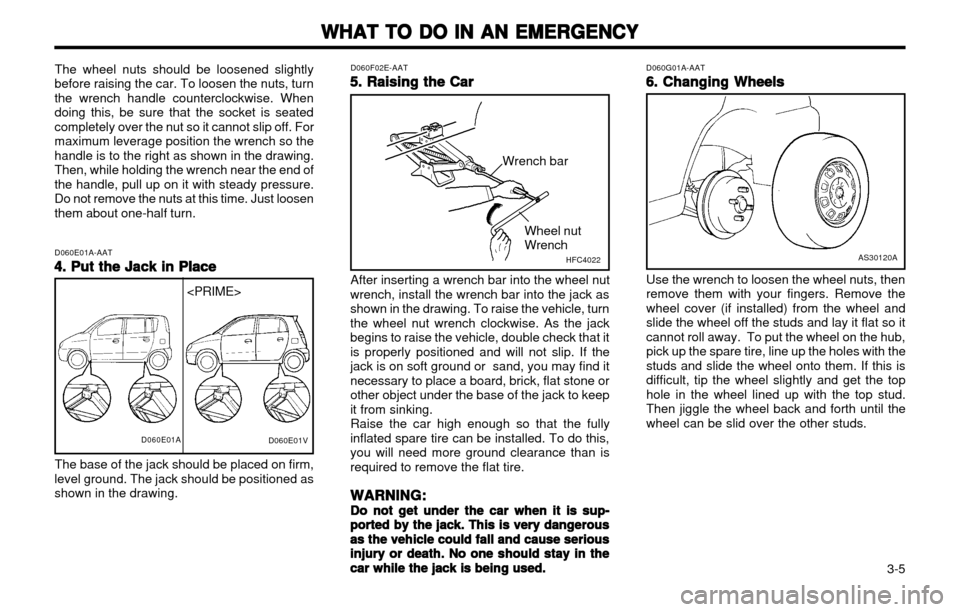
The wheel nuts should be loosened slightly
before raising the car. To loosen the nuts, turnthe wrench handle counterclockwise. Whendoing this, be sure that the socket is seatedcompletely over the nut so it cannot slip off. Formaximum leverage position the wrench so thehandle is to the right as shown in the drawing.Then, while holding the wrench near the end ofthe handle, pull up on it with steady pressure.Do not remove the nuts at this time. Just loosenthem about one-half turn.
D060E01A-AAT4. Put the Jack in Place
4. Put the Jack in Place 4. Put the Jack in Place
4. Put the Jack in Place
4. Put the Jack in Place
The base of the jack should be placed on firm,
level ground. The jack should be positioned asshown in the drawing. D060F02E-AAT
5. Raising the Car
5. Raising the Car 5. Raising the Car
5. Raising the Car
5. Raising the Car D060G01A-AAT
6. Changing Wheels
6. Changing Wheels 6. Changing Wheels
6. Changing Wheels
6. Changing Wheels
AS30120A
After inserting a wrench bar into the wheel nut
wrench, install the wrench bar into the jack as shown in the drawing. To raise the vehicle, turnthe wheel nut wrench clockwise. As the jackbegins to raise the vehicle, double check that itis properly positioned and will not slip. If thejack is on soft ground or sand, you may find itnecessary to place a board, brick, flat stone orother object under the base of the jack to keepit from sinking. Raise the car high enough so that the fully
inflated spare tire can be installed. To do this,you will need more ground clearance than isrequired to remove the flat tire.
WARNING:
WARNING: WARNING:
WARNING:
WARNING:
Do not get under the car when it is sup-
Do not get under the car when it is sup- Do not get under the car when it is sup-
Do not get under the car when it is sup-
Do not get under the car when it is sup- ported by the jack. This is very dangerous
ported by the jack. This is very dangerous ported by the jack. This is very dangerous
ported by the jack. This is very dangerous
ported by the jack. This is very dangerous
as the vehicle could fall and cause serious
as the vehicle could fall and cause serious as the vehicle could fall and cause serious
as the vehicle could fall and cause serious
as the vehicle could fall and cause serious
injury or death. No one should stay in the
injury or death. No one should stay in the injury or death. No one should stay in the
injury or death. No one should stay in the
injury or death. No one should stay in the
car while the jack is being used.
car while the jack is being used. car while the jack is being used.
car while the jack is being used.
car while the jack is being used. Use the wrench to loosen the wheel nuts, then remove them with your fingers. Remove thewheel cover (if installed) from the wheel andslide the wheel off the studs and lay it flat so itcannot roll away. To put the wheel on the hub,pick up the spare tire, line up the holes with thestuds and slide the wheel onto them. If this isdifficult, tip the wheel slightly and get the tophole in the wheel lined up with the top stud.Then jiggle the wheel back and forth until thewheel can be slid over the other studs.
D060E01A
D060E01V
HFC4022
Wrench bar
Page 98 of 249
DO-IT-YOURSELF MAINTENANCE
DO-IT-YOURSELF MAINTENANCE DO-IT-YOURSELF MAINTENANCE
DO-IT-YOURSELF MAINTENANCE
DO-IT-YOURSELF MAINTENANCE
6-2 G020A01A-AAT
GENERAL CHECKS
GENERAL CHECKS GENERAL CHECKS
GENERAL CHECKS
GENERAL CHECKS
Engine Compartment
Engine Compartment Engine Compartment
Engine Compartment
Engine Compartment The following should be checked regularly:
o Engine oil level and condition
o Transaxle fluid level and condition
o Brake fluid level
o Clutch fluid level
o Engine coolant level
o Windshield washer fluid level
o Accessory drive belt condition
o Engine coolant hose condition
o Fluid leaks (on or below components)
o Power steering fluid level
o Battery Condition G020C01X-GAT
Vehicle Interior
Vehicle Interior Vehicle Interior
Vehicle Interior
Vehicle Interior
The following should be checked each time
when the vehicle is driven:
o Lights operation
o Windshield wipers operation
o Horn operation
o Defroster, heating system operation (and air conditioning, if installed)
o Steering operation and condition
o Mirror condition and operation
o Turn signal operation
o Accelerator pedal operation
o Brake operation, including parking brake
o Manual transaxle operation, including clutch operation
o Automatic transaxle operation, including "Park" mechanism operation
o Seat control condition and operation
o Seat belt condition and operation
o Sunvisor operation
If you notice anything that does not operate
correctly or appears to be functioning in cor-rectly, inspect it carefully and seek assistancefrom your Hyundai dealer if service is needed. G030A01A-AAT
CHECKING THE ENGINE OIL
CHECKING THE ENGINE OIL CHECKING THE ENGINE OIL
CHECKING THE ENGINE OIL
CHECKING THE ENGINE OIL
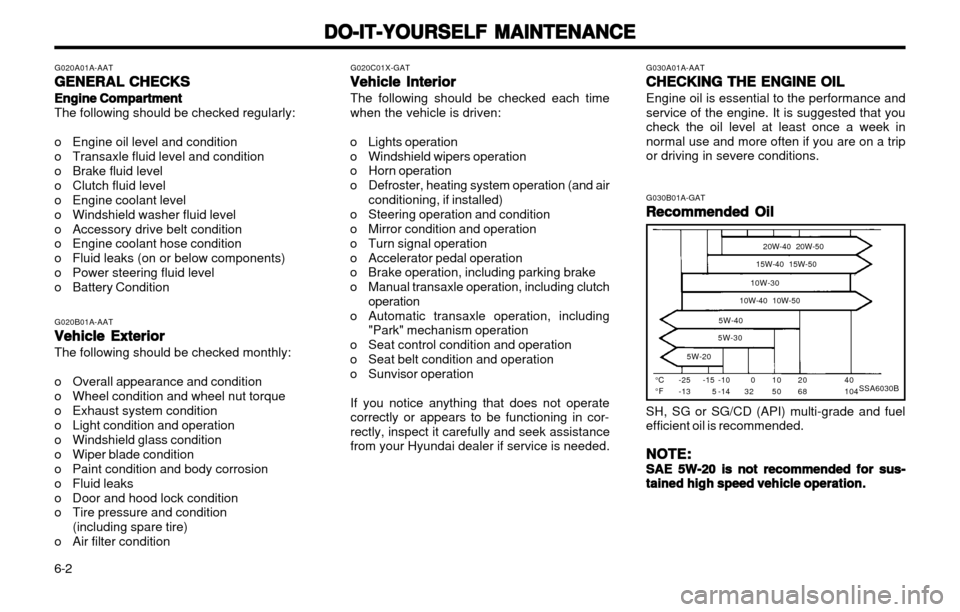
Engine oil is essential to the performance andservice of the engine. It is suggested that youcheck the oil level at least once a week innormal use and more often if you are on a tripor driving in severe conditions. G030B01A-GAT
Recommended Oil
Recommended Oil Recommended Oil
Recommended Oil
Recommended Oil
SSA6030B°C °F -25-13 20W-40 20W-50
15W-40 15W-50
10W-30
10W-40 10W-50
5W-40
5W-30
5W-2040 104
2068
1050
032
-15 5 -10-14
SH, SG or SG/CD (API) multi-grade and fuel efficient oil is recommended.
NOTE:
NOTE: NOTE:
NOTE:
NOTE:
SAE 5W-20 is not recommended for sus-
SAE 5W-20 is not recommended for sus- SAE 5W-20 is not recommended for sus-
SAE 5W-20 is not recommended for sus-
SAE 5W-20 is not recommended for sus-
tained high speed vehicle operation.
tained high speed vehicle operation. tained high speed vehicle operation.
tained high speed vehicle operation.
tained high speed vehicle operation.
G020B01A-AAT
Vehicle Exterior
Vehicle Exterior Vehicle Exterior
Vehicle Exterior
Vehicle Exterior The following should be checked monthly:
o Overall appearance and condition
o Wheel condition and wheel nut torque
o Exhaust system condition
o Light condition and operation
o Windshield glass condition
o Wiper blade condition
o Paint condition and body corrosion
o Fluid leaks
o Door and hood lock condition
o Tire pressure and condition
(including spare tire)
o Air filter condition
Page 113 of 249

DO-IT-YOURSELF MAINTENANCE
DO-IT-YOURSELF MAINTENANCE DO-IT-YOURSELF MAINTENANCE
DO-IT-YOURSELF MAINTENANCE
DO-IT-YOURSELF MAINTENANCE
6-17
G270A02X-GAT
HEADLIGHT BULB
HEADLIGHT BULB HEADLIGHT BULB
HEADLIGHT BULB
HEADLIGHT BULB
Replacement instructions:
1. Allow the bulb to cool. Wear eye protection.
2. Always grasp the bulb by its base, avoid touching the glass.
3. Disconnect the connector, then remove the dust cover.
4. Push the bulb spring for removing the head- light bulb.
5. Remove the headlight bulb. If the bulb is burned out, replace it with the same watt- age.
6. Installation is the reverse order of the re- moval.
7. Use the protective cap and carton to promptly dispose of the old bulb.
8. Check for proper headlight aim. WARNING:
WARNING: WARNING:
WARNING:
WARNING:
The halogen bulb contains gas under pres-
The halogen bulb contains gas under pres- The halogen bulb contains gas under pres-
The halogen bulb contains gas under pres-
The halogen bulb contains gas under pres- sure and if impacted
sure and if impacted sure and if impacted
sure and if impacted
sure and if impacted
could shatter, and re-
could shatter, and re- could shatter, and re-
could shatter, and re-
could shatter, and re-
sulting in flying fragments. Always wear eye
sulting in flying fragments. Always wear eye sulting in flying fragments. Always wear eye
sulting in flying fragments. Always wear eye
sulting in flying fragments. Always wear eye
protection
protection protection
protection
protection
when servicing the bulb. Protect
when servicing the bulb. Protect when servicing the bulb. Protect
when servicing the bulb. Protect
when servicing the bulb. Protect
the bulb against abrasions or scratches and
the bulb against abrasions or scratches and the bulb against abrasions or scratches and
the bulb against abrasions or scratches and
the bulb against abrasions or scratches and
against liquids when lighted. Turn the bulb
against liquids when lighted. Turn the bulb against liquids when lighted. Turn the bulb
against liquids when lighted. Turn the bulb
against liquids when lighted. Turn the bulb
on only when installed in a headlight. Re-
on only when installed in a headlight. Re- on only when installed in a headlight. Re-
on only when installed in a headlight. Re-
on only when installed in a headlight. Re-
place the headlight if damaged or cracked.
place the headlight if damaged or cracked. place the headlight if damaged or cracked.
place the headlight if damaged or cracked.
place the headlight if damaged or cracked.
Keep the bulb out of the reach
Keep the bulb out of the reach Keep the bulb out of the reach
Keep the bulb out of the reach
Keep the bulb out of the reach
of children
of children of children
of children
of children
and dispose of the used bulb with care.
and dispose of the used bulb with care. and dispose of the used bulb with care.
and dispose of the used bulb with care.
and dispose of the used bulb with care. G290A02X-GAT
HEADLIGHT AIMING ADJUSTMENT
HEADLIGHT AIMING ADJUSTMENT HEADLIGHT AIMING ADJUSTMENT
HEADLIGHT AIMING ADJUSTMENT
HEADLIGHT AIMING ADJUSTMENT Before performing aiming adjustment, make sure of the following.
1. Keep all tires inflated to the correct pres-
sure.
2. Place the vehicle on level ground and press the front bumper & rear bumper down sev- eral times. Place the vehicle at a distance of3,000 mm (118 in.) from the test wall.
3. See that the vehicle is unloaded (except for full levels of coolant, engine oil and fuel, andspare tire, jack, and tools). Have the driveror equivalent weight placed in driver's seat.
Recommended Fluid
Recommended Fluid Recommended Fluid
Recommended Fluid
Recommended Fluid
Use PSF-3 type fluid.
NOTE:
NOTE: NOTE:
NOTE:
NOTE:
Do not start the engine when the power
Do not start the engine when the power Do not start the engine when the power
Do not start the engine when the power
Do not start the engine when the power steering oil reservoir is empty.
steering oil reservoir is empty. steering oil reservoir is empty.
steering oil reservoir is empty.
steering oil reservoir is empty.
G240A01A-AATPOWER STEERING HOSES
POWER STEERING HOSES POWER STEERING HOSES
POWER STEERING HOSES
POWER STEERING HOSES
It is suggested that you check the power steer-
ing hose connections for fluid leakage at those intervals specified in the vehicle maintenanceschedule in Section 5.
The power steering hoses should be replaced if
there is severe surface cracking, pulling, scuff-ing or worn spots. Deterioration of the hosecould cause premature failure.
G260A03A-AATREPLACING HEADLIGHT BULBS
REPLACING HEADLIGHT BULBS REPLACING HEADLIGHT BULBS
REPLACING HEADLIGHT BULBS
REPLACING HEADLIGHT BULBS
Before attempting to replace a headlight bulb,
be sure the switch is turned to the "OFF"position.
The next paragraph shows how to reach head-
light bulbs so they may be changed. Be sure toreplace the burned-out bulb with one of thesame number and wattage rating.
CAUTION:
CAUTION: CAUTION:
CAUTION:
CAUTION:
Keep the lamps out of contact with petro-
Keep the lamps out of contact with petro- Keep the lamps out of contact with petro-
Keep the lamps out of contact with petro-
Keep the lamps out of contact with petro- leum product, such as oil, gasoline, etc.
leum product, such as oil, gasoline, etc. leum product, such as oil, gasoline, etc.
leum product, such as oil, gasoline, etc.
leum product, such as oil, gasoline, etc.
G270A01X
Page 120 of 249
CONSUMER INFORMATION
CONSUMER INFORMATION CONSUMER INFORMATION
CONSUMER INFORMATION
CONSUMER INFORMATION
8-2
o Lower-than-recommended tire pressures
cause uneven tread wear and poor han- dling.
o Higher-than-recommended tire pressures increase the chance of damage from im-pacts and cause uneven tread wear.
CAUTION:
CAUTION: CAUTION:
CAUTION:
CAUTION:
Always observe the following:
Always observe the following: Always observe the following:
Always observe the following:
Always observe the following:
oo
oo
o Check pressures when the tires are cold.
Check pressures when the tires are cold. Check pressures when the tires are cold.
Check pressures when the tires are cold.
Check pressures when the tires are cold.
That is, after the car has been parked for
That is, after the car has been parked for That is, after the car has been parked for
That is, after the car has been parked for
That is, after the car has been parked for
at least three hours and hasn't been driv-
at least three hours and hasn't been driv- at least three hours and hasn't been driv-
at least three hours and hasn't been driv-
at least three hours and hasn't been driv-
en more than 1.6 km or one mile since
en more than 1.6 km or one mile since en more than 1.6 km or one mile since
en more than 1.6 km or one mile since
en more than 1.6 km or one mile since
starting up.
starting up. starting up.
starting up.
starting up.
oo
oo
o Check the pressure of your spare tire
Check the pressure of your spare tire Check the pressure of your spare tire
Check the pressure of your spare tire
Check the pressure of your spare tire
each time you check the pressure of
each time you check the pressure of each time you check the pressure of
each time you check the pressure of
each time you check the pressure of
other tires.
other tires. other tires.
other tires.
other tires.
oo
oo
o Never overload your car. Be especially
Never overload your car. Be especially Never overload your car. Be especially
Never overload your car. Be especially
Never overload your car. Be especially
careful about overloading if you equip
careful about overloading if you equip careful about overloading if you equip
careful about overloading if you equip
careful about overloading if you equip
your car with a luggage rack or car top
your car with a luggage rack or car top your car with a luggage rack or car top
your car with a luggage rack or car top
your car with a luggage rack or car top
carrier.
carrier. carrier.
carrier.
carrier. I040A01A-GAT
SNOW TIRES
SNOW TIRES SNOW TIRES
SNOW TIRES
SNOW TIRES
If you equip your car with snow tires, they
should be the same size and have the sameload capacity as the original tires. Snow tiresshould be installed on all four wheels; other-wise, poor handling may result.
Snow tires should carry 28 kPa (4 psi) more air
pressure than the pressure recommended forthe standard tires on the tire label on the driverside center pillar outer panel, or up to themaximum pressure shown on the tire sidewallwhichever is less.
Do not drive faster than the speed limit when
your car is equipped with snow tires. I050A01X-GAT
TIRE CHAINS
TIRE CHAINS TIRE CHAINS
TIRE CHAINS
TIRE CHAINS Tire chains, if necessary, should be installed on the front wheels. Be sure that the chains are theproper size and that they are installed in accor-dance with the manufacturer's instructions. To minimize tire and chain wear, do not con- tinue to use tire chains when they are no longerneeded.
WARNING:
WARNING: WARNING:
WARNING:
WARNING:
When driving on roads covered with snow
When driving on roads covered with snow When driving on roads covered with snow
When driving on roads covered with snow
When driving on roads covered with snow
or ice, drive at less
or ice, drive at less or ice, drive at less
or ice, drive at less
or ice, drive at less than 30 km/h (20 mph).
than 30 km/h (20 mph). than 30 km/h (20 mph).
than 30 km/h (20 mph).
than 30 km/h (20 mph). I060A01A-GAT
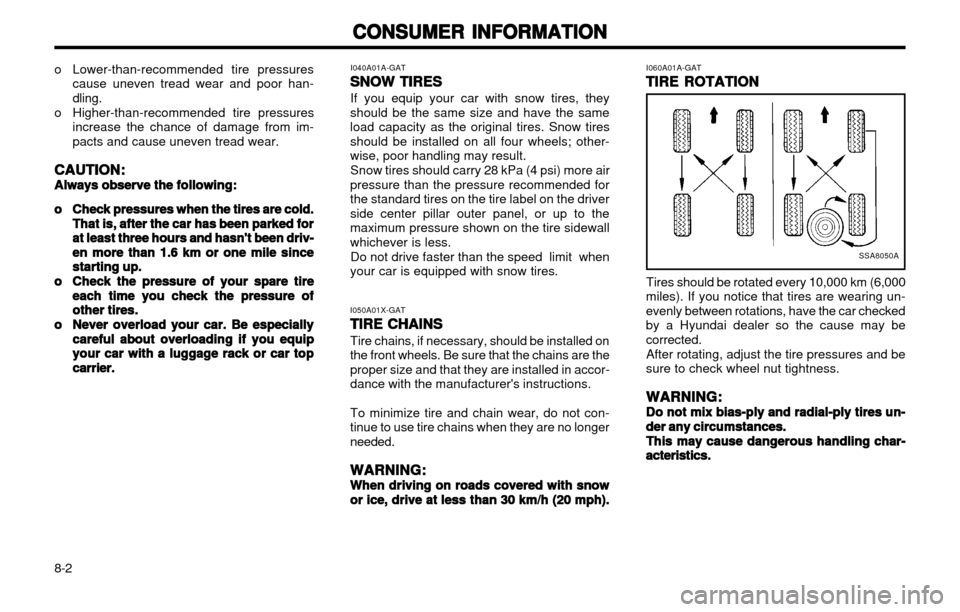
TIRE ROTATION
TIRE ROTATION TIRE ROTATION
TIRE ROTATION
TIRE ROTATION
SSA8050A
Tires should be rotated every 10,000 km (6,000
miles). If you notice that tires are wearing un- evenly between rotations, have the car checkedby a Hyundai dealer so the cause may becorrected.
After rotating, adjust the tire pressures and be
sure to check wheel nut tightness.
WARNING:
WARNING: WARNING:
WARNING:
WARNING:
Do not mix bias-ply and radial-ply tires un-
Do not mix bias-ply and radial-ply tires un- Do not mix bias-ply and radial-ply tires un-
Do not mix bias-ply and radial-ply tires un-
Do not mix bias-ply and radial-ply tires un- der any circumstances.
der any circumstances. der any circumstances.
der any circumstances.
der any circumstances.
This may cause dangerous handling char-
This may cause dangerous handling char- This may cause dangerous handling char-
This may cause dangerous handling char-
This may cause dangerous handling char-acteristics.
acteristics. acteristics.
acteristics.
acteristics.
Page 121 of 249
CONSUMER INFORMATION
CONSUMER INFORMATION CONSUMER INFORMATION
CONSUMER INFORMATION
CONSUMER INFORMATION
8-3
tread. Always replace your tires with those of the recommended size. If you change wheels,the new wheel's rim width and offset must meetHyundai specification.
I070A01A-AAT
TIRE BALANCING
TIRE BALANCING TIRE BALANCING
TIRE BALANCING
TIRE BALANCING A tire that is out of balance may affect handling and tire wear. The tires on your Hyundai werebalanced before the car was delivered but mayneed balancing again during the years you ownthe car. Whenever a tire is dismounted for repair, it should be rebalanced before being reinstalledon the car. I080A01A-AAT
TIRE TRACTION
TIRE TRACTION TIRE TRACTION
TIRE TRACTION
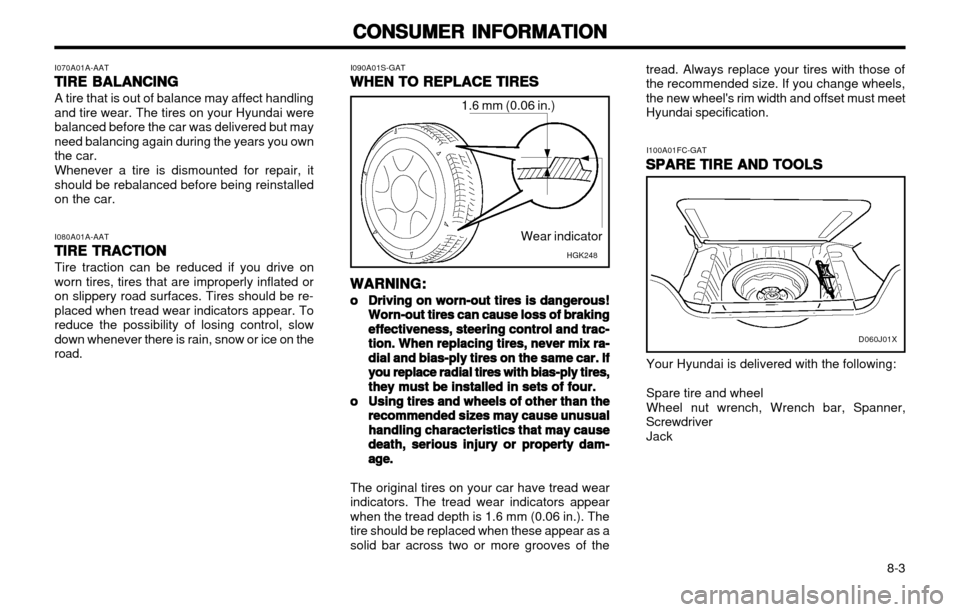
TIRE TRACTION Tire traction can be reduced if you drive on worn tires, tires that are improperly inflated oron slippery road surfaces. Tires should be re-placed when tread wear indicators appear. Toreduce the possibility of losing control, slowdown whenever there is rain, snow or ice on theroad. Wear indicator
I090A01S-GAT
WHEN TO REPLACE TIRES
WHEN TO REPLACE TIRES WHEN TO REPLACE TIRES
WHEN TO REPLACE TIRES
WHEN TO REPLACE TIRES
I100A01FC-GATSPARE TIRE AND TOOLS
SPARE TIRE AND TOOLS SPARE TIRE AND TOOLS
SPARE TIRE AND TOOLS
SPARE TIRE AND TOOLS
Your Hyundai is delivered with the following: Spare tire and wheel Wheel nut wrench, Wrench bar, Spanner,
Screwdriver
Jack
WARNING
WARNING WARNING
WARNING
WARNING
::
::
:
oo
oo
o Driving on worn-out tires is dangerous!
Driving on worn-out tires is dangerous! Driving on worn-out tires is dangerous!
Driving on worn-out tires is dangerous!
Driving on worn-out tires is dangerous!
Worn-out tires can cause loss of braking
Worn-out tires can cause loss of braking Worn-out tires can cause loss of braking
Worn-out tires can cause loss of braking
Worn-out tires can cause loss of braking
effectiveness, steering control and trac-
effectiveness, steering control and trac- effectiveness, steering control and trac-
effectiveness, steering control and trac-
effectiveness, steering control and trac-
tion. When replacing tires, never mix ra-
tion. When replacing tires, never mix ra- tion. When replacing tires, never mix ra-
tion. When replacing tires, never mix ra-
tion. When replacing tires, never mix ra-
dial and bias-ply tires on the same car. If
dial and bias-ply tires on the same car. If dial and bias-ply tires on the same car. If
dial and bias-ply tires on the same car. If
dial and bias-ply tires on the same car. If
you replace radial tires with bias-ply tires,
you replace radial tires with bias-ply tires, you replace radial tires with bias-ply tires,
you replace radial tires with bias-ply tires,
you replace radial tires with bias-ply tires,
they must be installed in sets of four.
they must be installed in sets of four. they must be installed in sets of four.
they must be installed in sets of four.
they must be installed in sets of four.
oo
oo
o Using tires and wheels of other than the
Using tires and wheels of other than the Using tires and wheels of other than the
Using tires and wheels of other than the
Using tires and wheels of other than the
recommended sizes may cause unusual
recommended sizes may cause unusual recommended sizes may cause unusual
recommended sizes may cause unusual
recommended sizes may cause unusual
handling characteristics that may cause
handling characteristics that may cause handling characteristics that may cause
handling characteristics that may cause
handling characteristics that may cause
death, serious injury or property
death, serious injury or property death, serious injury or property
death, serious injury or property
death, serious injury or property dam-
dam- dam-
dam-
dam-
age.age.
age.age.
age.
The original tires on your car have tread wearindicators. The tread wear indicators appearwhen the tread depth is 1.6 mm (0.06 in.). Thetire should be replaced when these appear as asolid bar across two or more grooves of the
D060J01X
1.6 mm (0.06 in.)
HGK248