2002 Hyundai Atos engine
[x] Cancel search: enginePage 112 of 249
DO-IT-YOURSELF MAINTENANCE
DO-IT-YOURSELF MAINTENANCE DO-IT-YOURSELF MAINTENANCE
DO-IT-YOURSELF MAINTENANCE
DO-IT-YOURSELF MAINTENANCE
6-16
G230A03A-GAT POWER STEERING FLUID LEVEL
POWER STEERING FLUID LEVEL POWER STEERING FLUID LEVEL
POWER STEERING FLUID LEVEL
POWER STEERING FLUID LEVEL
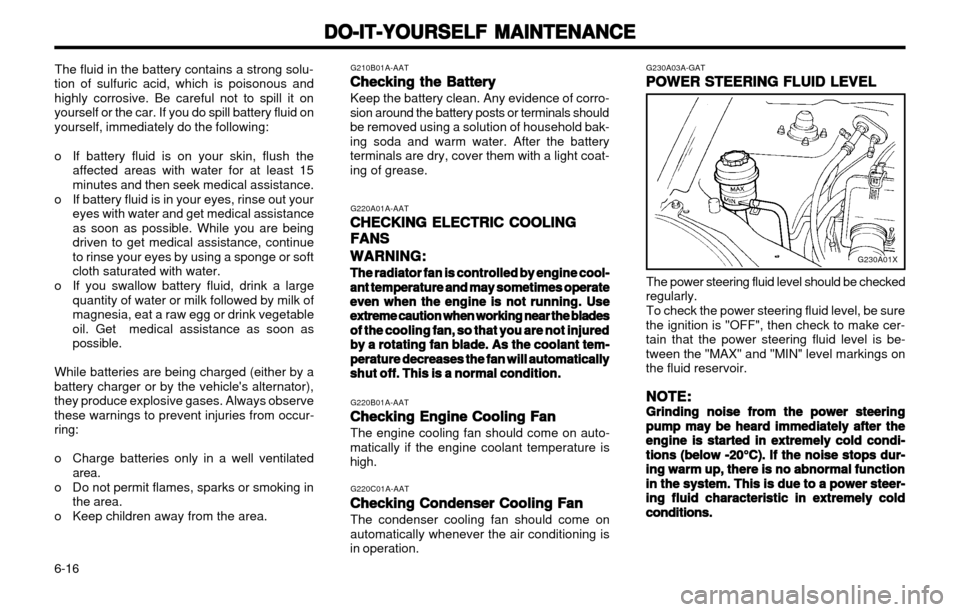
The power steering fluid level should be checked
regularly.
To check the power steering fluid level, be sure
the ignition is "OFF", then check to make cer- tain that the power steering fluid level is be-tween the "MAX" and "MIN" level markings onthe fluid reservoir.
NOTE:
NOTE: NOTE:
NOTE:
NOTE:
Grinding noise from the power steering
Grinding noise from the power steering Grinding noise from the power steering
Grinding noise from the power steering
Grinding noise from the power steering pump may be heard immediately after the
pump may be heard immediately after the pump may be heard immediately after the
pump may be heard immediately after the
pump may be heard immediately after the
engine is started in extremely cold condi-
engine is started in extremely cold condi- engine is started in extremely cold condi-
engine is started in extremely cold condi-
engine is started in extremely cold condi-
tions (below
tions (below tions (below
tions (below
tions (below
-20°C). If the noise stops dur-
-20°C). If the noise stops dur- -20°C). If the noise stops dur-
-20°C). If the noise stops dur-
-20°C). If the noise stops dur-
ing warm up, there is no abnormal function
ing warm up, there is no abnormal function ing warm up, there is no abnormal function
ing warm up, there is no abnormal function
ing warm up, there is no abnormal function
in the system. This is due to a power steer-
in the system. This is due to a power steer- in the system. This is due to a power steer-
in the system. This is due to a power steer-
in the system. This is due to a power steer-
ing fluid characteristic in extremely cold
ing fluid characteristic in extremely cold ing fluid characteristic in extremely cold
ing fluid characteristic in extremely cold
ing fluid characteristic in extremely cold
conditions.
conditions. conditions.
conditions.
conditions.
G230A01X
The fluid in the battery contains a strong solu-
tion of sulfuric acid, which is poisonous and highly corrosive. Be careful not to spill it onyourself or the car. If you do spill battery fluid onyourself, immediately do the following:
o If battery fluid is on your skin, flush the affected areas with water for at least 15 minutes and then seek medical assistance.
o If battery fluid is in your eyes, rinse out your eyes with water and get medical assistanceas soon as possible. While you are beingdriven to get medical assistance, continueto rinse your eyes by using a sponge or softcloth saturated with water.
o If you swallow battery fluid, drink a large quantity of water or milk followed by milk ofmagnesia, eat a raw egg or drink vegetableoil. Get medical assistance as soon aspossible.
While batteries are being charged (either by abattery charger or by the vehicle's alternator),they produce explosive gases. Always observethese warnings to prevent injuries from occur-ring:
o Charge batteries only in a well ventilated area.
o Do not permit flames, sparks or smoking in the area.
o Keep children away from the area. G210B01A-AAT
Checking the Battery
Checking the Battery Checking the Battery
Checking the Battery
Checking the Battery
Keep the battery clean. Any evidence of corro-
sion around the battery posts or terminals should be removed using a solution of household bak-ing soda and warm water. After the batteryterminals are dry, cover them with a light coat-ing of grease.
G220A01A-AATCHECKING ELECTRIC COOLING
CHECKING ELECTRIC COOLING CHECKING ELECTRIC COOLING
CHECKING ELECTRIC COOLING
CHECKING ELECTRIC COOLING
FANS
FANS FANS
FANS
FANS
WARNING:
WARNING: WARNING:
WARNING:
WARNING:
The radiator fan is controlled by engine cool-
The radiator fan is controlled by engine cool- The radiator fan is controlled by engine cool-
The radiator fan is controlled by engine cool-
The radiator fan is controlled by engine cool-
ant temperature and may sometimes operate
ant temperature and may sometimes operate ant temperature and may sometimes operate
ant temperature and may sometimes operate
ant temperature and may sometimes operate
even when the engine is not running. Use
even when the engine is not running. Use even when the engine is not running. Use
even when the engine is not running. Use
even when the engine is not running. Use
extreme caution when working near the blades
extreme caution when working near the blades extreme caution when working near the blades
extreme caution when working near the blades
extreme caution when working near the blades
of the cooling fan, so that you are not injured
of the cooling fan, so that you are not injured of the cooling fan, so that you are not injured
of the cooling fan, so that you are not injured
of the cooling fan, so that you are not injured
by a rotating fan blade. As the coolant tem-
by a rotating fan blade. As the coolant tem- by a rotating fan blade. As the coolant tem-
by a rotating fan blade. As the coolant tem-
by a rotating fan blade. As the coolant tem-
perature decreases the fan will automatically
perature decreases the fan will automatically perature decreases the fan will automatically
perature decreases the fan will automatically
perature decreases the fan will automatically
shut off. This is a normal condition.
shut off. This is a normal condition. shut off. This is a normal condition.
shut off. This is a normal condition.
shut off. This is a normal condition.
G220B01A-AATChecking Engine Cooling Fan
Checking Engine Cooling Fan Checking Engine Cooling Fan
Checking Engine Cooling Fan
Checking Engine Cooling Fan
The engine cooling fan should come on auto-
matically if the engine coolant temperature ishigh.
G220C01A-AATChecking Condenser Cooling Fan
Checking Condenser Cooling Fan Checking Condenser Cooling Fan
Checking Condenser Cooling Fan
Checking Condenser Cooling Fan
The condenser cooling fan should come on
automatically whenever the air conditioning isin operation.
Page 113 of 249

DO-IT-YOURSELF MAINTENANCE
DO-IT-YOURSELF MAINTENANCE DO-IT-YOURSELF MAINTENANCE
DO-IT-YOURSELF MAINTENANCE
DO-IT-YOURSELF MAINTENANCE
6-17
G270A02X-GAT
HEADLIGHT BULB
HEADLIGHT BULB HEADLIGHT BULB
HEADLIGHT BULB
HEADLIGHT BULB
Replacement instructions:
1. Allow the bulb to cool. Wear eye protection.
2. Always grasp the bulb by its base, avoid touching the glass.
3. Disconnect the connector, then remove the dust cover.
4. Push the bulb spring for removing the head- light bulb.
5. Remove the headlight bulb. If the bulb is burned out, replace it with the same watt- age.
6. Installation is the reverse order of the re- moval.
7. Use the protective cap and carton to promptly dispose of the old bulb.
8. Check for proper headlight aim. WARNING:
WARNING: WARNING:
WARNING:
WARNING:
The halogen bulb contains gas under pres-
The halogen bulb contains gas under pres- The halogen bulb contains gas under pres-
The halogen bulb contains gas under pres-
The halogen bulb contains gas under pres- sure and if impacted
sure and if impacted sure and if impacted
sure and if impacted
sure and if impacted
could shatter, and re-
could shatter, and re- could shatter, and re-
could shatter, and re-
could shatter, and re-
sulting in flying fragments. Always wear eye
sulting in flying fragments. Always wear eye sulting in flying fragments. Always wear eye
sulting in flying fragments. Always wear eye
sulting in flying fragments. Always wear eye
protection
protection protection
protection
protection
when servicing the bulb. Protect
when servicing the bulb. Protect when servicing the bulb. Protect
when servicing the bulb. Protect
when servicing the bulb. Protect
the bulb against abrasions or scratches and
the bulb against abrasions or scratches and the bulb against abrasions or scratches and
the bulb against abrasions or scratches and
the bulb against abrasions or scratches and
against liquids when lighted. Turn the bulb
against liquids when lighted. Turn the bulb against liquids when lighted. Turn the bulb
against liquids when lighted. Turn the bulb
against liquids when lighted. Turn the bulb
on only when installed in a headlight. Re-
on only when installed in a headlight. Re- on only when installed in a headlight. Re-
on only when installed in a headlight. Re-
on only when installed in a headlight. Re-
place the headlight if damaged or cracked.
place the headlight if damaged or cracked. place the headlight if damaged or cracked.
place the headlight if damaged or cracked.
place the headlight if damaged or cracked.
Keep the bulb out of the reach
Keep the bulb out of the reach Keep the bulb out of the reach
Keep the bulb out of the reach
Keep the bulb out of the reach
of children
of children of children
of children
of children
and dispose of the used bulb with care.
and dispose of the used bulb with care. and dispose of the used bulb with care.
and dispose of the used bulb with care.
and dispose of the used bulb with care. G290A02X-GAT
HEADLIGHT AIMING ADJUSTMENT
HEADLIGHT AIMING ADJUSTMENT HEADLIGHT AIMING ADJUSTMENT
HEADLIGHT AIMING ADJUSTMENT
HEADLIGHT AIMING ADJUSTMENT Before performing aiming adjustment, make sure of the following.
1. Keep all tires inflated to the correct pres-
sure.
2. Place the vehicle on level ground and press the front bumper & rear bumper down sev- eral times. Place the vehicle at a distance of3,000 mm (118 in.) from the test wall.
3. See that the vehicle is unloaded (except for full levels of coolant, engine oil and fuel, andspare tire, jack, and tools). Have the driveror equivalent weight placed in driver's seat.
Recommended Fluid
Recommended Fluid Recommended Fluid
Recommended Fluid
Recommended Fluid
Use PSF-3 type fluid.
NOTE:
NOTE: NOTE:
NOTE:
NOTE:
Do not start the engine when the power
Do not start the engine when the power Do not start the engine when the power
Do not start the engine when the power
Do not start the engine when the power steering oil reservoir is empty.
steering oil reservoir is empty. steering oil reservoir is empty.
steering oil reservoir is empty.
steering oil reservoir is empty.
G240A01A-AATPOWER STEERING HOSES
POWER STEERING HOSES POWER STEERING HOSES
POWER STEERING HOSES
POWER STEERING HOSES
It is suggested that you check the power steer-
ing hose connections for fluid leakage at those intervals specified in the vehicle maintenanceschedule in Section 5.
The power steering hoses should be replaced if
there is severe surface cracking, pulling, scuff-ing or worn spots. Deterioration of the hosecould cause premature failure.
G260A03A-AATREPLACING HEADLIGHT BULBS
REPLACING HEADLIGHT BULBS REPLACING HEADLIGHT BULBS
REPLACING HEADLIGHT BULBS
REPLACING HEADLIGHT BULBS
Before attempting to replace a headlight bulb,
be sure the switch is turned to the "OFF"position.
The next paragraph shows how to reach head-
light bulbs so they may be changed. Be sure toreplace the burned-out bulb with one of thesame number and wattage rating.
CAUTION:
CAUTION: CAUTION:
CAUTION:
CAUTION:
Keep the lamps out of contact with petro-
Keep the lamps out of contact with petro- Keep the lamps out of contact with petro-
Keep the lamps out of contact with petro-
Keep the lamps out of contact with petro- leum product, such as oil, gasoline, etc.
leum product, such as oil, gasoline, etc. leum product, such as oil, gasoline, etc.
leum product, such as oil, gasoline, etc.
leum product, such as oil, gasoline, etc.
G270A01X
Page 117 of 249
EMISSION CONTROL SYSTEMS
EMISSION CONTROL SYSTEMS EMISSION CONTROL SYSTEMS
EMISSION CONTROL SYSTEMS
EMISSION CONTROL SYSTEMS
7-1
7.7.
7.7.
7.
EMISSION CON-
EMISSION CON- EMISSION CON-
EMISSION CON-
EMISSION CON-
TR
TR TR
TR
TR
OL SYSTEMS
OL SYSTEMS OL SYSTEMS
OL SYSTEMS
OL SYSTEMS
H010A01A-GAT EMISSION CONTROL SYSTEM
EMISSION CONTROL SYSTEM EMISSION CONTROL SYSTEM
EMISSION CONTROL SYSTEM
EMISSION CONTROL SYSTEM
(If Installed)
(If Installed) (If Installed)
(If Installed)
(If Installed)
Your Hyundai is equipped with an emission
control system to meet all requirements of the Emission prohibition rules of your province. There are three emission control systems which
are as follows.
1) Crankcase emission control system
2) Evaporative emission control system
3) Exhaust emission control system In order to assure the proper function of the
emission control systems, it is recommended that you have your car inspected and main-tained by an authorized Hyundai dealer in ac-cordance with the maintenance schedule in thismanual. the crankcase through the air intake hose.Inside the crankcase, the fresh air mixes withblow-by gases, which then pass through thePCV valve and into the induction system.
H010C02A-GAT2.2.
2.2.
2. Evaporative Emission Control
Evaporative Emission Control Evaporative Emission Control
Evaporative Emission Control
Evaporative Emission Control
System (If installed)
System (If installed) System (If installed)
System (If installed)
System (If installed)
The Evaporative Emission Control System is
designed to prevent fuel vapors from escapinginto the atmosphere.
Canister
Canister Canister
Canister
Canister
While the engine is inoperative, fuel vapors
generated inside the fuel tank are absorbed andstored in the onboard canister. When the en-gine is running, the fuel vapors absorbed in thecanister are drawn into the induction systemthrough
the purge control solenoid valve.
Purge Control Solenoid Valve
Purge Control Solenoid Valve Purge Control Solenoid Valve
Purge Control Solenoid Valve
Purge Control Solenoid Valve
The purge control solenoid valve is controlled
by the ECM; when the engine coolant temper-ature is low, and during idling, it closes, so thatevaporated fuel is not taken into the engine.After engine warm-up, during ordinary driving, itopens so as to introduce evaporated fuel to theengine.
H010B01A-AAT
1.1.
1.1.
1.
Crankcase Emission Control Sys-
Crankcase Emission Control Sys- Crankcase Emission Control Sys-
Crankcase Emission Control Sys-
Crankcase Emission Control Sys-
tem
tem tem
tem
tem
The Positive Crankcase Ventilation System is
employed to prevent air pollution caused byblow-by gases being emitted from the crank-case. This system supplies fresh filtered air to H010D01A-AAT
3. Exhaust Emission Control System
3. Exhaust Emission Control System 3. Exhaust Emission Control System
3. Exhaust Emission Control System
3. Exhaust Emission Control System
The exhaust emission control system is a high-
ly effective system which controls exhaust emis-sion while maintaining good vehicle perfor-mance.
H020A01A-GATCATALYTIC CONVERTER
CATALYTIC CONVERTER CATALYTIC CONVERTER
CATALYTIC CONVERTER
CATALYTIC CONVERTER
(If Installed)
(If Installed) (If Installed)
(If Installed)
(If Installed)
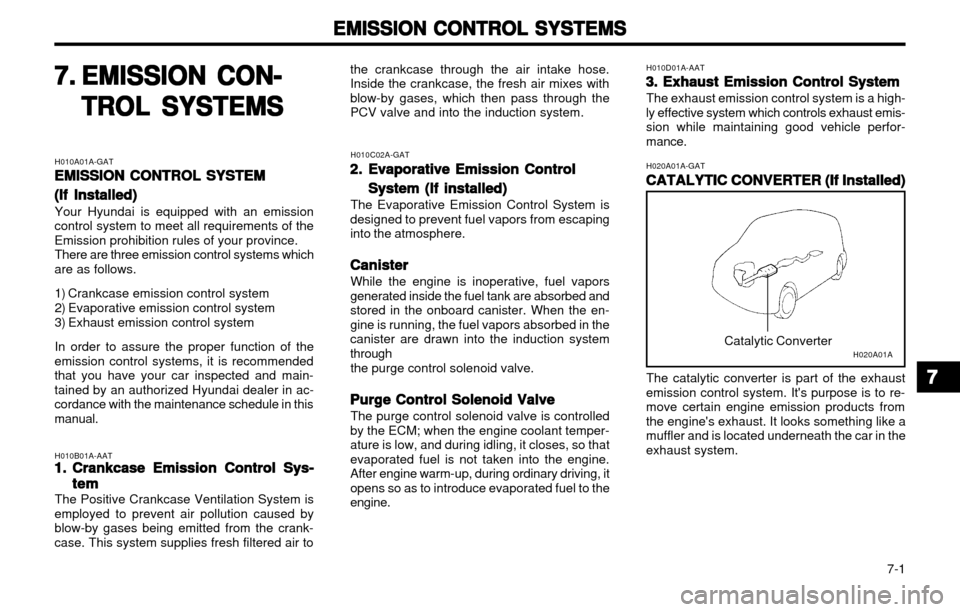
The catalytic converter is part of the exhaust
emission control system. It's purpose is to re-move certain engine emission products from
the engine's exhaust. It looks something like amuffler and is located underneath the car in theexhaust system. Catalytic Converter
H020A01A
77
77
7
Page 118 of 249
EMISSION CONTROL SYSTEMS
EMISSION CONTROL SYSTEMS EMISSION CONTROL SYSTEMS
EMISSION CONTROL SYSTEMS
EMISSION CONTROL SYSTEMS
7-2 o Do not touch the catalytic converter or any
other part of the exhaust system while the engine is running as it is very hot and couldresult in burns.
o Remember that your Hyundai dealer is your best source of assistance.
H020B01A-GAT
About the Catalytic Converter
About the Catalytic Converter About the Catalytic Converter
About the Catalytic Converter
About the Catalytic Converter
Exhaust gases passing through the catalytic
converter cause it to operate at very high tem-peratures. As a result, the introduction of large
amounts of unburned gasoline may cause it to
overheat and create a fire hazard.
This can be avoided by observing the following:
o Use unleaded fuel only.
o Maintain your engine in good condition. Ex- tremely high converter temperatures can result from improper operation of the electri-cal, ignition or fuel injection systems.
o If your engine stalls, pings, knocks, or is hard to start, take your car to your Hyundaidealer as soon as possible and have thedifficulty corrected.
o Avoid driving with a very low fuel level. If you run out of gasoline, it could cause the engineto misfire and result in excessive loading of
the catalytic converter.
o Avoid idling the engine for periods longer than 10 minutes.
o Your Hyundai should not be either pushed or pulled to get it started.This can cause the catalytic converter tooverload.
o Take care not to stop your Hyundai over any combustible material such as grass, paper,leaves or rags. As these materials could
come in contact with the catalytic converterand could cause a fire.
Page 119 of 249
CONSUMER INFORMATION
CONSUMER INFORMATION CONSUMER INFORMATION
CONSUMER INFORMATION
CONSUMER INFORMATION
8-1
I010B01A-AAT
Engine Number
Engine Number Engine Number
Engine Number
Engine Number
8.8.
8.8.
8.
CONSUMER IN-
CONSUMER IN- CONSUMER IN-
CONSUMER IN-
CONSUMER IN-
FORMA
FORMA FORMA
FORMA
FORMA
TION
TION TION
TION
TION
I010A01A-GAT VEHICLE IDENTIFICATION NUMBER
VEHICLE IDENTIFICATION NUMBER VEHICLE IDENTIFICATION NUMBER
VEHICLE IDENTIFICATION NUMBER
VEHICLE IDENTIFICATION NUMBER
(VIN)
(VIN) (VIN)
(VIN)
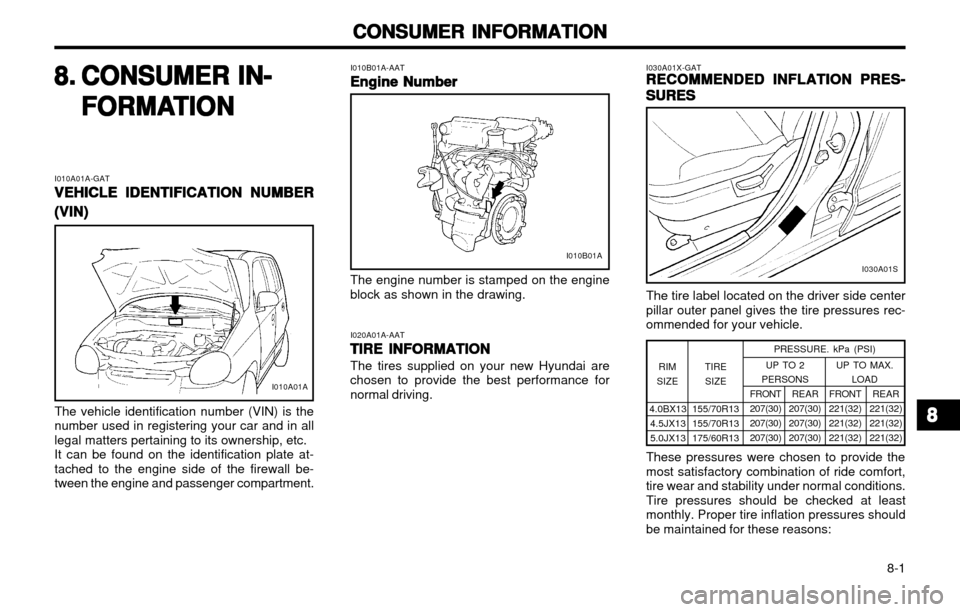
(VIN) The vehicle identification number (VIN) is the number used in registering your car and in alllegal matters pertaining to its ownership, etc.It can be found on the identification plate at-tached to the engine side of the firewall be-tween the engine and passenger compartment. The engine number is stamped on the engineblock as shown in the drawing. I020A01A-AAT
TIRE INFORMATION
TIRE INFORMATION TIRE INFORMATION
TIRE INFORMATION
TIRE INFORMATION The tires supplied on your new Hyundai are chosen to provide the best performance fornormal driving. I030A01X-GAT
RECOMMENDED INFLATION PRES-
RECOMMENDED INFLATION PRES- RECOMMENDED INFLATION PRES-
RECOMMENDED INFLATION PRES-
RECOMMENDED INFLATION PRES-
SURES
SURES SURES
SURES
SURES The tire label located on the driver side center pillar outer panel gives the tire pressures rec-ommended for your vehicle.
I010A01A
I010B01AI030A01S
88
88
84.0BX13
4.5JX13 5.0JX13 TIRE
SIZE PRESSURE. kPa (PSI)
155/70R13155/70R13175/60R13 REAR
207(30)207(30)207(30) FRONT
221(32)221(32) 221(32)
UP TO 2
PERSONS UP TO MAX.
LOAD
REAR
221(32) 221(32) 221(32)
FRONT 207(30)207(30)207(30)
RIM
SIZE
These pressures were chosen to provide the most satisfactory combination of ride comfort,tire wear and stability under normal conditions.Tire pressures should be checked at leastmonthly. Proper tire inflation pressures shouldbe maintained for these reasons:
Page 123 of 249
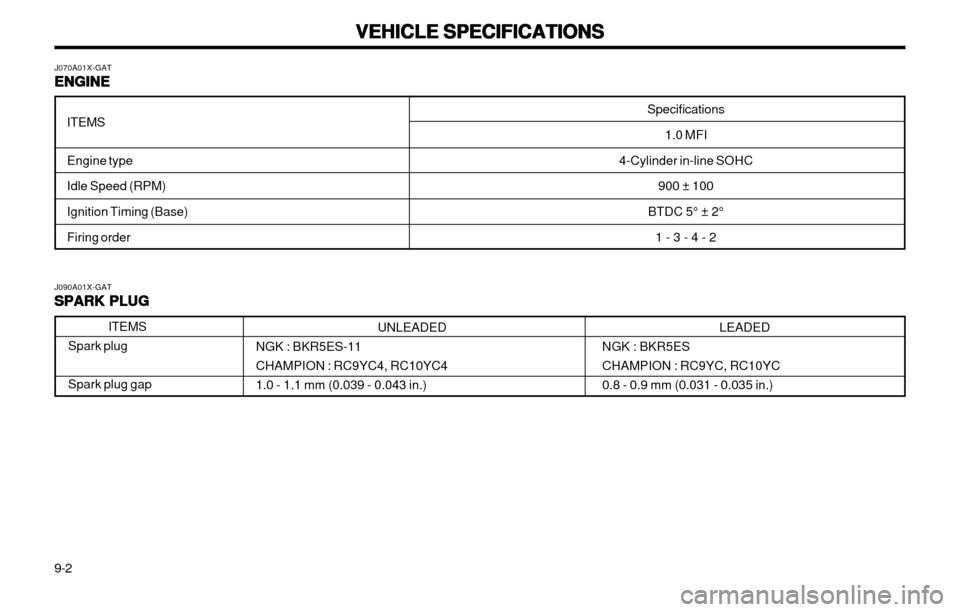
VEHICLE SPECIFICATIONS
VEHICLE SPECIFICATIONS VEHICLE SPECIFICATIONS
VEHICLE SPECIFICATIONS
VEHICLE SPECIFICATIONS
9-2
J090A01X-GAT SPARK PLUG
SPARK PLUG SPARK PLUG
SPARK PLUG
SPARK PLUG
ITEMS
Spark plug Spark plug gap
UNLEADED
NGK : BKR5ES-11 CHAMPION : RC9YC4, RC10YC41.0 - 1.1 mm (0.039 - 0.043 in.) LEADED
NGK : BKR5ESCHAMPION : RC9YC, RC10YC0.8 - 0.9 mm (0.031 - 0.035 in.)
J070A01X-GAT
ENGINE
ENGINE ENGINE
ENGINE
ENGINE
ITEMS Engine type Idle Speed (RPM) Ignition Timing (Base) Firing order Specifications
1.0 MFI
4-Cylinder in-line SOHC
900 ± 100
BTDC 5° ± 2° 1 - 3 - 4 - 2
Page 124 of 249
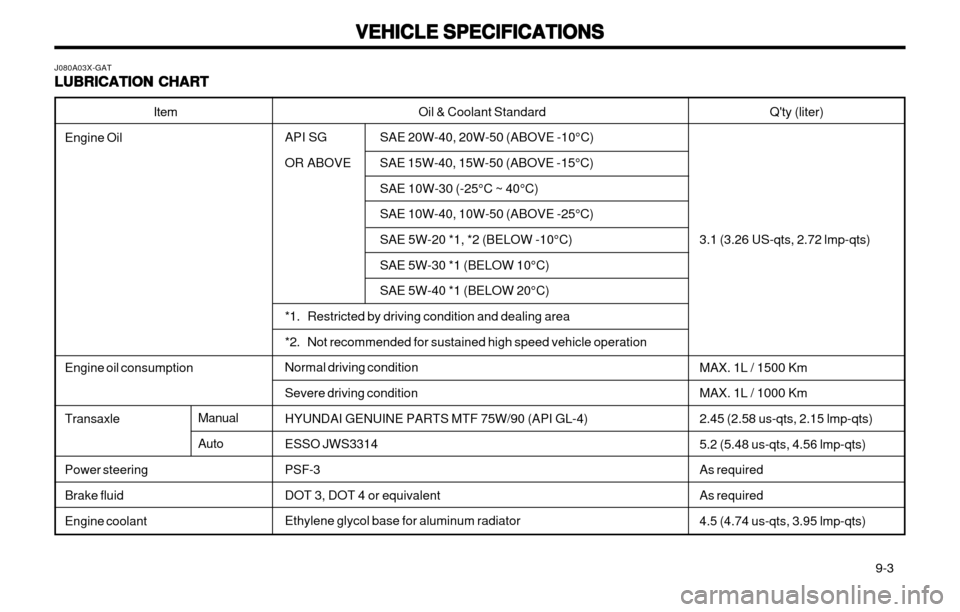
VEHICLE SPECIFICATIONS
VEHICLE SPECIFICATIONS VEHICLE SPECIFICATIONS
VEHICLE SPECIFICATIONS
VEHICLE SPECIFICATIONS
9-3
Oil & Coolant Standard
API SG SAE 20W-40, 20W-50 (ABOVE -10°C)
OR ABOVE SAE 15W-40, 15W-50 (ABOVE -15°C) SAE 10W-30 (-25°C ~ 40°C) SAE 10W-40, 10W-50 (ABOVE -25°C) SAE 5W-20 *1, *2 (BELOW -10°C) SAE 5W-30 *1 (BELOW 10°C)SAE 5W-40 *1 (BELOW 20°C)
*1. Restricted by driving condition and dealing area
*2. Not recommended for sustained high speed vehicle operationNormal driving condition Severe driving condition HYUNDAI GENUINE PARTS MTF 75W/90 (API GL-4)ESSO JWS3314 PSF-3 DOT 3, DOT 4 or equivalentEthylene glycol base for aluminum radiator
Item
Engine Oil Engine oil consumption Transaxle Power steering Brake fluid Engine coolant Q'ty (liter)
3.1 (3.26 US-qts, 2.72 lmp-qts) MAX. 1L / 1500 Km MAX. 1L / 1000 Km2.45 (2.58 us-qts, 2.15 lmp-qts) 5.2 (5.48 us-qts, 4.56 lmp-qts) As requiredAs required 4.5 (4.74 us-qts, 3.95 lmp-qts)
J080A03X-GAT LUBRICATION CHART
LUBRICATION CHART LUBRICATION CHART
LUBRICATION CHART
LUBRICATION CHART
Manual Auto
Page 126 of 249

INDEX
INDEX INDEX
INDEX
INDEX
10-2 EE
EE
E
Emission Control System ................................................................... 7-1Engine
Before starting the engine .............................................................. 2-2
Compartment (For MFI) ................................................................. 6-1 Coolant ........................................................................................... 6-5
Coolant temperature gauge ......................................................... 1-22
If the engine overheats .................................................................. 3-2 Number .......................................................................................... 8-1
Oil .................................................................................................. 6-2
Oil consumption ............................................................................. 6-3
Starting ........................................................................................... 2-3
Engine Exhaust Can Be Dangerous ................................................... 2-1
FF
FF
F
Fan Speed Control ............................................................................ 1-34
Fog Light
Front ............................................................................................. 1-31
Rear ............................................................................................. 1-31
Front Seats Adjustable front seats .................................................................... 1-5
Adjustable headrests ..................................................................... 1-6
Adjusting seat forward and rearward ............................................. 1-5
Adjusting seatback angle ............................................................... 1-6
Fuel Capacity ......................................................................................... 9-1Gauge .......................................................................................... 1-22
Recommendations ......................................................................... 1-1 Fuel Filler Lid
Remote release ............................................................................ 1-31
Fuses ................................................................................................ 6-15
GG
GG
G
General Everyday Checks .................................................................. 6-2
HH
HH
H
Hazard Warning System ................................................................... 1-27
Headlight ........................................................................................... 6-17
Headlight Bulb Replacement ............................................................. 6-17
Headlight Leveling Device System ................................................... 1-25
Heating and Ventilation
High-mounted Rear Stoplight ............................................................ 1-28
Hood Release ................................................................................... 1-32
Horn ................................................................................................ 1-33
II
II
I
Ignition Switch ..................................................................................... 2-2
Immobilizer System ............................................................................. 1-2
Instrument Cluster and Indicator ....................................................... 1-19
Instruments and Controls .................................................................. 1-18
Interior Light ...................................................................................... 1-27
JJ
JJ
J
Jump Starting ...................................................................................... 3-1
KK
KK
K
Keys .................................................................................................. 1-2
If you lose your keys ..................................................................... 3-8
Positions ........................................................................................ 2-2