2002 Hyundai Atos engine oil
[x] Cancel search: engine oilPage 101 of 249
DO-IT-YOURSELF MAINTENANCE
DO-IT-YOURSELF MAINTENANCE DO-IT-YOURSELF MAINTENANCE
DO-IT-YOURSELF MAINTENANCE
DO-IT-YOURSELF MAINTENANCE
6-5
G050A01A-AAT
CHECKING AND CHANGING THE EN-
CHECKING AND CHANGING THE EN- CHECKING AND CHANGING THE EN-
CHECKING AND CHANGING THE EN-
CHECKING AND CHANGING THE EN-
GINE COOLANT
GINE COOLANT GINE COOLANT
GINE COOLANT
GINE COOLANT
WARNING:
WARNING: WARNING:
WARNING:
WARNING:
Do not remove the radiator cap when the
Do not remove the radiator cap when the Do not remove the radiator cap when the
Do not remove the radiator cap when the
Do not remove the radiator cap when the engine is hot. When the engine is hot, the
engine is hot. When the engine is hot, the engine is hot. When the engine is hot, the
engine is hot. When the engine is hot, the
engine is hot. When the engine is hot, the
engine coolant is under pressure and may
engine coolant is under pressure and may engine coolant is under pressure and may
engine coolant is under pressure and may
engine coolant is under pressure and may
erupt through the opening if the cap is
erupt through the opening if the cap is erupt through the opening if the cap is
erupt through the opening if the cap is
erupt through the opening if the cap is
removed. You could be seriously burned if
removed. You could be seriously burned if removed. You could be seriously burned if
removed. You could be seriously burned if
removed. You could be seriously burned if
you do not observe this precaution. Do not
you do not observe this precaution. Do not you do not observe this precaution. Do not
you do not observe this precaution. Do not
you do not observe this precaution. Do not
remove the radiator cap until the radiator is
remove the radiator cap until the radiator is remove the radiator cap until the radiator is
remove the radiator cap until the radiator is
remove the radiator cap until the radiator is
cool to the touch.
cool to the touch. cool to the touch.
cool to the touch.
cool to the touch.
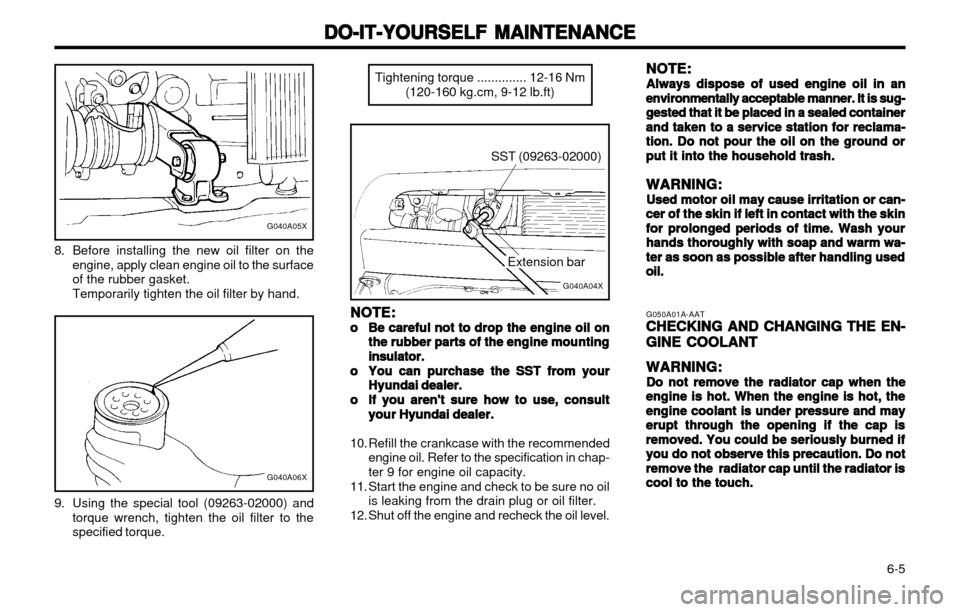
8. Before installing the new oil filter on the
engine, apply clean engine oil to the surface of the rubber gasket. Temporarily tighten the oil filter by hand.
G040A05X
G040A06X
9. Using the special tool (09263-02000) andtorque wrench, tighten the oil filter to the specified torque. Tightening torque .............. 12-16 Nm
(120-160 kg.cm, 9-12 lb.ft)
SST (09263-02000)
G040A04X
Extension bar
NOTE:
NOTE: NOTE:
NOTE:
NOTE:
oo
oo
o Be careful not to drop the engine oil on
Be careful not to drop the engine oil on Be careful not to drop the engine oil on
Be careful not to drop the engine oil on
Be careful not to drop the engine oil on
the rubber
the rubber the rubber
the rubber
the rubber
parts of the engine mounting
parts of the engine mounting parts of the engine mounting
parts of the engine mounting
parts of the engine mounting
insulator.
insulator. insulator.
insulator.
insulator.
oo
oo
o You can purchase the SST from your
You can purchase the SST from your You can purchase the SST from your
You can purchase the SST from your
You can purchase the SST from your
Hyundai dealer.
Hyundai dealer. Hyundai dealer.
Hyundai dealer.
Hyundai dealer.
oo
oo
o If you aren't sure how to use, consult
If you aren't sure how to use, consult If you aren't sure how to use, consult
If you aren't sure how to use, consult
If you aren't sure how to use, consult
your Hyundai dealer.
your Hyundai dealer. your Hyundai dealer.
your Hyundai dealer.
your Hyundai dealer.
10. Refill the crankcase with the recommended engine oil. Refer to the specification in chap- ter 9 for engine oil capacity.
11. Start the engine and check to be sure no oil is leaking from the drain plug or oil filter.
12. Shut off the engine and recheck the oil level. NOTE:
NOTE: NOTE:
NOTE:
NOTE:
Always dispose of used engine oil in an
Always dispose of used engine oil in an Always dispose of used engine oil in an
Always dispose of used engine oil in an
Always dispose of used engine oil in an environmentally acceptable
environmentally acceptable environmentally acceptable
environmentally acceptable
environmentally acceptable
manner. It is sug-
manner. It is sug- manner. It is sug-
manner. It is sug-
manner. It is sug-
gested that it be placed in a sealed container
gested that it be placed in a sealed container gested that it be placed in a sealed container
gested that it be placed in a sealed container
gested that it be placed in a sealed container
and taken
and taken and taken
and taken
and taken
to a service station for reclama-
to a service station for reclama- to a service station for reclama-
to a service station for reclama-
to a service station for reclama-
tion. Do not pour the oil on the ground or
tion. Do not pour the oil on the ground or tion. Do not pour the oil on the ground or
tion. Do not pour the oil on the ground or
tion. Do not pour the oil on the ground or
put it into the household trash.
put it into the household trash. put it into the household trash.
put it into the household trash.
put it into the household trash.
WARNING:
WARNING: WARNING:
WARNING:
WARNING:
Used motor oil may cause irritation or can-
Used motor oil may cause irritation or can- Used motor oil may cause irritation or can-
Used motor oil may cause irritation or can-
Used motor oil may cause irritation or can-cer of the skin if
cer of the skin if cer of the skin if
cer of the skin if
cer of the skin if left in contact with the skin
left in contact with the skin left in contact with the skin
left in contact with the skin
left in contact with the skin
for prolonged periods of time. Wash your
for prolonged periods of time. Wash your for prolonged periods of time. Wash your
for prolonged periods of time. Wash your
for prolonged periods of time. Wash your
hands
hands hands
hands
hands thoroughly with soap and warm wa-
thoroughly with soap and warm wa- thoroughly with soap and warm wa-
thoroughly with soap and warm wa-
thoroughly with soap and warm wa-
ter as soon as possible after handling used
ter as soon as possible after handling used ter as soon as possible after handling used
ter as soon as possible after handling used
ter as soon as possible after handling used
oil.oil.
oil.oil.
oil.
Page 105 of 249
DO-IT-YOURSELF MAINTENANCE
DO-IT-YOURSELF MAINTENANCE DO-IT-YOURSELF MAINTENANCE
DO-IT-YOURSELF MAINTENANCE
DO-IT-YOURSELF MAINTENANCE
6-9
G090A01X-GAT
FILLING THE WASHER RESERVOIR
FILLING THE WASHER RESERVOIR FILLING THE WASHER RESERVOIR
FILLING THE WASHER RESERVOIR
FILLING THE WASHER RESERVOIR
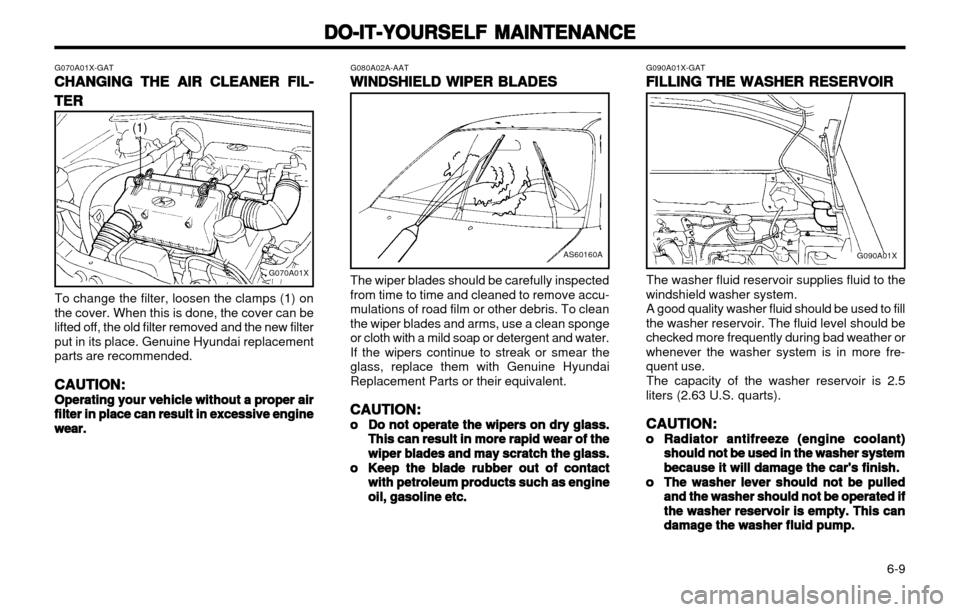
The washer fluid reservoir supplies fluid to the
windshield washer system. A good quality washer fluid should be used to fill
the washer reservoir. The fluid level should be checked more frequently during bad weather orwhenever the washer system is in more fre-quent use.
The capacity of the washer reservoir is 2.5
liters (2.63 U.S. quarts).
CAUTION:
CAUTION: CAUTION:
CAUTION:
CAUTION:
oo
oo
o Radiator antifreeze (engine coolant)
Radiator antifreeze (engine coolant) Radiator antifreeze (engine coolant)
Radiator antifreeze (engine coolant)
Radiator antifreeze (engine coolant)
should not be used in the washer system
should not be used in the washer system should not be used in the washer system
should not be used in the washer system
should not be used in the washer system
because it will damage the car's finish.
because it will damage the car's finish. because it will damage the car's finish.
because it will damage the car's finish.
because it will damage the car's finish.
oo
oo
o The washer lever should not be pulled
The washer lever should not be pulled The washer lever should not be pulled
The washer lever should not be pulled
The washer lever should not be pulled
and the washer should not be operated if
and the washer should not be operated if and the washer should not be operated if
and the washer should not be operated if
and the washer should not be operated if
the washer reservoir is empty. This can
the washer reservoir is empty. This can the washer reservoir is empty. This can
the washer reservoir is empty. This can
the washer reservoir is empty. This can
damage the washer fluid pump.
damage the washer fluid pump. damage the washer fluid pump.
damage the washer fluid pump.
damage the washer fluid pump.
G070A01X-GAT
CHANGING THE AIR CLEANER FIL-
CHANGING THE AIR CLEANER FIL- CHANGING THE AIR CLEANER FIL-
CHANGING THE AIR CLEANER FIL-
CHANGING THE AIR CLEANER FIL-
TER
TER TER
TER
TER G080A02A-AAT
WINDSHIELD WIPER BLADES
WINDSHIELD WIPER BLADES WINDSHIELD WIPER BLADES
WINDSHIELD WIPER BLADES
WINDSHIELD WIPER BLADES The wiper blades should be carefully inspected from time to time and cleaned to remove accu-mulations of road film or other debris. To cleanthe wiper blades and arms, use a clean spongeor cloth with a mild soap or detergent and water.If the wipers continue to streak or smear theglass, replace them with Genuine HyundaiReplacement Parts or their equivalent.
CAUTION:
CAUTION: CAUTION:
CAUTION:
CAUTION:
oo
oo
o Do not operate the wipers on dry glass.
Do not operate the wipers on dry glass. Do not operate the wipers on dry glass.
Do not operate the wipers on dry glass.
Do not operate the wipers on dry glass.
This can result in more rapid wear of the
This can result in more rapid wear of the This can result in more rapid wear of the
This can result in more rapid wear of the
This can result in more rapid wear of the
wiper blades and may scratch the glass.
wiper blades and may scratch the glass. wiper blades and may scratch the glass.
wiper blades and may scratch the glass.
wiper blades and may scratch the glass.
oo
oo
o Keep the blade rubber out of contact
Keep the blade rubber out of contact Keep the blade rubber out of contact
Keep the blade rubber out of contact
Keep the blade rubber out of contact
with petroleum products such as engine
with petroleum products such as engine with petroleum products such as engine
with petroleum products such as engine
with petroleum products such as engine
oil, gasoline etc.
oil, gasoline etc. oil, gasoline etc.
oil, gasoline etc.
oil, gasoline etc.
To change the filter, loosen the clamps (1) on
the cover. When this is done, the cover can be
lifted off, the old filter removed and the new filterput in its place. Genuine Hyundai replacement
parts are recommended.
CAUTION:
CAUTION: CAUTION:
CAUTION:
CAUTION:
Operating your vehicle without a proper air
Operating your vehicle without a proper air Operating your vehicle without a proper air
Operating your vehicle without a proper air
Operating your vehicle without a proper air filter in place
filter in place filter in place
filter in place
filter in place can result in excessive engine
can result in excessive engine can result in excessive engine
can result in excessive engine
can result in excessive engine
wear.
wear. wear.
wear.
wear.
G070A01X
(1)
AS60160AG090A01X
Page 106 of 249
DO-IT-YOURSELF MAINTENANCE
DO-IT-YOURSELF MAINTENANCE DO-IT-YOURSELF MAINTENANCE
DO-IT-YOURSELF MAINTENANCE
DO-IT-YOURSELF MAINTENANCE
6-10 G110A01A-AAT
CHECKING THE TRANSAXLE FLUID
CHECKING THE TRANSAXLE FLUID CHECKING THE TRANSAXLE FLUID
CHECKING THE TRANSAXLE FLUID
CHECKING THE TRANSAXLE FLUID
(AUTOMATIC)
(AUTOMATIC) (AUTOMATIC)
(AUTOMATIC)
(AUTOMATIC)
Transaxle fluid in the automatic transaxle should be checked at those intervals specified in thevehicle maintenance schedule in Section 5. G110B01X-AAT
Recommended Fluid
Recommended Fluid Recommended Fluid
Recommended Fluid
Recommended Fluid Your Hyundai automatic transaxle is specially designed to operate with ESSO JWS3314. Dam-age caused by a nonspecified fluid is not cov-ered by your new vehicle limited warranty. G110C01X-GAT
Transaxle Fluid Capacity
Transaxle Fluid Capacity Transaxle Fluid Capacity
Transaxle Fluid Capacity
Transaxle Fluid Capacity
The fluid capacity of the automatic transaxle is
5.2 liters (5.48 U.S. quarts).
WARNING:
WARNING: WARNING:
WARNING:
WARNING:
The transaxle fluid level should be checked
The transaxle fluid level should be checked The transaxle fluid level should be checked
The transaxle fluid level should be checked
The transaxle fluid level should be checked
when the engine
when the engine when the engine
when the engine
when the engine is at normal operating tem-
is at normal operating tem- is at normal operating tem-
is at normal operating tem-
is at normal operating tem-
perature. This means that the engine, radia-
perature. This means that the engine, radia- perature. This means that the engine, radia-
perature. This means that the engine, radia-
perature. This means that the engine, radia-
tor, tor,
tor, tor,
tor, exhaust system etc., are very hot. Exer-
exhaust system etc., are very hot. Exer- exhaust system etc., are very hot. Exer-
exhaust system etc., are very hot. Exer-
exhaust system etc., are very hot. Exer-
cise great care not to burn yourself
cise great care not to burn yourself cise great care not to burn yourself
cise great care not to burn yourself
cise great care not to burn yourself during
during during
during
during
this procedure.
this procedure. this procedure.
this procedure.
this procedure.
G100A04X-GAT
CHECKING THE TRANSAXLE OIL
CHECKING THE TRANSAXLE OIL CHECKING THE TRANSAXLE OIL
CHECKING THE TRANSAXLE OIL
CHECKING THE TRANSAXLE OIL
(MANUAL)
(MANUAL) (MANUAL)
(MANUAL)
(MANUAL) Transaxle lubricant in the manual and transaxle should be checked at those intervals specified in the vehicle maintenance schedule in Section5.
Recommended Oil
Recommended Oil Recommended Oil
Recommended Oil
Recommended Oil Use only HYUNDAI GENUINE PARTS MTF 75W/90 (API GL-4) in the manual transaxle.
Manual Transaxle Oil Capacity
Manual Transaxle Oil Capacity Manual Transaxle Oil Capacity
Manual Transaxle Oil Capacity
Manual Transaxle Oil Capacity The oil capacity of the manual transaxle is 2.45 liters (2.58 U.S. quarts).
WARNING:
WARNING: WARNING:
WARNING:
WARNING:
It is always better to check the transaxle oil
It is always better to check the transaxle oil It is always better to check the transaxle oil
It is always better to check the transaxle oil
It is always better to check the transaxle oil
level when the
level when the level when the
level when the
level when the engine is cool or cold. If the
engine is cool or cold. If the engine is cool or cold. If the
engine is cool or cold. If the
engine is cool or cold. If the
engine is hot, you should exercise great
engine is hot, you should exercise great engine is hot, you should exercise great
engine is hot, you should exercise great
engine is hot, you should exercise great
caution
caution caution
caution
caution to avoid burning yourself on hot
to avoid burning yourself on hot to avoid burning yourself on hot
to avoid burning yourself on hot
to avoid burning yourself on hot
engine or exhaust parts.
engine or exhaust parts. engine or exhaust parts.
engine or exhaust parts.
engine or exhaust parts. G100B01A-AAT
To check the Manual Transaxle Fluid
To check the Manual Transaxle Fluid To check the Manual Transaxle Fluid
To check the Manual Transaxle Fluid
To check the Manual Transaxle Fluid
Level
Level Level
Level
Level
SSA6100B
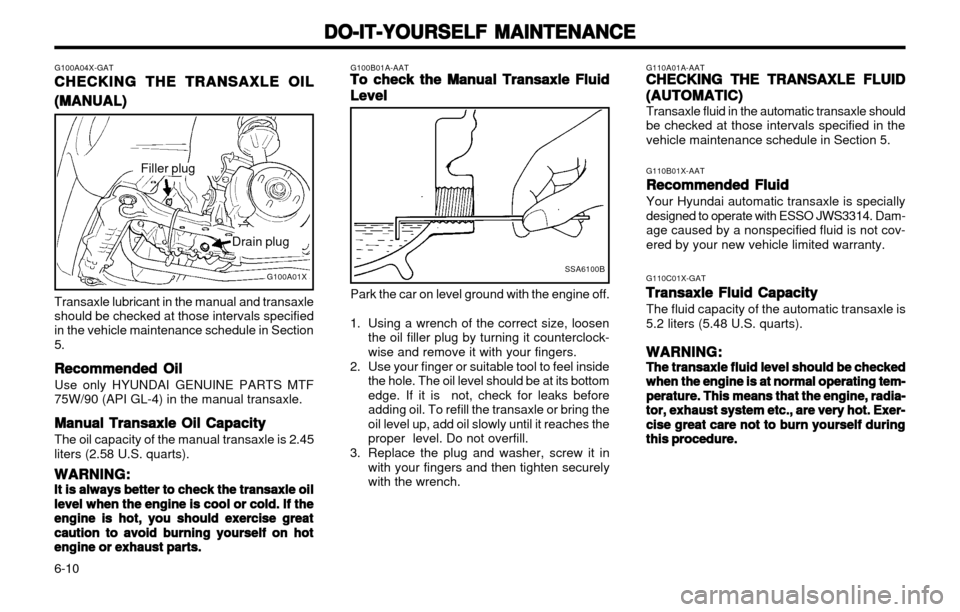
Park the car on level ground with the engine off.
1. Using a wrench of the correct size, loosen the oil filler plug by turning it counterclock- wise and remove it with your fingers.
2. Use your finger or suitable tool to feel inside the hole. The oil level should be at its bottomedge. If it is not, check for leaks beforeadding oil. To refill the transaxle or bring theoil level up, add oil slowly until it reaches theproper level. Do not overfill.
3. Replace the plug and washer, screw it in with your fingers and then tighten securelywith the wrench.
G100A01X
Filler plug
Drain plug
Page 112 of 249
DO-IT-YOURSELF MAINTENANCE
DO-IT-YOURSELF MAINTENANCE DO-IT-YOURSELF MAINTENANCE
DO-IT-YOURSELF MAINTENANCE
DO-IT-YOURSELF MAINTENANCE
6-16
G230A03A-GAT POWER STEERING FLUID LEVEL
POWER STEERING FLUID LEVEL POWER STEERING FLUID LEVEL
POWER STEERING FLUID LEVEL
POWER STEERING FLUID LEVEL
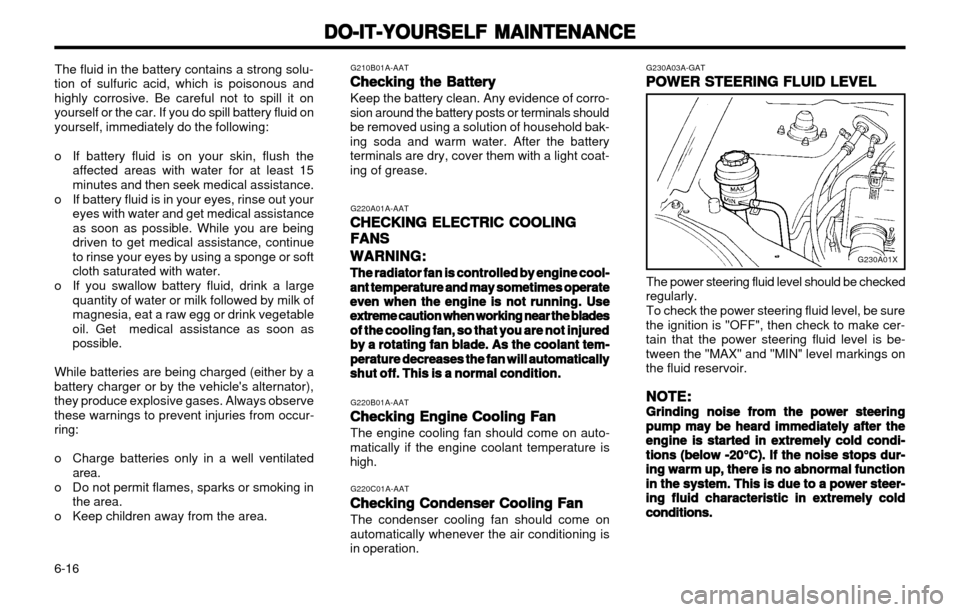
The power steering fluid level should be checked
regularly.
To check the power steering fluid level, be sure
the ignition is "OFF", then check to make cer- tain that the power steering fluid level is be-tween the "MAX" and "MIN" level markings onthe fluid reservoir.
NOTE:
NOTE: NOTE:
NOTE:
NOTE:
Grinding noise from the power steering
Grinding noise from the power steering Grinding noise from the power steering
Grinding noise from the power steering
Grinding noise from the power steering pump may be heard immediately after the
pump may be heard immediately after the pump may be heard immediately after the
pump may be heard immediately after the
pump may be heard immediately after the
engine is started in extremely cold condi-
engine is started in extremely cold condi- engine is started in extremely cold condi-
engine is started in extremely cold condi-
engine is started in extremely cold condi-
tions (below
tions (below tions (below
tions (below
tions (below
-20°C). If the noise stops dur-
-20°C). If the noise stops dur- -20°C). If the noise stops dur-
-20°C). If the noise stops dur-
-20°C). If the noise stops dur-
ing warm up, there is no abnormal function
ing warm up, there is no abnormal function ing warm up, there is no abnormal function
ing warm up, there is no abnormal function
ing warm up, there is no abnormal function
in the system. This is due to a power steer-
in the system. This is due to a power steer- in the system. This is due to a power steer-
in the system. This is due to a power steer-
in the system. This is due to a power steer-
ing fluid characteristic in extremely cold
ing fluid characteristic in extremely cold ing fluid characteristic in extremely cold
ing fluid characteristic in extremely cold
ing fluid characteristic in extremely cold
conditions.
conditions. conditions.
conditions.
conditions.
G230A01X
The fluid in the battery contains a strong solu-
tion of sulfuric acid, which is poisonous and highly corrosive. Be careful not to spill it onyourself or the car. If you do spill battery fluid onyourself, immediately do the following:
o If battery fluid is on your skin, flush the affected areas with water for at least 15 minutes and then seek medical assistance.
o If battery fluid is in your eyes, rinse out your eyes with water and get medical assistanceas soon as possible. While you are beingdriven to get medical assistance, continueto rinse your eyes by using a sponge or softcloth saturated with water.
o If you swallow battery fluid, drink a large quantity of water or milk followed by milk ofmagnesia, eat a raw egg or drink vegetableoil. Get medical assistance as soon aspossible.
While batteries are being charged (either by abattery charger or by the vehicle's alternator),they produce explosive gases. Always observethese warnings to prevent injuries from occur-ring:
o Charge batteries only in a well ventilated area.
o Do not permit flames, sparks or smoking in the area.
o Keep children away from the area. G210B01A-AAT
Checking the Battery
Checking the Battery Checking the Battery
Checking the Battery
Checking the Battery
Keep the battery clean. Any evidence of corro-
sion around the battery posts or terminals should be removed using a solution of household bak-ing soda and warm water. After the batteryterminals are dry, cover them with a light coat-ing of grease.
G220A01A-AATCHECKING ELECTRIC COOLING
CHECKING ELECTRIC COOLING CHECKING ELECTRIC COOLING
CHECKING ELECTRIC COOLING
CHECKING ELECTRIC COOLING
FANS
FANS FANS
FANS
FANS
WARNING:
WARNING: WARNING:
WARNING:
WARNING:
The radiator fan is controlled by engine cool-
The radiator fan is controlled by engine cool- The radiator fan is controlled by engine cool-
The radiator fan is controlled by engine cool-
The radiator fan is controlled by engine cool-
ant temperature and may sometimes operate
ant temperature and may sometimes operate ant temperature and may sometimes operate
ant temperature and may sometimes operate
ant temperature and may sometimes operate
even when the engine is not running. Use
even when the engine is not running. Use even when the engine is not running. Use
even when the engine is not running. Use
even when the engine is not running. Use
extreme caution when working near the blades
extreme caution when working near the blades extreme caution when working near the blades
extreme caution when working near the blades
extreme caution when working near the blades
of the cooling fan, so that you are not injured
of the cooling fan, so that you are not injured of the cooling fan, so that you are not injured
of the cooling fan, so that you are not injured
of the cooling fan, so that you are not injured
by a rotating fan blade. As the coolant tem-
by a rotating fan blade. As the coolant tem- by a rotating fan blade. As the coolant tem-
by a rotating fan blade. As the coolant tem-
by a rotating fan blade. As the coolant tem-
perature decreases the fan will automatically
perature decreases the fan will automatically perature decreases the fan will automatically
perature decreases the fan will automatically
perature decreases the fan will automatically
shut off. This is a normal condition.
shut off. This is a normal condition. shut off. This is a normal condition.
shut off. This is a normal condition.
shut off. This is a normal condition.
G220B01A-AATChecking Engine Cooling Fan
Checking Engine Cooling Fan Checking Engine Cooling Fan
Checking Engine Cooling Fan
Checking Engine Cooling Fan
The engine cooling fan should come on auto-
matically if the engine coolant temperature ishigh.
G220C01A-AATChecking Condenser Cooling Fan
Checking Condenser Cooling Fan Checking Condenser Cooling Fan
Checking Condenser Cooling Fan
Checking Condenser Cooling Fan
The condenser cooling fan should come on
automatically whenever the air conditioning isin operation.
Page 113 of 249

DO-IT-YOURSELF MAINTENANCE
DO-IT-YOURSELF MAINTENANCE DO-IT-YOURSELF MAINTENANCE
DO-IT-YOURSELF MAINTENANCE
DO-IT-YOURSELF MAINTENANCE
6-17
G270A02X-GAT
HEADLIGHT BULB
HEADLIGHT BULB HEADLIGHT BULB
HEADLIGHT BULB
HEADLIGHT BULB
Replacement instructions:
1. Allow the bulb to cool. Wear eye protection.
2. Always grasp the bulb by its base, avoid touching the glass.
3. Disconnect the connector, then remove the dust cover.
4. Push the bulb spring for removing the head- light bulb.
5. Remove the headlight bulb. If the bulb is burned out, replace it with the same watt- age.
6. Installation is the reverse order of the re- moval.
7. Use the protective cap and carton to promptly dispose of the old bulb.
8. Check for proper headlight aim. WARNING:
WARNING: WARNING:
WARNING:
WARNING:
The halogen bulb contains gas under pres-
The halogen bulb contains gas under pres- The halogen bulb contains gas under pres-
The halogen bulb contains gas under pres-
The halogen bulb contains gas under pres- sure and if impacted
sure and if impacted sure and if impacted
sure and if impacted
sure and if impacted
could shatter, and re-
could shatter, and re- could shatter, and re-
could shatter, and re-
could shatter, and re-
sulting in flying fragments. Always wear eye
sulting in flying fragments. Always wear eye sulting in flying fragments. Always wear eye
sulting in flying fragments. Always wear eye
sulting in flying fragments. Always wear eye
protection
protection protection
protection
protection
when servicing the bulb. Protect
when servicing the bulb. Protect when servicing the bulb. Protect
when servicing the bulb. Protect
when servicing the bulb. Protect
the bulb against abrasions or scratches and
the bulb against abrasions or scratches and the bulb against abrasions or scratches and
the bulb against abrasions or scratches and
the bulb against abrasions or scratches and
against liquids when lighted. Turn the bulb
against liquids when lighted. Turn the bulb against liquids when lighted. Turn the bulb
against liquids when lighted. Turn the bulb
against liquids when lighted. Turn the bulb
on only when installed in a headlight. Re-
on only when installed in a headlight. Re- on only when installed in a headlight. Re-
on only when installed in a headlight. Re-
on only when installed in a headlight. Re-
place the headlight if damaged or cracked.
place the headlight if damaged or cracked. place the headlight if damaged or cracked.
place the headlight if damaged or cracked.
place the headlight if damaged or cracked.
Keep the bulb out of the reach
Keep the bulb out of the reach Keep the bulb out of the reach
Keep the bulb out of the reach
Keep the bulb out of the reach
of children
of children of children
of children
of children
and dispose of the used bulb with care.
and dispose of the used bulb with care. and dispose of the used bulb with care.
and dispose of the used bulb with care.
and dispose of the used bulb with care. G290A02X-GAT
HEADLIGHT AIMING ADJUSTMENT
HEADLIGHT AIMING ADJUSTMENT HEADLIGHT AIMING ADJUSTMENT
HEADLIGHT AIMING ADJUSTMENT
HEADLIGHT AIMING ADJUSTMENT Before performing aiming adjustment, make sure of the following.
1. Keep all tires inflated to the correct pres-
sure.
2. Place the vehicle on level ground and press the front bumper & rear bumper down sev- eral times. Place the vehicle at a distance of3,000 mm (118 in.) from the test wall.
3. See that the vehicle is unloaded (except for full levels of coolant, engine oil and fuel, andspare tire, jack, and tools). Have the driveror equivalent weight placed in driver's seat.
Recommended Fluid
Recommended Fluid Recommended Fluid
Recommended Fluid
Recommended Fluid
Use PSF-3 type fluid.
NOTE:
NOTE: NOTE:
NOTE:
NOTE:
Do not start the engine when the power
Do not start the engine when the power Do not start the engine when the power
Do not start the engine when the power
Do not start the engine when the power steering oil reservoir is empty.
steering oil reservoir is empty. steering oil reservoir is empty.
steering oil reservoir is empty.
steering oil reservoir is empty.
G240A01A-AATPOWER STEERING HOSES
POWER STEERING HOSES POWER STEERING HOSES
POWER STEERING HOSES
POWER STEERING HOSES
It is suggested that you check the power steer-
ing hose connections for fluid leakage at those intervals specified in the vehicle maintenanceschedule in Section 5.
The power steering hoses should be replaced if
there is severe surface cracking, pulling, scuff-ing or worn spots. Deterioration of the hosecould cause premature failure.
G260A03A-AATREPLACING HEADLIGHT BULBS
REPLACING HEADLIGHT BULBS REPLACING HEADLIGHT BULBS
REPLACING HEADLIGHT BULBS
REPLACING HEADLIGHT BULBS
Before attempting to replace a headlight bulb,
be sure the switch is turned to the "OFF"position.
The next paragraph shows how to reach head-
light bulbs so they may be changed. Be sure toreplace the burned-out bulb with one of thesame number and wattage rating.
CAUTION:
CAUTION: CAUTION:
CAUTION:
CAUTION:
Keep the lamps out of contact with petro-
Keep the lamps out of contact with petro- Keep the lamps out of contact with petro-
Keep the lamps out of contact with petro-
Keep the lamps out of contact with petro- leum product, such as oil, gasoline, etc.
leum product, such as oil, gasoline, etc. leum product, such as oil, gasoline, etc.
leum product, such as oil, gasoline, etc.
leum product, such as oil, gasoline, etc.
G270A01X
Page 124 of 249
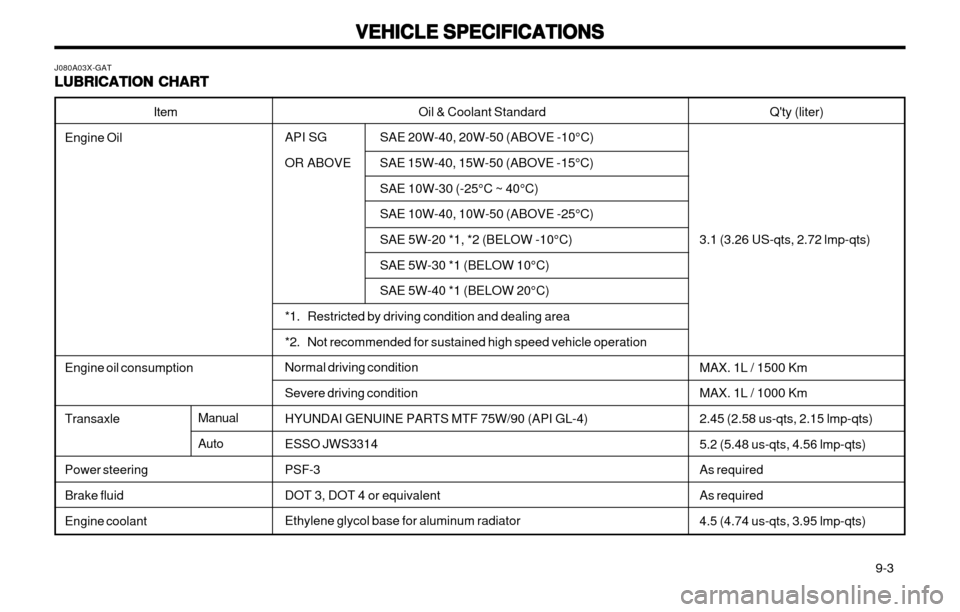
VEHICLE SPECIFICATIONS
VEHICLE SPECIFICATIONS VEHICLE SPECIFICATIONS
VEHICLE SPECIFICATIONS
VEHICLE SPECIFICATIONS
9-3
Oil & Coolant Standard
API SG SAE 20W-40, 20W-50 (ABOVE -10°C)
OR ABOVE SAE 15W-40, 15W-50 (ABOVE -15°C) SAE 10W-30 (-25°C ~ 40°C) SAE 10W-40, 10W-50 (ABOVE -25°C) SAE 5W-20 *1, *2 (BELOW -10°C) SAE 5W-30 *1 (BELOW 10°C)SAE 5W-40 *1 (BELOW 20°C)
*1. Restricted by driving condition and dealing area
*2. Not recommended for sustained high speed vehicle operationNormal driving condition Severe driving condition HYUNDAI GENUINE PARTS MTF 75W/90 (API GL-4)ESSO JWS3314 PSF-3 DOT 3, DOT 4 or equivalentEthylene glycol base for aluminum radiator
Item
Engine Oil Engine oil consumption Transaxle Power steering Brake fluid Engine coolant Q'ty (liter)
3.1 (3.26 US-qts, 2.72 lmp-qts) MAX. 1L / 1500 Km MAX. 1L / 1000 Km2.45 (2.58 us-qts, 2.15 lmp-qts) 5.2 (5.48 us-qts, 4.56 lmp-qts) As requiredAs required 4.5 (4.74 us-qts, 3.95 lmp-qts)
J080A03X-GAT LUBRICATION CHART
LUBRICATION CHART LUBRICATION CHART
LUBRICATION CHART
LUBRICATION CHART
Manual Auto
Page 126 of 249

INDEX
INDEX INDEX
INDEX
INDEX
10-2 EE
EE
E
Emission Control System ................................................................... 7-1Engine
Before starting the engine .............................................................. 2-2
Compartment (For MFI) ................................................................. 6-1 Coolant ........................................................................................... 6-5
Coolant temperature gauge ......................................................... 1-22
If the engine overheats .................................................................. 3-2 Number .......................................................................................... 8-1
Oil .................................................................................................. 6-2
Oil consumption ............................................................................. 6-3
Starting ........................................................................................... 2-3
Engine Exhaust Can Be Dangerous ................................................... 2-1
FF
FF
F
Fan Speed Control ............................................................................ 1-34
Fog Light
Front ............................................................................................. 1-31
Rear ............................................................................................. 1-31
Front Seats Adjustable front seats .................................................................... 1-5
Adjustable headrests ..................................................................... 1-6
Adjusting seat forward and rearward ............................................. 1-5
Adjusting seatback angle ............................................................... 1-6
Fuel Capacity ......................................................................................... 9-1Gauge .......................................................................................... 1-22
Recommendations ......................................................................... 1-1 Fuel Filler Lid
Remote release ............................................................................ 1-31
Fuses ................................................................................................ 6-15
GG
GG
G
General Everyday Checks .................................................................. 6-2
HH
HH
H
Hazard Warning System ................................................................... 1-27
Headlight ........................................................................................... 6-17
Headlight Bulb Replacement ............................................................. 6-17
Headlight Leveling Device System ................................................... 1-25
Heating and Ventilation
High-mounted Rear Stoplight ............................................................ 1-28
Hood Release ................................................................................... 1-32
Horn ................................................................................................ 1-33
II
II
I
Ignition Switch ..................................................................................... 2-2
Immobilizer System ............................................................................. 1-2
Instrument Cluster and Indicator ....................................................... 1-19
Instruments and Controls .................................................................. 1-18
Interior Light ...................................................................................... 1-27
JJ
JJ
J
Jump Starting ...................................................................................... 3-1
KK
KK
K
Keys .................................................................................................. 1-2
If you lose your keys ..................................................................... 3-8
Positions ........................................................................................ 2-2
Page 151 of 249
FEATURES OF YOUR HYUNDAI
1-14 B240C01X-EAT SRS CareThe SRS is virtually maintenance-free and so there are no parts you can safely service byyourself. The entire SRS system must be in-spected by an authorized Hyundai dealer in 10years after the date that the car was manufac-ture. Any work on the airbag system, such as remov- ing, installing, repairing, or any work on thesteering wheel must be performed by a quali-fied Hyundai technician. Improper handling of the airbag system may result in serious personal injury. WARNING:
o Modification to SRS components or wir- ing, including the addition of any kind of badges to the pad cover or modifica-tions to the body structure, can adverse-ly affect SRS performance and lead topossible injury.
o For cleaning the horn pad, use only a soft, dry cloth or one which has beenmoistened with plain water. Solvents orcleaners could adversely affect the airbagcover and proper deployment of the sys-tem.
o No objects should be placed over or near the label identifying the airbag on thesteering wheel and instrument panel,because any such object could causeharm if the vehicle is in a crash severeenough to cause the airbag to inflate.
WARNING:
o When the SRS is activated, there may be
a loud noise and fine dust will be re- leased through out the vehicle. Theseconditions are normal and are not haz-ardous. However, the fine dust generat-ed during airbag deployment may causeskin irritation. Be sure to wash your handsand face thoroughly with lukewarm wa-ter and a mild soap after an accident inwhich the airbags were deployed.
o The SRS can function only when the ignition key is in the "ON" position. If theSRS SRI does not come on, or continu-ously remains on, after flashing for about6 seconds when the ignition key is turnedto the "ON" position, or after the engineis started, or comes on while driving, theSRS is not working properly. If this oc-curs, have your vehicle immediately in-spected by your Hyundai dealer.
o Before you replace a fuse or disconnect a battery terminal, turn the ignition key tothe "LOCK" position or remove the igni-tion key. Never remove or replace the airbag related fuse(s) when the ignition keyis in the "ON" position. Failure to heedthis warning will cause the SRS SRI toilluminate.
Upon deployment, tear seams molded directly
into the pad covers will separate under pres-sure from the expansion of the airbags. Furtheropening of the covers then allows full inflation ofthe airbags.
A fully inflated airbag in combination with a
properly worn seat belt slows the driver's for-ward motion, thus reducing the
risk of head and chest injury. After complete inflation, the airbag immediately
starts deflating, enabling the driver to maintain forward visibility.
CAUTION: When installing a container of liquid air
fresherer inside a vehicle, do not place it near the instrument cluster nor on the in-strument panel pad surface. If there is anyleakage from the air fresherer onto theseareas (instrument cluster, instrument panelpad or air ventilator), it may damage theseparts. If the liquid from the air freshererdoes leak onto these areas, wash them withwater immediately.