Page 223 of 249
DO-IT-YOURSELF MAINTENANCE 6-5
G040A05XNOTE: Always dispose of used engine oil in an
environmentally acceptable manner. It is suggested that it be placed in a sealed con-tainer and taken to a service station forreclamation. Do not pour the oil on theground or put it into the household trash.
WARNING: Used motor oil may cause irritation or can-
cer of the skin if left in contact with the skin for prolonged periods of time. Wash yourhands thoroughly with soap and warm wa-ter as soon as possible after handling usedoil.
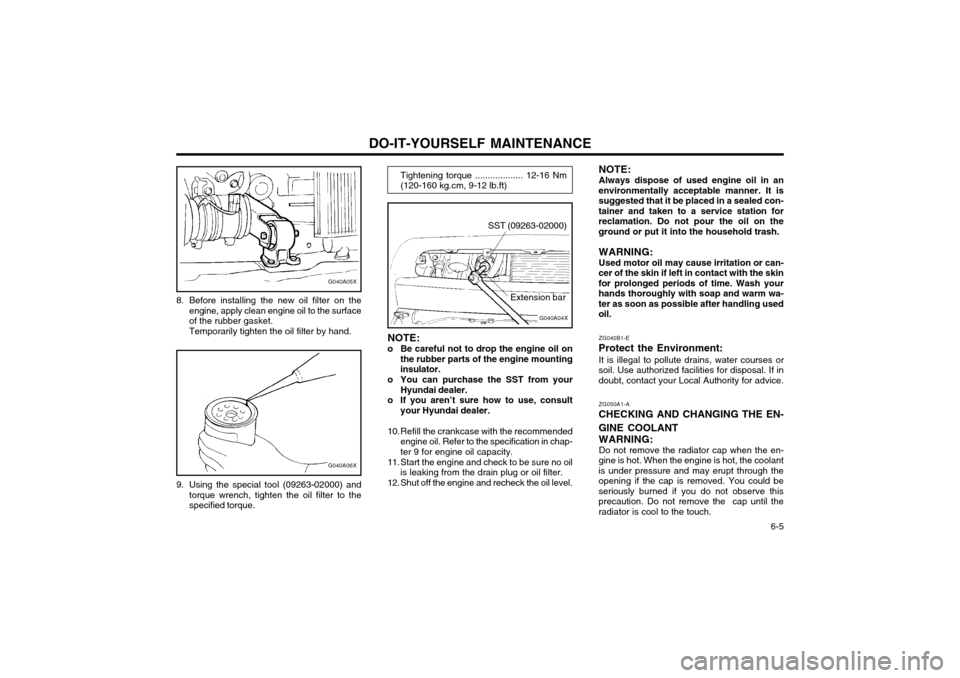
8. Before installing the new oil filter on the
engine, apply clean engine oil to the surfaceof the rubber gasket.Temporarily tighten the oil filter by hand.
G040A06X
9. Using the special tool (09263-02000) andtorque wrench, tighten the oil filter to the specified torque.
Tightening torque ................... 12-16 Nm (120-160 kg.cm, 9-12 lb.ft)
G040A04X
SST (09263-02000)
Extension bar
NOTE:
o Be careful not to drop the engine oil on the rubber parts of the engine mounting insulator.
o You can purchase the SST from your Hyundai dealer.
o If you aren’t sure how to use, consult your Hyundai dealer.
10. Refill the crankcase with the recommended engine oil. Refer to the specification in chap-ter 9 for engine oil capacity.
11. Start the engine and check to be sure no oil is leaking from the drain plug or oil filter.
12. Shut off the engine and recheck the oil level. ZG040B1-E
Protect the Environment: It is illegal to pollute drains, water courses or
soil. Use authorized facilities for disposal. If indoubt, contact your Local Authority for advice.
ZG050A1-A
CHECKING AND CHANGING THE EN- GINE COOLANT
WARNING: Do not remove the radiator cap when the en-
gine is hot. When the engine is hot, the coolant is under pressure and may erupt through theopening if the cap is removed. You could beseriously burned if you do not observe thisprecaution. Do not remove the cap until theradiator is cool to the touch.
Page 228 of 249
DO-IT-YOURSELF MAINTENANCE
6-10
C090B01X-DAG
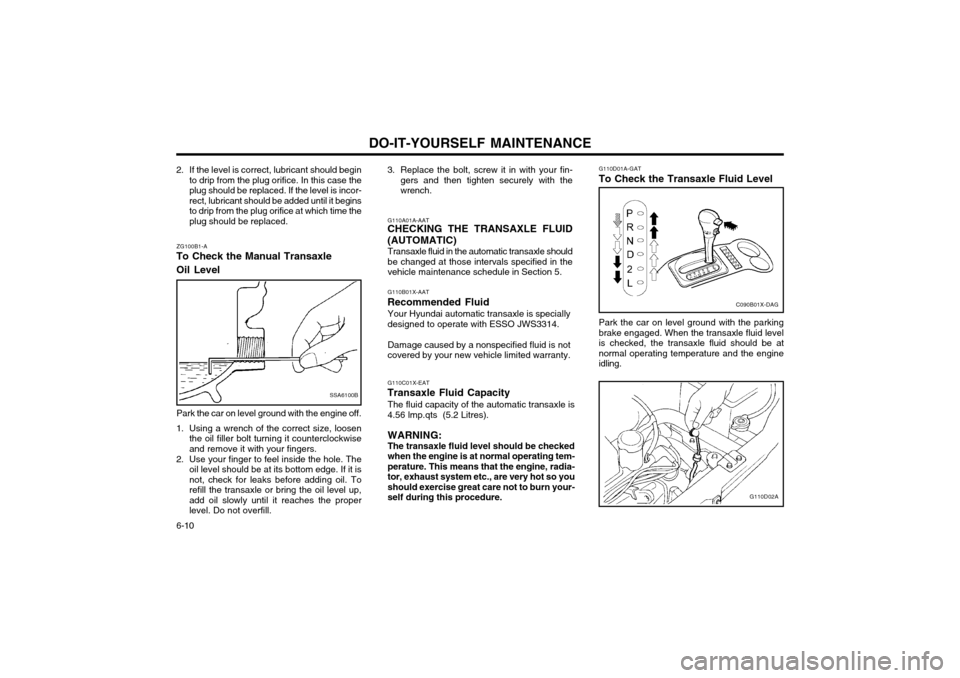
G110D01A-GAT To Check the Transaxle Fluid Level
G110D02A
Park the car on level ground with the parking brake engaged. When the transaxle fluid levelis checked, the transaxle fluid should be atnormal operating temperature and the engineidling.
G110A01A-AAT
CHECKING THE TRANSAXLE FLUID (AUTOMATIC)
Transaxle fluid in the automatic transaxle should be changed at those intervals specified in thevehicle maintenance schedule in Section 5.
3. Replace the bolt, screw it in with your fin-
gers and then tighten securely with thewrench.
G110C01X-EAT
Transaxle Fluid Capacity
The fluid capacity of the automatic transaxle is4.56 lmp.qts (5.2 Litres). WARNING: The transaxle fluid level should be checked when the engine is at normal operating tem-perature. This means that the engine, radia-tor, exhaust system etc., are very hot so youshould exercise great care not to burn your-self during this procedure.
G110B01X-AAT
Recommended Fluid Your Hyundai automatic transaxle is speciallydesigned to operate with ESSO JWS3314. Damage caused by a nonspecified fluid is not covered by your new vehicle limited warranty.
ZG100B1-A
To Check the Manual Transaxle Oil Level
SSA6100B
Park the car on level ground with the engine off.
1. Using a wrench of the correct size, loosen the oil filler bolt turning it counterclockwise and remove it with your fingers.
2. Use your finger to feel inside the hole. The oil level should be at its bottom edge. If it isnot, check for leaks before adding oil. Torefill the transaxle or bring the oil level up,add oil slowly until it reaches the properlevel. Do not overfill.
2. If the level is correct, lubricant should begin
to drip from the plug orifice. In this case theplug should be replaced. If the level is incor-rect, lubricant should be added until it beginsto drip from the plug orifice at which time theplug should be replaced.
Page 234 of 249

DO-IT-YOURSELF MAINTENANCE
6-16 G270A01X-GAT
HEADLIGHT BULB
G270A01X
Replacement instructions:
1. Allow the bulb to cool. Wear eye protection.
2. Always grasp the bulb by its base, avoid touching the glass.
3. Disconnect the connector, then remove the dust cover.
4. Push the bulb spring for removing the head- light bulb.
5. Remove the headlight bulb. If the bulb is burned out, replace it with the same watt- age.
6. Installation is the reverse order of the re- moval.
7. Use the protective cap and carton to promptly dispose of the old bulb.
8. Check for proper headlight aim.
noise stops during warm up, there is no
abnormal function in the system. This is dueto a power steering fluid characteristic inextremely cold conditions.
Recommended Fluid Use PSF-3 type fluid. NOTE: Do not start the engine when the power
steering oil reservoir is empty. ZG230B1-E
POWER STEERING HOSES It is suggested that you check the power steering hose connections for fluid leakage at those inter-vals specified in the vehicle maintenance sched-ule in Section 5.The power steering hoses should be replaced ifthere is severe surface cracking, pulling, scuff-ing or worn spots. Deterioration of the hose couldcause premature failure.
G260A01A-AAT
REPLACING LIGHT BULBS Before attempting to replace a light bulb, be
sure the switch is turned to the "OFF" position.
The drawings show how to reach light bulbs sothey may be changed. Be sure to replace the
burned-out bulb with one of the same numberand wattage rating.
G220C01A-AAT
Checking Condenser Cooling Fan
The condenser cooling fan should come on
automatically whenever the air conditioning is in operation.
G230A03A-GAT
POWER STEERING FLUID LEVEL
G230A01X
The power steering fluid level should be checked
regularly.
To check the power steering fluid level, be sure
the ignition is "OFF", then check to make cer- tain that the power steering fluid level is be-
tween the "MAX" and "MIN" level markings onthe fluid reservoir.
NOTE: Grinding noise from the power steering
pump may be heard immediately after the engine is started in extremely cold condi-tions (below -4°F(-20°C)). In this case, if the