Page 71 of 399
. The smaller inner
numbers are the speed in kilometers
per hour (km/h).
This shows your speed in kilometers
per hour (km/h). Th")
U.S. ModelsCanadian Models
This shows your speed in miles per
hour (mph). The smaller inner
numbers are the speed in kilometers
per hour (km/h).
This shows your speed in kilometers
per hour (km/h). The smaller inner
numbers are the speed in miles per
hour (mph). The tachometer shows the engine
speed in revolutions per minute
(rpm). To protect the engine f rom
damage, never drive with the
tachometer needle in the red zone.The odometer shows the total dis-
tance your vehicle has been driven.
It measures miles in U.S. models and
kilometers in Canadian models.
It is illegal under U.S. f ederal law and
Canadian provincial regulations to
disconnect, reset, or alter the
odometer with the intent to change
the number of miles or kilometers
indicated.
Speedometer Odometer
T achometer
Gauges
Inst rument s and Cont rols68
T T E
EM
M P
PE
ER
RA A T
TU
UR REE
G
GA AU
UG GEE
S
SP
PE
EE
ED
D O
OM M E
ET
TE
ER
R
M
M A
AI
INNT TE
EN
NA AN
NC CEE
R
RE EQ
QU UIIRRE ED
D I
INND DI
ICCA A T
TO
OR R
T
T
A
A C
CHH O
OM M E
ET
TE
ER
R F
FU
UE EL
L G
GAAU
UG GEE
T
T R
RI IPP M
M E
ET
TE
ER
R O
ODDO
OM M E
ET
TE
ER
R
T
T R
RI IPP M
M E
ET
TE
ER
R S
SEEL
LEE C
CT T/
/R
RE ES
SE ET
T B
BUUT TT
TO
ON N
Page 72 of 399

This shows how much f uel you have.
It is most accurate when the vehicle
is on level ground. It may show
slightly more or less than the actual
amount when you are driving on
curvy or hilly roads.
This shows the temperature of the
engine’s coolant. During normal
operation, the pointer should rise
from the bottom white mark to about
the middle of the gauge. In severe
driving conditions, such as very hot
weather or a long period of uphill
driving, the pointer may rise to near
the upper white mark. If it reaches
the red (Hot) mark, pull safely to the
side of the road. Turn to page f or
instructions and precautions on
checking the engine’s cooling
system.
This meter shows the number of
miles (U.S.) or kilometers (Canada)
driven since you last reset it.
There are two trip meters: Trip A
and Trip B. Switch between these
displays by pressing the Select/
Reset button repeatedly. Each trip
meter works independently, so you
can keep track of two dif f erent
distances.
To reset a trip meter, display it, and
then press and hold the Select/Reset
button until the number resets to
‘‘0.0’’.
The needle returns to the bottom
after you turn off the ignition. The
gauge shows the f uel level reading
immediately af ter you turn the
ignition switch back ON (II).
351
Gauges
Inst rument s and Cont rols
Trip Meter
Temperature GaugeFuel Gauge
69
Please ref uel early, as driving to the
last drop of f uel can result in damage
to the engine and/or three way catalytic
converter.
Page 73 of 399

af ter the Maintenance Required
Indicator is reset, it will come on f")
Ref er to the Maintenance Schedules
f or Normal and Severe Driving
Conditions on pages and .
For the f irst 6,000 miles (9,600 km)
af ter the Maintenance Required
Indicator is reset, it will come on f or
two seconds when you turn the
ignition switch ON (II).Between 6,000 miles (9,600 km) and
7,500 miles (12,000 km) this
indicator will light f or two seconds
when you first turn the ignition
switch ON (II), and then f lash f or
ten seconds.
If you exceed 7,500 miles (12,000
km) without having the scheduled
maintenance perf ormed, this
indicator will remain on as a constant
reminder.Your dealer will reset this indicator
af ter completing the scheduled
maintenance. If this maintenance is
done by someone other than your
Honda dealer, reset the indicator as
f ollows.
Turn of f the engine.
This indicator reminds you that it is
time to take your vehicle in for sched-
uled maintenance. Press and hold the select/reset
buttonintheinstrumentpanel,
then turn the ignition switch ON
(II).
Hold the button until the indicator
resets (approximately ten
seconds).
1.
2.
3.
276 278
Gauges
Maintenance Required Indicator
Inst rument s and Cont rols70
M M A
AI
INNT TE
EN
NA AN
NC CEE R
REEQ
QU UIIRRE ED
D
I
IN ND DI
ICCA A T
TO
OR R
S
SEEL
LEE C
CT T/
/R
RE ES
SE ET
T B
BUUT TT
TO
ON N
Page 99 of 399

If a person or object is in the way
af ter the door begins to close, the
door handles cannot be used to stop
the door. To stop the door, use the
dashboard switches or the remote
transmitter.
If a passenger needs to get out of the
vehicle while you are ref ueling,
instruct that person to exit on the
passenger’s side, not the driver’s
side.Make sure the power sliding doors
are latched in the f ully-open
position, then hold the door open
while allowing your passengers to
enter or exit the vehicle. Do not
pull the inside or outside door
handle, or the latch will release
and the door will close. Make sure the MAIN switch is in
the ON position. This allows the
power assist to keep the doors
f rom slamming shut.
If the MAIN switch is off, the door
can slam shut and possibly injure
someone.If your vehicle’s battery is
disconnected or goes dead while a
sliding door is open, the power
sliding door system needs to be reset.
Af ter reconnecting the battery:
Close each sliding door completely
by hand; or
Move the MAIN switch on the
dashboard to the ON position.
Push and hold the top of each door
switch until each sliding door
closes completely.
If the power sliding doors are closed,
the system will reset itself
automatically once the battery has
been reconnected.
If the power sliding doors do not
operate properly af ter resetting,
have your vehicle checked by a
Honda dealer.
When parking f acing downhill on a
steep grade, the power sliding doors
may not open or close as they do
normally.
Bef ore ref ueling, make sure the
driver’s side sliding door is f ully
closed. When you release the f uel f ill
door, the driver’s side sliding door
automatically locks so it cannot open
and interfere with the fuel door. If a
passenger attempts to unlock the
door by cycling the lock knob several
times, the door may unlock and can
be opened. Af ter you close the f uel f ill door, the
sliding door does not automatically
unlock. You must unlock it manually.
A Not e A bout Ref ueling
Parking Facing DownhillHow t o Reset t he Power Sliding
Doors
Power Sliding Doors (EX, EX-L Models)
Inst rument s and Cont rols96
Page 121 of 399
Press and hold the H button until
the hour advances to the desired
time.
You can use R to quickly set the time
to the nearest hour. If the displayed
time is before the half hour, pressing
Rsetstheclockbacktotheprevious
hour. If the displayed time is af ter
the half hour, pressing R sets the
clock f orward to the beginning of the
next hour.
For example: 1:06 would RESET to 1:00.
1:52 would RESET to 2:00. To use the center table, pull up the
outside edge of the table until it
latches. To store it, pull the lever and
lower the table.
Press and hold the M button until
the numbers advance to the
desired time.
To set the clock: Turn the ignition switch ON (II) to
display the time. 2.
3.
1.
On models without navigation system
Digital Clock Center Table
Digital Clock, Center Table
Inst rument s and Cont rols118
H HM
M R
R
Page 160 of 399
�Î
�Î
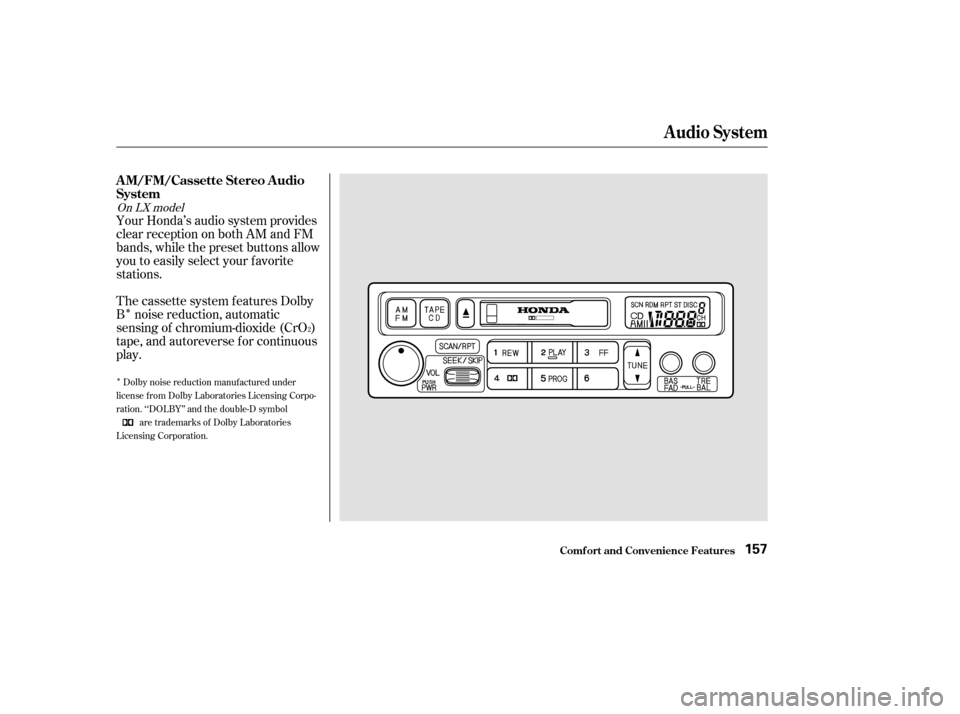
Your Honda’s audio system provides
clear reception on both AM and FM
bands, while the preset buttons allow
you to easily select your f avorite
stations.
The cassette system f eatures Dolby
B noise reduction, automatic
sensing of chromium-dioxide (CrO )
tape, and autoreverse f or continuous
play.
2
Dolby noise reduction manuf actured under
license from Dolby Laboratories Licensing Corpo-
ration. ‘‘DOLBY’’ and the double-D symbol are trademarks of Dolby Laboratories
Licensing Corporation.
On LX model
Audio System
Comf ort and Convenience Feat ures
A M/FM/Cassette Stereo A udio
System
157
Page 161 of 399
 or ON (II) to
operate the audio system. Turn the
system on by pushing the PWR/
VOL knob.
The band and f requency that the
radio was last tun")
�µ�µ
�Ý �Û
The ignition switch must be in
ACCESSORY (I) or ON (II) to
operate the audio system. Turn the
system on by pushing the PWR/
VOL knob.
The band and f requency that the
radio was last tuned to is displayed.
To change bands, press the AM/FM
button. On the FM band, ST will be
displayed if the station is broadcast-
ing in stereo. Stereo reproduction on
AM is not available. Adjust the volume by turning the
PWR/VOL knob. You can use any of f our methods to
f ind radio stations on the selected
band: TUNE, SEEK, SCAN or the
Preset buttons.
Use the TUNE bar to tune
the radio to a desired f requency.
Press the upper part ( ) to tune
to a higher f requency, or the lower
part ( ) to tune to a lower
f requency. The f requency numbers
will start to change rapidly. Release
the bar when the display reaches the
desired f requency. To change the
f requency in small increments, press
and release the TUNE bar quickly. The SEEK f unction
searches the band for a station with
a strong signal. To activate it, push
the SEEK switch up or down, then
release it. Depending on which way
you push the switch, the system
scans upward or downward f rom the
current f requency. It stops when it
finds a station with a strong signal.
Audio System
Comf ort and Convenience Feat ures
Operating the Radio
TUNESEEK
158
Page 163 of 399

�µYou can store the
f requencies of your f avorite radio
stations in the six preset buttons.
Each button will store one f requency
on the AM band, and two
f requencies on the FM band.
To store a f requency:
Select the desired band, AM or
FM. FM1 and FM2 let you store
two f requencies with each Preset
button.
Use the TUNE or SEEK f unction
to tune the radio to a desired
station.
Pick the Preset button you want
for that station. Press the button
and hold it until you hear a beep.
Repeat steps 1 to 3 to store a total
of six stations on AM and twelve
on FM. Once a station’s f requency is stored,
simply press and release the proper
Preset button to tune to it.
The preset f requencies will be lost if
your vehicle’s battery goes dead, is
disconnected, or the radio f use is
removed.
1.
2.
3.
4. Preset
Audio System
Comf ort and Convenience Feat ures160
A A
M
M /
/F
FM M B
BUUT TT
TO
ON N
S
SE EE
EK
K S
SWWI ITT C
CH H T
T
U
UN NEE B
BAA R
R
P
P
R
RE ES
SE ET
T
B
BU UT TT
TO
ON NSS