Page 98 of 399

Each power sliding door has an auto-
reverse f eature. If a door meets
resistance while closing, it will beep
three times and automatically
reverse direction. However, the door
may not immediately reverse
direction (like some elevator doors),
and the f orce of a closing door may
cause bruising or discomf ort. Always
make sure passengers and any
objects are well away f rom the power
sliding doors bef ore closing them.
Also check that passengers,
especially children, do not have their
hands on the edge of the sliding door
or on the door pillar. The auto-
reverse f eature stops working when
the door is about to latch so the
motor can pull the door shut.
With the sliding door f ully-closed or
f ully-open, pull the outside or inside
door handle, then release it.
Once the door begins to move, the
door handles cannot be used to stop
the door. If you need to stop the door
f or any reason, use the dashboard
switches or the remote transmitter. Each sliding door has a lock knob
under the inside door handle. Slide
the lock knob f orward to unlock, and
backward to lock the doors. You can
also use the lock and unlock buttons
on the remote transmitter.
Whenyoudrivewithchildreninyour
vehicle, use the childproof door
locks (see page ). This will
prevent children f rom opening the
doors accidentally.
88
CONT INUED
Operat ing t he Doors Wit h t he Door
Handles L ocking t he Doors
Sliding Doors and Obst acles
Power Sliding Doors (EX, EX-L Models)
Inst rument s and Cont rols95
O OUUTTS
SI IDD E
E
I
INNS SIIDD E
E U
Un
nl
loo c
ckk
L
Loo c
ckk
L
LO
OC CKK K
KNNO OBB
Page 112 of 399
CONT INUED
Remove the head restraints by
pushing the release buttons and
pulling the restraints out.
To create more cargo space, you can
f old the third row ‘‘Magic Seat’’ into
the f loor recess.
To fold the seat:
Make sure the head restraint legs
areinsidethecargonetsotheydo
not damage the seat as you fold it. Store the head restraints in the
sidecargonet.Toinstalltheside
cargo net, hook the f our loops on
the net to the tabs on the left side
panel.Unlock the seat-back by pulling
the handle. Push the seat-back
forward.
1. 2.
3.
Seats
Inst rument s and Cont rols
Folding the T hird Row ‘‘Magic
Seat’’
109
R REEL
LEE A
A S
SEE B
BUUT TT
TO
ON N H
H
A
AN
ND DL
LEE
Page 136 of 399
Use the MODE buttons to select the
vents the air flows from. Some air
will f low f rom the dashboard corner
vents in all modes.Air f lows f rom the f loor
vents. Air f low is divided between
the vents in the dashboard and the
f loor vents. Air flows from the center
and corner vents in the dashboard.
Air f low is divided between
the f loor vents and the def roster
vents at the base of the windshield.
Air f lows f rom the def roster
vents at the base of the windshield. When you select or ,
the system automatically switches to
Fresh Air mode and turns on the
A/C. In this case you cannot turn it
off.When you select , the system
automatically switches to Fresh Air
mode.
Heating and Cooling
Comf ort and Convenience Feat ures
Mode Buttons
133
Page 152 of 399
You can manually select various
f unctions of the Climate Control
system when it is in FULL AUTO.
All other f eatures remain auto-
matically controlled. Some of these
f unctions appear in the Navigation
System display. Press the A/C
button next to the display to show
these functions.
Pressing ‘‘ON’’ or ‘‘OFF’’ in the
display turns the air conditioning on
andoff.YouwillseeA/CONorA/C
OFF activated in the display.
When you turn the A/C of f , the
system cannot regulate the inside
temperature if you set it below the
outside temperature. With the A/C
on, use the temperature buttons to
adjust the temperature of the air
flow to a comfortable setting.
CONT INUED
Climat e Cont rol Syst em
Comf ort and Convenience Feat ures
Semi-automatic Operation
A ir Condit ioning (A /C) But t ons
149
A AI
IRR C
COON NDDI
ITT I
IOON NIINNG G (
(A
A /
/C
C) )B
BU UT TT
TO
ON NSS
T
T
E
EM
M P
PE
ER
RA A T
TU
UR REE B
BUUT TT
TO
ON NSS
R
RE EC
CI IRRC CUUL LAA T
TI
IOON N B
BUUT TT
TO
ON N
Page 160 of 399
�Î
�Î
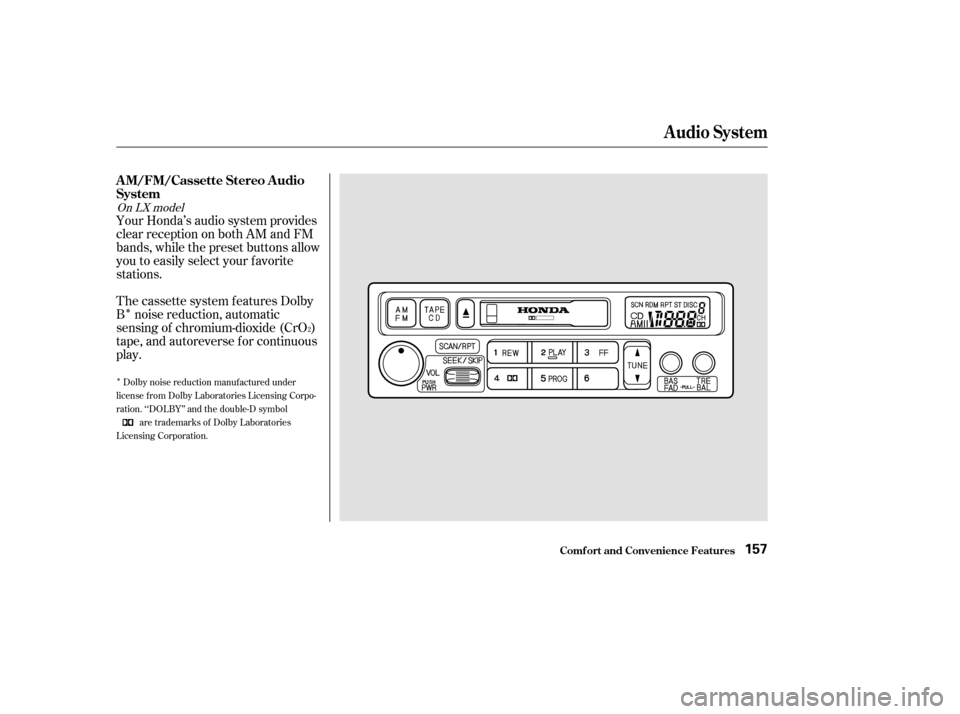
Your Honda’s audio system provides
clear reception on both AM and FM
bands, while the preset buttons allow
you to easily select your f avorite
stations.
The cassette system f eatures Dolby
B noise reduction, automatic
sensing of chromium-dioxide (CrO )
tape, and autoreverse f or continuous
play.
2
Dolby noise reduction manuf actured under
license from Dolby Laboratories Licensing Corpo-
ration. ‘‘DOLBY’’ and the double-D symbol are trademarks of Dolby Laboratories
Licensing Corporation.
On LX model
Audio System
Comf ort and Convenience Feat ures
A M/FM/Cassette Stereo A udio
System
157
Page 161 of 399
 or ON (II) to
operate the audio system. Turn the
system on by pushing the PWR/
VOL knob.
The band and f requency that the
radio was last tun")
�µ�µ
�Ý �Û
The ignition switch must be in
ACCESSORY (I) or ON (II) to
operate the audio system. Turn the
system on by pushing the PWR/
VOL knob.
The band and f requency that the
radio was last tuned to is displayed.
To change bands, press the AM/FM
button. On the FM band, ST will be
displayed if the station is broadcast-
ing in stereo. Stereo reproduction on
AM is not available. Adjust the volume by turning the
PWR/VOL knob. You can use any of f our methods to
f ind radio stations on the selected
band: TUNE, SEEK, SCAN or the
Preset buttons.
Use the TUNE bar to tune
the radio to a desired f requency.
Press the upper part ( ) to tune
to a higher f requency, or the lower
part ( ) to tune to a lower
f requency. The f requency numbers
will start to change rapidly. Release
the bar when the display reaches the
desired f requency. To change the
f requency in small increments, press
and release the TUNE bar quickly. The SEEK f unction
searches the band for a station with
a strong signal. To activate it, push
the SEEK switch up or down, then
release it. Depending on which way
you push the switch, the system
scans upward or downward f rom the
current f requency. It stops when it
finds a station with a strong signal.
Audio System
Comf ort and Convenience Feat ures
Operating the Radio
TUNESEEK
158
Page 163 of 399

�µYou can store the
f requencies of your f avorite radio
stations in the six preset buttons.
Each button will store one f requency
on the AM band, and two
f requencies on the FM band.
To store a f requency:
Select the desired band, AM or
FM. FM1 and FM2 let you store
two f requencies with each Preset
button.
Use the TUNE or SEEK f unction
to tune the radio to a desired
station.
Pick the Preset button you want
for that station. Press the button
and hold it until you hear a beep.
Repeat steps 1 to 3 to store a total
of six stations on AM and twelve
on FM. Once a station’s f requency is stored,
simply press and release the proper
Preset button to tune to it.
The preset f requencies will be lost if
your vehicle’s battery goes dead, is
disconnected, or the radio f use is
removed.
1.
2.
3.
4. Preset
Audio System
Comf ort and Convenience Feat ures160
A A
M
M /
/F
FM M B
BUUT TT
TO
ON N
S
SE EE
EK
K S
SWWI ITT C
CH H T
T
U
UN NEE B
BAA R
R
P
P
R
RE ES
SE ET
T
B
BU UT TT
TO
ON NSS
Page 172 of 399
Your Honda’s audio system provides
clear reception on both AM and FM
bands, while the preset buttons allow
you to easily select your f avorite
stations.
The anti-thef t f eature will disable the
system if it is disconnected f rom the
vehicle’s battery. To get the system
working again, you must enter a
code number (see page ).188
On EX and EX-L models
Audio System
Comf ort and Convenience Feat ures
AM/FM/CD Audio System
169