2002 HONDA CIVIC airbag off
[x] Cancel search: airbag offPage 1038 of 1139
ISystem Description
SRS Components
Airbags
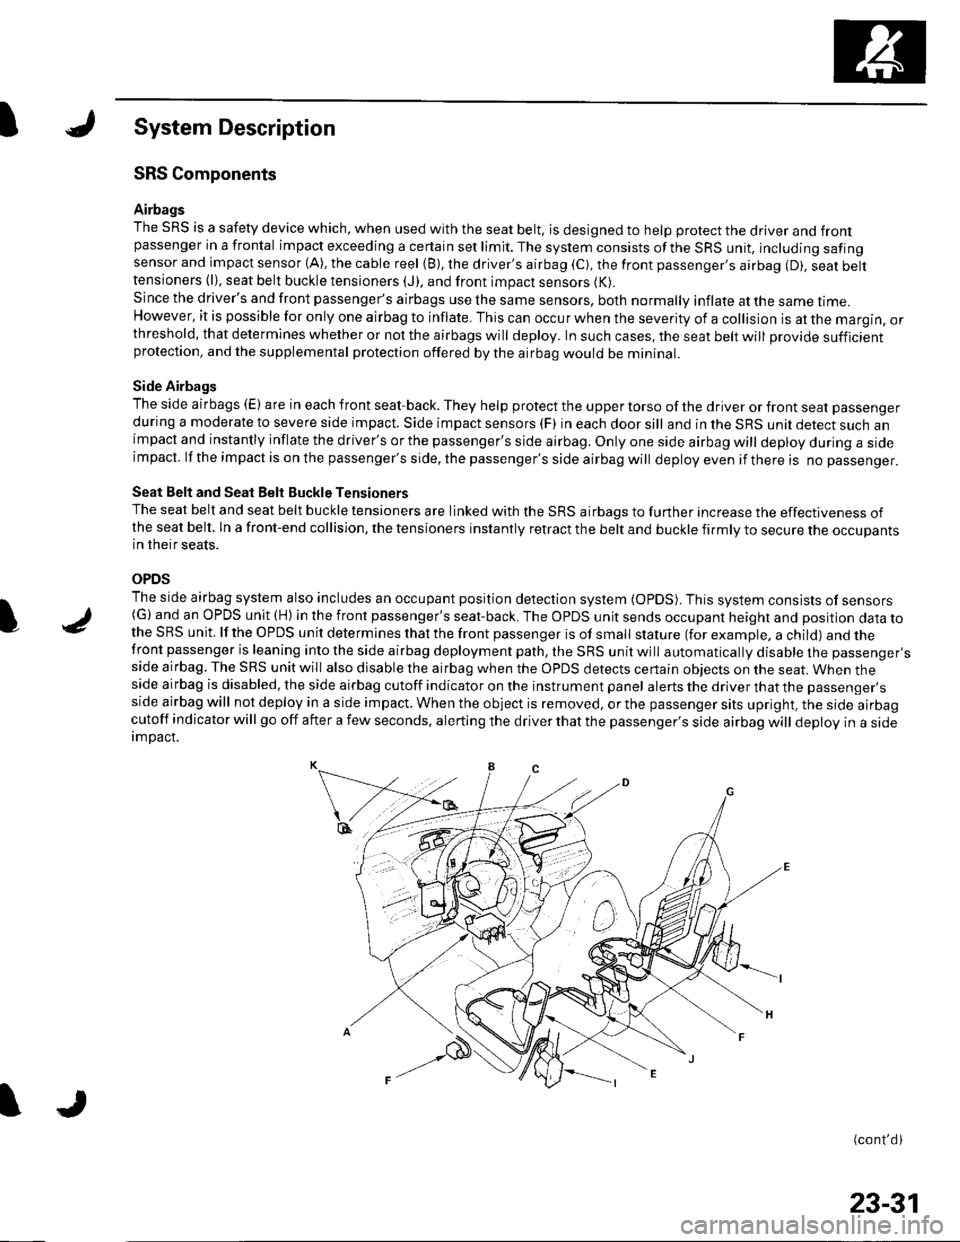
The SRS is a safety device which, when used with the seat belt, is designed to help protect the driver and frontpassenger in a frontal impact exceeding a certain set limit. The system consists ofthe SRS unit, including safingsensor and impact sensor (A), the cable reel (B), the driver's airbag (C), the front passenger,s airbag (D). seat belttensioners (l), seat belt buckle tensioners (J), and front impact sensors (K).
Since the driver's and front passenger's airbags use the same sensors, both normally inflate at the same ttme.However, it is possible for only one airbag to inflate. This can occur when the severity of a collision is at the margin, orthreshold, that determines whether or not the airbags will deploy. In such cases, the seat belt will provide sufficientprotection, and the supplemental protection offered by the airbag would be mininal.
Side Airbags
The side airbags (E) are in each front seat-back. They help protect the upper torso of the driver or front seat passenger
during a moderate to severe side impact. Side impact sensors (F) in each door sill and in the SRS unit detect such animpact and instantly inflate the driver's or the passenger's side airbag. Only one side airbag will deploy during a sideimpacl. lf the impact is on the passenger's side, the passenger's side airbag will deploy even if there is no passenger.
Seat Belt and Seat Belt Buckle Tensioners
The seat belt and seat belt buckle tensioners are linked with the SRS airbags to further increase the effectiveness ofthe seat belt. ln a front-end collision, the tensioners instantly retract the belt and buckle firmly to secure the occupantsin their seats.
OPDS
The side airbag system also includes an occupant position detection system (OpDS). This system consists of sensors(G)and an OPDS unit (H) in the front passenger's seat-back. The OPDS unit sends occupant heighl and position data tothe SRS unit. lf the OPDS unit determines that the front passenger is of small stature (for example, a child) and thefront passenger is leaning into the side airbag deployment path, the SRS unit will automatically disable the passenger'sside airbag. The SRS unit will also disable the airbag when the OPDS detects certain obiects on the seat. When theside airbag is disabled, the side airbag cutoff indicator on the instrument panel alerts the driver that the passenger'sside airbag will not deploy in a side impact. When the object is removed, or the passenger sits upright, the side airbagcutoff indicator will go off after a few seconds, alerting the driver that the passenger's side airbag will deploy in a sideimDact.
(cont'd)
I
23-31
Page 1039 of 1139
sRs
System Description (cont'dl
SRS Operation
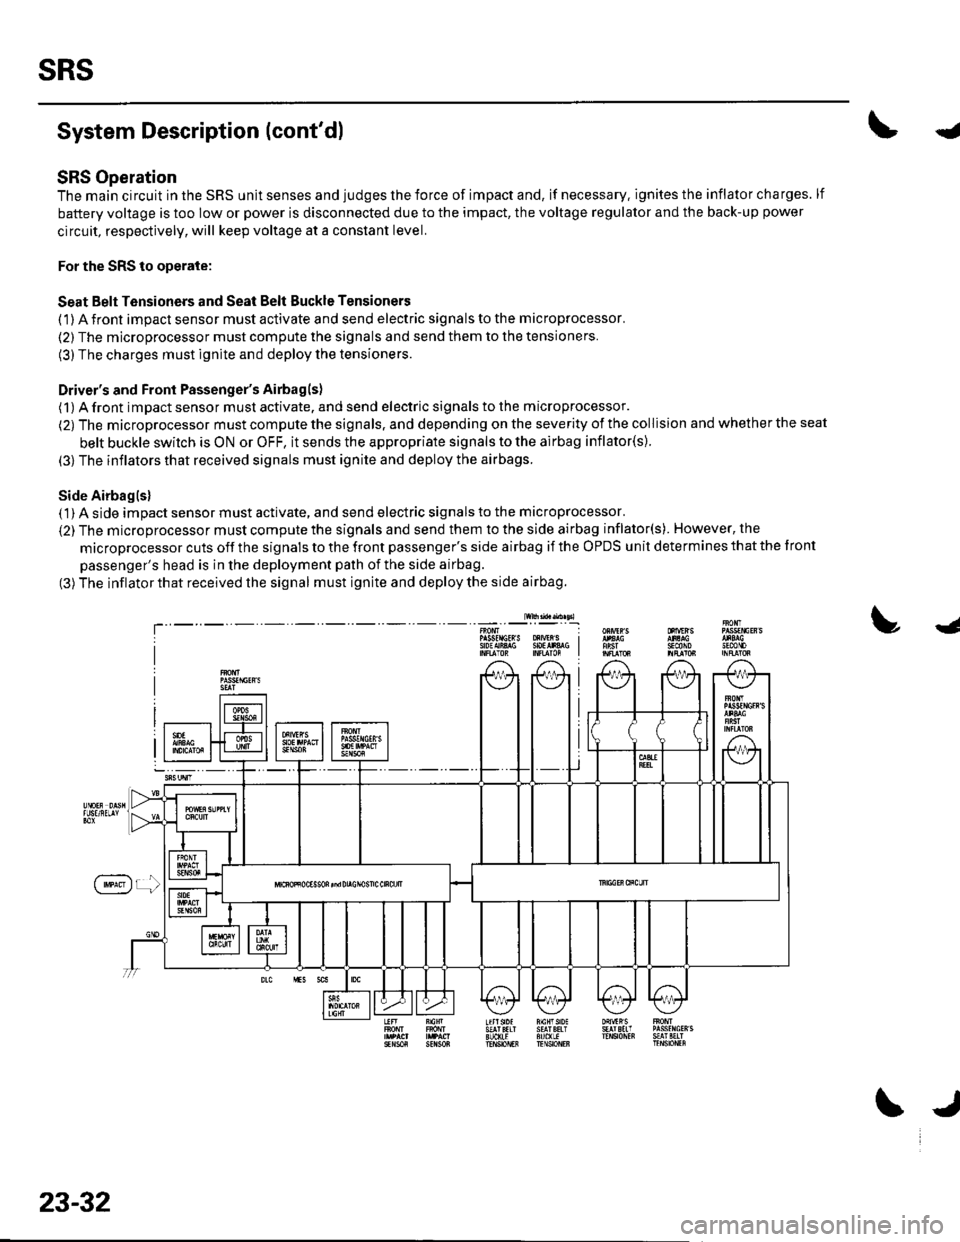
The main circuit in the SRS unit senses and judges the force of impact and, if necessary. ignites the inflator charges. lf
battery voltage is too low or power is disconnected due to the impact, the voltage regulator and the back-up power
circuit, respectively, will keep voltage at a constant level.
For the SRS to operate:
Seat Belt Tensioners and Seat Belt Buckle Tensioners
(1) A front impact sensor must activate and send electric signals to the microprocessor.
(2) The microprocessor must compute the signals and send them to the tensioners.
(3) The charges must ignite and deploy the tensioners.
Driver's and Front Passenger's Airbagls)
(1) A front impact sensor musl activate. and send electric signals to the microprocessor.
(2) The microprocessor must compute the signals. and depending on the severity of the collision and whether the seat
belt buckle swilch is ON or OFF, it sends the appropriate signals to the airbag inflator(s).
(3) The inflators that received signals must ignite and deploy the airbags.
Side Airbaglsl( 1) A side impact sensor must activate, and send electric signals to the microprocessor.
(2) The microprocessor must compute the signals and send them to the side airbag inflator(s). However, the
microprocessor cuts off the signals to the front passenger's side airbag if the OPDS unit determines that the tront
passenger's head is in the deployment path of the side airbag.
(3) The inflator that received the signal must ignite and deploy the side airbag.
lw$ad..n sl
!J
T'sEcttoJn0mP gsfrlctR S oXrVEr S I9oEAiA$ SOtlr&G I
f'**)r !
23-32
\J
Page 1043 of 1139
sRs
J
a
DTC Troubleshooting
DTC 1-1: Open in Driver's Airbag Inflator
DTC 1-2: Increased Resistance in Driver's
Airbag Inflator
Special Tools Required. SRS inflator simulator 07SAZ-TB4011A. SRS simulator lead F 07XAZ-S230100
1. Erase the DTC memory (see page 23-26).
2. Turn the ignition switch ON {ll), and check that the
SRS indicator comes on for aboul 6 seconds and
then goes off.
Does the SBS indicator stay on?
YES-Go to step 3.
NO Intermittent failure, system is OK at this time.
Go to Troubleshooting Intermittent Failures (see
page 23-26).
3. Turn the ignition switch OFF. Disconnect the
battery negative cable, and wait for 3 minutes.
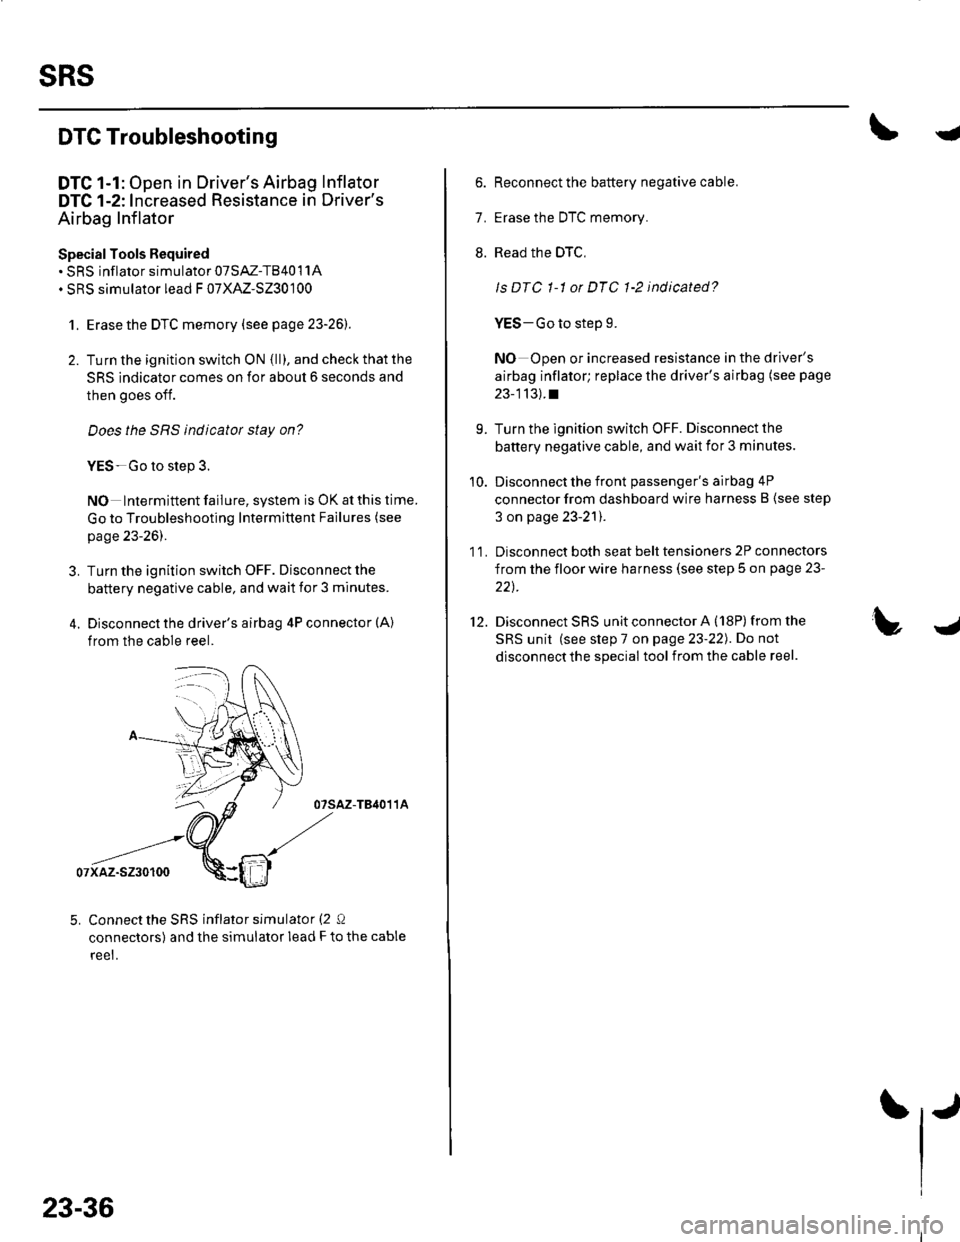
4. Disconnect the driver's airbag 4P connector (A)
from the cable reel.
07sAz-TB4011A
07xaz-s230100
5. Connect the SRS inflator simulator (2 Q
connectors) and the simulator lead F to the cable
reet.
23-36
6. Reconnect the battery negative cable.
7. Erase the DTC memory.
8. Read the DTC,
ls DTC 1-1 or DTC 1-2 indicated?
YES-Go to step 9.
NO Open or increased resistance in the driver's
airbag inflator; replace the driver's airbag (see page
23-113).t
9. Turn the ignition switch OFF. Disconnect the
battery negative cable, and wait ior 3 minutes.
10. Disconnect the front passenger's airbag 4P
connector from dashboard wire harness B (see step
3 on page 23-21).
1 1. Disconnect both seat belt tensioners 2P connectors
from the floor wire harness (see step 5 on page 23-
22t.
12. Disconnect SRS unit connector A (18P)from the
SRS unit (see step 7 on page 23-22). Do not
disconnect the special tool from the cable reel.
Page 1044 of 1139
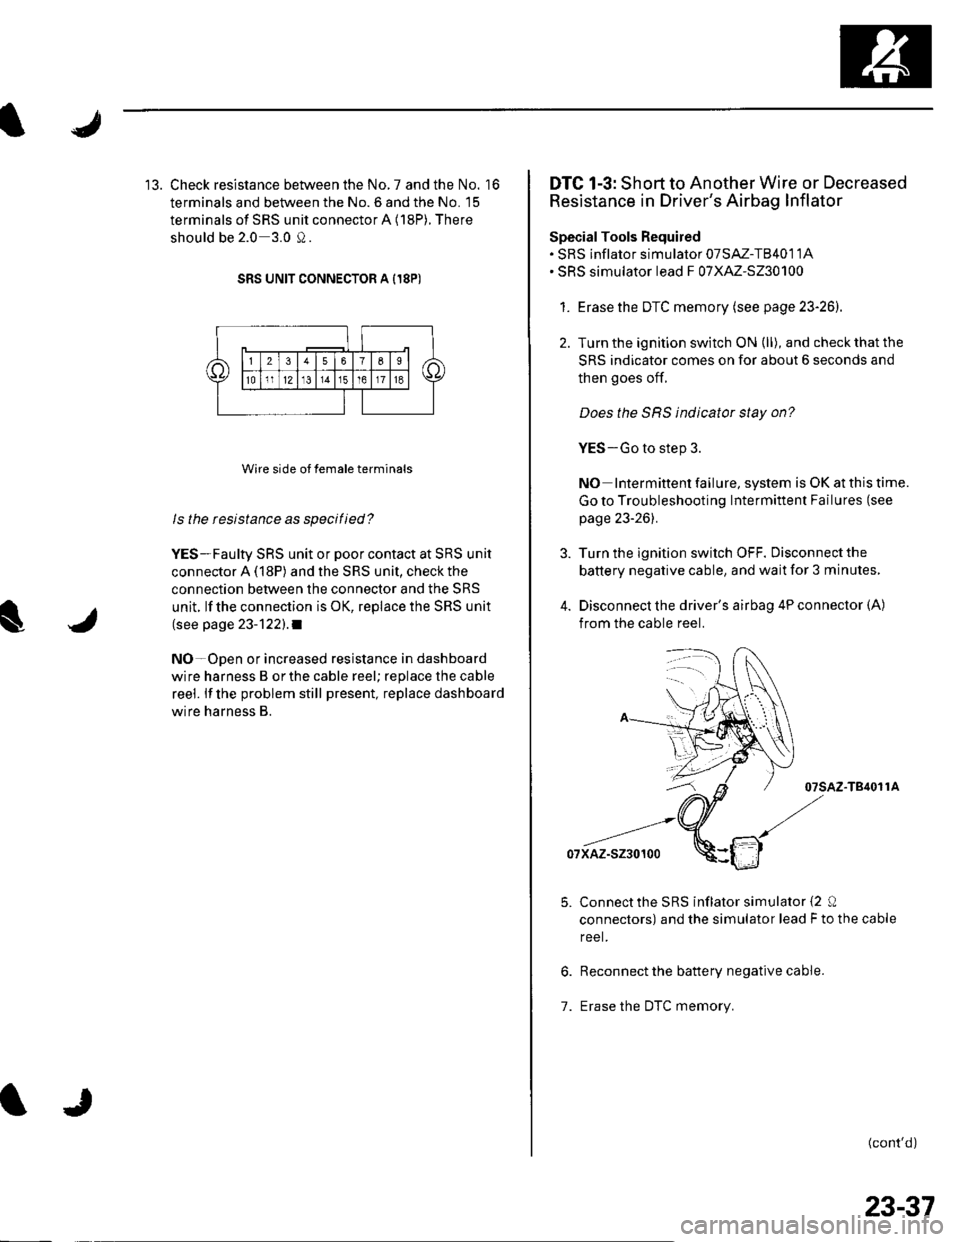
13. Check resistance between the No. 7 and the No. '16
terminals and between the No. 6 and the No. 15
terminals of SRS unit connector A (18P). There
should be 2.0 3.0 0.
SRS UNIT CONNECTOR A I18P)
Wire side of female terminals
ls the resistance as specilied?
YES-Faulty SRS unit or poor contact at SRS unit
connector A (18P) and the SRS unit, check the
connection between the connector and the SRS
unit. lf the connection is OK, replace the SRS unit
(see page 23-122).1
NO-Open or increased resistance in dashboard
wire harness B orthe cable reel; replace the cable
reel. lf the problem still present, replace dashboard
wire harness B.
DTC 1-3: Short to Another Wire or Decreased
Resistance in Driver's Airbag Inflator
SpecialTools Required. SRS inflator simulator 07SAZ-T8401 1A. SRS simulator lead F 07XAZ-S230100
1. Erasethe DTC memory (see page 23-26).
2. Turn the ignition switch ON (ll), and check that the
SRS indicator comes on for about 6 seconds and
then goes of{.
Does the SRS indicator stay on?
YES-Go to step 3.
NO Intermittent failure, system is OK at this time.
Go to Troubleshooting Intermittent Failures (see
page 23-261.
Turn the ignition switch OFF. Disconnect the
battery negative cable, and wait for 3 minutes,
Disconnect the driver's airbag 4P connector (A)
from the cable reel.
07sAz-T84011A
07xAz-s230100
Connectthe SRS inflator simulator {2 0
connectors) and the simulator lead F to the cable
reel.
Reconnect the battery negative cable.
Erase the DTC memory.1.
(cont'd)
23-37
Page 1045 of 1139
sRs
DTC Troubleshooting {cont'd)
8. Read the DTC.
Is DTC 1-3 indicated?
YES Go to step 9.
NO Short in the driver's airbag; replace the
driver's airbag (see page 23-'l 13).1
9. Turn the ignition switch OFF. Disconnect the
battery negative cable, and wait for 3 minutes.
10. Disconnect the front passenger's airbag 4P
connector from dashboard wire harness B (see step
3 on page 23-21).
1 '1. Disconnect both seat belt tensioner 2P connectors
from the floor wire harness (see step 5 on page 23-
22t.
12. Disconnect SRS unit connectorA (18P)from the
SRS unit (see step 7 on page 23-221.
13. Disconnectthe special tool from the cable reel.
23-38
IJ
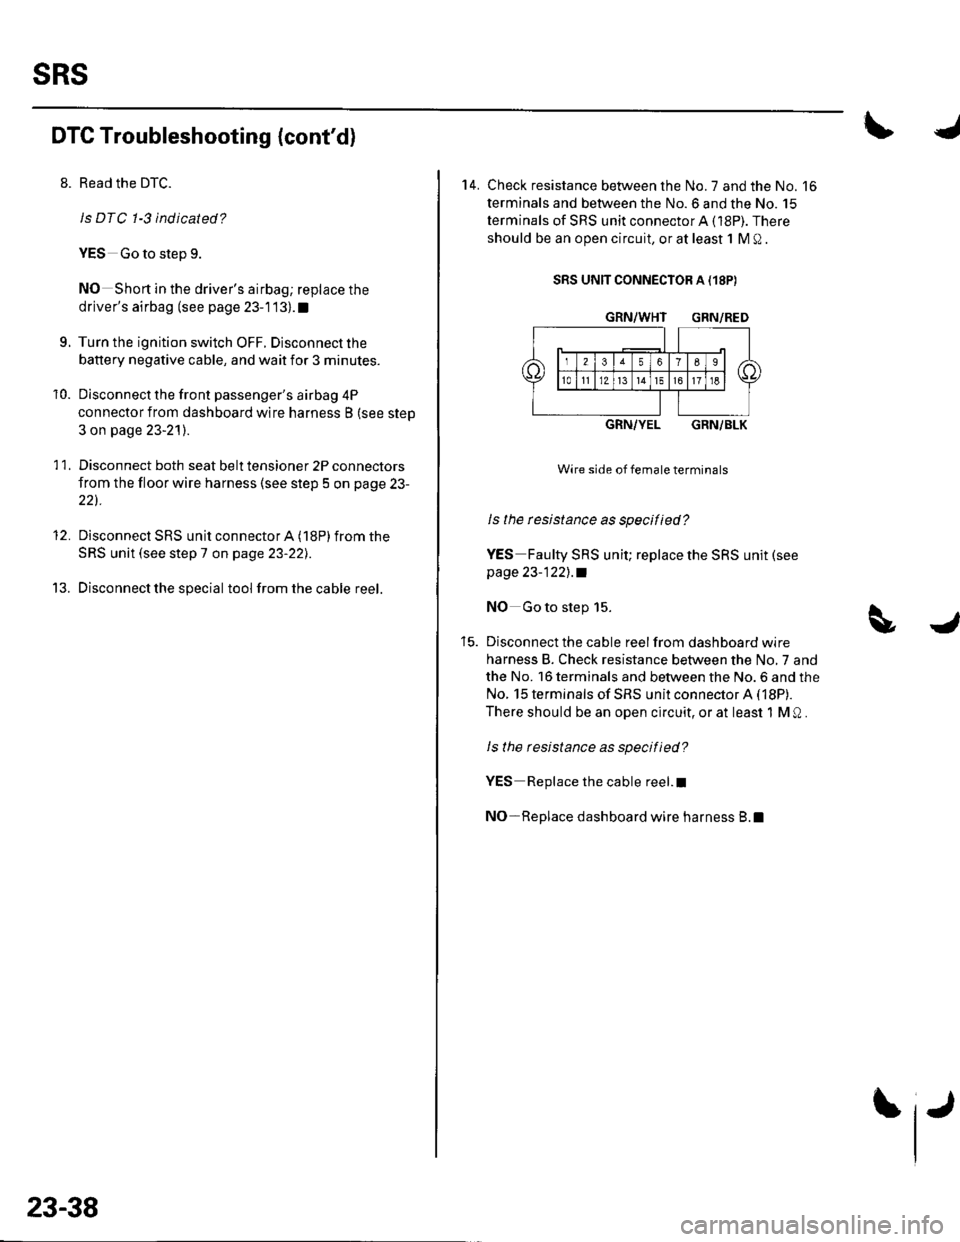
14. Check resistance between the No. 7 and the No. 16
terminals and between the No.6 and the No. 15
terminals of SRS unit connectorA (18P). There
should be an open circuit, or at least 1 M Q .
SRS UNIT CONNECTOR A {18P)
GRN/WHT GRN/RED
GRN/YELGRN/BLK
Wire side of female terminals
ls the rcsistance as specified?
YES Faulty SRS unit; replace the SRS unit (see
page 23-122],.a
NO Go to step 15.
Disconnect the cable reel from dashboard wire
harness B. Check resistance between the No,7 and
the No. 16 terminals and between the No. 6 and the
No. 15 terminals of SRS unit connector A (18P).
There should be an open circuit, or at least 1 M Q .
ls the resistance as specified?
YES Replace the cable reel.I
NO-Replace dashboard wire harness B.l
Page 1046 of 1139
s
DTC 1-4: Short to Power in Driver's Airbag
Inflator
SpecialTools Bequired. sRS inflator simulator 07SAZ-T84011A. SRS simulator lead F 07XAZ-S230100
1. Erase the DTC memory (see page 23-26).
2. Turn the ignition switch ON (ll), and check that the
SRS indicator comes on for about 6 seconds and
then goes off.
Does the SRS indicator stay on?
YES Go to step 3.
NO Intermittent failure, system is OK at this time.
Go to Troubleshooting Intermittent Failures (see
page 23-26).
3. Turn the ignition switch OFF. Disconnect the
battery negative cable, and wait for 3 minutes.
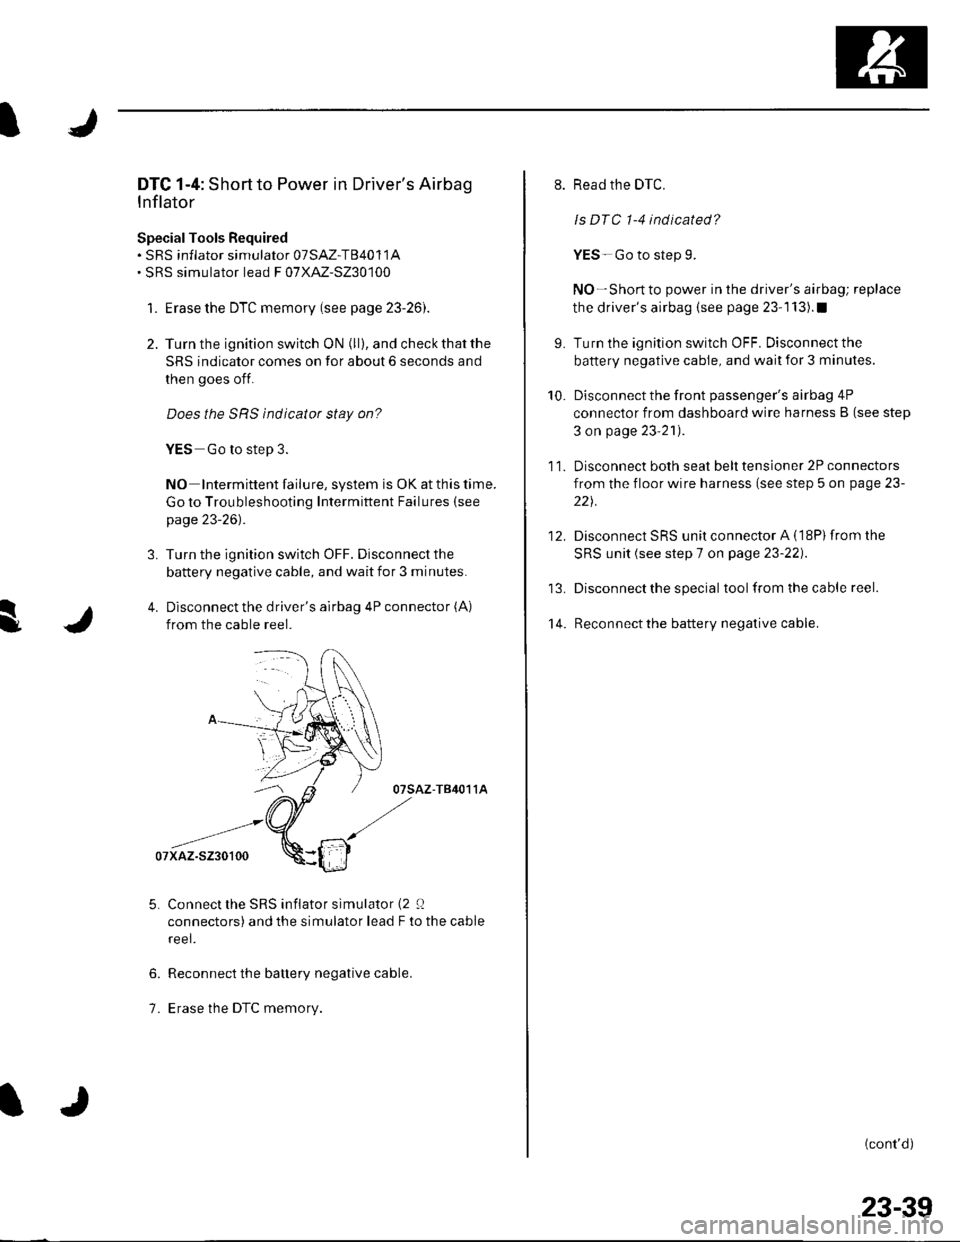
4. Disconnect the driver's airbag 4P connector (A)
from the cable reel.
07sAz-T84011A
Connect the SRS inflator simulator (2 0
connectors) and the simulator lead F to the cable
reel.
Reconnect the battery negative cable.
Erase the DTC memory.
6.
1.
9.
10.
't 4.
11.
12.
Read the DTC.
ls DTC 1-4 indicated?
YES-Go to step 9.
NO-Short to power in the driver's airbag; replace
the driver's airbag (see page 23-1 13).1
Turn the ignition switch OFF. Disconnect the
battery negative cable, and wait for 3 minutes.
Disconnect the front passenger's airbag 4P
connector from dashboard wire harness B (see step
3 on page 23'21).
Disconnect both seat belt tensioner 2P connectors
from the floor wire harness (see step 5 on page 23-
221.
Disconnect SRS unit connector A (18P)from the
SRS unit (see step 7 on page 23-22).
Disconnect the special tool from the cable reel.
Reconnect the battery negative cable.
(cont'd)
23-39
Page 1047 of 1139
SRS
16.
DTC Troubleshooting (cont'd)
Turn the ignition switch ON {ll).
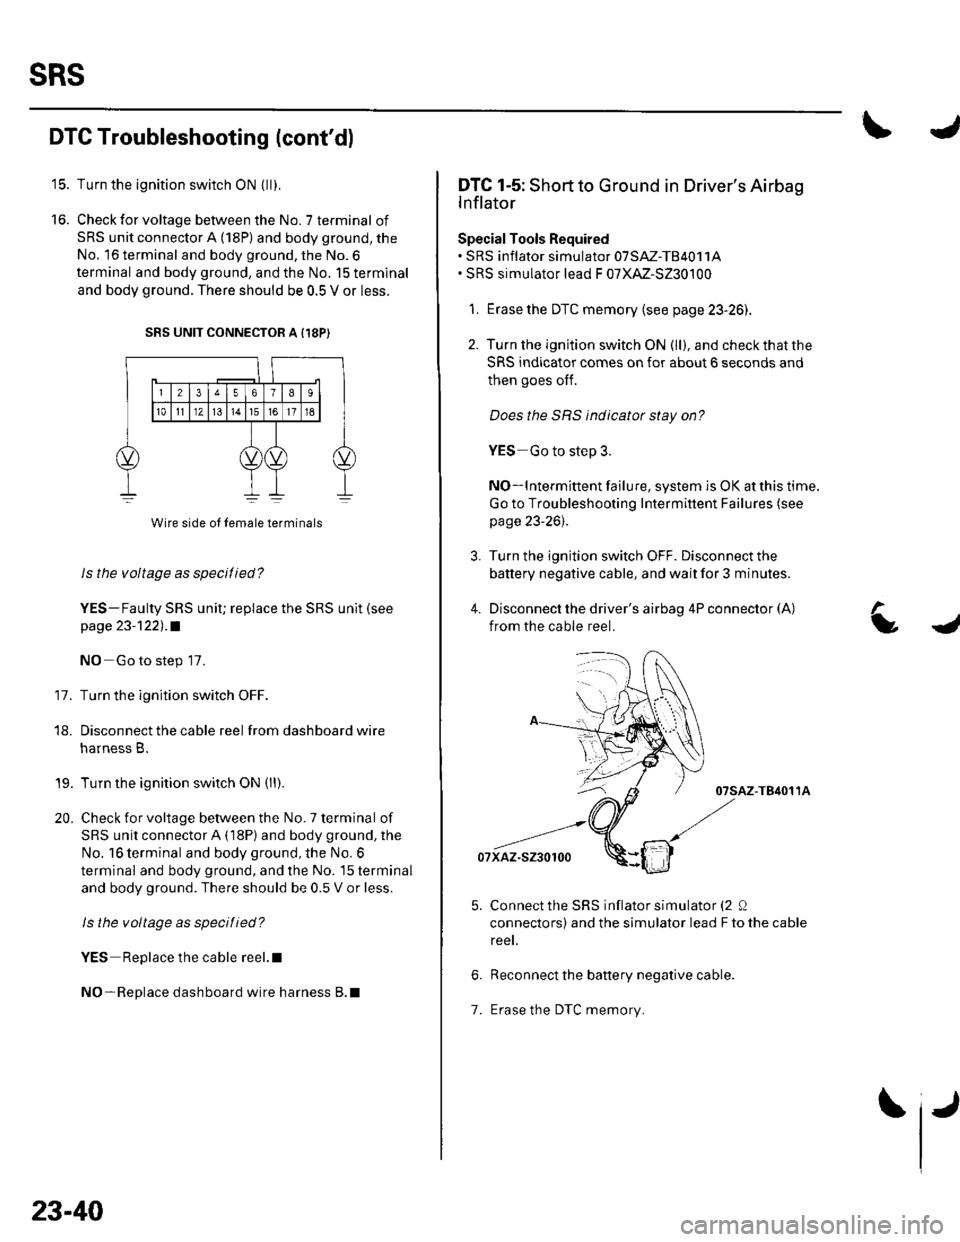
Check for voltage between the No. 7 terminal of
SRS unit connector A (18P) and body ground, the
No. 16 terminal and body ground, the No.6
terminal and body ground, and the No. 15 terminal
and body ground. There should be 0.5 V or less.
SRS UNIT CONNECTOR A {18P)
11.
Wire side ol lemale terminals
Is the voltage as specilied?
YES-Faulty SRS uniU replace the SRS unit (see
page 23-122) .a
NO Go to step 17.
Turn the ignition switch OFF.
Disconnect the cable reel from dashboard wire
harness B.
Turn the ignition switch ON (ll).
Check for voltage between the No. 7 terminal of
SRS unit connector A (18P) and body ground, the
No. 16 terminal and body ground, the No. 6
terminal and body ground, and the No. 15 terminal
and body ground. There should be 0.5 V or less.
ls the voltage as specitied?
YES Replace the cable reel.l
NO-Replace dashboard wire harness B.l
18.
19.
20.
23-40
1.
IJ
L
DTC 1-5: Short to Ground in Driver's Airbag
lnflator
Special Tools Required. SRS inflator simulator 07SM-TB4011A. SRS simulator lead F 07XM-S230100
1. Erase the DTC memory (see page 23-26).
2. Turn the ignition switch ON (ll), and checkthatthe
SRS indicator comes on for about 6 seconds and
then goes oIf.
Does the SBS indicator stay on?
YES Go to step 3.
NO-lntermittent failure, system is OK at this time.
Go to Troubleshooting Intermittent Failures (see
page 23-26).
3. Turn the ignition switch OFF. Disconnect the
battery negative cable, and wait for 3 minutes.
4. Disconnect the driver's airbag 4P connector (A)
from the cable reel.
07sAz-T84011A
07xaz-s230100
Connect the SRS inflator simulator (2 0
connectors) and the simulator lead F to the cable
reet.
Reconnect the battery negative cable.
Erase the DTC memory.
a
Page 1048 of 1139
8. Read the DTC.
ls DTC 1-5 indicated?
YES-Go to step 9.
NO Short to ground in the driver's airbag inflator;
replace the driver's airbag (see page 23-1 13).I
9. Turn the ignition switch OFF. Disconnect the
battery negative cable, and wait for 3 minutes.
'10. Disconnectthe front passenger's airbag 4P
connector from dashboard wire harness B (see step
2 on page 23-21) .
11. Disconnect both seat belt tensioner 2P connectors
from the floor wire harness (see step 5 on page 23-
22t.
12. Disconnect SRS unit connector A (18P) fromthe
SRS unit (see step 7 on page 23-22],.
13. Disconnectthe specialtoolfrom the cable reel.
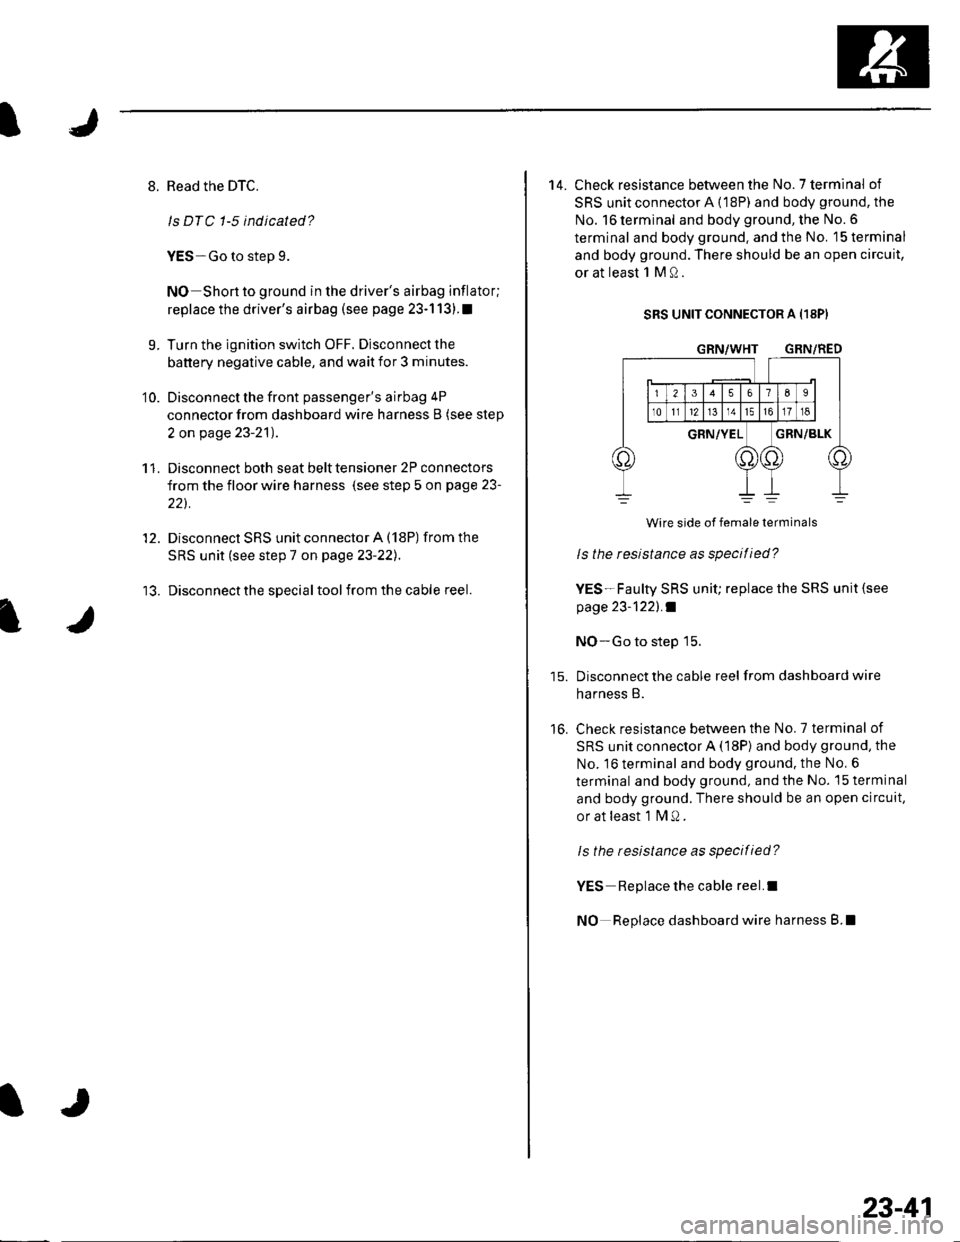
14. Check resistance between the No.7 terminal of
SRS unit connector A {18P) and body ground, the
No. 16 terminal and body ground, the No. 6
terminal and body ground. and the No. 15 terminal
and body ground. There should be an open circuit,
or at least 1 M Q.
SRS UNIT CONNECTOR A I18PI
GRN/WHT GRN/RED
16.
Wire side of female terminals
ls the resistance as specified?
YES-Faulty SRS unit; replace the SRS unit {see
page 23-1221 .f
NO-Go to step 15.
Disconnect the cable reel from dashboard wire
harness B.
Check resistance between the No.7 terminal of
SRS unit connector A (18P) and body ground, the
No. 16 terminal and body ground. the No, 6
terminal and body ground, and the No. 15 terminal
and body ground. There should be an open circuit,
or at least 1 fvl Q .
ls the resistance as specified?
YES Replace the cable reel.I
NO Replace dashboard wire harness B.l
23-41