2002 HONDA CIVIC brake
[x] Cancel search: brakePage 908 of 1139

4. Make these input tests at the connector,
.lfanytestindicatesaproblem,findandcorrectthecause,thenrecheckthesystem.
. lf all the input tests prove OK, the control unit must be faulty. Replace it.
CavityWireTest conditionTest: Desired resultPossible cause if result is not obtained2R E D/BLUUnder all
conditions
Check for voltage to ground:
There should be battery voltage.
Blown No. 14 (40A) fuse in the
under-hood fuse/relay box
Blown No. 3 {10A)fuse in the
under-dash fuse/relay box
An open in the wire12YE L/RE Dlgnition switch
oN (r)Check for voltage to ground:
There should be battery voltage.
Blown No. l2 (7.5A)fuse in the
under-dash fuse/relay box
An open in the wire
BLKUnder all
conditions
Check for continuity to ground:
There should be continuitv.
. Poor ground {G50'1). An oDen in the wire7BLKUnder all
conditions
Check for continuity to ground:
There should be continuitv.
. Poor ground (G501)
' An open in the wire
10REDI/ELCombination
light switch ON/ =f\
Check for voltage to ground:
There should be battery voltage.
Blown No. 15 (15A) fuse in the
under-hood fuse/relay box
Faulty headlight relay 2
Faulty combination light switch
An open in the wire
1RED/B LUCombination
light switch ON
{iD), and
dimmer switch
in HIGH
Connect a jumper wire between
No.3 and No. 1 terminals.
Both headlights (HIGH) and
h igh beam indicator light
should come on.
Blown bulb
Faulty low beam cut relay
Faulty combination light switch
Poor ground (G50'l )
An open in the wire'11
3
RED/BLK
GRN/BLK
Combination
light switch ON(iD), and
dimmer switch
in HIGH
Com bination
light switch ON(iD), and
dimmer switch
in HIGH
Connect a jumper wire between
No. 5 and No. 11 terminals.
Right headlight (HIGH) should
come on.
Check for continulty to ground
There should be continuity.
. Blown bulb. Faulty combination light switch. Poor ground (G 50'1 ). An open in the wire
. Faulty combination light switch. Poor grou nd {G501). An open in the wire
5
6GRN/ORNParking brake
lever oulled
Check for continuity to ground:
There should be continuitv.
Faulty parking brake switch
An open in the wire
8BLU/REDCombination
light switch OFF
Check for voltage to ground:
There should be battery voltage.
Faulty headlight relays
Short to ground
An ooen in the wire
WHT/BLUlgnition switch
oN 0r)
Attach to ground:
The DRL indicator light should
come on.
. Blown No. 10 (7.5A) fuse in the
under-dash fuse/relay box. Faulty DRL indicator. An ooen in the wire
t5G RN/REDlgnition switch
oN (||)Attach to ground:
The brake system light should
come on.
Faulty brake system indicator
An open in the wire
22-77
Page 913 of 1139
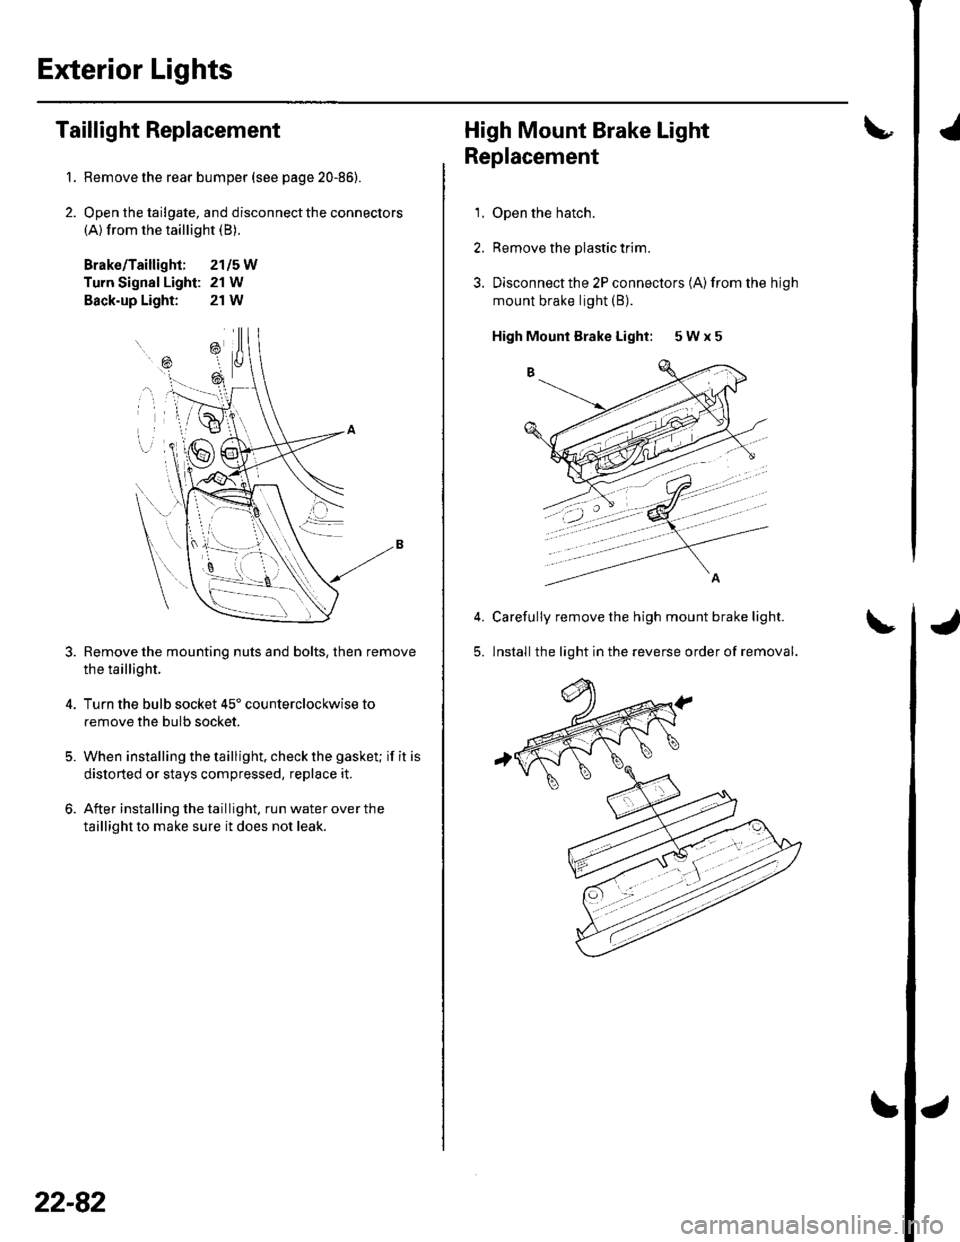
Exterior Lights
1.
2.
Taillight Replacement
Remove the rear bumper (see page 20-86).
Open the tailgate, and disconnect the connectors(A) from the taillight (B).
Brako/Taillight; 2115W
Turn Signal Light: 21 W
Back-up Light: 21W
Remove the mounting nuts and bolts, then remove
the taillight.
Turn the bulb socket 45' counterclockwise to
remove the bulb socket.
When installing the taillight. check the gasket; if it is
distorted or stays compressed, replace it.
After installing the taillight. run water over the
taillight to make sure it does not leak.
=\
ili--- _ \
rB , \.
---'a t
\
22-82
High Mount Brake Light
Replacement
1. Open the hatch.
2. Remove the plastic trim.
3. Disconnectthe 2P connectors (A)from the high
mount brake light (B).
High Mounl Brake Light: 5 W x 5
Carefully remove the high mount brake light.
lnstall the light in the reverse order of removal.5.
'
Page 915 of 1139

Exterior Lights
Brake PedalPosition Switch Test
1. Disconnectthe 4P connector (A) from the brakepedal position switch {B).
Check for continuity between the No. 1 and No. 2
termtnals.
. There should be continuity when the brake pedal
rs presseo.
. There should be no continuity when the brake
pedal is released.
Check for continuity between the No. 3 and No. 4
terminals {with cruise control).
There should be no continuity when the brake
pedal is pressed.
There should be continuity when the brake pedal
is released.
lf necessary, adjust or replace the switch, or adjust
the pedal height (see page 19-6).
22-84
Side Turn Signal Light Replacement
NOTE: Be careful nol to damage the fender.
1. Push the retaining spring (A). and remove the side
turn signal light (B),
Side Turn Signal Light: 5 W
2. Disconnect the 2P connector {C) from the light.
Page 997 of 1139

lmmobilizer System
Troubleshooting (cont'dl
8. Check for voltage betvveen the immobilizer control
unit-receiver 7P connector No. 6 terminal and No. 1
rermlnat.
ls thete battery voltage?
YES Go to step 12.
NO Check for these problems,
. Open on the BRNI/EL wire.l. Faulty ECM.I
9. Remove the driver's dashboard lower cover (see
page 20-59).
10. Remove the steering column lower cover (see page
17-9).
11. Disconnect the 7P connector (A) from the
immobilizer control unit-receiver (B).
22-166
-
Check for continuity between the immobilizer
control unit-receiver 7P connector No. 2 terminal
and ECM terminal E27.
ls there continuity?
YES-Go to step 13.
NO- Repair the open in the RED/BLU wire.I
Reconnect the 7P connector to the immobilizer
control unit-receiver.
Check for voltage between the immobilizer control
unit-receiver 7P connector No. 4 terminal and body
ground with the parking brake lever pulled, then
released.
ls there 1 V or less, then 5 V or more?
YES Replace the immobilizer control unit-receiver.
After replacing the immobillzer control unit-
receiver, rewrite the unit with a Honda PGM
Tester.l
NO Check for these problems:
. Faulty parking brake switch or a poor body
ground of the parking brake switch.l. Repair short or open in the GRN/ORN wire. I
13.
14.
{
Page 1007 of 1139
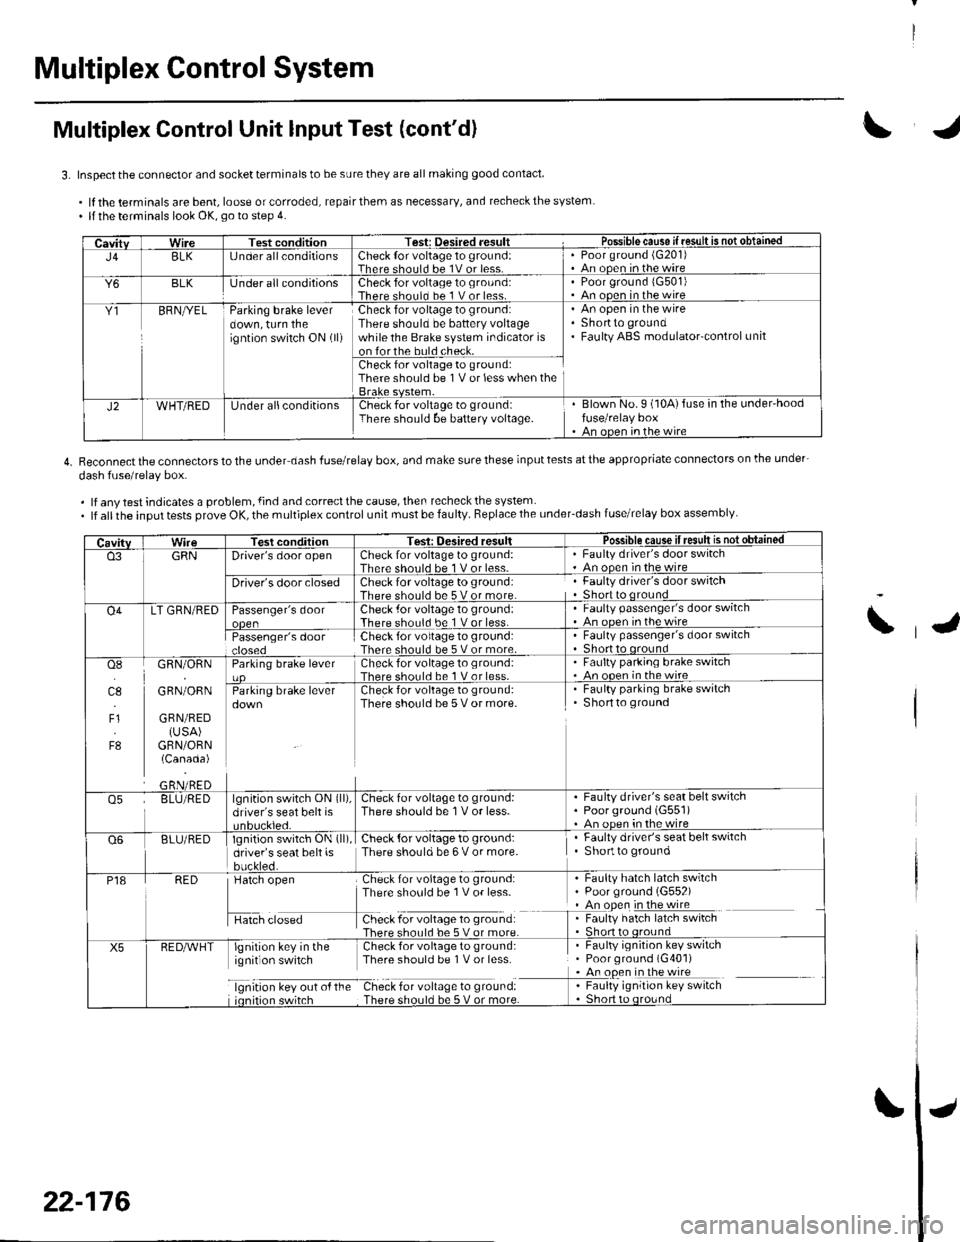
Multiplex Control System
Multiplex Control Unit lnput Test (cont'd)
3. Inspect the connector and socket terminals to be sure they are all making good contact
.lftheterminalsarebent,looseorcorroded,repairthemasnecessary,andrecheckthesystem. llthe terminals look OK, go to step 4.
4. Reconnectthe connectorstothe under dash fuserelay box, and make surethese inputtests atthe appropriate connectors on lhe under-
dash fuse/relav box.
. lf any test indicates a problem, {ind and correct the cause, then recheck the system. lf allthe input tests prove OK, the multiplex control unit must be faulty. Replace the under_dash fuse/relay box assembly
CavitvWireTest conditionTest: Desired .esult r Possible cause if resullE qS!q!!e!!ed
J4BLK[J nder all conditionsCheck {or voltage 1o ground:Therc sholl.l he 1V or lessPoor ground (G20'l)An ooen in the wire
Y6BLKlJnder all conditionsCheck for voltage to ground:There should bc 1 V or less.Poor ground 1G501)An ooen in the wire
Y1BFNryELParking brake leverdown, turn theigntion switch ON (ll)
Check for voltage to ground:There should be battery voltagewhile the Brake system indicator ison forthe buld check.
An open in the wireShortto groundFaulty ABS modulatorcontrol unit
Check for voltage to ground:There should be 1V or less when the
J2WHT/REDUnder allconditionsCheck for voltage to groundiThere should be baftery voltage.Blown No.9 (10A)fuse in the under'hoodfuse/relay boxAn oncn in rhc wire
CavitvTest conditionTesi: Oesired resultPossible cause ifresult is notobtained
o3GRNDriver's door openCheck for voltage to ground:There should be 1 V or less-Faulty driver's door switchAn ooen in the wire
Driver's door closedCheck for voltage to ground:There should be 5 V or more.Faulty driver's door switchShort to qround
O4LT GRN/REDPassenger's doorCheck .for voltage 10 ground:There should be 1 V or less.Faulty passenger's door switchAn ooen inthewire
Passenger's doorCheck for voltage to ground:There should be 5 V or more.Faulty passenger's door switchShort to oround
osI]l.l
4.,
F1
F8
GRN/ORN
GRN/ORN
GRN/RED(USA)GRN/ORN(Canada)
Parking brake leverCheck for voltage to groLrnd:There shorl.l be 1 V or less.Faulty parking brake switch. An ooen in thewireCheck for voltage to ground:There should be 5 V or more.
. Faulty parking brake switchShortto ground
o5BLU/REDlgnition switch ON (ll),
driver's seat belt isCheck for voltage to ground:There should be 1V or less.Faulty driver's seat belt switchPoorground (G551)An oDen in the wire
Q6BLU/REDlgnition switch ON (ll)
driver's seat belt isbuckled.
Check {or voltage to ground:There should be 6 V or more.Faulty driver's seat belt switchShortto ground
P18RED
H",=
Check for voltage to ground:There sho0ld be 1V or less-
f -9*:li:'^:**:':s*:*
Faulty hatch latch swrtchPoor ground (G552)An open in the wireFaulty hatch latch switch
X5lgnirion key in the Check for voliage to gtound:ignit on switch Thpre should be I V or lcss
lgnrtron kev our o{ the Check for vollage to ground:
. Faulty ignition key switch. Poor ground (G401). An open in the wire
I : [11y.'::i':::1"' **6
\
22-176
Page 1008 of 1139
IJ
IJ
IJ
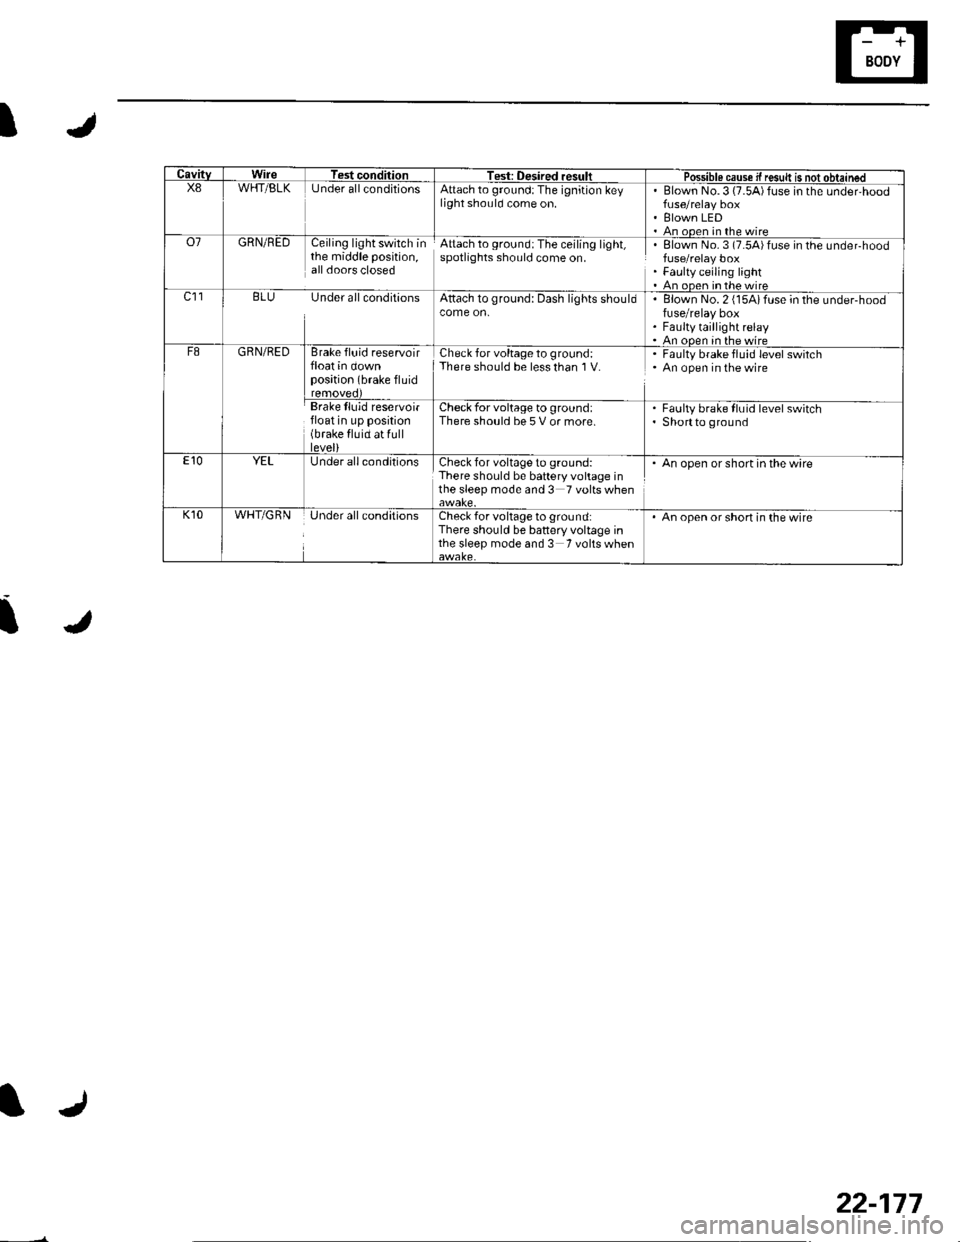
CavitvWireTest conditionTest: Desired resultPossible cause if resuk is not obtainedX8WHT/BLKUnder allconditionsAttach to ground:The ignition keylight should come on.Blown No.3 (7.5A)fuse in the under,hood
Blown LEDAn ooen in the wireo7GRN/REDCeiling light switch inthe middle position,all doors closed
Attach to ground:The ceiling light,spotlights should come on.Elown No. 3 (7.54)fuse in the undeFhood
Faulty ceiling lightAn oDen in the wirec]1BLU Under all conditionsAttach to ground: Dash lights shouldBlown No. 2 (15Aifuse in the under-hoodfuse/relay boxFaulty taillight relayAn ooen in the wireF8GRN/REDBrake fluid reservoirfloat in downposition (brake fluid
Check for voltage to ground:There should be less than I V.Faulty brake fluid level switchAn open in the wire
Brake lluid reservoirfloat in up position(brake fluid at fulllevel)
Check for voltage to ground:There should be 5 V or more.Faulty brake fluid level switchShortto ground
E10YELUnder all conditionsCheck for voltage to ground:There should be battery voltage inthe sleep mode and 3 Tvoltswhen
. An open or short in the wire
K10WHT/GRNUnder all conditionsCheck for voltage to ground:There should be battery voltage inthe sleep mode and 3 Tvoltswhen
An open or short in the wire
22-177
Page 1112 of 1139
I
d
\9I
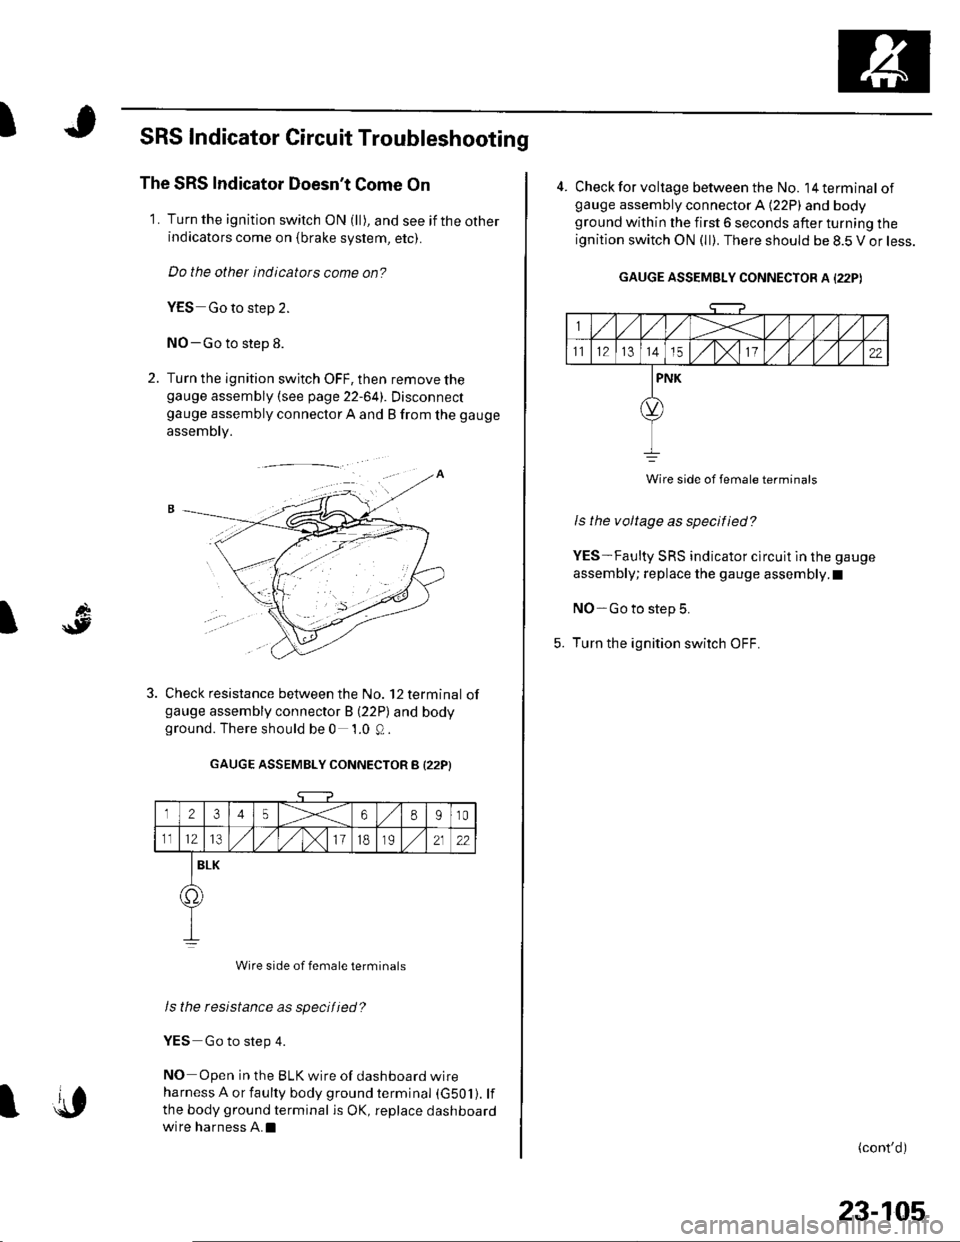
SRS Indicator Circuit Troubleshooting
The SRS Indicator Doesn't Come On
1. Turn the ignition switch ON (ll), and see if the otherindicators come on {brake system, etc).
Do the other indicators come on?
YES Go to step 2.
NO-Go to step 8.
2. Turn the ignition switch OFF, then remove thegauge assembly {see page 22-641. Disconnectgauge assembly connector A and B from the gauge
assembly.
Check resistance between the No. 12 terminal ofgauge assembly connector B (22P) and bodyground. There should be 0 1.0 Q.
GAUGE ASSEMBLY CONNECTOR B I22PI
12345X68910
1112l3/)x111B2122
BLK
o.
Wire side of female terminals
Is the resistance as specified?
YES Go to step 4.
NO Open in the BLK wire of dashboard wire
harness A or faulty body ground terminal (G501). lf
the body ground terminal is OK, replace dashboard
wire harness A.Il{,
23-105
4. Check for voltage between the No. l4terminal ofgauge assembly connector A (22P) and bodyground within the first 6 seconds after turning the
ignition switch ON (ll). There should be 8.5 V or less.
GAUGE ASSEMBLY CONNECTOR A I22PI
Wire side of female terminats
Is the voltage as specified?
YES-Faulty SRS indicator clrcuit in the gauge
assembly; replace the gauge assembly.I
NO-Go to step 5.
Turn the ignition switch OFF.
(cont'd)
Page 1133 of 1139
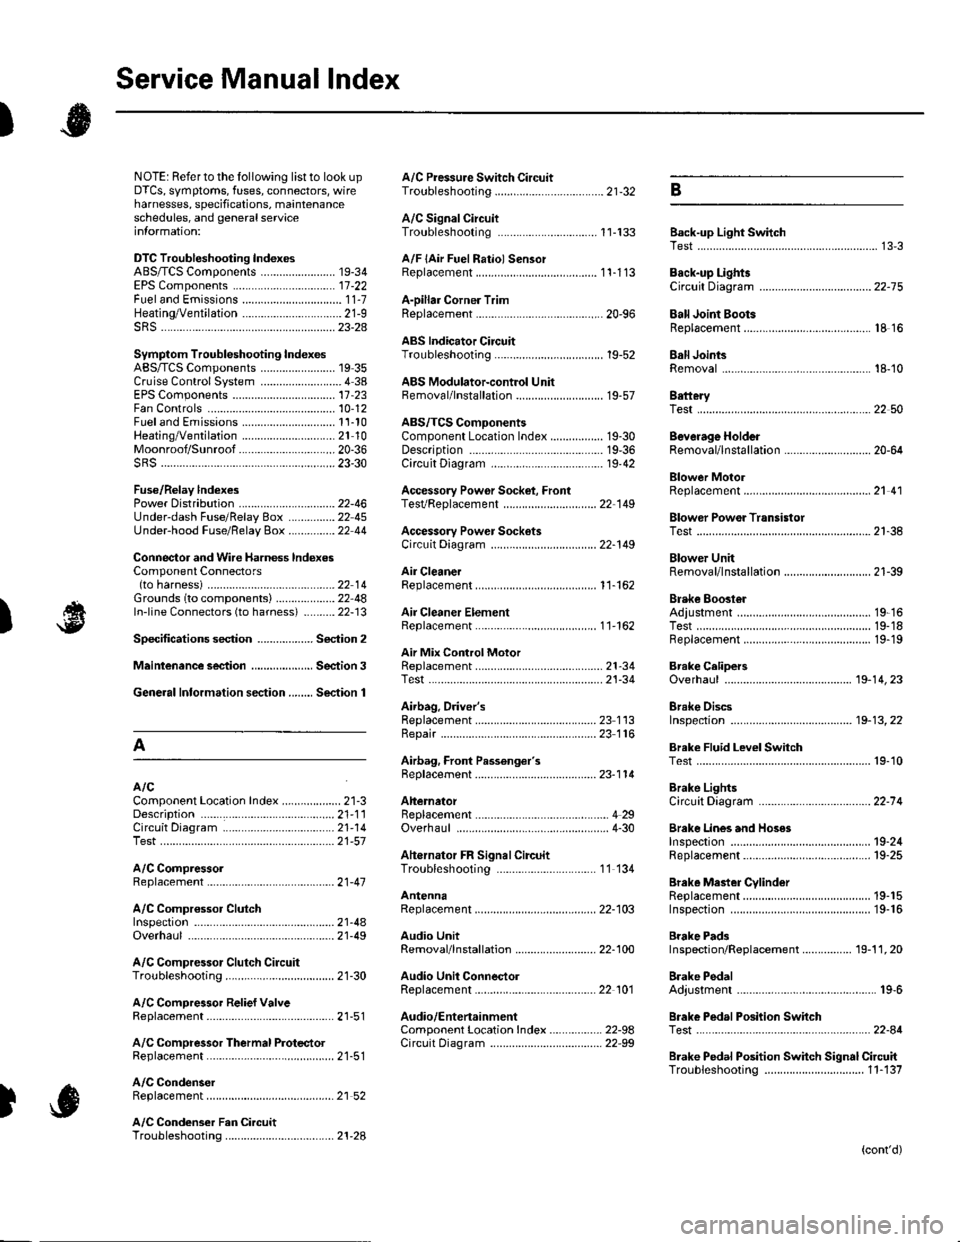
Service Manual lndex
)s
NOTE: Referto the lollowing listto look up A/C Pressure Switch CircuitDTCS, symptoms, fuses, connectors, wire Troubleshooting ......... ...-.-....-...-.-.-....-..21-32 Bharnesses, specifications, maintenanceschedules, and general serviceinlormation:
DTC Troubleshooting Indexes
A/C Signal CircuitTroubleshooting.........................-...... 11-'133 Back-up Light SwitchTest .......................................................... 13'3A/F lAir Fuel Ratiol SensorABS/TCS Components ........................ 19-34 Replacement ....................................... 1 1-113 Back-up Li9ht3EPS Components ................................. '17-22 Circuit DiagramFueland Emissions11-i A-Dillar Corner Trim
ABS Indicator Circuit
Heating/Ventilation ................................ 21-9 Replacement ...............-.....-..............-.... 20,96 Ball Joint BootssRS ........................................................ 23-28Replacement ......
... 19-52 Ball Joints
22-75
18 16
Remova1.............-.......... . ...........18-10Symptom Troubleshooting Indexes TroubleshootingABS/TCSComponents........................ 19 35Cruise Control System ..........................4 38 ABS Modulator-contml UnitEPS Components ................................. 17-23 Bemoval/lnstallation ............................ 19-57 BettervFan Controls10,12
Accessory Powor Socket Front
Blowor Pow€r Transistor
.......22 50
Blower UnitRemoval/lnstallation ............................ 21-39
Fuel and Em issions .............................. 11-10 ABS/TCS ComoonentsHeating/Ventilation..............................21 10 Component Location Index ................. 19-30 Beverage Holder
SRS ........................................................ 23'30 CircuitDiaqram.......................... 19'42Blower MotorReplacement .....21 41
21-38
Power 0istribution ...............................22-46 TesVReplacement .............................. 22'149Under-dash Fuse/Relay Box ............... 22 45Under-hood Fuse/Belay Box ...............22 44 Accessory Power Sockets
Fuse/Relay lndexes
(to harness)
Connector and Wire Harness lndexesComponent Connectors
Circuit Oiagram .................................. 22-149
Air Cleaner......2214 Rep1acemen1.....................................11-162
Air MixControl MotorMeintenence section .................... Section 3 Replacement ......................................... 21'34 Brake CelipersTest......................21-34 Overhaul19-14,23Gene.al lnlormation section........ Section 1
21.57
Airbag. Driver's
Ahernator FR Signal CircuitTroubleshooting .... .........-..........11 134
AntennaReplacement
Inspection ............................................. 19-24Rep|acement................. .................... 19-25
Bieke Meder Cylinder
Irake Discs
A
Replacement ....................................... 23 1 'l3 Inspection .................... ................... 19-13,22Repair ...........-...................................... 23 1 16Brake Fluid Level SwitchAirbag. Front Passenger's TestBeplacement....................................... 23-1 14AIC Brake LightsComponent Location fndex ...................21-3 Altemator CircuitDiagram....................................22-74Description.....................................-....21'1'l Beplacement ................ ........................... 4 29CircuitDiagram....................................21-14 Overhaul .................................................4-30 Brake Lines and Hoses
19.10
A/C CompressolReplacement .......-...-............................. 21 -41
A/C Compr€ssor ClulchRep1acement......................................... 19-15.........22-103 Inspection ............................................. 19-16Inspecton........Overhaul ..........
A/C CondenserReplacement,.,
21-442l-49 Audio Unit
Replacement
Brake PadsRemoval/lnstallation .. ........................22-100 Inspection/Rep1acement................ 19-11,20A/C Compressor Clutch CircuitTroubleshooting ................................... 21-30 Audio Unit Connector Brake Pedal22101 Adjustment..............19,6ArfC Comoressor Relief ValvcReplacement ..........-...-.......................... 21-51 Audio/Entertainment
A/C Compr$sor Thermal Protector Circuit DiagramReplacement............-............................ 21-51
Component Location In dex .................22-9A Test .......-.............. 22-84Breke Pedal Posilion Switch
Brake Pedal Position Switch Signal Clrcuit11-137
.....21 52
A/C Condenser Fan CircuitTroubleshooting ................... . . . . . .....21-28
)s
Troubleshooting
(cont'd)