2002 FORD TAURUS turn signal
[x] Cancel search: turn signalPage 14 of 248

Check transaxle
Illuminates when a transaxle
problem has been detected and
shifting may be restricted. If this
lamp remains on, have your vehicle
serviced immediately.
Turn signals
Illuminates when the turn signals or
the hazard lights are turned on. If
the lights stay on continuously or
flash faster, check for a burned-out
bulb.
High beams
Illuminates when the high beam
headlamps are turned on.
Door ajar
Illuminates when any door is open
(or not fully closed).
Anti-theft system (if equipped)
Refer toPerimeter alarm system
(if equipped)andSecuriLocky
passive anti-theft systemin the
Locks and Securitychapter.
Safety belt warning chime
Sounds to remind you to fasten your safety belts.
THEFT
Instrument Cluster
14
Page 39 of 248

²Do not leave tapes in the cassette player for a long time when not
being played.
RADIO FREQUENCY INFORMATION
The Federal Communications Commission (FCC) and the Canadian Radio
and Telecommunications Commission(CRTC) establish the frequencies
AM and FM stations may use for their broadcasts. Allowable frequencies
are:
AM 530, 540±1600, 1610 kHz
FM 87.7, 87.9±107.7, 107.9 MHz
Not all frequencies are used in a given area.
RADIO RECEPTION FACTORS
Three factors can affect radio reception:
²Distance/strength.The further an FM signal travels, the weaker it is.
The listenable range of the average FM station is approximately 40 km
(24 miles). This range can be affected by ªsignal modulation.º Signal
modulation is a process radio stations use to increase their
strength/volume relative to other stations.
²Terrain.Hills, mountains and tall buildings between your vehicle's
antenna and the radio station signal can cause FM reception problems.
Static can be caused on AM stations by power lines, electric fences,
traffic lights and thunderstorms. Moving away from an interfering
structure (out of its ªshadowº) returns your reception to normal.
²Station overload.Weak signals are sometimes captured by stronger
signals when you pass a broadcast tower. A stronger signal may
temporarily overtake a weaker signal and play while the weak station
frequency is displayed.
The audio system automatically switches to single channel reception if it
will improve the reception of a station normally received in stereo.
AUDIO SYSTEM WARRANTIES AND SERVICE
Refer to theWarranty Guidefor audio system warranty information.
If service is necessary, see your dealer or a qualified technician.
Entertainment Systems
39
Page 54 of 248

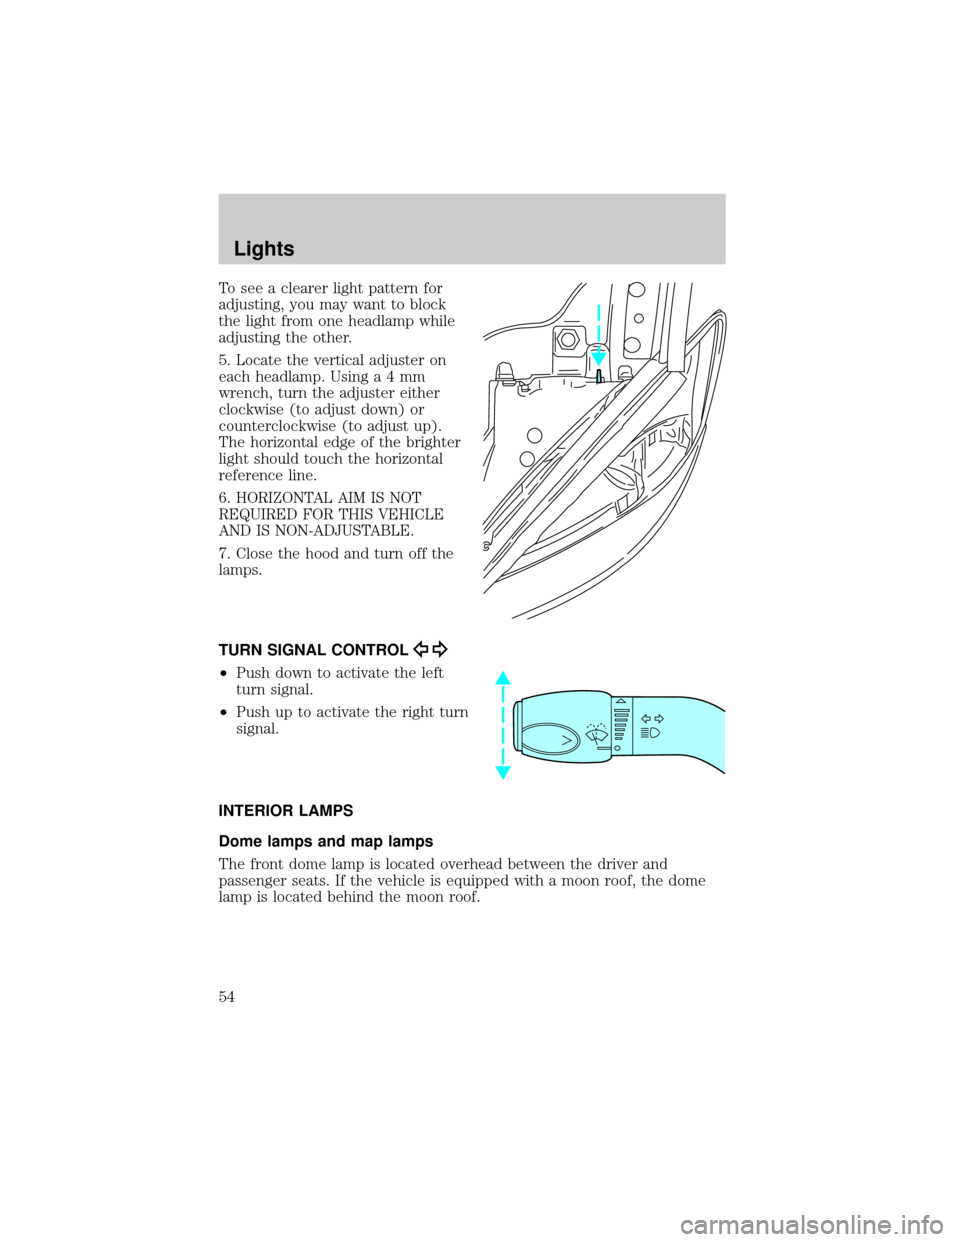
To see a clearer light pattern for
adjusting, you may want to block
the light from one headlamp while
adjusting the other.
5. Locate the vertical adjuster on
each headlamp. Usinga4mm
wrench, turn the adjuster either
clockwise (to adjust down) or
counterclockwise (to adjust up).
The horizontal edge of the brighter
light should touch the horizontal
reference line.
6. HORIZONTAL AIM IS NOT
REQUIRED FOR THIS VEHICLE
AND IS NON-ADJUSTABLE.
7. Close the hood and turn off the
lamps.
TURN SIGNAL CONTROL
²Push down to activate the left
turn signal.
²Push up to activate the right turn
signal.
INTERIOR LAMPS
Dome lamps and map lamps
The front dome lamp is located overhead between the driver and
passenger seats. If the vehicle is equipped with a moon roof, the dome
lamp is located behind the moon roof.
Lights
54
Page 56 of 248

Rear dome lamp (if equipped)
The dome lamp lights when:
²any door is opened with the
control in the middle position.
²the instrument panel dimmer
switch is held up until the
courtesy lamps come on.
²any of the remote entry controls
are pressed and the ignition is
OFF.
²the lamp control is moved to the passenger side position.
With the ignition key in the ACC or ON position, the rear dome lamp can
be turned ON or OFF by sliding the control.
BULBS
Replacing exterior bulbs
Check the operation of the following lamps frequently:
²Headlamps
²Tail lamps
²Brakelamps
²High-mount brakelamp
²Turn signals
²Backup lamps
²License plate lamp
Do not remove lamp bulbs unless they will be replaced immediately. If a
bulb is removed for an extended period of time, contaminants may enter
the lamp housings and affect performance.
Using the right bulbs
Replacement bulbs are specified in the chart below. Headlamp bulbs
must be marked with an authorized ªD.O.T.º for North America and an
ªEº for Europe to assure lamp performance, light brightness and pattern
and safe visibility. The correct bulbs will not damage the lamp assembly
or void the lamp assembly warranty and will provide quality bulb burn
time.
Lights
56
Page 60 of 248

2. Install the bulb retaining ring over the plastic base and lock the ring
by rotating clockwise until it snaps into place.
3. Connect the electrical connector to the bulb.
4. Install the protective dust shield and lock the shield by rotating it
clockwise until it locks into position.
5. Carefully position the headlamp assembly onto the vehicle.
6. Hold the headlamp assembly snugly against the vehicle and install the
retainer pins straight down to lock the lamp into place.
7. Before reinstalling the bolt, make sure the retainer pins are fully
seated, and install bolt on headlamp housing.
8. Turn the headlamps on and make sure they work properly. If the
headlamp was correctly aligned before you changed the bulb, you should
not need to align it again.
Replacing front parking lamp/turn signal/cornering lamp bulbs
1. Make sure the headlamp control
is in the OFF position.
2. Remove the bolt from the
headlamp housing.
3. At the back of the headlamp, pry
up and remove the two retainer pins
to release the headlamp assembly
from the vehicle and pull headlamp
forward.
4. Rotate the bulb socket
counterclockwise and remove it
from the lamp assembly.
Lights
60
Page 64 of 248

Sedan
1. Remove two screws, grommets
and the license plate lamp assembly
from the trunk lid.
2. Carefully pull the bulb from the
socket and push in the new bulb.
3. Install the lamp assembly on
trunk lid with two grommets,
ensuring the grommets are pushed
all the way in to the trunk lid and
secure with two screws.
Replacing tail/brake/turn signal/backup lamp bulbs
Sedan
The tail lamp, brake lamp, turn
signal lamp and backup lamp bulbs
are located in the same portion of
the tail lamp assembly. Follow the
same steps to replace either bulb.
1. Open trunk and remove two
plastic mushroom nuts, five push
pins and the plastic cover from
inside the trunk to access the lamp
assembly.
2. Carefully pull the carpet away to
expose the lamp assembly hardware.
3. Remove three nut and washer
assemblies and the lamp assembly
from the vehicle.
Lights
64
Page 165 of 248

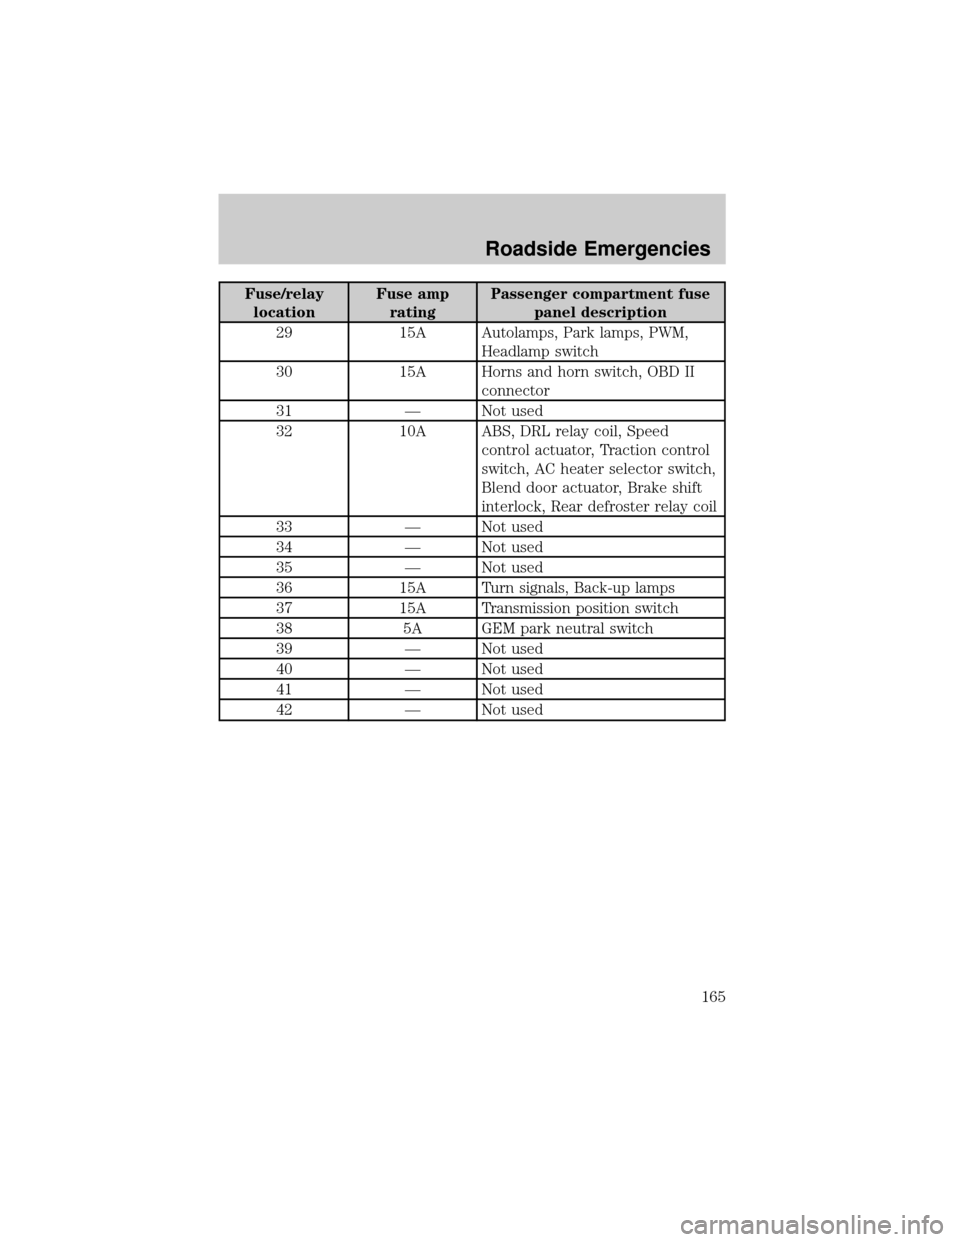
Fuse/relay
locationFuse amp
ratingPassenger compartment fuse
panel description
29 15A Autolamps, Park lamps, PWM,
Headlamp switch
30 15A Horns and horn switch, OBD II
connector
31 Ð Not used
32 10A ABS, DRL relay coil, Speed
control actuator, Traction control
switch, AC heater selector switch,
Blend door actuator, Brake shift
interlock, Rear defroster relay coil
33 Ð Not used
34 Ð Not used
35 Ð Not used
36 15A Turn signals, Back-up lamps
37 15A Transmission position switch
38 5A GEM park neutral switch
39 Ð Not used
40 Ð Not used
41 Ð Not used
42 Ð Not used
Roadside Emergencies
165
Page 246 of 248

high beam ...........................14, 52
replacing bulbs .........................58
turning on and off ....................51
warning chime ..........................15
Heating ........................................43
heating and air conditioning
system .......................................40
Hood ..........................................198
I
Ignition ...............................138, 236
Infant seats
(see Safety seats) .....................130
Inspection/maintenance
(I/M) testing ..............................223
Instrument panel
cleaning ...................................193
cluster ................................10, 193
lighting up panel
and interior ...............................52
J
Jack ............................................168
positioning ...............................168
storage .....................................168
Jump-starting your vehicle ......172
K
Keyless entry system .................91
autolock .....................................94
keypad .......................................91
locking and unlocking doors ....93
programming entry code .........92
Keys .................................94±95, 97
key in ignition chime ...............15
positions of the ignition .........138L
Lamps
autolamp system .......................51
bulb replacement
specifications chart ..................56
cargo lamps ...............................52
daytime running light ...............51
headlamps .................................51
headlamps, flash to pass ..........52
instrument panel, dimming .....52
interior lamps .....................54, 56
replacing
bulbs ..................56, 58, 60±62, 64
Lane change indicator
(see Turn signal) ........................54
Liftgate ..................................81, 88
Lights, warning and indicator ....10
air bag ........................................12
anti-lock brakes (ABS) ....12, 144
anti-theft ...................................14
brake ..........................................12
charging system ........................12
check coolant ............................14
cruise indicator .........................13
door ajar ....................................14
fuel cap light .............................11
high beam .................................14
low coolant ................................13
low fuel ......................................13
oil pressure ...............................13
safety belt .................................12
service engine soon ..................10
speed control ............................78
traction control active ..............13
turn signal indicator .................14
Load limits .................................153
GAWR ......................................153
GVWR ......................................153
trailer towing ..........................153
Index
246