2002 FORD F350 automatic transmission
[x] Cancel search: automatic transmissionPage 150 of 264

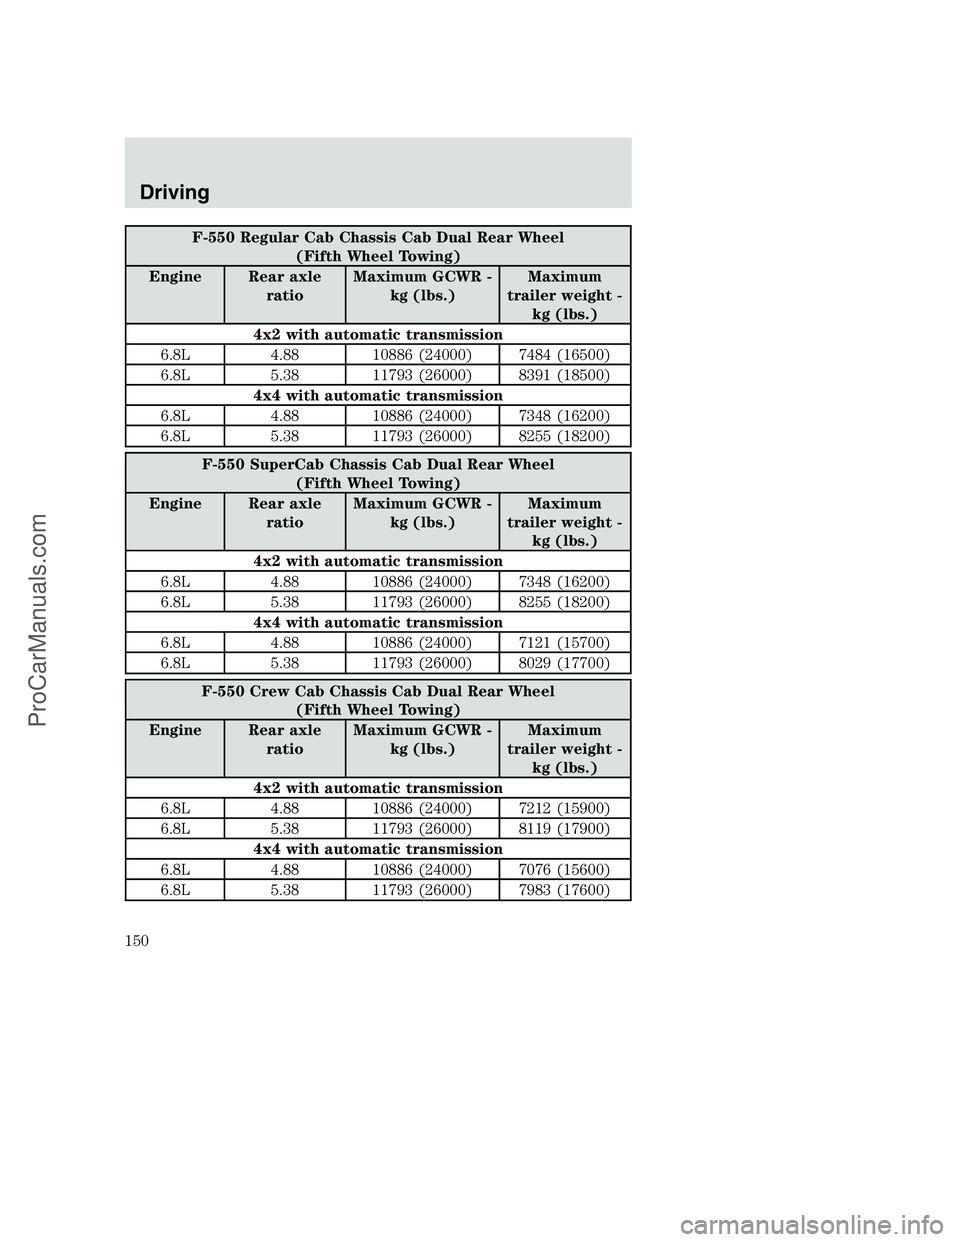
F-550 Regular Cab Chassis Cab Dual Rear Wheel
(Fifth Wheel Towing)
Engine Rear axle
ratioMaximum GCWR -
kg (lbs.)Maximum
trailer weight -
kg (lbs.)
4x2 with automatic transmission
6.8L 4.88 10886 (24000) 7484 (16500)
6.8L 5.38 11793 (26000) 8391 (18500)
4x4 with automatic transmission
6.8L 4.88 10886 (24000) 7348 (16200)
6.8L 5.38 11793 (26000) 8255 (18200)
F-550 SuperCab Chassis Cab Dual Rear Wheel
(Fifth Wheel Towing)
Engine Rear axle
ratioMaximum GCWR -
kg (lbs.)Maximum
trailer weight -
kg (lbs.)
4x2 with automatic transmission
6.8L 4.88 10886 (24000) 7348 (16200)
6.8L 5.38 11793 (26000) 8255 (18200)
4x4 with automatic transmission
6.8L 4.88 10886 (24000) 7121 (15700)
6.8L 5.38 11793 (26000) 8029 (17700)
F-550 Crew Cab Chassis Cab Dual Rear Wheel
(Fifth Wheel Towing)
Engine Rear axle
ratioMaximum GCWR -
kg (lbs.)Maximum
trailer weight -
kg (lbs.)
4x2 with automatic transmission
6.8L 4.88 10886 (24000) 7212 (15900)
6.8L 5.38 11793 (26000) 8119 (17900)
4x4 with automatic transmission
6.8L 4.88 10886 (24000) 7076 (15600)
6.8L 5.38 11793 (26000) 7983 (17600)
Driving
150
ProCarManuals.com
Page 152 of 264

Do not connect a trailer’s hydraulic brake system directly to your
vehicle’s brake system. Your vehicle may not have enough
braking power and your chances of having a collision greatly increase.
The braking system of the tow vehicle is rated for operation at the
GVWR not GCWR.
Trailer lamps
Trailer lamps are required on most towed vehicles. Make sure your
trailer lamps conform to local and Federal regulations. See your dealer or
trailer rental agency for proper instructions and equipment for hooking
up trailer lamps.
Using a step bumper (if equipped)
The rear bumper is equipped with an integral hitch and only requires a
ball with a 25.4 mm (one inch) shank diameter. The bumper has a 2,270
kg (5,000 lb.) trailer weight and 227 kg (500 lb.) tongue weight capacity.
If it is necessary to relocate the trailer hitch ball position, a
frame-mounted trailer hitch must be installed.
Driving while you tow
When towing a trailer:
•Turn off the speed control. The speed control may shut off
automatically when you are towing on long, steep grades.
•Consult your local motor vehicle speed regulations for towing a trailer.
•To eliminate excessive shifting, use a lower gear. This will also assist
in transmission cooling. (For additional information, refer to the
Driving with a 4–speed automatic transmissionsection in this
chapter.
•Anticipate stops and brake gradually.
•Do not exceed the GCWR rating or transmission damage may occur.
Servicing after towing
If you tow a trailer for long distances, your vehicle will require more
frequent service intervals. Refer to your scheduled maintenance guide for
more information.
Trailer towing tips
•Practice turning, stopping and backing up before starting on a trip to
get the feel of the vehicle trailer combination. When turning, make
wider turns so the trailer wheels will clear curbs and other obstacles.
Driving
152
ProCarManuals.com
Page 153 of 264

•Allow more distance for stopping with a trailer attached.
•The trailer tongue weight should be 10–15% of the loaded trailer
weight.
•After you have traveled 80 km (50 miles), thoroughly check your
hitch, electrical connections and trailer wheel lug nuts.
•To aid in engine/transmission cooling and A/C efficiency during hot
weather while stopped in traffic, place the gearshift lever in P (Park)
(automatic transmission) or N (Neutral) (manual transmissions).
•Vehicles with trailers should not be parked on a grade. If you must
park on a grade, place wheel chocks under the trailer’s wheels.
Launching or retrieving a boat
When backing down a ramp during boat launching or retrieval,
•Do not allow the static water level to rise above the bottom edge of
the rear bumper.
•Do not allow waves to break higher than 15 cm (6 inches) above the
bottom edge of the rear bumper.
•Disconnect the trailer tow electrical connector to prevent blown fuses
caused by water entering into your trailer’s electrical wiring.
Exceeding these limits may allow water to enter critical vehicle
components, adversely affecting driveability, emissions and reliability.
Replace front and rear axle lubricants any time the axles have been
submerged in water. Axle lubricant quantities are not to be checked
unless a leak is suspected.
ALL REAR WHEEL DRIVE (RWD) VEHICLES
This applies to all cars and 4x2 trucks/sport utilities with rear wheel
drive capability.
An example of recreational towing is towing your vehicle behind a
motorhome. The following recreational towing guidelines are designed to
ensure that your transmission is not damaged.
•Place the transmission in N (Neutral).
•Maximum speed is 56 km/h (35 mph).
•Maximum distance is 80 km (50 miles).
If a distance of 80 km (50 miles) or a speed of 56 km/h (35 mph) must
be exceeded, you must disconnect the driveshaft. Ford recommends the
driveshaft be removed/installed only by a qualified technician. See your
local dealer for driveshaft removal/installation.
Driving
153
ProCarManuals.com
Page 154 of 264

Improper removal/installation of the driveshaft can cause
transmission fluid loss, damage to the driveshaft and internal
transmission components.
RWD vehicles with 4x4 electronic shift transfer case or All Wheel
Drive (AWD) vehicles with automatic transmissions:
Regarding recreational towing or having your vehicle towed, 4x4 vehicles
with electronic shift on the fly and AWD vehicles cannot be towed with
any wheels on the ground (with the exception of moving it as a disabled
vehicle off the road out of traffic).
SNOWPLOWING
Note:Do not use your vehicle to snowplow until it has been driven at
least 800 km (500 miles). Follow the severe duty schedule in your
scheduled maintenance guide for engine oil and transmission fluid
change intervals.
Note:Ford does not install snowplows.
For low speed snow removal, Ford offers a Snowplow Package Option on
select 4x4 vehicles. To assist Ford dealers and equipment installers
further prepare the vehicle for snowplowing, Ford includes instructions
in theFord Truck Body Builders Layout BookandFord Truck Source
Book. These instructions are available through your Ford dealer; they
include the list of vehicle models recommended for snowplowing and
snowplow weight limits. Use of the Snowplow Package Option, or its
equivalent, along with these instructions will help avoid possible
powertrain and chassis damage from snowplowing.
The front and rear GAWR, GVWR, Total Accessory Reserve Capacity
(TARC) and tire inflation pressures are found on the Safety Compliance
Certification Label located on one of the vehicle’s door jambs. This label
is applied to all vehicles completed by Ford Motor Company. Incomplete
vehicles built by Ford Motor Company will have an Incomplete Vehicle
Label in place of the Safety Compliance Label. The TARC does not apply
to Incomplete Vehicles and will not be shown on the Incomplete Vehicle
Label. The weight of the vehicle with occupants must never exceed the
front and rear GAWR or the GVWR.
The TARC is the weight of the permanently attached equipment that can
be added to the vehicle without violating the vehicle’s Safety Compliance
Certification. This includes the snowplow mounting hardware but does
not include the removable portion of the snowplow assembly.
Driving
154
ProCarManuals.com
Page 163 of 264

Fuse/Relay
LocationFuse Amp
RatingPassenger Compartment Fuse Panel
Description
12 20A* Cigar lighter / OBD II
13 5A* Power mirrors/switches
14 15A* Daytime running lamps (DRL)
15 — Not used
16 — Not used
17 15A* Exterior lamps
18 20A* Turn lamps/Brake on-off switch (high)
19 10A* Body security module/4x4 module
20 — Not used
21 — Not used
22 20A* Engine control
23 20A* Engine control (gasoline engine only)
24 15A* Not used (spare)
25 10A* 4-Wheel Anti-lock Brake System (4WABS)
module
26 10A* Air bags
27 15A* Ignition switch Run feed
28 10A* EATC module/Front blower relay coil
29 10A* Customer access
30 15A* Highbeam headlamps
31 15A* Clutch interlock switch (manual
transmissions only), Transmission range
sensor (automatic transmissions only)
then to starter relay coil (all
transmissions)
32 5A* Radio (start)
33 15A* Front wiper
34 10A* Brake on-off switch
35 10A* Instrument cluster
36 10A* PCM Keep-Alive
37 15A* Horn
38 20A* Trailer tow park lamps and backup lamps
Roadside Emergencies
163
ProCarManuals.com
Page 167 of 264

2. Attach the spare tire lock key (A)
to the jack handle (B).
3. Fully insert the jack handle
through the bumper hole and into
the guide tube. The key and lock
will engage with a slight push and
counterclockwise turn. Some
resistance will be felt when turning
the jack handle assembly.
4. Turn the handle counterclockwise
and lower the spare tire until you
can slide the tire rearward and the
cable is slack.
5. Remove the retainer through the center of the wheel.
Tire change procedure
1. Park on a level surface, activate
hazard flashers and set the parking
brake.
•Automatic transmission: Place
gearshift lever in P (Park).
•Manual transmission: Place
gearshift lever in R (Reverse).
•Electronic Shift On the Fly 4WD:
Place transfer case in any
position.
•Manual shift transfer case 4WD:
Place transfer case in 2H, 4H or
4L.
Roadside Emergencies
167
ProCarManuals.com
Page 168 of 264

To prevent the vehicle from
moving when you change a
tire, be sure the parking brake is
set, then block (in both
directions) the wheel that is
diagonally opposite (other side
and end of the vehicle) to the tire
being changed.
2. Turn engine off and block the diagonally opposite wheel (block not
provided).
3. Remove the jack, jack handle, lug wrench and spare tire from the
stowage locations.
4. Use the tip of the lug wrench to remove any wheel trim.
5. Loosen each wheel lug nut
one-half turn counterclockwise but
do not remove them until the wheel
is raised off the ground.
When one of the rear wheels is off the ground, the transmission
alone will not prevent the vehicle from moving or slipping off the
jack, even if the transmission is in P (Park) (automatic transmission)
or R (Reverse) (manual transmission). To prevent the vehicle from
moving when you change the tire, be sure that the parking brake is set
and the diagonally opposite wheel is blocked.
If the vehicle slips off the jack, you or someone else could be
seriously injured.
Roadside Emergencies
168
ProCarManuals.com
Page 174 of 264

Stowing the flat/spare tire
1.
Lay the tire on the ground with the valve stem facing in the direction
specified on the Tire Changing Instructions located with the jack hardware.
2. Slide the wheel partially under the vehicle and install the retainer
through the wheel center. Pull on the cable to align the components at
the end of the cable.
3. Turn the jack handle clockwise until the tire is raised to its stowed
position underneath the vehicle. The effort to turn the jack handle
increases significantly and the spare tire carrier ratchets or slips when
the tire is raised to the maximum tightness. Tighten to the best of your
ability, to the point where the ratchet/slip occurs, if possible. The spare
tire carrier will not allow you to overtighten. If the spare tire carrier
ratchets or slips with little effort, take the vehicle to your dealer for
assistance at your earliest convenience.
4. Check that the tire lies flat against the frame and is properly
tightened. Try to push or pull, then turn the tire to be sure it will not
move. Loosen and retighten, if necessary. Failure to properly stow the
spare tire may result in failure of the winch cable and loss of the tire.
5.
Repeat this tightness check procedure when servicing the spare tire
pressure (every six months, per scheduled maintenance guide), or at any
time that the spare tire is disturbed through service of other components.
6. If removed, install the spare tire lock (if equipped) into the bumper
drive tube with the spare tire lock key (if equipped) and jack handle.
JUMP STARTING YOUR VEHICLE
The gases around the battery can explode if exposed to flames,
sparks, or lit cigarettes. An explosion could result in injury or
vehicle damage.
Batteries contain sulfuric acid which can burn skin, eyes and
clothing, if contacted.
Do not attempt to push-start your vehicle. Automatic
transmissions do not have push-start capability; also, the
catalytic converter may become damaged.
Preparing your vehicle
When the battery is disconnected or a new battery is installed, the
transmission must relearn its shift strategy. As a result, the transmission
may have firm and/or soft shifts. This operation is considered normal and
will not affect function or durability of the transmission. Over time, the
adaptive learning process will fully update transmission operation.
2003 F250/350/450/550(f23)
New Owners Guide own2002(own2002)
USA English(fus)
Roadside Emergencies
174
ProCarManuals.com