Page 1 of 320
Introduction 4
Congratulations 4
Safety and environment protection 5
Symbol glossary 8
Instrument Cluster 10
Warning and control lights 10
Gauges 16
Entertainment Systems 20
AM/FM stereo cassette 20
AM/FM stereo with CD 27
AM/FM stereo cassette (CD changer compatible) 36
CD changer 49
Climate Controls 54
Heater only 54
Manual heating and air conditioning 55
Electronic automatic temperature control 59
Lights 65
Headlamps 65
Bulb replacement 69
Driver Controls 76
Steering wheel adjustment 77
Power windows 85
Mirrors 87
Locks and Security 106
Keys 106
Locks 106
Anti-theft system 108
Table of Contents
1
Page 11 of 320

Warning lights and gauges can alert you to a vehicle condition that may
become serious enough to cause expensive repairs. A warning light may
illuminate when a problem exists with one of your vehicle's functions.
Many lights will illuminate when you start your vehicle to make sure the
bulb works.If any light remains on after starting the vehicle, have
the respective system inspected immediately.
Service engine soon
Illuminates briefly to ensure the
system is functional. If it comes on
after the engine is started, one of
the engine's emission control
systems may be malfunctioning. The
light may illuminate without a
driveability concern being noted. The vehicle will usually be drivable and
will not require towing.
Light turns on solid:
Temporary malfunctions may cause the light to illuminate. Examples are:
1. The vehicle has run out of fuel.
2. Poor fuel quality or water in the fuel.
3. The fuel cap may not have been properly installed and securely
tightened.
These temporary malfunctions can be corrected by filling the fuel tank
with high quality fuel of the recommended octane and/or properly
installing and securely tightening the fuel cap. After three driving cycles
without these or any other temporary malfunctions present, the light
should turn off. (A driving cycle consists of a cold engine startup
followed by mixed city/highway driving.) No additional vehicle service is
required.
If the light remains on, have your vehicle serviced at the first available
opportunity.
Light is blinking:
Engine misfire is occurring which could damage your catalytic converter.
You should drive in a moderate fashion (avoid heavy acceleration and
deceleration) and have your vehicle serviced at the first available
opportunity.
SERVICE
ENGINE
SOON
Instrument Cluster
11
Page 14 of 320
Low washer fluid
Illuminates when the windshield
washer fluid is low.
Speed control (if equipped)
Illuminates when the speed control
is activated.
Transmission control indicator light (TCIL)
Illuminates when the overdrive
function of the transmission has
been turned OFF using the
Transmission Control Switch (TCS).
Refer to theDrivingchapter for
transmission function and operation.
If the light does not come on or if the light flashes steadily, have your
vehicle serviced as soon as possible, damage to the transmission could
occur.
Turn signals
Illuminates when the turn signals or
the hazard lights are turned on. If
the lights stay on continuously or
flash faster, check for a burned-out
bulb.
High beams
Illuminates when the high beam
headlamps are turned on.
Door ajar
Illuminates when any door is open
(or not fully closed).
CRUISE
OVERDRIVE
DOOR
AJAR
Instrument Cluster
14
Page 69 of 320
Courtesy/reading lamps
The courtesy lamp lights when:
²any door is opened.
²the instrument panel dimmer
switch is held up until the
courtesy lamps come on.
²the remote entry controls are
pressed and the ignition is OFF.
The reading lamps can be turned on
by pressing the rocker controls next to each lamp.
Rear door lamps (if equipped)
The rear door lamps lights when:
²any door is opened.
²the instrument panel dimmer
switch is held up until the
courtesy lamps come on.
²the remote entry controls are
pressed and the ignition is OFF.
The rear door lamps can be turned
on by pressing the rocker controls next to each lamp.
BULBS
Replacing exterior bulbs
Check the operation of the following lamps frequently:
²Headlamps
²Foglamps (if equipped)
²High-mount brakelamp
²Brakelamps
²Turn signals
²License plate lamp
²Tail lamps
²Back-up lamps
Lights
69
Page 70 of 320

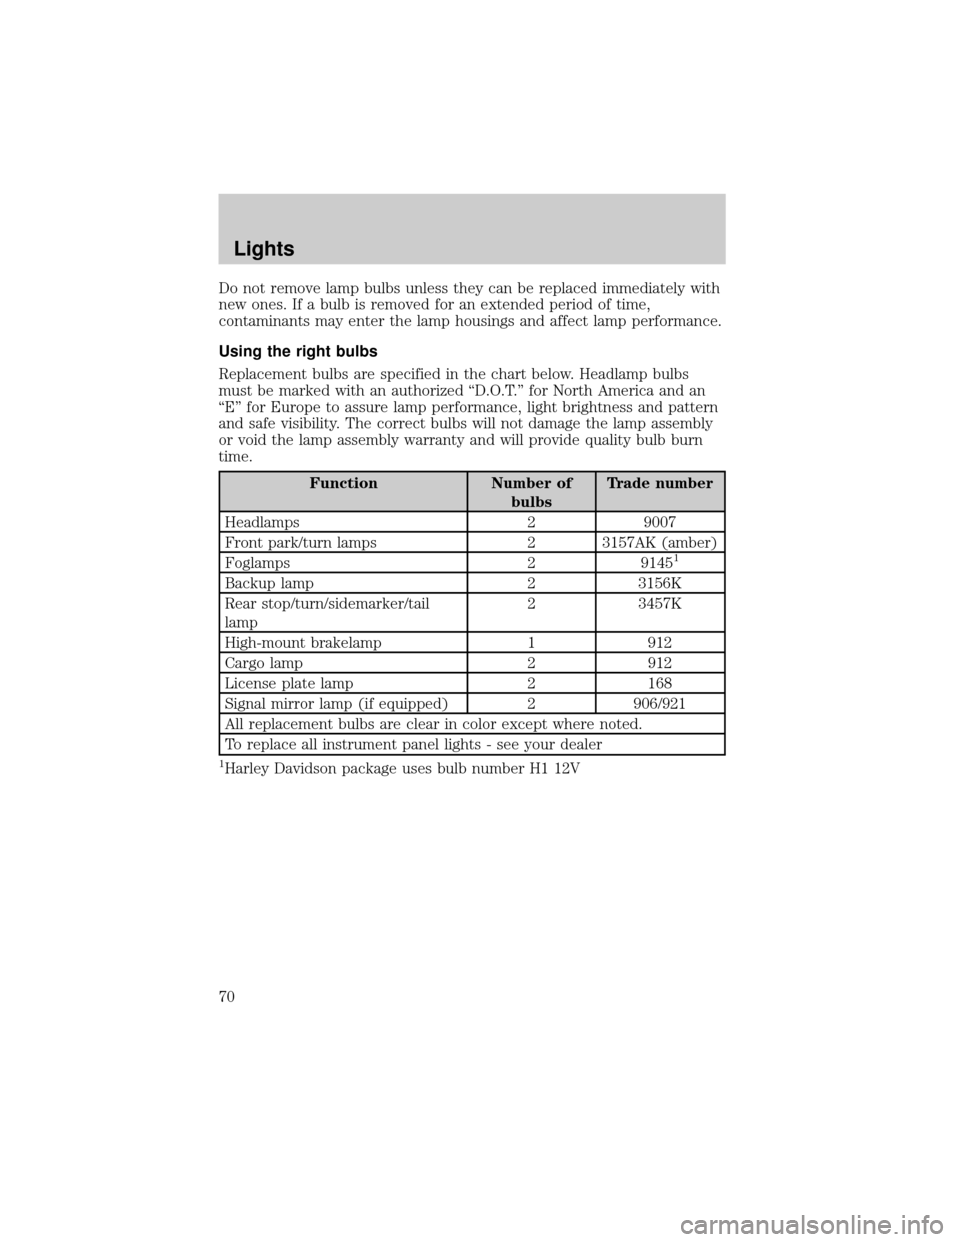
Do not remove lamp bulbs unless they can be replaced immediately with
new ones. If a bulb is removed for an extended period of time,
contaminants may enter the lamp housings and affect lamp performance.
Using the right bulbs
Replacement bulbs are specified in the chart below. Headlamp bulbs
must be marked with an authorized ªD.O.T.º for North America and an
ªEº for Europe to assure lamp performance, light brightness and pattern
and safe visibility. The correct bulbs will not damage the lamp assembly
or void the lamp assembly warranty and will provide quality bulb burn
time.
Function Number of
bulbsTrade number
Headlamps 2 9007
Front park/turn lamps 2 3157AK (amber)
Foglamps 2 9145
1
Backup lamp 2 3156K
Rear stop/turn/sidemarker/tail
lamp2 3457K
High-mount brakelamp 1 912
Cargo lamp 2 912
License plate lamp 2 168
Signal mirror lamp (if equipped) 2 906/921
All replacement bulbs are clear in color except where noted.
To replace all instrument panel lights - see your dealer
1Harley Davidson package uses bulb number H1 12V
Lights
70
Page 71 of 320

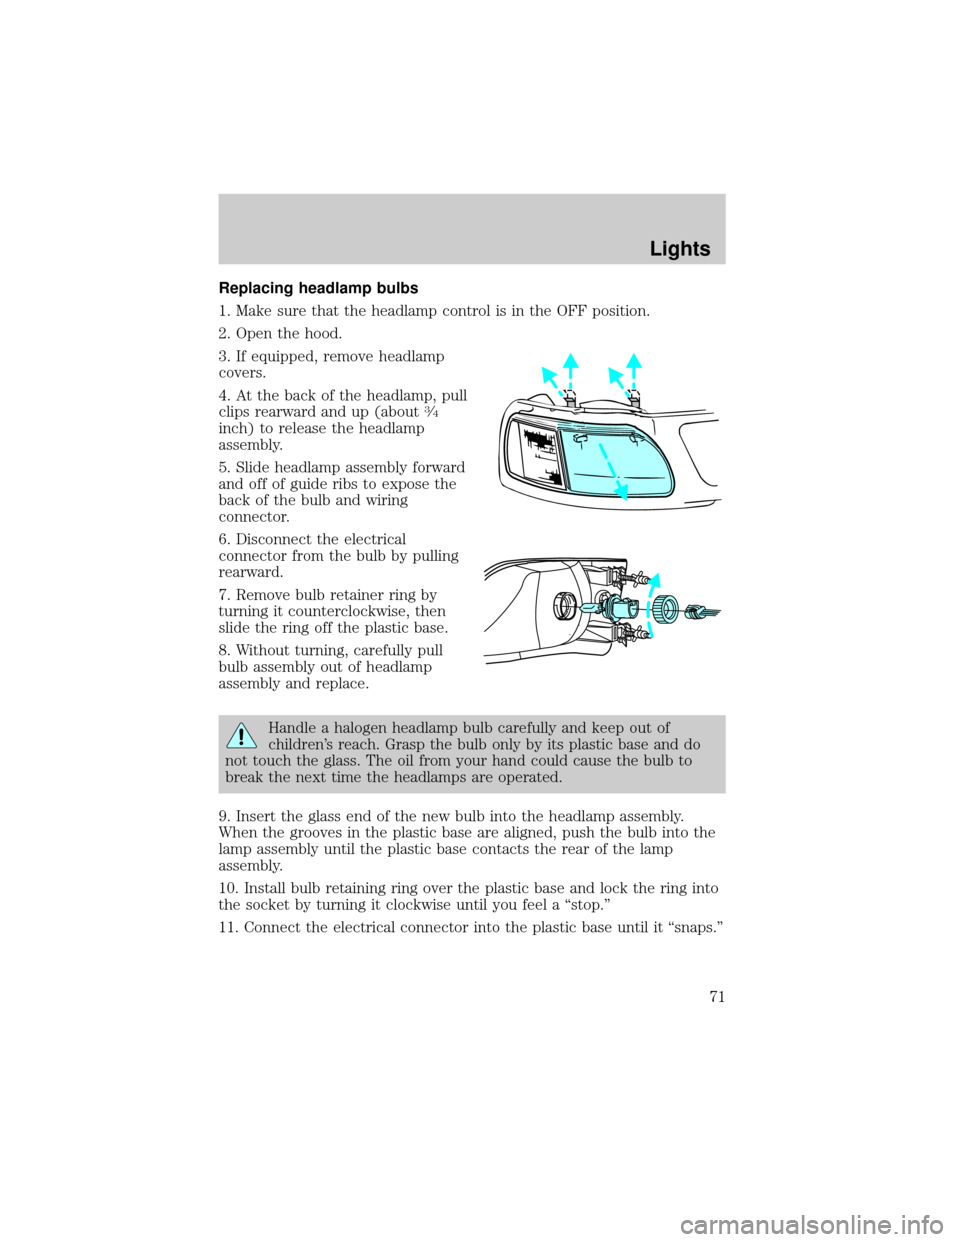
Replacing headlamp bulbs
1. Make sure that the headlamp control is in the OFF position.
2. Open the hood.
3. If equipped, remove headlamp
covers.
4. At the back of the headlamp, pull
clips rearward and up (about
3¤4
inch) to release the headlamp
assembly.
5. Slide headlamp assembly forward
and off of guide ribs to expose the
back of the bulb and wiring
connector.
6. Disconnect the electrical
connector from the bulb by pulling
rearward.
7. Remove bulb retainer ring by
turning it counterclockwise, then
slide the ring off the plastic base.
8. Without turning, carefully pull
bulb assembly out of headlamp
assembly and replace.
Handle a halogen headlamp bulb carefully and keep out of
children's reach. Grasp the bulb only by its plastic base and do
not touch the glass. The oil from your hand could cause the bulb to
break the next time the headlamps are operated.
9. Insert the glass end of the new bulb into the headlamp assembly.
When the grooves in the plastic base are aligned, push the bulb into the
lamp assembly until the plastic base contacts the rear of the lamp
assembly.
10. Install bulb retaining ring over the plastic base and lock the ring into
the socket by turning it clockwise until you feel a ªstop.º
11. Connect the electrical connector into the plastic base until it ªsnaps.º
Lights
71
Page 72 of 320
12. Straighten alignment pins,
making them parallel with the outer
edges of the attachment standoff.
13. Carefully insert the headlamp
assembly into the vehicle making
sure the alignment pins are inserted
into the proper holes and into the
guide ribs.
14. Hold the headlamp assembly
snugly against the vehicle and push down on the clips to lock the lamp
into place.
Replacing front parking lamp/turn signal bulbs
1. Remove screw from the lamp
assembly.
2. Disengage lamp assembly (it has
a snap fit) by pulling straight
forward.
3. Remove bulb socket from the
parking lamp assembly by turning it
counterclockwise.
4. Pull bulb straight out of socket
and press in the new bulb.
5. Install the bulb socket into the
lamp assembly by turning clockwise.
Lights
72
Page 73 of 320

6. Align top and bottom ribs of
parking lamp assembly with
corresponding slots on front of
vehicle.
7. Push gently until parking lamp
assembly seats (you will hear a
snap).
8. Install screw on lamp assembly.
Replacing tail/brake/turn signal/backup lamp bulbs
The tail/brake/turn signal and
backup lamp bulbs are located in
the tail lamp assembly, one just
below the other. Follow the same
steps to replace either bulb:
1. If equipped, remove tail lamp
covers.
2. Open the liftgate to expose the
lamp assembly screws.
3. Remove the two bolts from the
tail lamp assembly.
4. Carefully pull the lamp assembly
from the tailgate pillar to disengage two hidden snap-in retainers. (Flare
side and Super Crewtail lamps are not equipped with snap-in retainers.)
5. Remove bulb socket from the lamp assembly by turning it
counterclockwise.
6. Pull bulb straight out of socket and press in the new bulb.
7. Install the bulb socket into the lamp assembly by turning clockwise.
8. Carefully install the tail lamp assembly on tailgate pillar snapping the
two snap-in retainers into place. (Flare side and Super Crewtail lamps do
not snap into place but have two tabs which fit into slots.)
9. Secure the tail lamp on the vehicle with two bolts.
Lights
73