Page 190 of 320

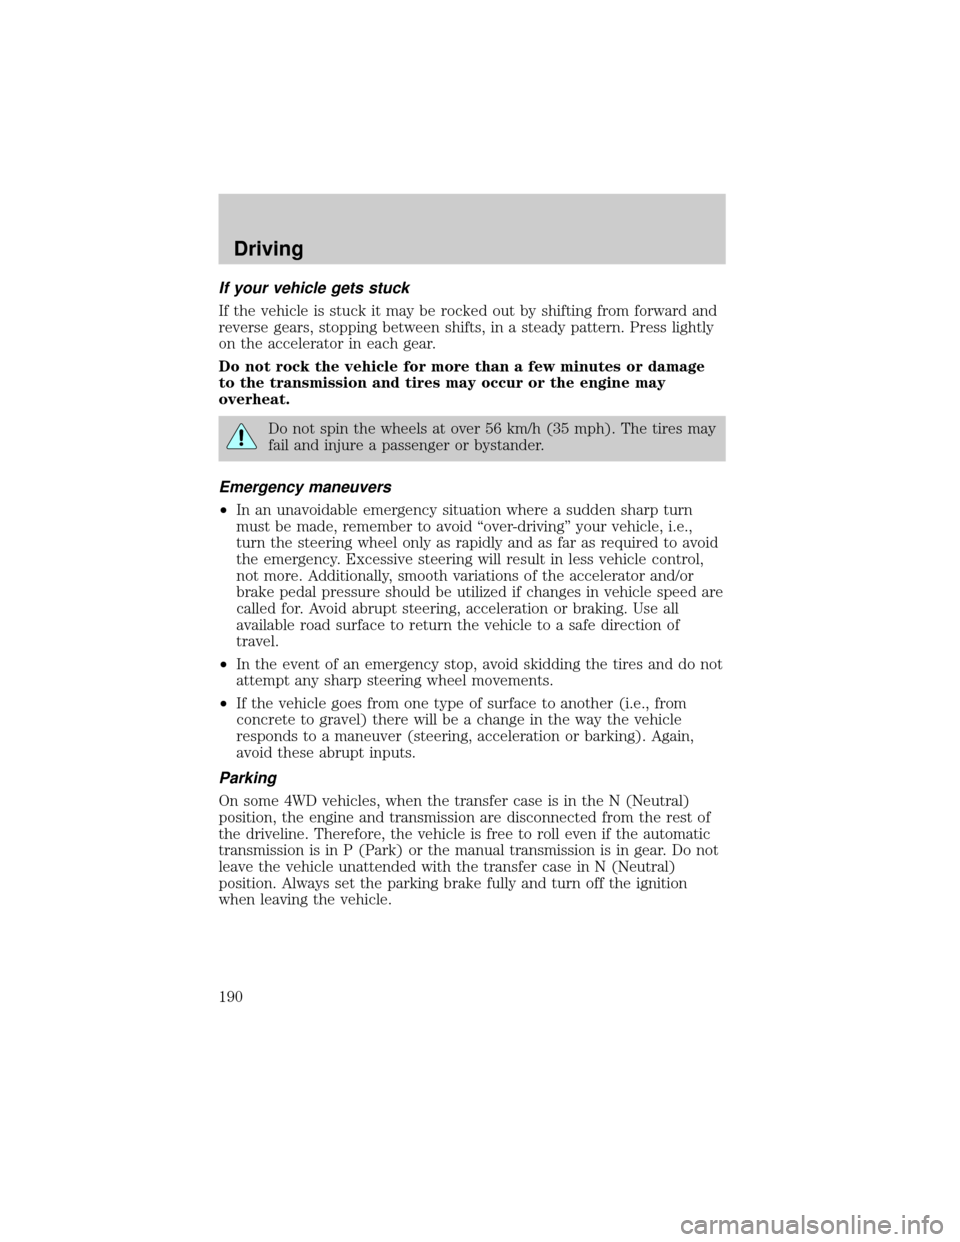
If your vehicle gets stuck
If the vehicle is stuck it may be rocked out by shifting from forward and
reverse gears, stopping between shifts, in a steady pattern. Press lightly
on the accelerator in each gear.
Do not rock the vehicle for more than a few minutes or damage
to the transmission and tires may occur or the engine may
overheat.
Do not spin the wheels at over 56 km/h (35 mph). The tires may
fail and injure a passenger or bystander.
Emergency maneuvers
²In an unavoidable emergency situation where a sudden sharp turn
must be made, remember to avoid ªover-drivingº your vehicle, i.e.,
turn the steering wheel only as rapidly and as far as required to avoid
the emergency. Excessive steering will result in less vehicle control,
not more. Additionally, smooth variations of the accelerator and/or
brake pedal pressure should be utilized if changes in vehicle speed are
called for. Avoid abrupt steering, acceleration or braking. Use all
available road surface to return the vehicle to a safe direction of
travel.
²In the event of an emergency stop, avoid skidding the tires and do not
attempt any sharp steering wheel movements.
²If the vehicle goes from one type of surface to another (i.e., from
concrete to gravel) there will be a change in the way the vehicle
responds to a maneuver (steering, acceleration or barking). Again,
avoid these abrupt inputs.
Parking
On some 4WD vehicles, when the transfer case is in the N (Neutral)
position, the engine and transmission are disconnected from the rest of
the driveline. Therefore, the vehicle is free to roll even if the automatic
transmission is in P (Park) or the manual transmission is in gear. Do not
leave the vehicle unattended with the transfer case in N (Neutral)
position. Always set the parking brake fully and turn off the ignition
when leaving the vehicle.
Driving
190
Page 201 of 320

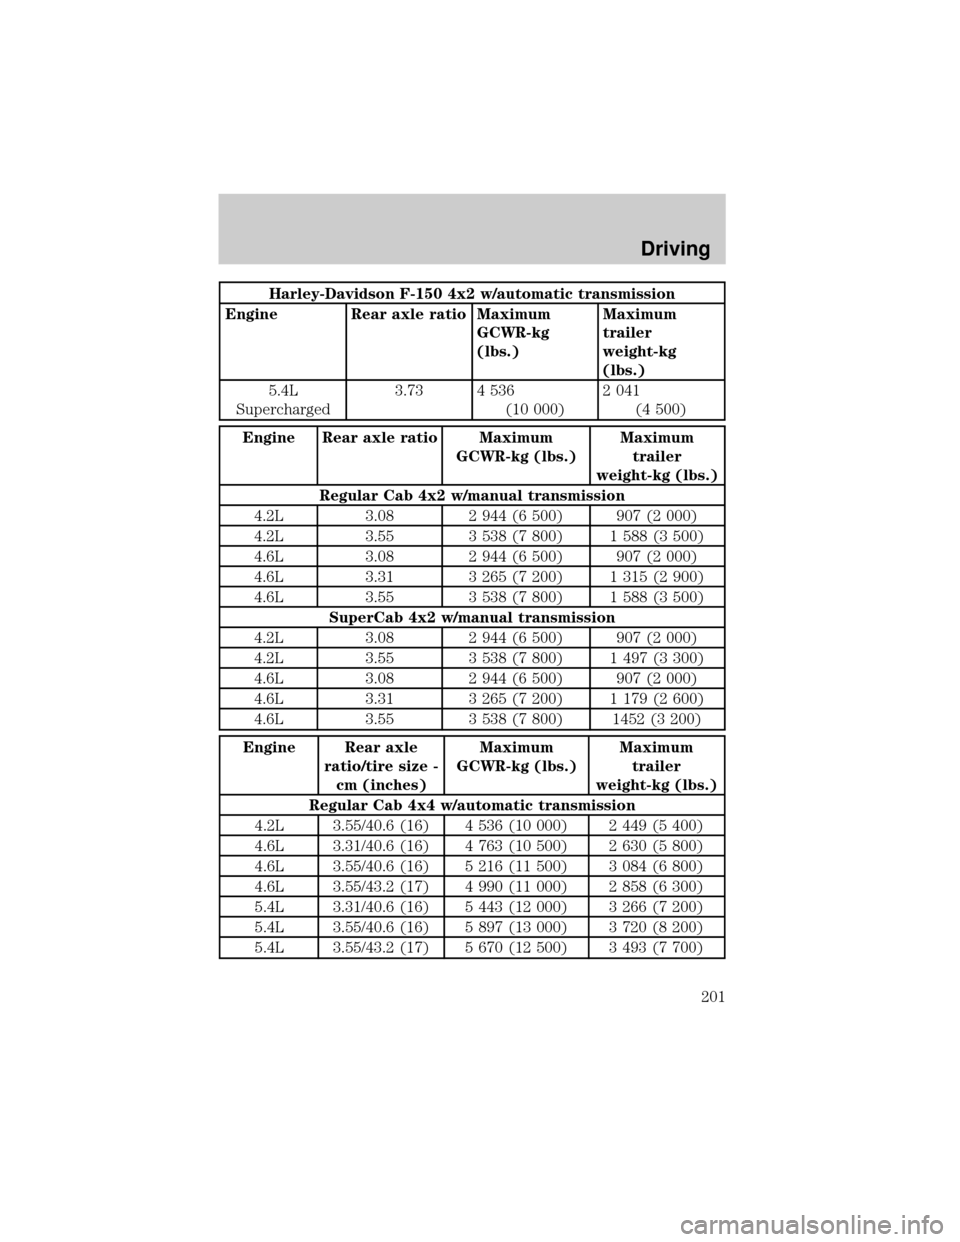
Harley-Davidson F-150 4x2 w/automatic transmission
Engine Rear axle ratio Maximum
GCWR-kg
(lbs.)Maximum
trailer
weight-kg
(lbs.)
5.4L
Supercharged3.73 4 536
(10 000)2 041
(4 500)
Engine Rear axle ratio Maximum
GCWR-kg (lbs.)Maximum
trailer
weight-kg (lbs.)
Regular Cab 4x2 w/manual transmission
4.2L 3.08 2 944 (6 500) 907 (2 000)
4.2L 3.55 3 538 (7 800) 1 588 (3 500)
4.6L 3.08 2 944 (6 500) 907 (2 000)
4.6L 3.31 3 265 (7 200) 1 315 (2 900)
4.6L 3.55 3 538 (7 800) 1 588 (3 500)
SuperCab 4x2 w/manual transmission
4.2L 3.08 2 944 (6 500) 907 (2 000)
4.2L 3.55 3 538 (7 800) 1 497 (3 300)
4.6L 3.08 2 944 (6 500) 907 (2 000)
4.6L 3.31 3 265 (7 200) 1 179 (2 600)
4.6L 3.55 3 538 (7 800) 1452 (3 200)
Engine Rear axle
ratio/tire size -
cm (inches)Maximum
GCWR-kg (lbs.)Maximum
trailer
weight-kg (lbs.)
Regular Cab 4x4 w/automatic transmission
4.2L 3.55/40.6 (16) 4 536 (10 000) 2 449 (5 400)
4.6L 3.31/40.6 (16) 4 763 (10 500) 2 630 (5 800)
4.6L 3.55/40.6 (16) 5 216 (11 500) 3 084 (6 800)
4.6L 3.55/43.2 (17) 4 990 (11 000) 2 858 (6 300)
5.4L 3.31/40.6 (16) 5 443 (12 000) 3 266 (7 200)
5.4L 3.55/40.6 (16) 5 897 (13 000) 3 720 (8 200)
5.4L 3.55/43.2 (17) 5 670 (12 500) 3 493 (7 700)
Driving
201
Page 202 of 320

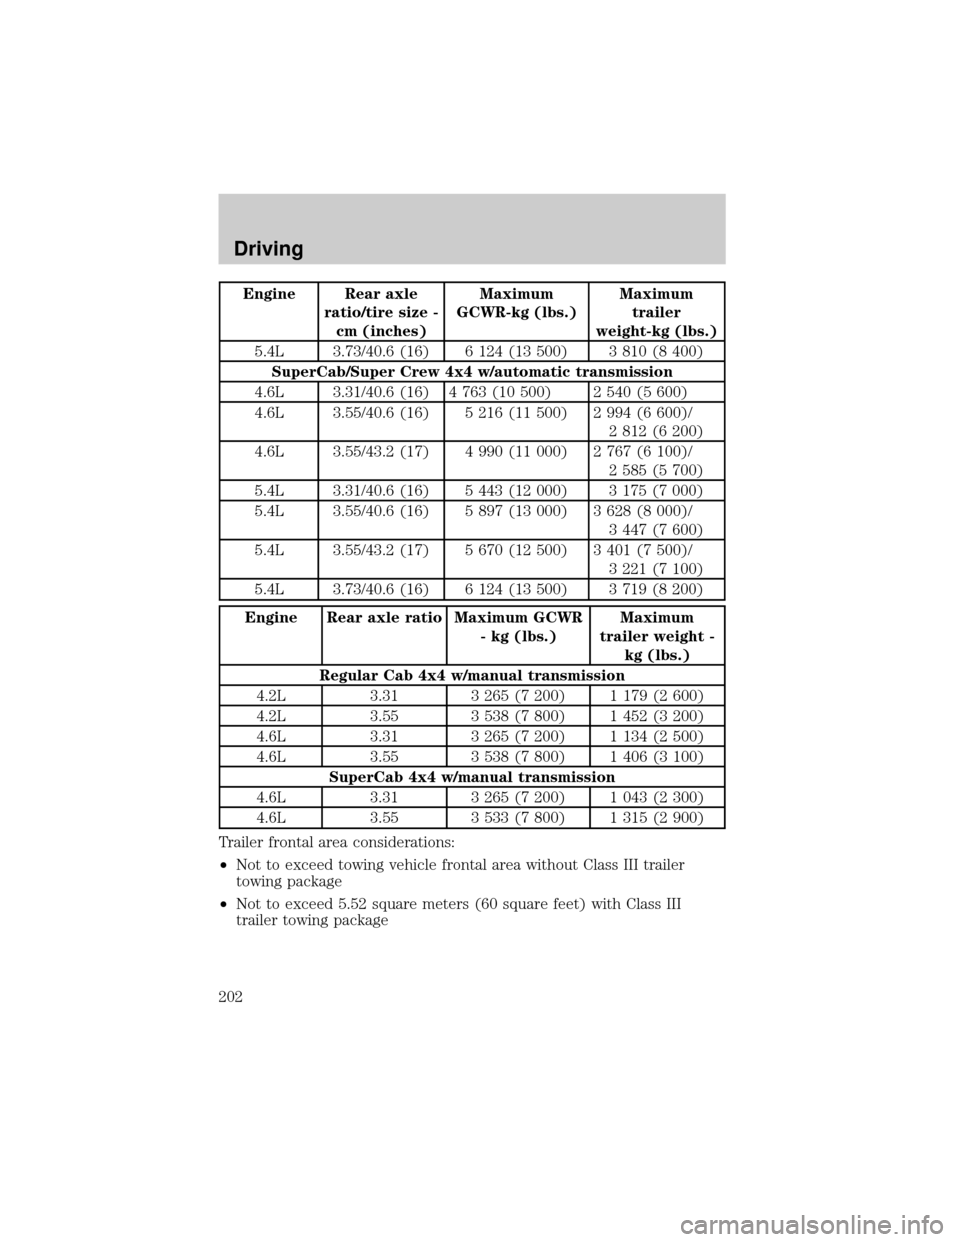
Engine Rear axle
ratio/tire size -
cm (inches)Maximum
GCWR-kg (lbs.)Maximum
trailer
weight-kg (lbs.)
5.4L 3.73/40.6 (16) 6 124 (13 500) 3 810 (8 400)
SuperCab/Super Crew 4x4 w/automatic transmission
4.6L 3.31/40.6 (16) 4 763 (10 500) 2 540 (5 600)
4.6L 3.55/40.6 (16) 5 216 (11 500) 2 994 (6 600)/
2 812 (6 200)
4.6L 3.55/43.2 (17) 4 990 (11 000) 2 767 (6 100)/
2 585 (5 700)
5.4L 3.31/40.6 (16) 5 443 (12 000) 3 175 (7 000)
5.4L 3.55/40.6 (16) 5 897 (13 000) 3 628 (8 000)/
3 447 (7 600)
5.4L 3.55/43.2 (17) 5 670 (12 500) 3 401 (7 500)/
3 221 (7 100)
5.4L 3.73/40.6 (16) 6 124 (13 500) 3 719 (8 200)
Engine Rear axle ratio Maximum GCWR
- kg (lbs.)Maximum
trailer weight -
kg (lbs.)
Regular Cab 4x4 w/manual transmission
4.2L 3.31 3 265 (7 200) 1 179 (2 600)
4.2L 3.55 3 538 (7 800) 1 452 (3 200)
4.6L 3.31 3 265 (7 200) 1 134 (2 500)
4.6L 3.55 3 538 (7 800) 1 406 (3 100)
SuperCab 4x4 w/manual transmission
4.6L 3.31 3 265 (7 200) 1 043 (2 300)
4.6L 3.55 3 533 (7 800) 1 315 (2 900)
Trailer frontal area considerations:
²Not to exceed towing vehicle frontal area without Class III trailer
towing package
²Not to exceed 5.52 square meters (60 square feet) with Class III
trailer towing package
Driving
202
Page 204 of 320

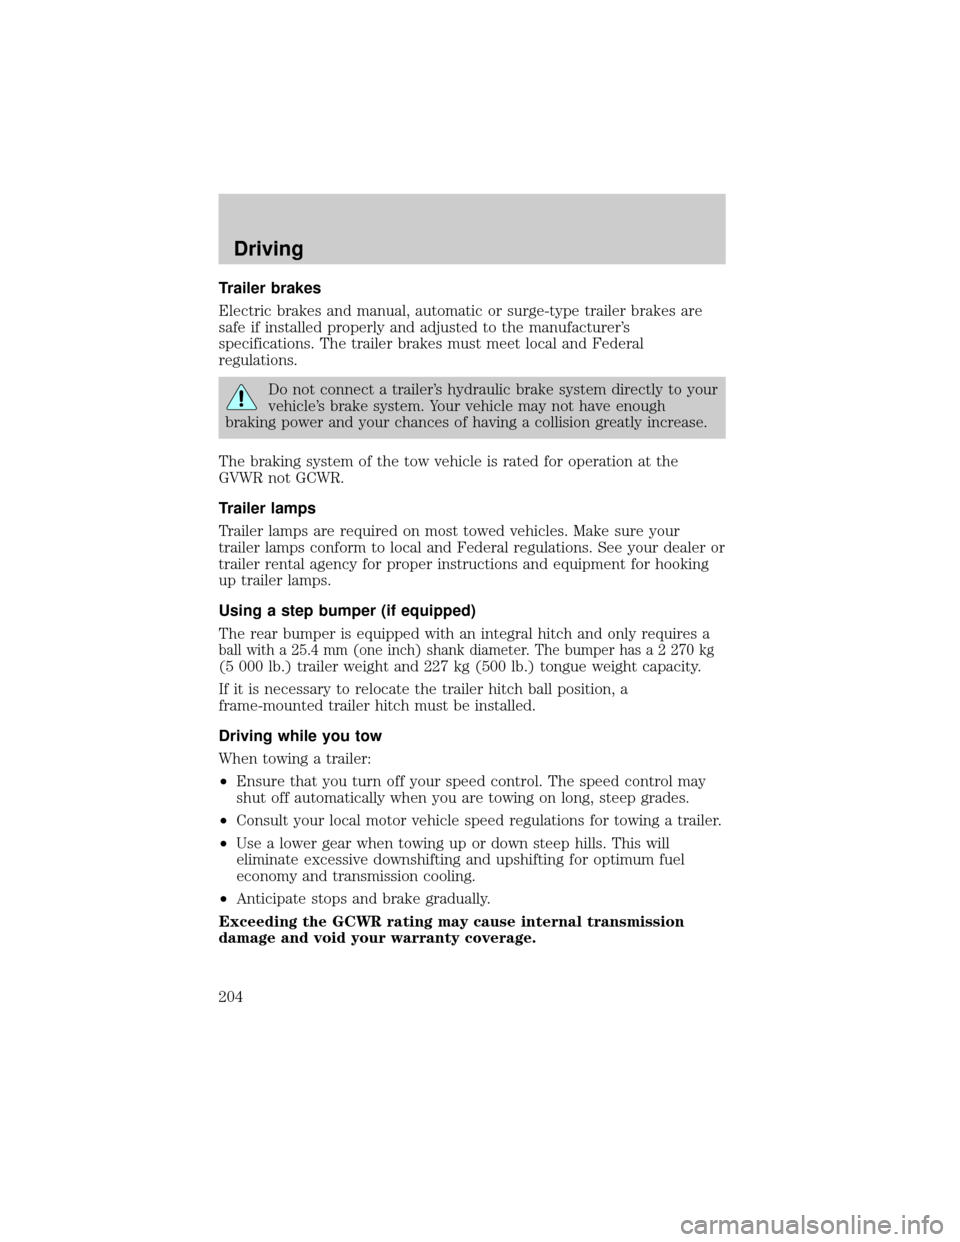
Trailer brakes
Electric brakes and manual, automatic or surge-type trailer brakes are
safe if installed properly and adjusted to the manufacturer's
specifications. The trailer brakes must meet local and Federal
regulations.
Do not connect a trailer's hydraulic brake system directly to your
vehicle's brake system. Your vehicle may not have enough
braking power and your chances of having a collision greatly increase.
The braking system of the tow vehicle is rated for operation at the
GVWR not GCWR.
Trailer lamps
Trailer lamps are required on most towed vehicles. Make sure your
trailer lamps conform to local and Federal regulations. See your dealer or
trailer rental agency for proper instructions and equipment for hooking
up trailer lamps.
Using a step bumper (if equipped)
The rear bumper is equipped with an integral hitch and only requires a
ball with a 25.4 mm (one inch) shank diameter. The bumper has a 2 270 kg
(5 000 lb.) trailer weight and 227 kg (500 lb.) tongue weight capacity.
If it is necessary to relocate the trailer hitch ball position, a
frame-mounted trailer hitch must be installed.
Driving while you tow
When towing a trailer:
²Ensure that you turn off your speed control. The speed control may
shut off automatically when you are towing on long, steep grades.
²Consult your local motor vehicle speed regulations for towing a trailer.
²Use a lower gear when towing up or down steep hills. This will
eliminate excessive downshifting and upshifting for optimum fuel
economy and transmission cooling.
²Anticipate stops and brake gradually.
Exceeding the GCWR rating may cause internal transmission
damage and void your warranty coverage.
Driving
204
Page 205 of 320

Servicing after towing
If you tow a trailer for long distances, your vehicle will require more
frequent service intervals. Refer to your scheduled maintenance guide for
more information.
Trailer towing tips
²Practice turning, stopping and backing up before starting on a trip to
get the feel of the vehicle trailer combination. When turning, make
wider turns so the trailer wheels will clear curbs and other obstacles.
²Allow more distance for stopping with a trailer attached.
²The trailer tongue weight should be no more than 10±15% of the
loaded trailer weight.
²After you have traveled 80 km (50 miles), thoroughly check your
hitch, electrical connections and trailer wheel lug nuts.
²When stopped in traffic for long periods of time in hot weather, place
the gearshift in P (Park) (automatic transmissions) or N (Neutral)
(manual transmissions). This aids engine cooling and air conditioner
efficiency.
²Vehicles with trailers should not be parked on a grade. If you must
park on a grade, place wheel chocks under the trailer's wheels.
Launching or retrieving a boat
When backing down a ramp during boat launching or retrieval:
²do not allow the static water level to rise above the bottom edge of
the rear bumper.
²do not allow waves to break higher than 15 cm (6 inches) above the
bottom edge of the rear bumper.
Exceeding these limits may allow water to enter critical vehicle
components, adversely affecting driveability, emissions, reliability and
causing internal transmission damage.
Replace the rear axle lubricant any time the axle has been submerged in
water. Rear axle lubricant quantities are not to be checked or changed
unless a leak is suspected or repair required.
Disconnect the wiring to the trailer before backing the trailer into the
water. Reconnect the wiring to the trailer after the trailer is removed
from the water.
Driving
205
Page 207 of 320

Installing the snowplow
Removing the blocker beam without installing snowplow
attachment hardware may affect air bag deployment in a crash.
Do not operate the truck unless either the blocker beam or snowplow
attachment hardware is installed on the vehicle.
Read the following instructions before installing a snowplow:
²Front GAWR must not exceed 63% of the GVW. Add ballast weight to
the back of the vehicle, if necessary. Refer to the Safety Compliance
Certification Label to find Front GAWR.
²The Front Axle Accessory Reserve Capacity and the Total Accessory
Reserve Capacity listed on the bottom right of the Safety Compliance
Certification Label will determine whether or not the addition of a
snowplow will overload your vehicle.
²The weight of the snowplow and supporting components distributed to
the front axle must not exceed the front accessory reserve capacity.
²The total weight of the snowplow and aftermarket equipment must
not exceed the Total Accessory Reserve Capacity.
²The weight of the installed snowplow and aftermarket equipment must
not load the vehicle beyond the GAWR (front/rear) and GVWR listed
on the Safety Compliance Certification Label.
²The total weight of the snowplow and aftermarket equipment must be
considered part of the payload and must not exceed the Gross
Combined Weight Rating (GCWR) for towing.
²Federal and most local regulations require additional exterior lamps
for snowplow-equipped vehicles. Consult your dealer for additional
information.
²After installing a snowplow to the vehicle, ensure the vehicle's front
toe alignment and front ride height are within specification (reset if
required). These specifications are located in the vehicle's Workshop
Manual. Adherence to the toe, tire pressures and ride height
specification is important for proper tire wear, ride, handling and
headlight aim. Also, maintain the engine oil and transmission fluid
change intervals following the severe duty schedule.
Do not exceed the GVWR or the GAWR specified on the
certification label.
Driving
207
Page 223 of 320
1. Park on a level surface, activate
hazard flashers and set the parking
brake.
2. Place gearshift lever in P (Park)
(automatic transmission) or in the
reverse gear (manual
transmission)and turn engine OFF.
3. Block the diagonally opposite
wheel.
4. Obtain the spare tire and jack
from their storage locations.
5. Use the tip of the lug wrench to
remove any wheel trim.
6. Loosen each wheel lug nut
one-half turn counterclockwise but
do not remove them until the wheel
is raised off the ground.
7. Position the jack according to the following guides and turn the jack
handle clockwise until the wheel is completely off the ground.
Roadside Emergencies
223
Page 224 of 320
When one of the rear wheels is off the ground, the transmission
alone will not prevent the vehicle from moving or slipping off the
jack, even if the transmission is in P (Park) or in the reverse gear
(manual transmission). To prevent the vehicle from moving when you
change the tire, be sure that the parking brake is set and the
diagonally opposite wheel is blocked. If the vehicle slips off the jack,
someone could be seriously injured.
²Front (4x2)
²Front (4x4)
Roadside Emergencies
224