Page 33 of 104
Each time the vehicle is started, the transmission will automatically
return to normal overdrive mode.
Every time the vehicle is shut off and restarted, you must press the
transmission control switch to cancel overdrive operation if driving in
overdrive is not desired.
2 (Second)
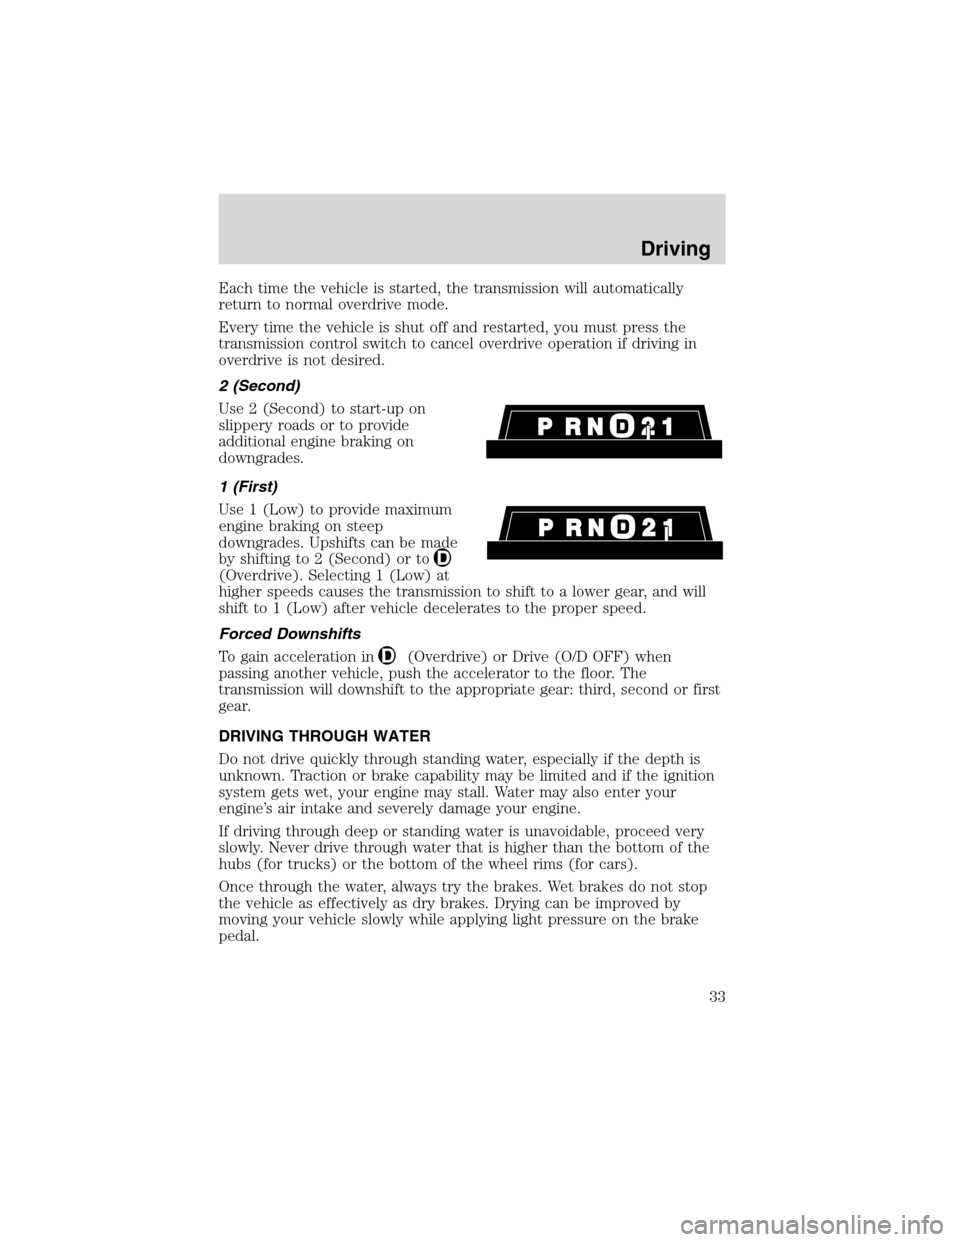
Use 2 (Second) to start-up on
slippery roads or to provide
additional engine braking on
downgrades.
1 (First)
Use 1 (Low) to provide maximum
engine braking on steep
downgrades. Upshifts can be made
by shifting to 2 (Second) or to
(Overdrive). Selecting 1 (Low) at
higher speeds causes the transmission to shift to a lower gear, and will
shift to 1 (Low) after vehicle decelerates to the proper speed.
Forced Downshifts
To gain acceleration in
(Overdrive) or Drive (O/D OFF) when
passing another vehicle, push the accelerator to the floor. The
transmission will downshift to the appropriate gear: third, second or first
gear.
DRIVING THROUGH WATER
Do not drive quickly through standing water, especially if the depth is
unknown. Traction or brake capability may be limited and if the ignition
system gets wet, your engine may stall. Water may also enter your
engine’s air intake and severely damage your engine.
If driving through deep or standing water is unavoidable, proceed very
slowly. Never drive through water that is higher than the bottom of the
hubs (for trucks) or the bottom of the wheel rims (for cars).
Once through the water, always try the brakes. Wet brakes do not stop
the vehicle as effectively as dry brakes. Drying can be improved by
moving your vehicle slowly while applying light pressure on the brake
pedal.
Driving
33
Page 36 of 104
TRAILER TOWING
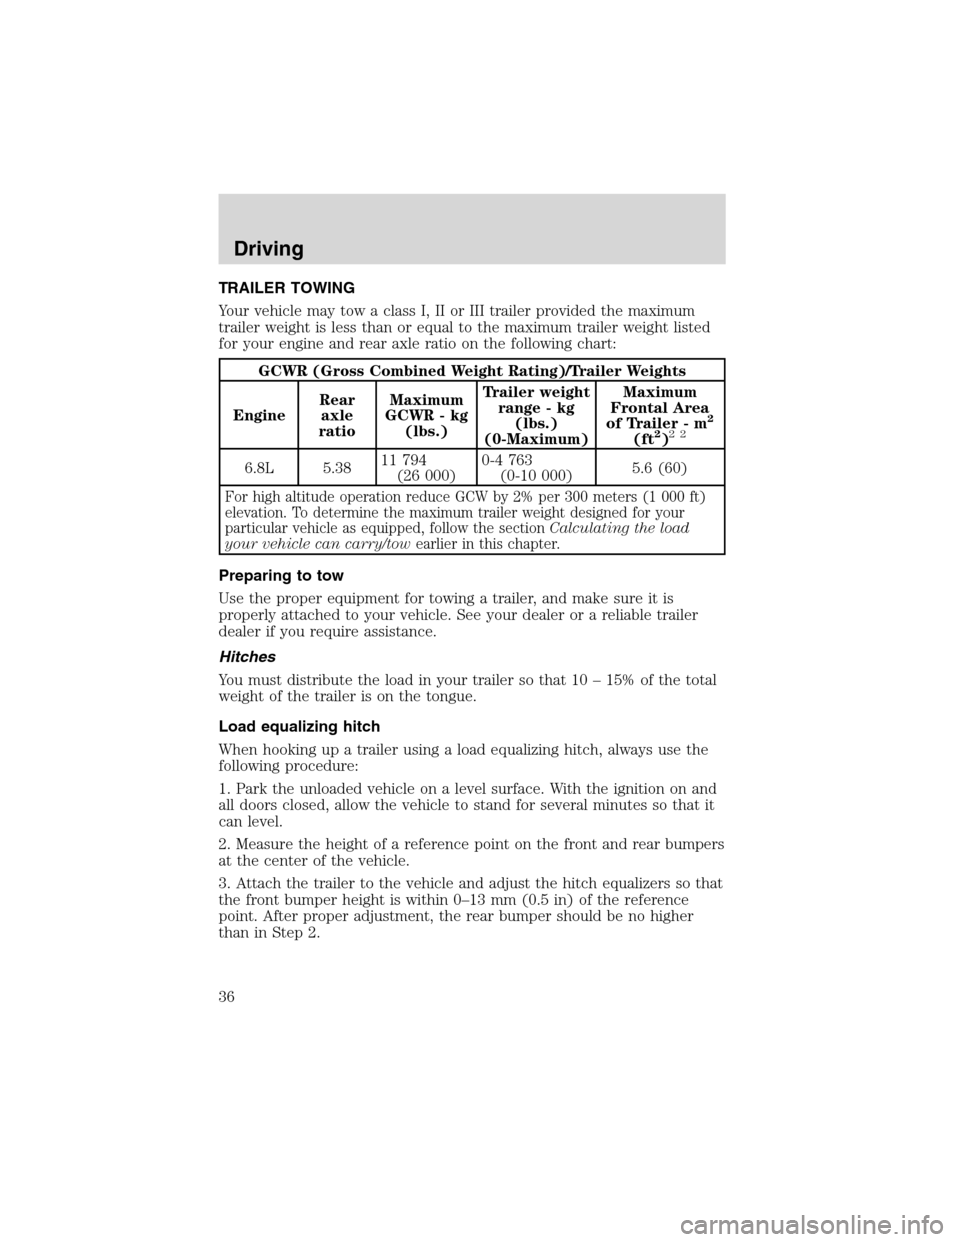
Your vehicle may tow a class I, II or III trailer provided the maximum
trailer weight is less than or equal to the maximum trailer weight listed
for your engine and rear axle ratio on the following chart:
GCWR (Gross Combined Weight Rating)/Trailer Weights
EngineRear
axle
ratioMaximum
GCWR - kg
(lbs.)Trailer weight
range - kg
(lbs.)
(0-Maximum)Maximum
Frontal Area
of Trailer - m
2
(ft2)22
6.8L 5.3811 794
(26 000)0-4 763
(0-10 000)5.6 (60)
For high altitude operation reduce GCW by 2% per 300 meters (1 000 ft)
elevation. To determine the maximum trailer weight designed for your
particular vehicle as equipped, follow the sectionCalculating the load
your vehicle can carry/towearlier in this chapter.
Preparing to tow
Use the proper equipment for towing a trailer, and make sure it is
properly attached to your vehicle. See your dealer or a reliable trailer
dealer if you require assistance.
Hitches
You must distribute the load in your trailer so that 10 – 15% of the total
weight of the trailer is on the tongue.
Load equalizing hitch
When hooking up a trailer using a load equalizing hitch, always use the
following procedure:
1. Park the unloaded vehicle on a level surface. With the ignition on and
all doors closed, allow the vehicle to stand for several minutes so that it
can level.
2. Measure the height of a reference point on the front and rear bumpers
at the center of the vehicle.
3. Attach the trailer to the vehicle and adjust the hitch equalizers so that
the front bumper height is within 0–13 mm (0.5 in) of the reference
point. After proper adjustment, the rear bumper should be no higher
than in Step 2.
Driving
36
Page 39 of 104
HAZARD LIGHTS CONTROL
Use only in an emergency to warn traffic of vehicle breakdown,
approaching danger, etc. The hazard flashers can be operated when the
ignition is off.
•The hazard lights control is
located on top of the steering
column.
•Depress hazard lights control to
activate the hazard flashers.
•Depress control again to turn the
flashers off.
FUEL PUMP SHUT-OFF SWITCH
FUEL
RESET
The fuel pump shut-off switch is a device intended to stop the electric
fuel pump when your vehicle has been involved in a substantial jolt.
After a collision, if the engine cranks but does not start, the fuel pump
shut-off switch may have been activated.
Roadside emergencies
39
Page 40 of 104
The fuel pump shut-off switch is
located on a bracket above the
brake pedal.
Use the following procedure to reset the fuel pump shut-off switch.
1. Turn the ignition to the OFF position.
2. Check the fuel system for leaks.
3. If no fuel leak is apparent, reset the fuel pump shut-off switch by
pushing in on the reset button.
4. Turn the ignition to the ON position. Pause for a few seconds and
return the key to the OFF position.
5. Make a further check for leaks in the fuel system.
Roadside emergencies
40
Page 46 of 104
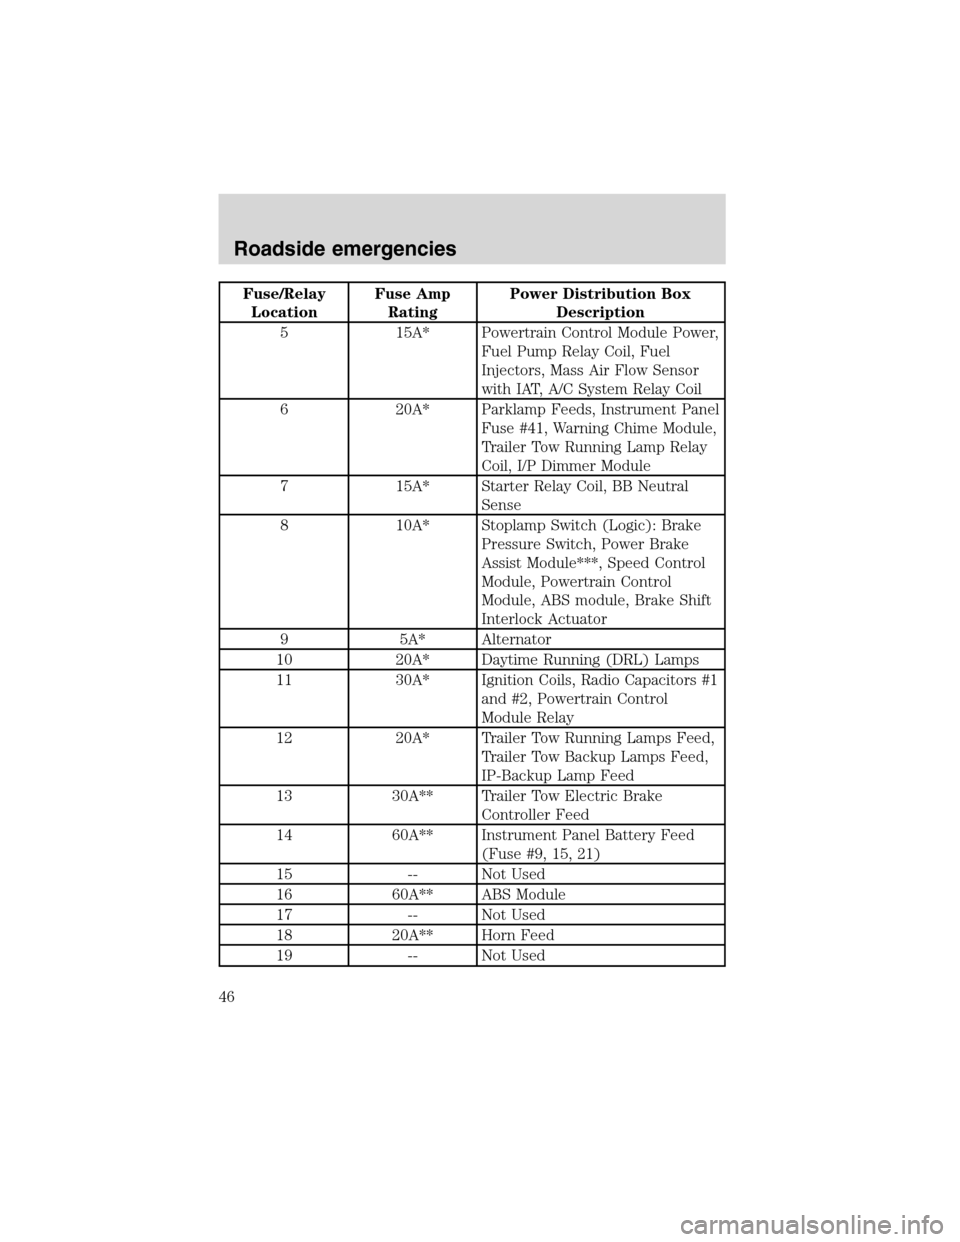
Fuse/Relay
LocationFuse Amp
RatingPower Distribution Box
Description
5 15A* Powertrain Control Module Power,
Fuel Pump Relay Coil, Fuel
Injectors, Mass Air Flow Sensor
with IAT, A/C System Relay Coil
6 20A* Parklamp Feeds, Instrument Panel
Fuse #41, Warning Chime Module,
Trailer Tow Running Lamp Relay
Coil, I/P Dimmer Module
7 15A* Starter Relay Coil, BB Neutral
Sense
8 10A* Stoplamp Switch (Logic): Brake
Pressure Switch, Power Brake
Assist Module***, Speed Control
Module, Powertrain Control
Module, ABS module, Brake Shift
Interlock Actuator
9 5A* Alternator
10 20A* Daytime Running (DRL) Lamps
11 30A* Ignition Coils, Radio Capacitors #1
and #2, Powertrain Control
Module Relay
12 20A* Trailer Tow Running Lamps Feed,
Trailer Tow Backup Lamps Feed,
IP-Backup Lamp Feed
13 30A** Trailer Tow Electric Brake
Controller Feed
14 60A** Instrument Panel Battery Feed
(Fuse #9, 15, 21)
15 -- Not Used
16 60A** ABS Module
17 -- Not Used
18 20A** Horn Feed
19 -- Not Used
Roadside emergencies
46
Page 47 of 104
Fuse/Relay
LocationFuse Amp
RatingPower Distribution Box
Description
20 40A** Powertrain Control Module Relay
21 20A** Fuel Pump Motor
22 20A** Diagnostic Tool Connector, Cigar
Lighter Feed
23 40A** Blower Motor Feed
24 40A** Instrument Panel Battery Feed
(fuses #4, 10, 16)
25 50A** Ignition Switch Feed (Instrument
Panel Fuses #1, 5, 7, 11, 13, 14,
17, 19, PDB fuses #7, 9, 11)
26 60A** Ignition Switch Feed (Instrument
Panel Fuses #5, 11, 17, 26, 32,
38)
27 30A** Multifunction Switch (Headlamps)
28 — Not Used
29 60A** Power Brake Assist Motor***
Relay 1 — Daytime Running Lamps On/Off
Relay
Relay 2 — Fuel Pump Relay
Relay 3 — Horn Relay
Relay 4 — A/C System Relay
Relay 5 — Blower Motor Relay
Relay 6 — Powertrain Control Module Relay
Diode 1 — Powertrain Control Module Diode
Diode 2 — Park Brake Diode
* Mini Fuses ** Maxi Fuses ***Vehicles with Hydromax brake assist
only
Roadside emergencies
47
Page 75 of 104
Fuel quality
If you are experiencing starting, rough idle or hesitation driveability
problems during a cold start, try a different brand of “Regular” unleaded
gasoline. “Premium” unleaded gasoline is not recommended (particularly
in the United States) because it may cause these problems to become
more pronounced. If the problems persist, see your dealer or a qualified
service technician.
It should not be necessary to add any aftermarket products to your fuel
tank if you continue to use high quality fuel of the recommended octane
rating. Aftermarket products could cause damage to the fuel system.
Repairs to correct the effects of using an aftermarket product in your
fuel may not be covered by your warranty.
Many of the world’s automakers
issued the World-wide Fuel Charter
that recommends gasoline
specifications to provide improved
performance and emission control
system protection for your vehicle.
Gasolines that meet the World-wide
Fuel Charter should be used when
available. Ask your fuel supplier
about gasolines that meet the
World-wide Fuel Charter. In Canada,
look for fuels that display theAuto Makers’ Choice�logo.
Cleaner air
Ford endorses the use of reformulated “cleaner-burning” gasolines to
improve air quality.
Running out of fuel
Avoid running out of fuel because this situation may have an adverse
affect on powertrain components.
If you have run out of fuel:
•You may need to cycle the ignition from OFF to ON several times after
refueling, to allow the fuel system to pump the fuel from the tank to
the engine.
•Your “Service Engine Soon” indicator may come on. For more
information on the “Service Engine Soon” indicator, refer to the
Instrument Clusterchapter.
Maintenance and specifications
75
Page 79 of 104
The advertised capacity is the amount of the indicated capacity and the
empty reserve combined. Indicated capacity is the difference in the
amount of fuel in a full tank and a tank when the fuel gauge indicates
empty. Empty reserve is the small amount of fuel remaining in the fuel
tank after the fuel gauge indicates empty.
The amount of usable fuel in the empty reserve varies and should
not be relied upon to increase driving range. When refueling your
vehicle after the fuel gauge indicates empty, you might not be
able to refuel the full amount of the advertised capacity of the
fuel tank due to the empty reserve still present in the tank.
For consistent results when filling the fuel tank:
•Turn the engine/ignition switch to the off position prior to refueling,
an error in the reading will result if the engine is left running.
•Use the same filling rate setting (low — medium — high) each time
the tank is filled.
•Allow no more than 2 automatic click-offs when filling.
•Always use fuel with the recommended octane rating.
•Use a known quality gasoline, preferably a national brand.
•Use the same side of the same pump and have the vehicle facing the
same direction each time you fill up.
•Have the vehicle loading and distribution the same every time.
Your results will be most accurate if your filling method is consistent.
Calculating fuel economy
1. Fill the fuel tank completely and record the initial odometer reading
(in kilometers or miles).
2. Each time you fill the tank, record the amount of fuel added (in liters
or gallons).
3. After at least three to five tank fill-ups, fill the fuel tank and record
the current odometer reading.
4. Subtract your initial odometer reading from the current odometer
reading.
Maintenance and specifications
79