Page 1 of 200
Introduction 4
Instrument Cluster 8
Warning and control lights 8
Gauges 11
Entertainment Systems 14
AM/FM stereo cassette with CD 14
AM/FM stereo with CD 27
Rear seat controls 30
Climate Controls 31
Manual heating and air conditioning 31
Rear window defroster 32
Lights 33
Driver Controls 41
Windshield wiper/washer control 41
Power windows 45
Mirrors 48
Speed control 49
Locks and Security 60
Keys 60
Locks 60
Anti-theft system 66
Table of Contents
1
Page 10 of 200
Four wheel drive low:Illuminates
when four-wheel drive low is
engaged.
Four wheel drive high:Illuminates
when four-wheel drive high is
engaged.
Anti-theft system:Flashes when
the Securilock�Passive Anti-theft
System has been activated.
Speed control:Illuminates when
the speed control is activated. Turns
off when the speed control system
is deactivated.
Turn signal:Illuminates when the
left or right turn signal or the
hazard lights are turned on. If the
indicators stay on or flash faster, check for a burned out bulb.
High beams:Illuminates when the
high beam headlamps are turned on.
Key-in-ignition warning chime:Sounds when the key is left in the
ignition in the OFF/LOCK or ACC position and the driver’s door is
opened.
Headlamps on warning chime:Sounds when the headlamps or parking
lamps are on, the ignition is off (and the key is not in the ignition) and
the driver’s door is opened.4WD
LOW
4WD
HIGH
SPEED
CONT
Instrument Cluster
10
Page 43 of 200

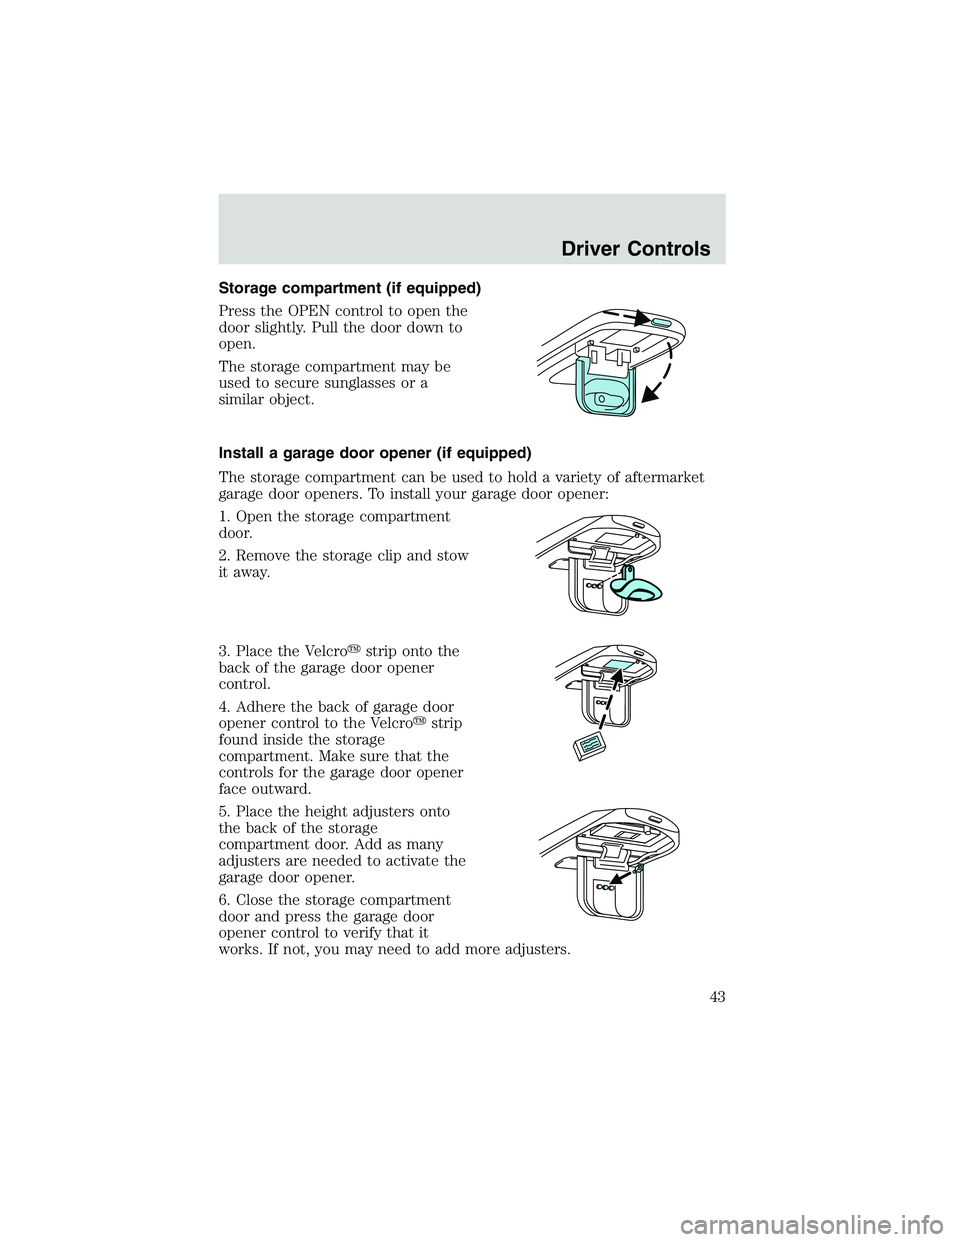
Storage compartment (if equipped)
Press the OPEN control to open the
door slightly. Pull the door down to
open.
The storage compartment may be
used to secure sunglasses or a
similar object.
Install a garage door opener (if equipped)
The storage compartment can be used to hold a variety of aftermarket
garage door openers. To install your garage door opener:
1. Open the storage compartment
door.
2. Remove the storage clip and stow
it away.
3. Place the Velcro�strip onto the
back of the garage door opener
control.
4. Adhere the back of garage door
opener control to the Velcro�strip
found inside the storage
compartment. Make sure that the
controls for the garage door opener
face outward.
5. Place the height adjusters onto
the back of the storage
compartment door. Add as many
adjusters are needed to activate the
garage door opener.
6. Close the storage compartment
door and press the garage door
opener control to verify that it
works. If not, you may need to add more adjusters.
Driver Controls
43
Page 47 of 200

Normal Operation
If an“up”command is selected and the ignition is switched to OFF or
START during window travel, the window will:
•stop if it is between the vent position and fully closed or
•continue to move up to the vent position if it is between vent and fully
open.
If a“down”or“vent”command is selected and the ignition is switched to
OFF or START during window travel, the window will move to the fully
open or vent position and then stop.
The“down”command is the only one allowed after the ignition has been
switched to OFF or START while the window is moving.
Bounce-Back
When the back window is moving upward and an obstacle interferes with
the window’s movement, the back window will reverse direction and
move toward the fully open position. This is known as“bounce-back”.
Security Override
If, during a bounce-back condition, the control is held in the clockwise
(“up”) direction for at least two seconds,the back window will travel
up with no bounce-back protection.If the control is released before
the window reaches fully closed or the ignition is switched to OFF or
START, the back window will reverse direction with bounce-back
re-enabled.
The following are possible reasons for using the security override:
•Ice on the window causing a restriction.
•Window unexpectedly reverses.
Position recovery mode
If the window fails to operate in“normal”operation mode, the control
can be turned and held in the active position (up or down window
direction) which will move the window in increments of approximately
15mm (0.6 inches) in the selected direction. (The“vent”feature is
inoperable in this mode.) This feature allows the window to be closed.
Once the window has reached the full closed position, the window
should again operate in the“normal”operation mode. If the window still
does not operate correctly, see your dealer for service.
Driver Controls
47
Page 55 of 200
TAILGATE REMOVAL
Your tailgate is removable to allow
more room for loading.
1. Lower the tailgate.
2. Use a screwdriver to pry the
spring clip (on each connector) past
the head of the support screw.
Disconnect the cables.
3. Lift tailgate to a 45 degree angle
and remove it from the left and
right hinges.
To install, follow the removal procedures in reverse order.
EXTERIOR TIEDOWN HOOKS
Exterior tiedown hooks mounted on
the side of the pickup box:
•can be used to secure loads
within the pickup box.
•can be used to secure half the
tonneau cover in an open
position.
•allow for continued use of the
stake pockets.
Each tiedown hook can secure loads
of up to 350 kg (770 lbs.) inside the pickup box (total load not to exceed
box payload of 1000kg (2,200 lbs)). Loads can be secured to the hooks
with up to three wraps of 10 mm rope.
CARGO CAGE (IF EQUIPPED)
Your vehicle may be equipped with a cargo cage designed to extend the
pickup box for larger loads.
Driver Controls
55
Page 56 of 200

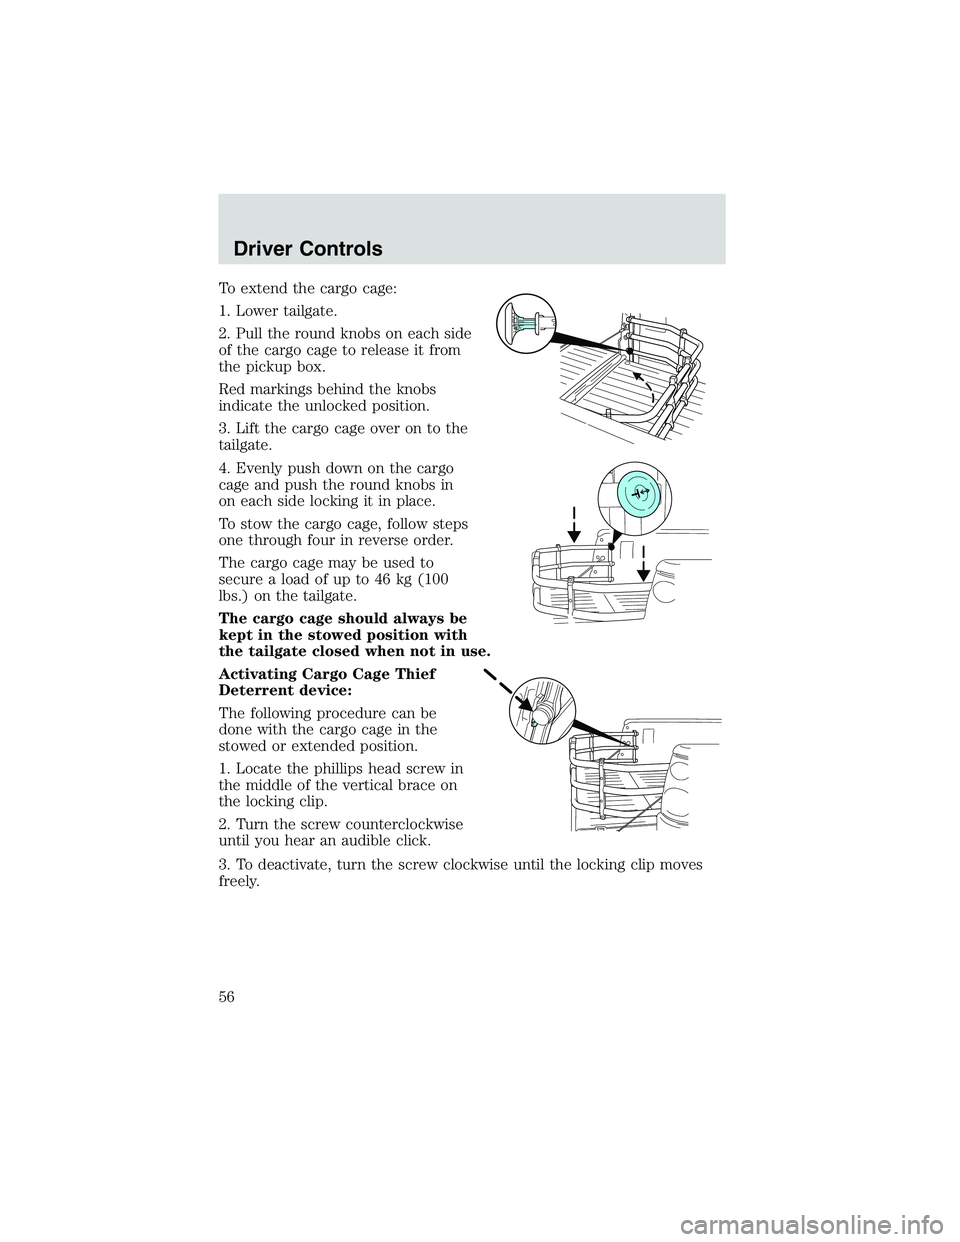
To extend the cargo cage:
1. Lower tailgate.
2. Pull the round knobs on each side
of the cargo cage to release it from
the pickup box.
Red markings behind the knobs
indicate the unlocked position.
3. Lift the cargo cage over on to the
tailgate.
4. Evenly push down on the cargo
cage and push the round knobs in
on each side locking it in place.
To stow the cargo cage, follow steps
one through four in reverse order.
The cargo cage may be used to
secure a load of up to 46 kg (100
lbs.) on the tailgate.
The cargo cage should always be
kept in the stowed position with
the tailgate closed when not in use.
Activating Cargo Cage Thief
Deterrent device:
The following procedure can be
done with the cargo cage in the
stowed or extended position.
1. Locate the phillips head screw in
the middle of the vertical brace on
the locking clip.
2. Turn the screw counterclockwise
until you hear an audible click.
3. To deactivate, turn the screw clockwise until the locking clip moves
freely.
Driver Controls
56
Page 57 of 200

To remove the cargo cage:
1. Extend the cargo cage.
2. Pull the round knobs on each side
of the cage to unlock it.
Make sure the locking clip screws
are loose before removing the cargo
cage.
3. Press the locking clips below the
middle bar and lift the cargo cage
out of the channels on the“D”pillar.
To install the cargo cage, follow the removal procedure in reverse order.
TONNEAU COVER (IF EQUIPPED)
The tonneau cover has been designed to maximize fuel economy and
should be fully installed whenever possible.
The rear panel can be folded in half and secured behind the cab, or the
whole cover can be removed completely from the vehicle.
To avoid damage to the cover, do not operate the vehicle unless
the cover is fully installed, or securely stowed.
To avoid damage to the cover, do not stand, sit or load anything
on top of the cover.
To open the front panel:
•Open the lock cover and unlock
the front panel.
•Lift the panel to access items in
the pickup box near the cab.
•To close, lower the panel down
on the pickup box.
The panel will automatically
lock when lowered onto the
pickup box.
Do not drive with front panel unlocked or folded on top of the
rear panel.
Driver Controls
57
Page 58 of 200

To open the rear panel:
•Open the lock cover and unlock
the rear panel.
•Lift the rear panel to access items
in the pickup box.
•To close, lower the rear panel on
the pickup box.
The panel will automatically
lock when lowered onto the
pickup box.
To stow the rear panel:
•Before driving with the rear panel
open, unlock the rear panel.
•Lift the rear panel up, lay it on
top of the front panel and secure
it with the two straps to the
exterior tiedowns on the pickup
box.
Failure to secure the rear panel
could damage the tonneau cover
or vehicle.
To remove the tonneau cover:
The tonneau cover weighs 29 kg (70
lbs.) and needs to be supported
during removal since the panels will
automatically lock when set down
on the pickup box. This is a two
person operation.
•Unlock and support the front and
rear panels.
•Fold the rear panel on top of the
front panel.
•Pull the release levers on the underside of the tonnneau cover from
the pickup box and remove the cover.
For installation of the tonneau cover, reverse the removal procedure.
Driver Controls
58