Page 14 of 184
PREMIUM AM/FM STEREO/CASSETTE/SINGLE CD
1.Power/volume:Press to turn
ON/OFF; turn
clockwise/counterclockwise to
increase/decrease volume.
2.Scan:Press SCAN to move up
the radio frequency band. SCAN
automatically finds a station, plays it
for five seconds, then moves to the next station. Press again to stop.
Tape/CD:Press SCAN to sample tape/CD selections for eight seconds.
Press again to stop.
3.CD Door:Insert the disc with
the playing side down and printed
side up.
SCAN
Entertainment Systems
14
Page 15 of 184
4.Cassette door:Insert the
cassette with the opening to the
right.
5.Eject:Press to eject the
cassette/CD. The radio will resume
playing.
6.Tape:Press to start tape play.
Press to stop tape during
rewind/fast forward.
CD:Press to start CD play. With the
dual media audio, press CD to
toggle between single CD and CD
changer play (if equipped).
7.Mute:Press to MUTE playing
media; press again return to playing
media.
8.Auto:Press to set first six
strongest stations (if available) into
AM, FM1 or FM2 memory buttons;
press again to return to normal
stations.
9.Clock:Press and hold to set the
clock. Press the
SEEK to
decrease hours or SEEK
to
increase hours. Press the
TUNE
to decrease minutes or TUNE
to
increase minutes. If your vehicle has a stand alone clock this control will
not function.
Entertainment Systems
15
Page 17 of 184
18.Select (SEL):Use with Bass,
Treble, Balance and Fade controls.
19.Bass:Press BASS; then press
SEL
/to decrease/increase
the bass output.
Treble:Press TREB; then press
SEL
/to decrease/increase
the treble output.
20.Tune:Works in radio mode only.
Press TUNE
/to change
frequency down/up.
21.Seek:Press and release
SEEK
/for previous/next
strong station, selection or track.
22.AM/FM:Press to select
AM/FM1/FM2 frequency band.
SEL
SEEKTUNE
SEEKTUNE
Entertainment Systems
17
Page 18 of 184
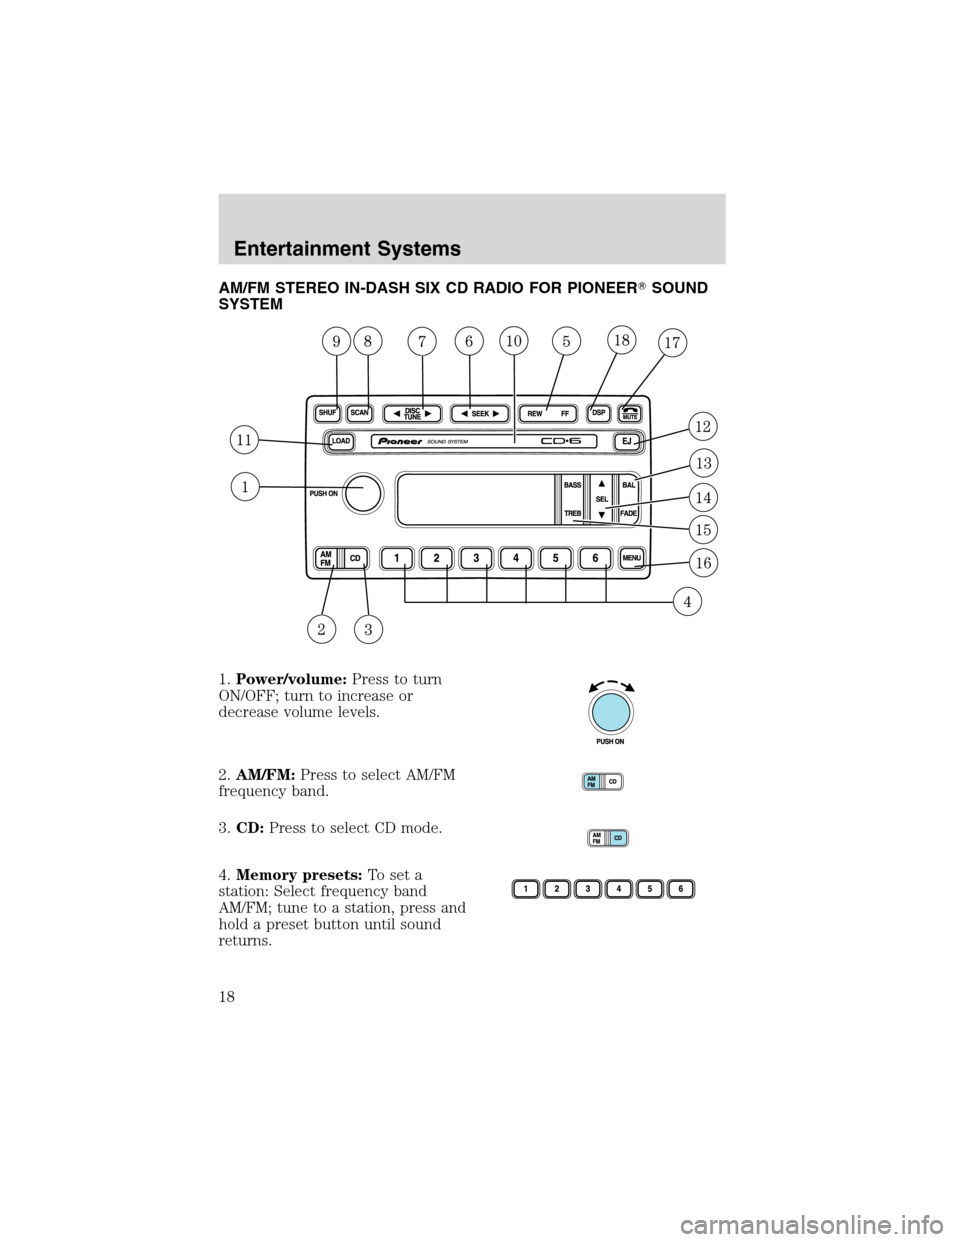
AM/FM STEREO IN-DASH SIX CD RADIO FOR PIONEER�SOUND
SYSTEM
1.Power/volume:Press to turn
ON/OFF; turn to increase or
decrease volume levels.
2.AM/FM:Press to select AM/FM
frequency band.
3.CD:Press to select CD mode.
4.Memory presets:To set a
station: Select frequency band
AM/FM; tune to a station, press and
hold a preset button until sound
returns.
Entertainment Systems
18
Page 19 of 184

5.Rewind:Press to stop tape
during rewind/fast forward.
Fast forward:Press to start CD
play. With the dual media audio,
press CD to toggle between single
CD and CD changer play.
6.Seek:Press and release
SEEK
/for previous/next
strong station, selection or track.
7.Tune:Radio: Press
orto
manually tune down or up the radio
frequency band. CD: Press
to
select the previous track or
to select the next track on the CD.
8.Scan:Press SCAN to move up
the radio frequency band. SCAN
automatically finds a station, plays it
for five seconds seconds, then moves to the next station. Press again to
stop.
Tape/CD:Press SCAN to sample tape/CD selections for eight seconds.
Press again to stop.
9.Shuffle:Press to play tracks in
random order.
10.CD door:Insert the disc with
the playing side down and printed
side up.
11.Load:Press to load a CD. Press
and hold to load up to six discs.
12.Eject:Press to eject a CD.
Press and hold to eject all loaded
discs.
13.Balance:Press BAL; then press
SEL
/to shift sound to the
left/right speakers.
Entertainment Systems
19
Page 21 of 184
REAR AUDIO CONTROLS (IF EQUIPPED)
The rear seat controls allow the middle seat passengers to operate the
radio, tape, CD or CD changer (if equipped).
To engage, simultaneously press the memory preset controls 3 and 5.
Press again to disengage.
1.Mode:Push to toggle between
AM, FM1, FM2, tape, CD or CD
changer mode (if equipped).
2.Memory:Push successively to
allow rear seat passengers to scroll
through memory presets. Push in
CD changer mode (if equipped) to
advance to the next disc.
3.Headphone jack:Plug a 3.5 mm
headphone into the jack.
4.Headphone/speaker:Press to turn all speakers off (headphone
mode). Press again to deactivate the headphone and activate system
speakers.
5.Seek:Press
orto access the previous or next station, selection
or track.
6.Volume:Press + to increase and—to decrease volume levels. From
the rear seat controls, volume can not be set higher than the front seat
setting.
Entertainment Systems
21
Page 49 of 184

2. Pressand release again within three seconds to confirm that all the
doors are closed and locked.Note:the doors will lock again, the horn
will chirp once and the headlamps will flash.
If any of the doors are not properly closed the horn will make two quick
chirps.
Sounding a panic alarm
Press
to activate the alarm. The horn will sound for a maximum of
30 seconds and the parklamps will flash for a maximum of 3 minutes.
Press again or turn the ignition to ON to deactivate, or wait for the alarm
to timeout in 3 minutes.
Note:The panic alarm will only operate when the ignition is in the OFF
or ACC position.
Replacing the battery
The remote entry transmitter uses one coin type three-volt lithium
battery CR2032 or equivalent. The typical operating range for your
remote entry transmitter is approximately 10 meters (33 feet). A
decrease in the operating range could be caused by:
•weather conditions,
•nearby radio towers,
•structures around the vehicle and
•other vehicles parked next to the vehicle.
To replace the battery:
1. Twist a thin coin between the two
halves of the remote entry
transmitter near the key ring. DO
NOT TAKE THE FRONT PART OF
THE REMOTE ENTRY
TRANSMITTER APART.
2. Remove the old battery.
3. Insert the new battery. Refer to
the diagram inside the remote entry
transmitter for the correct orientation of the battery.
4. Snap the two halves back together.
Note:Replacement of the battery willnotcause the remote transmitter
to become deprogrammed from your vehicle. The remote transmitter
should operate normally after battery replacement.
Locks and Security
49
Page 86 of 184

STARTING YOUR VEHICLE
Positions of the ignition
1. ACCESSORY, electrical
accessories such as the radio to
operate while the engine is not
running.
2. LOCK, locks the steering wheel
and allows key removal.
3. OFF, shuts off the engine and all
accessories without locking the
steering wheel. This position also
allows the automatic transmission gearshift lever to be moved from the P
(Park) position without the brake pedal being depressed.
In the ignition OFF position, the automatic transmission shift
lever can be moved from the P (Park) position without the brake
pedal depressed. To avoid unwanted vehicle movement, always set the
parking brake.
4. ON, all electrical accessories are operational and warning lights will
illuminate. This is the position the key is in when you’re driving.
5. START, cranks the engine. Release the key as soon as the engine
starts.
Preparing to start your vehicle
Engine starting is controlled by the powertrain control system. This
system meets all Canadian Interference-Causing Equipment standard
requirements regulating the impulse electrical field strength of radio
noise.
When starting a fuel-injected engine, don’t press the accelerator before
or during starting. Only use the accelerator when you have difficulty
starting the engine. For more information on starting the vehicle, refer to
Starting the enginein this chapter.
Extended idling at high engine speeds can produce very high
temperatures in the engine and exhaust system, creating the risk
of fire or other damage.
3
1
2
5
4
Driving
86


:Use with Bass,
Treble, Balance and Fade controls.
19.Bass:Press BASS; then press
SEL
/to decrease/increase
the bass output.
Treble:Press TREB; then press
SEL
/to decrease/increase
the")

The rear seat controls allow the middle seat passengers to operate the
radio, tape, CD or CD changer (if equipped).
To engage, simultaneously press the memory preset")