2002 FORD EXPLORER SPORT ECO mode
[x] Cancel search: ECO modePage 42 of 184
To vent the moon roof:press and hold thecontrol.The moon
roof must be in the closed position in order to move it into the
vent position.To close, press and hold the
control until the glass
panel stops moving.
The moon roof sliding shade can be opened or closed manually. The
glass panel must be closed in order to move the sliding shade.
Note:If the battery is disconnected, discharged, or a new battery is
installed, the moon roof positions will need to be reset. To reset the
moon roof positions, move the moon roof into the vent position.
ELECTRONIC COMPASS AND OUTSIDE TEMPERATURE DISPLAY
(IF EQUIPPED)
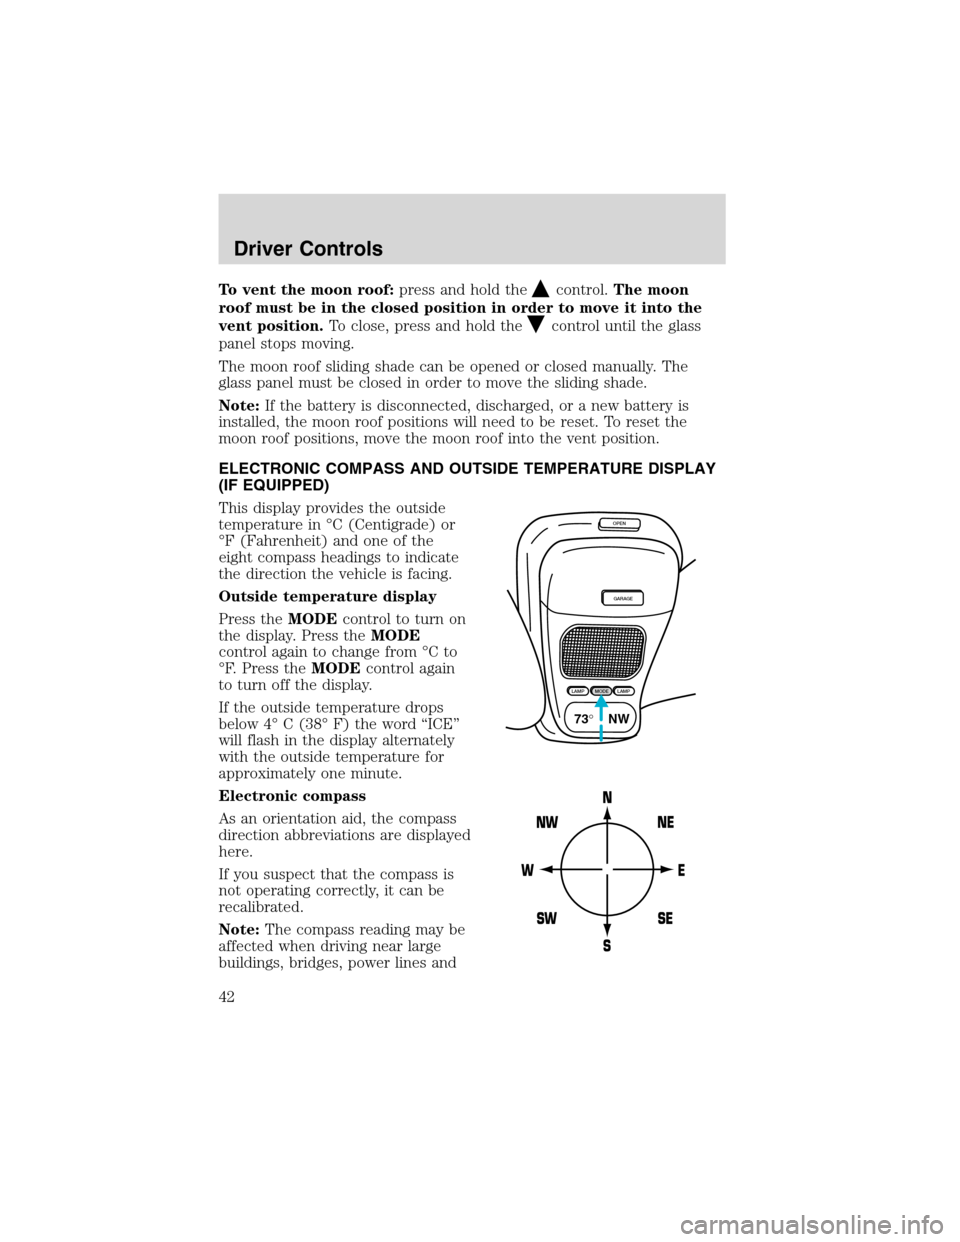
This display provides the outside
temperature in°C (Centigrade) or
°F (Fahrenheit) and one of the
eight compass headings to indicate
the direction the vehicle is facing.
Outside temperature display
Press theMODEcontrol to turn on
the display. Press theMODE
control again to change from°Cto
°F. Press theMODEcontrol again
to turn off the display.
If the outside temperature drops
below 4°C (38°F) the word“ICE”
will flash in the display alternately
with the outside temperature for
approximately one minute.
Electronic compass
As an orientation aid, the compass
direction abbreviations are displayed
here.
If you suspect that the compass is
not operating correctly, it can be
recalibrated.
Note:The compass reading may be
affected when driving near large
buildings, bridges, power lines and
OPEN
GARAGE
LAMPMODELAMP
73° NW
Driver Controls
42
Page 43 of 184
broadcast antennas. Magnetic or metallic objects place on or in the
vehicle may also affect the compass reading.
•Adjusting the compass
Note:The ignition must be in the ON position.
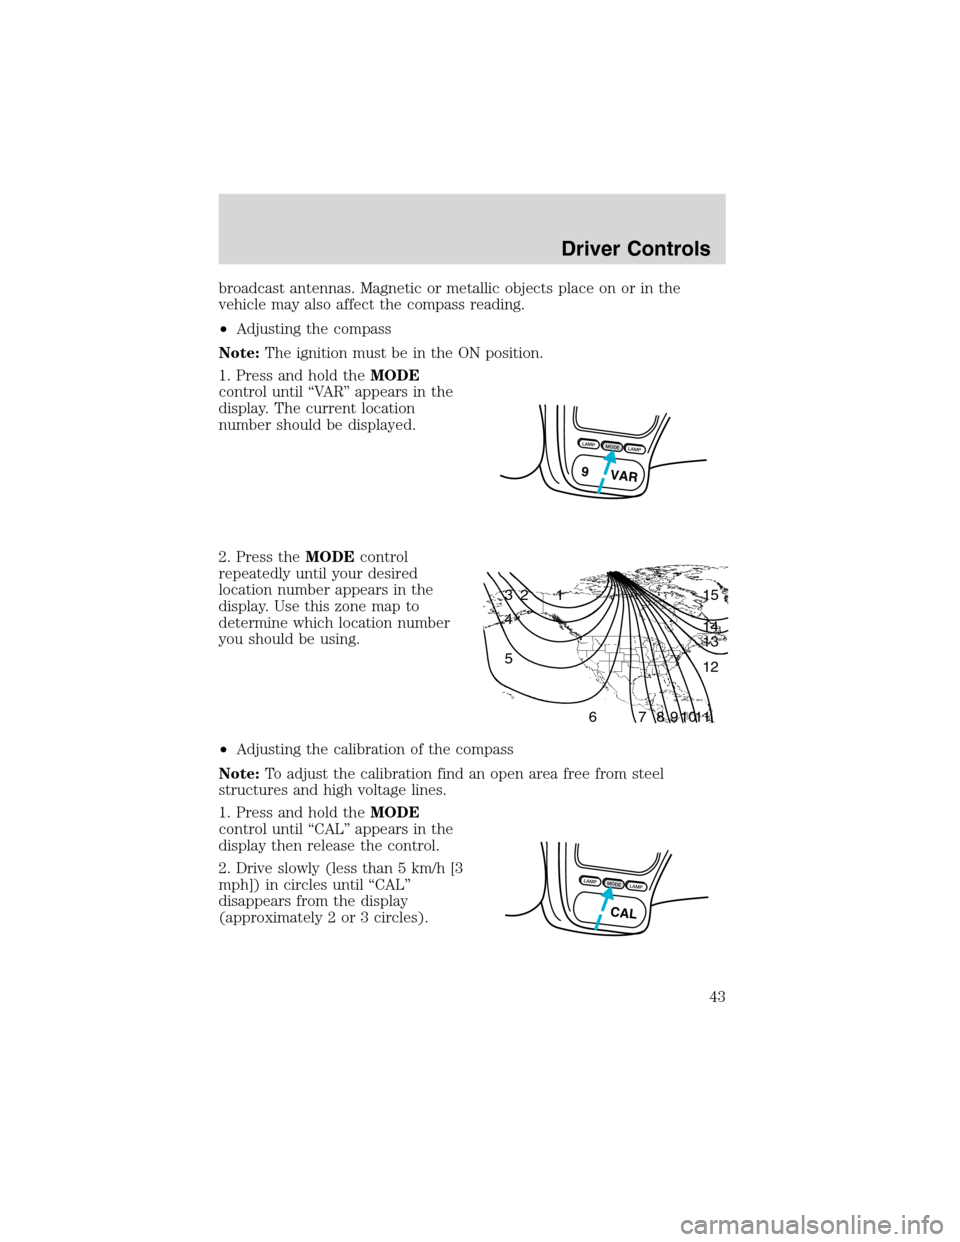
1. Press and hold theMODE
control until“VA R”appears in the
display. The current location
number should be displayed.
2. Press theMODEcontrol
repeatedly until your desired
location number appears in the
display. Use this zone map to
determine which location number
you should be using.
•Adjusting the calibration of the compass
Note:To adjust the calibration find an open area free from steel
structures and high voltage lines.
1. Press and hold theMODE
control until“CAL”appears in the
display then release the control.
2. Drive slowly (less than 5 km/h [3
mph]) in circles until“CAL”
disappears from the display
(approximately 2 or 3 circles).
LAMPMODELAMP
9 VAR
1 2 3
4
5
6 7 8 9 101112 13 14 15
LAMPMODELAMP
CAL
Driver Controls
43
Page 50 of 184
Replacing lost remote entry transmitters
If you would like to have your remote entry transmitter reprogrammed
because you lost one, or would like to buy additional remote entry
transmitters, you can either reprogram them yourself, or takeall
remote entry transmittersto your authorized dealer for
reprogramming.
How to reprogram your remote entry transmitters
You must haveall remote entry transmitters(maximum of four)
available before beginning this procedure.
To reprogram the remote entry
transmitters:
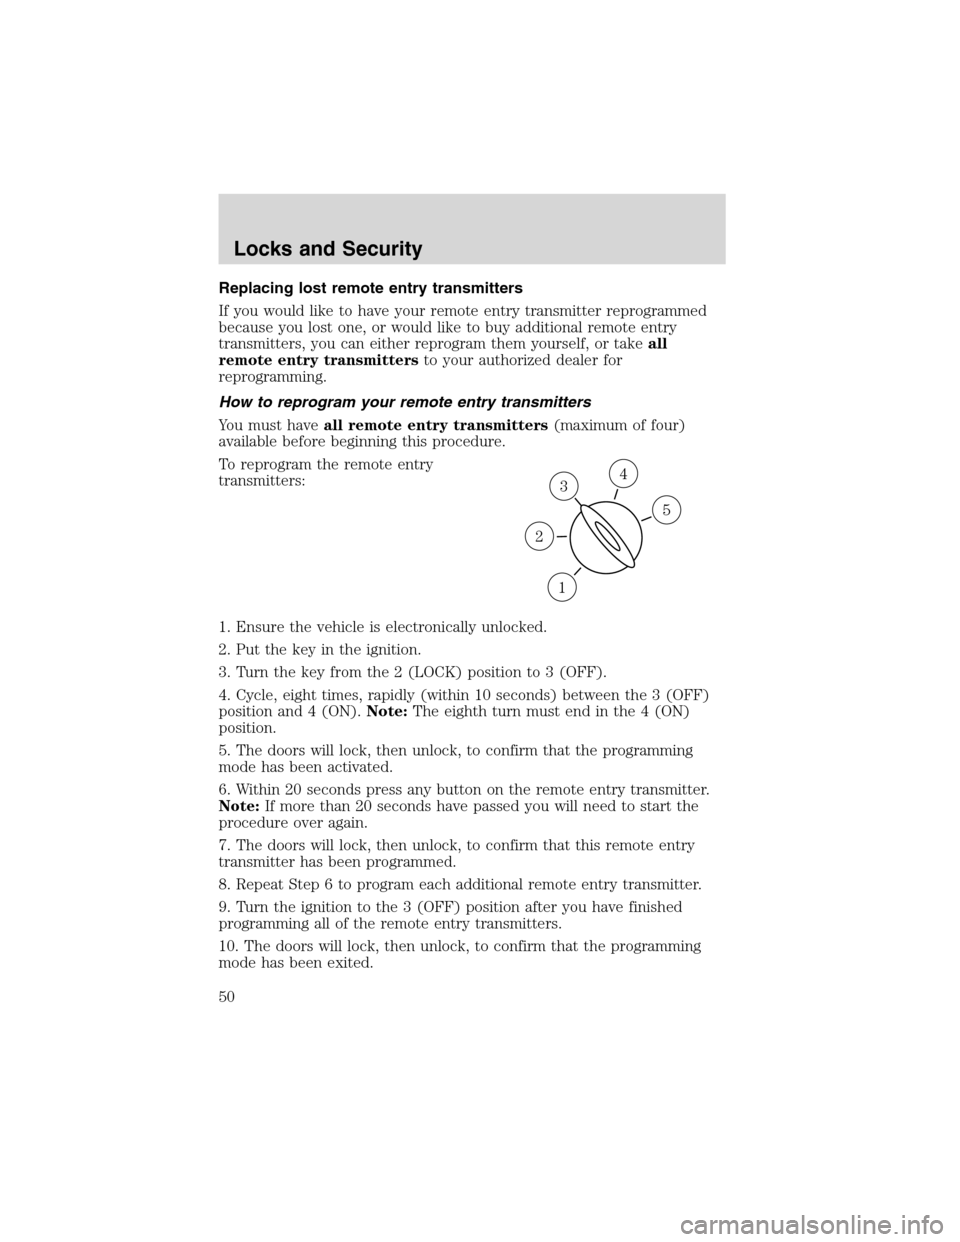
1. Ensure the vehicle is electronically unlocked.
2. Put the key in the ignition.
3. Turn the key from the 2 (LOCK) position to 3 (OFF).
4. Cycle, eight times, rapidly (within 10 seconds) between the 3 (OFF)
position and 4 (ON).Note:The eighth turn must end in the 4 (ON)
position.
5. The doors will lock, then unlock, to confirm that the programming
mode has been activated.
6. Within 20 seconds press any button on the remote entry transmitter.
Note:If more than 20 seconds have passed you will need to start the
procedure over again.
7. The doors will lock, then unlock, to confirm that this remote entry
transmitter has been programmed.
8. Repeat Step 6 to program each additional remote entry transmitter.
9. Turn the ignition to the 3 (OFF) position after you have finished
programming all of the remote entry transmitters.
10. The doors will lock, then unlock, to confirm that the programming
mode has been exited.
3
1
2
5
4
Locks and Security
50
Page 51 of 184
KEYLESS ENTRY SYSTEM (IF EQUIPPED)
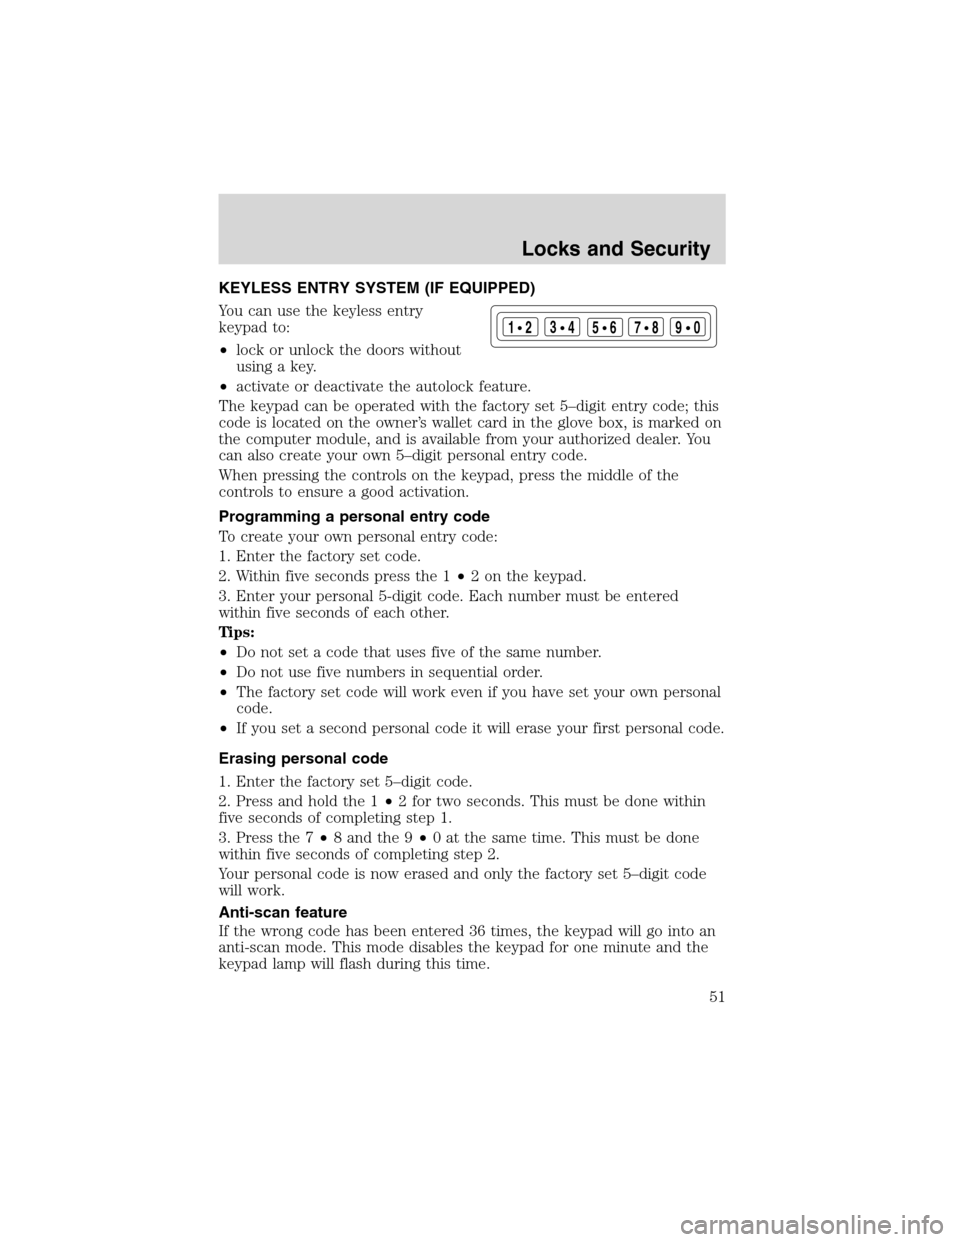
You can use the keyless entry
keypad to:
•lock or unlock the doors without
using a key.
•activate or deactivate the autolock feature.
The keypad can be operated with the factory set 5–digit entry code; this
code is located on the owner’s wallet card in the glove box, is marked on
the computer module, and is available from your authorized dealer. You
can also create your own 5–digit personal entry code.
When pressing the controls on the keypad, press the middle of the
controls to ensure a good activation.
Programming a personal entry code
To create your own personal entry code:
1. Enter the factory set code.
2. Within five seconds press the 1•2 on the keypad.
3. Enter your personal 5-digit code. Each number must be entered
within five seconds of each other.
Tips:
•Do not set a code that uses five of the same number.
•Do not use five numbers in sequential order.
•The factory set code will work even if you have set your own personal
code.
•If you set a second personal code it will erase your first personal code.
Erasing personal code
1. Enter the factory set 5–digit code.
2. Press and hold the 1•2 for two seconds. This must be done within
five seconds of completing step 1.
3. Press the 7•8 and the 9•0 at the same time. This must be done
within five seconds of completing step 2.
Your personal code is now erased and only the factory set 5–digit code
will work.
Anti-scan feature
If the wrong code has been entered 36 times, the keypad will go into an
anti-scan mode. This mode disables the keypad for one minute and the
keypad lamp will flash during this time.
123
45678
90
Locks and Security
51
Page 65 of 184
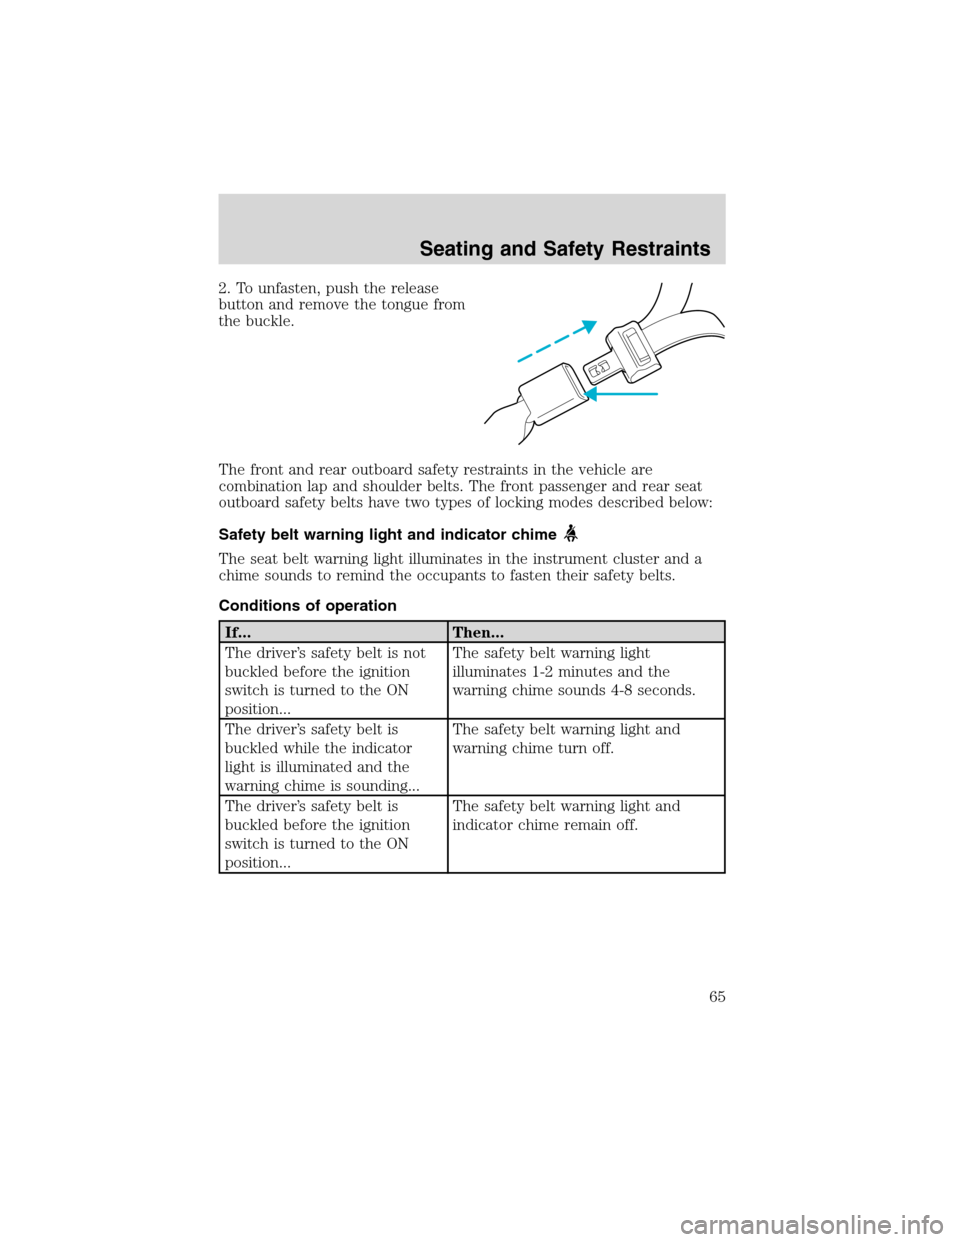
2. To unfasten, push the release
button and remove the tongue from
the buckle.
The front and rear outboard safety restraints in the vehicle are
combination lap and shoulder belts. The front passenger and rear seat
outboard safety belts have two types of locking modes described below:
Safety belt warning light and indicator chime
The seat belt warning light illuminates in the instrument cluster and a
chime sounds to remind the occupants to fasten their safety belts.
Conditions of operation
If... Then...
The driver’s safety belt is not
buckled before the ignition
switch is turned to the ON
position...The safety belt warning light
illuminates 1-2 minutes and the
warning chime sounds 4-8 seconds.
The driver’s safety belt is
buckled while the indicator
light is illuminated and the
warning chime is sounding...The safety belt warning light and
warning chime turn off.
The driver’s safety belt is
buckled before the ignition
switch is turned to the ON
position...The safety belt warning light and
indicator chime remain off.
Seating and Safety Restraints
65
Page 81 of 184
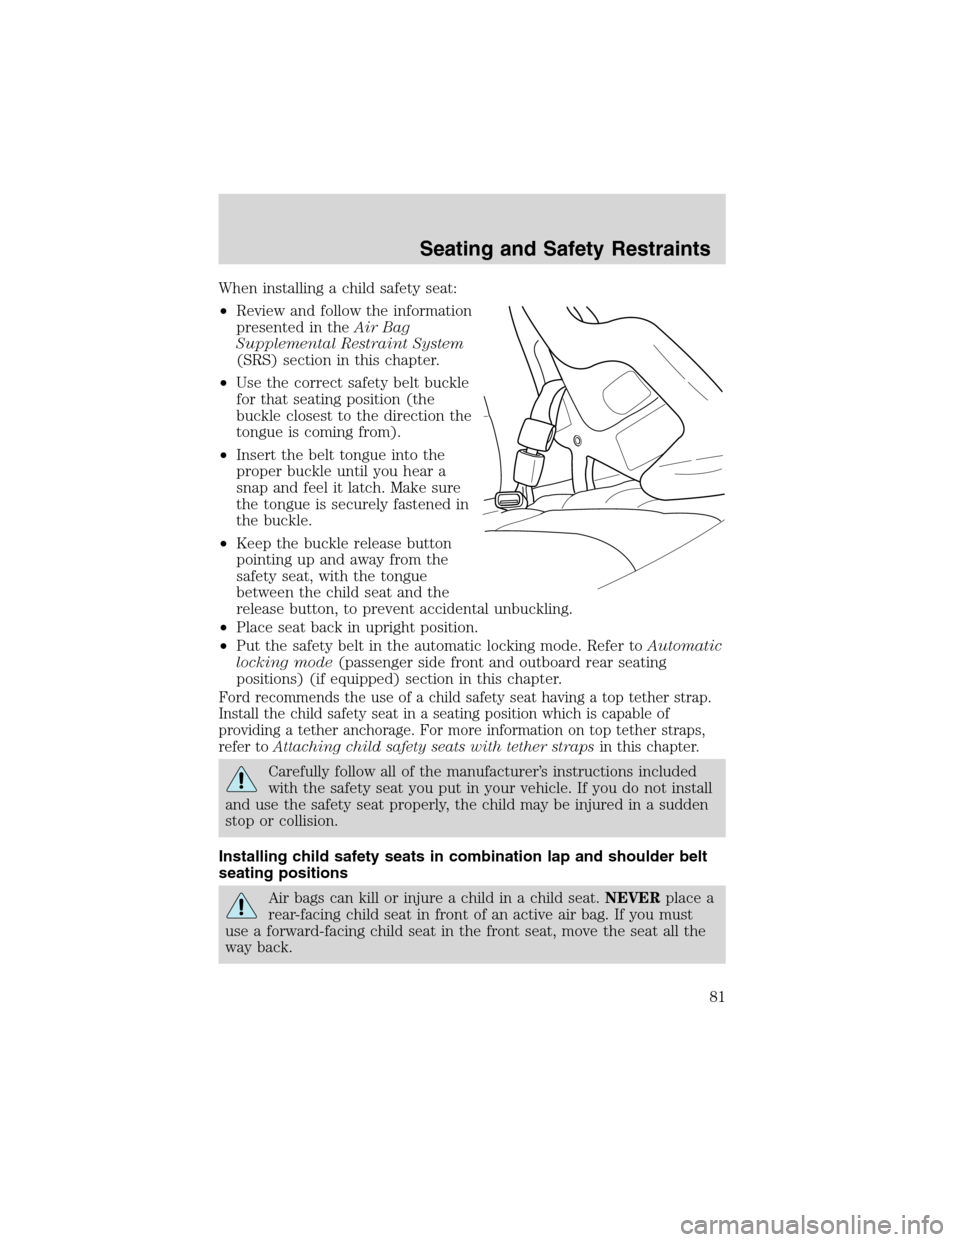
When installing a child safety seat:
•Review and follow the information
presented in theAir Bag
Supplemental Restraint System
(SRS) section in this chapter.
•Use the correct safety belt buckle
for that seating position (the
buckle closest to the direction the
tongue is coming from).
•Insert the belt tongue into the
proper buckle until you hear a
snap and feel it latch. Make sure
the tongue is securely fastened in
the buckle.
•Keep the buckle release button
pointing up and away from the
safety seat, with the tongue
between the child seat and the
release button, to prevent accidental unbuckling.
•Place seat back in upright position.
•Put the safety belt in the automatic locking mode. Refer toAutomatic
locking mode(passenger side front and outboard rear seating
positions) (if equipped) section in this chapter.
Ford recommends the use of a child safety seat having a top tether strap.
Install the child safety seat in a seating position which is capable of
providing a tether anchorage. For more information on top tether straps,
refer toAttaching child safety seats with tether strapsin this chapter.
Carefully follow all of the manufacturer’s instructions included
with the safety seat you put in your vehicle. If you do not install
and use the safety seat properly, the child may be injured in a sudden
stop or collision.
Installing child safety seats in combination lap and shoulder belt
seating positions
Air bags can kill or injure a child in a child seat.NEVERplace a
rear-facing child seat in front of an active air bag. If you must
use a forward-facing child seat in the front seat, move the seat all the
way back.
Seating and Safety Restraints
81
Page 95 of 184
N (Neutral)
With the gearshift lever in N (Neutral), the vehicle can be started and is
free to roll. Hold the brake pedal down while in this position.
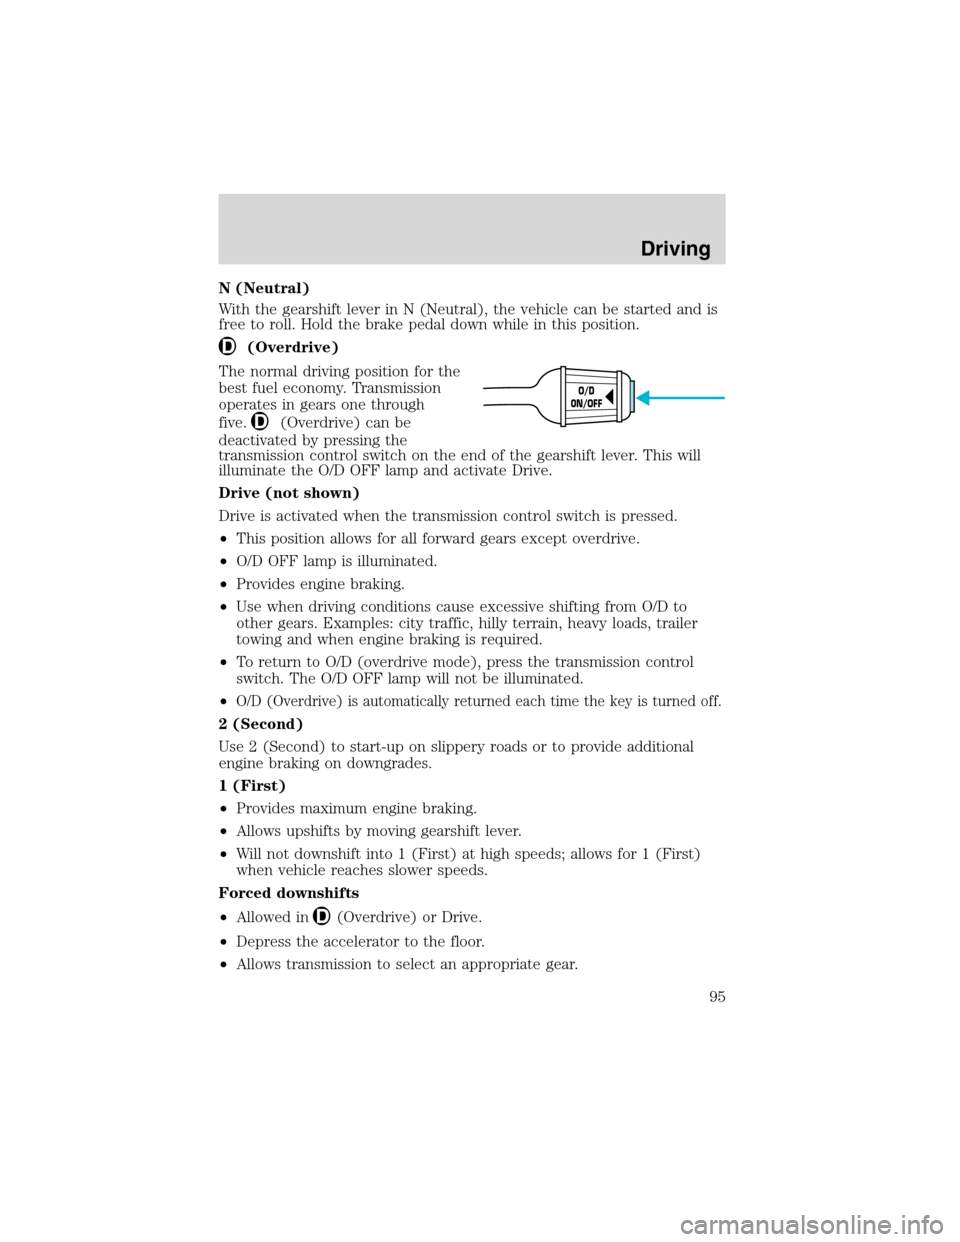
(Overdrive)
The normal driving position for the
best fuel economy. Transmission
operates in gears one through
five.
(Overdrive) can be
deactivated by pressing the
transmission control switch on the end of the gearshift lever. This will
illuminate the O/D OFF lamp and activate Drive.
Drive (not shown)
Drive is activated when the transmission control switch is pressed.
•This position allows for all forward gears except overdrive.
•O/D OFF lamp is illuminated.
•Provides engine braking.
•Use when driving conditions cause excessive shifting from O/D to
other gears. Examples: city traffic, hilly terrain, heavy loads, trailer
towing and when engine braking is required.
•To return to O/D (overdrive mode), press the transmission control
switch. The O/D OFF lamp will not be illuminated.
•
O/D (Overdrive) is automatically returned each time the key is turned off.
2 (Second)
Use 2 (Second) to start-up on slippery roads or to provide additional
engine braking on downgrades.
1 (First)
•Provides maximum engine braking.
•Allows upshifts by moving gearshift lever.
•Will not downshift into 1 (First) at high speeds; allows for 1 (First)
when vehicle reaches slower speeds.
Forced downshifts
•Allowed in
(Overdrive) or Drive.
•Depress the accelerator to the floor.
•Allows transmission to select an appropriate gear.
O/D
ON/OFF
Driving
95
Page 132 of 184
Board membership
The Board consists of:
•three consumer representatives
•a Ford or Lincoln Mercury dealership representative
Consumer candidates for Board membership are recruited and trained by
an independent consulting firm. The dealership Board member is chosen
from Ford and Lincoln Mercury dealership management, recognized for
their business leadership qualities.
What the Board needs
To have your case reviewed you must complete the application in the
DSB brochure and mail it to the address provided on the application
form. Some states will require you to use certified mail, with return
receipt requested.
Your application is reviewed and, if it is determined to be eligible, you
will receive an acknowledgment indicating:
•The file number assigned to your application.
•The toll-free phone number of the DSB’s independent administrator.
Your dealership and a Ford Motor Company representative will then be
asked to submit statements.
To properly review your case, the Board needs the following information:
•Legible copies of all documents and maintenance or repair orders
relevant to the case.
•The year, make, model, and Vehicle Identification Number (VIN) listed
on your vehicle ownership license.
•The date of repair(s) and mileage at the time of occurrence(s).
•The current mileage.
•The name of the dealer(s) who sold or serviced the vehicle.
•A brief description of your unresolved concern.
•A brief summary of the action taken by the dealer(s) and Ford Motor
Company.
•The names (if known) of all the people you contacted at the
dealership(s).
•A description of the action you expect to resolve your concern.
You will receive a letter of explanation if your application does not
qualify for Board review.
Customer Assistance
132