2002 FORD EXPLORER jump start
[x] Cancel search: jump startPage 205 of 312

GETTING ROADSIDE ASSISTANCE
To fully assist you should you have a vehicle concern, Ford offers a
complimentary roadside assistance program. This program is separate
from the New Vehicle Limited Warranty. The service is available:
²24±hours, seven days a week
²for the Basic warranty period (Canada) or New Vehicle Limited
Warranty period (U.S.) of three years or 60 000 km (36 000 miles),
whichever comes first on Ford and Mercury vehicles, and four years or
80 000 km (50 000 miles) on Lincoln vehicles
Roadside assistance will cover:
²changing a flat tire
²jump-starts
²lock-out assistance
²fuel delivery
²towing of your disabled vehicle to the nearest Ford dealership, or your
selling dealer if within 25 kms (15.5 miles) of the nearest Ford
Dealership (one tow per disablement). Even non-warranty related
tows, like accidents or getting stuck in the mud or snow, are covered
(some exclusions apply, such as impound towing or repossession).
Using roadside assistance
Complete the roadside assistance identification card and place it in your
wallet for quick reference. In the United States, this card is found in the
Owner Guide portfolio in the glove compartment in Ford vehicles and is
mailed to you if you own a Mercury or Lincoln. In Canada, it is found in
the Roadside Assistance book in the glove compartment.
To receive roadside assistance in the United States for Ford or Mercury
vehicles, call 1-800-241-3673 or if you own a Lincoln vehicle, call
1±800±521±4140. In Canada call 1±800±665±2006.
Should you need to arrange roadside assistance for yourself, Ford will
reimburse a reasonable amount. To obtain information about
reimbursement, call 1-800-241-3673 in the United States for Ford or
Mercury vehicles; or if you own a Lincoln vehicle, call 1±800±521±4140.
Call 1±800±665±2006 in Canada.
Roadside emergencies
205
Page 222 of 312

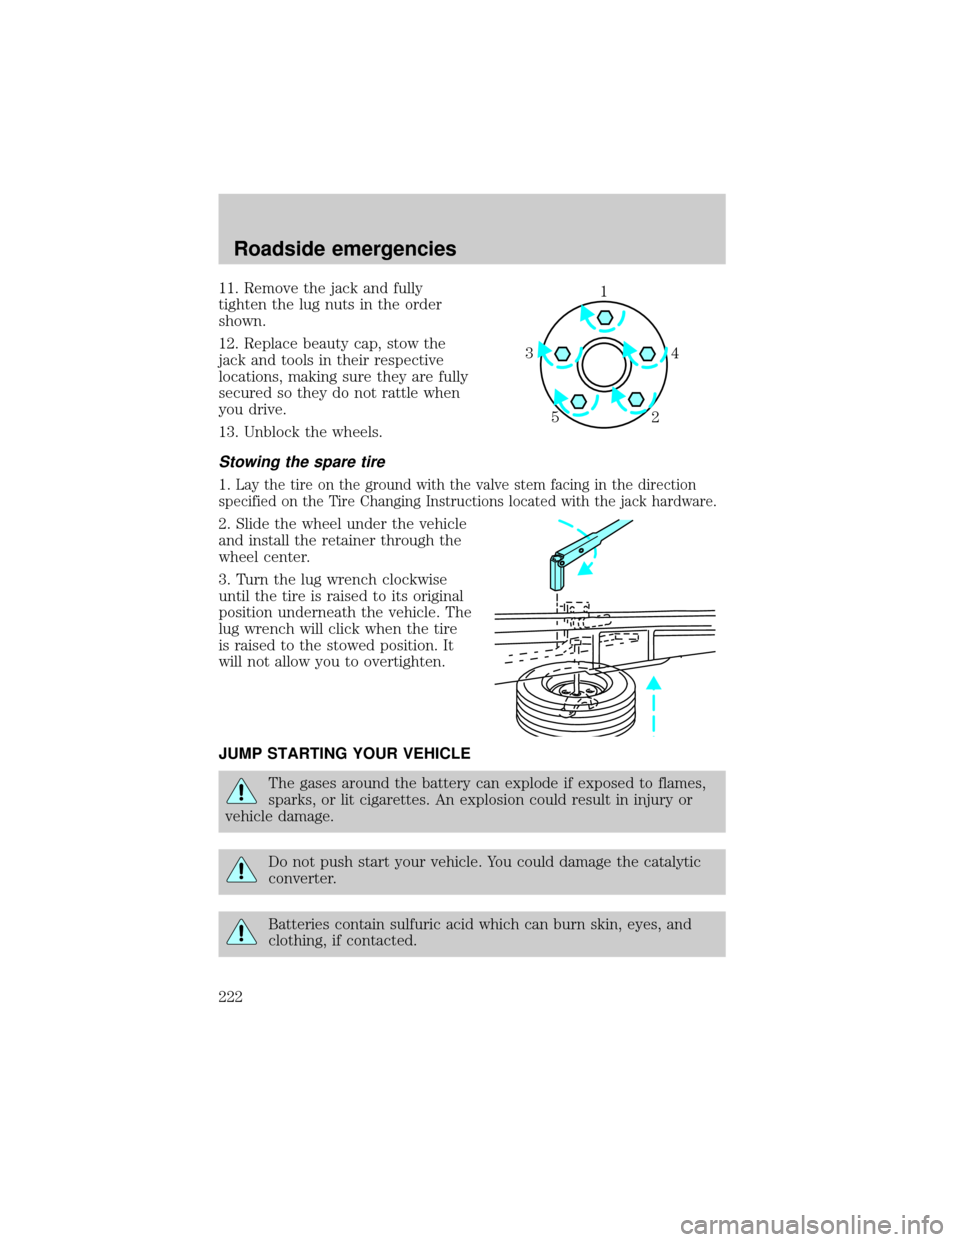
11. Remove the jack and fully
tighten the lug nuts in the order
shown.
12. Replace beauty cap, stow the
jack and tools in their respective
locations, making sure they are fully
secured so they do not rattle when
you drive.
13. Unblock the wheels.
Stowing the spare tire
1.Lay the tire on the ground with the valve stem facing in the direction
specified on the Tire Changing Instructions located with the jack hardware.
2. Slide the wheel under the vehicle
and install the retainer through the
wheel center.
3. Turn the lug wrench clockwise
until the tire is raised to its original
position underneath the vehicle. The
lug wrench will click when the tire
is raised to the stowed position. It
will not allow you to overtighten.
JUMP STARTING YOUR VEHICLE
The gases around the battery can explode if exposed to flames,
sparks, or lit cigarettes. An explosion could result in injury or
vehicle damage.
Do not push start your vehicle. You could damage the catalytic
converter.
Batteries contain sulfuric acid which can burn skin, eyes, and
clothing, if contacted.
1
4 3
2 5
Roadside emergencies
222
Page 223 of 312

Do not attempt to push start your vehicle. Automatic
transmissions do not have push-start capability.
Preparing your vehicle
When the battery is disconnected or a new battery is installed, the
transmission must relearn its adaptive strategy. As a result of this, the
transmission may shift firmly. This operation is considered normal and
will not effect function or durability of the transmission. Over time, the
adaptive learning process will fully update transmission operation to its
optimum shift feel.
1.Use only a 12±volt supply to start your vehicle.
2. Do not disconnect the battery of the disabled vehicle as this could
damage the vehicle's electrical system.
3.
Park the booster vehicle close to the hood of the disabled vehicle
making sure the two vehiclesdo nottouch. Set the parking brake on both
vehicles and stay clear of the engine cooling fan and other moving parts.
4. Check all battery terminals and remove any excessive corrosion before
you attach the battery cables. Ensure that vent caps are tight and level.
5. Turn the heater fan on in both vehicles to protect any electrical
surges. Turn all other accessories off.
Connecting the jumper cables
1. Connect the positive (+) booster cable to the positive (+) terminal of
the discharged battery.
Note:In the illustrations,lightning boltsare used to designate the
assisting (boosting) battery.
+–+–
Roadside emergencies
223
Page 224 of 312

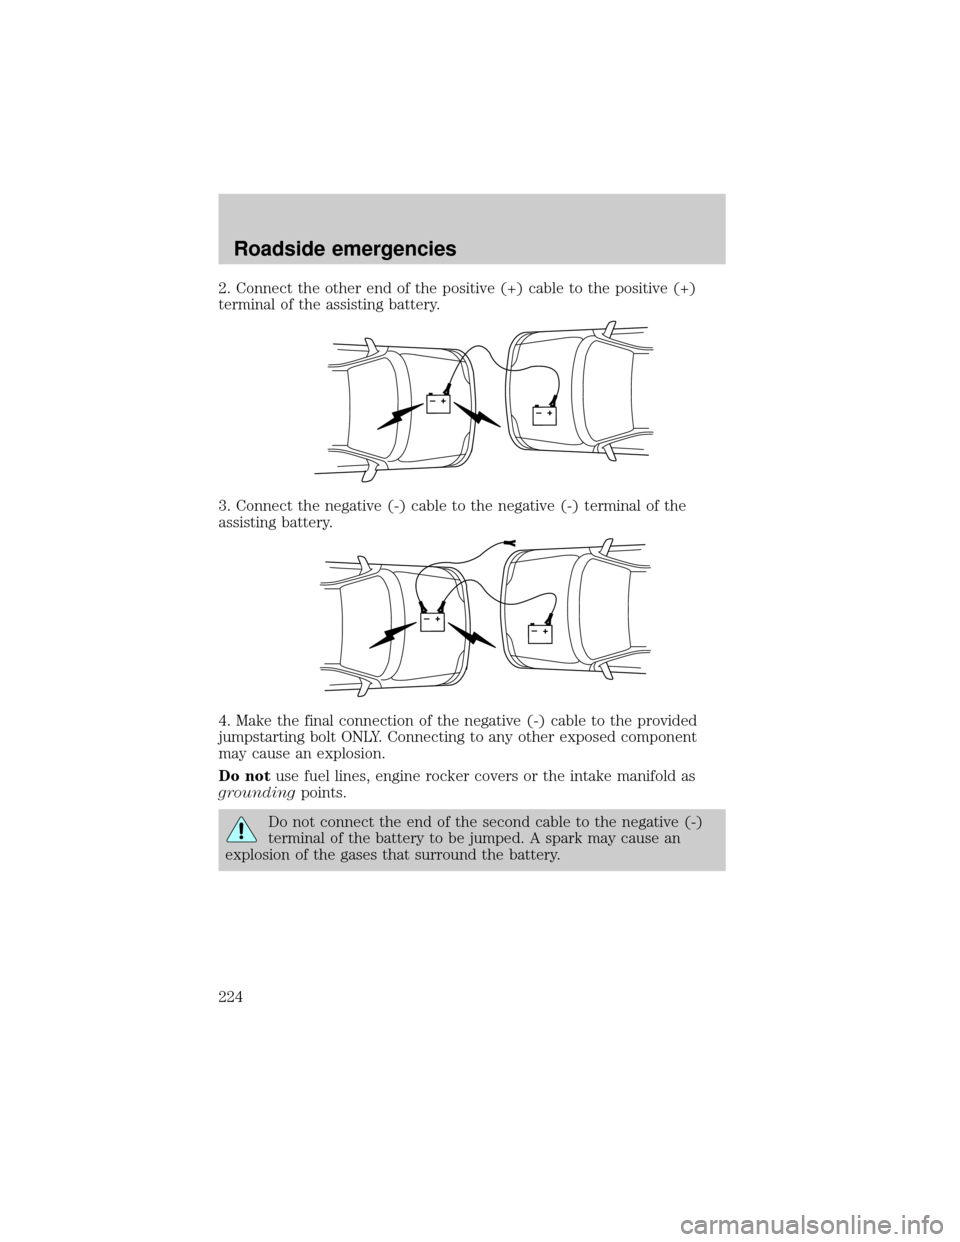
2. Connect the other end of the positive (+) cable to the positive (+)
terminal of the assisting battery.
3. Connect the negative (-) cable to the negative (-) terminal of the
assisting battery.
4. Make the final connection of the negative (-) cable to the provided
jumpstarting bolt ONLY. Connecting to any other exposed component
may cause an explosion.
Do notuse fuel lines, engine rocker covers or the intake manifold as
groundingpoints.
Do not connect the end of the second cable to the negative (-)
terminal of the battery to be jumped. A spark may cause an
explosion of the gases that surround the battery.
+–+–
+–+–
Roadside emergencies
224
Page 226 of 312

Jump starting
1. Start the engine of the booster vehicle and run the engine at
moderately increased speed.
2. Start the engine of the disabled vehicle.
3. Once the disabled vehicle has been started, run both engines for an
additional three minutes before disconnecting the jumper cables.
Removing the jumper cables
Remove the jumper cables in the reverse order that they were
connected.
1. Remove the jumper cable from thegroundmetal surface.
2. Remove the jumper cable on the negative (-) connection of the
booster vehicle's battery.
+–+–
+–+–
Roadside emergencies
226
Page 227 of 312

3. Remove the jumper cable from the positive (+) terminal of the booster
vehicle's battery.
4. Remove the jumper cable from the positive (+) terminal of the
disabled vehicle's battery.
After the disabled vehicle has been started and the jumper cables
removed, allow it to idle for several minutes so the engine computer can
relearnits idle conditions.
+–+–
Roadside emergencies
227
Page 306 of 312

through water .................192, 196
E
Electronic message center .........19
Emergencies, roadside
jump-starting ..........................222
Emission control system ..........268
Engine ........................................287
check engine/
service engine soon light ...........8
cleaning ...................................278
coolant .....................................241
fail-safe coolant ......................246
idle speed control ...................251
lubrication
specifications ..................285, 287
refill capacities ........................283
service points ..................233±234
starting after a collision .........206
Engine block heater .................174
Engine oil ..................................235
checking and adding ..............235
dipstick ....................................235
filter, specifications ........238, 283
recommendations ...................238
refill capacities ........................283
specifications ..................285, 287
Exhaust fumes ..........................175
F
Fail safe cooling ........................246
Floor mats .................................114
Fluid capacities .........................283
Foglamps .....................................28
Four-Wheel Drive
vehicles ................................12, 187control trac .......................50, 188
description ......................188, 190
driving off road .......................191
electronic shift ..........................50
preparing to
drive your vehicle ...................179
Fuel ............................................259
calculating
fuel economy ....................22, 265
cap .....................................10, 264
capacity ...................................283
choosing the right fuel ...........261
comparisons with EPA
fuel economy estimates .........268
detergent in fuel .....................263
filling your vehicle
with fuel ..................259, 264±265
filter, specifications ........265, 283
fuel pump shut-off switch .....206
gauge .........................................17
improving fuel economy ........265
octane rating ...................262, 287
quality ......................................262
running out of fuel .................263
safety information relating
to automotive fuels ................259
Fuses ..................................207, 209
G
Garage door opener ..........101, 103
Gas cap (see Fuel cap) ......10, 264
Gas mileage
(see Fuel economy) .................265
Gauges ...................................13±14
battery voltage gauge ...............16
engine coolant
temperature gauge ...................14
engine oil pressure gauge ........16
fuel gauge ..................................17
Index
306
Page 307 of 312

odometer ...................................15
speedometer .............................14
tachometer ................................16
trip odometer ............................15
GAWR
(Gross Axle Weight Rating) .....194
calculating ...............................196
definition .................................194
driving with a heavy load ......194
location ....................................194
GVWR (Gross
Vehicle Weight Rating) .............194
calculating .......................194, 196
definition .................................194
driving with a heavy load ......194
location ....................................194
H
Hazard flashers .........................206
Head restraints .................131, 136
Headlamps ...................................28
aiming ......................................276
autolamp system .......................30
bulb specifications ..................274
daytime running lights .............28
flash to pass ..............................29
high beam ...........................11, 29
replacing bulbs .......................271
turning on and off ....................28
warning chime ..........................13
Heating ........................................33
heating and air
conditioning system .................33
HomeLink universal
transceiver (see
Garage door opener) ........103±107
Hood ..........................................231I
Ignition .................................89, 287
Infant seats
(see Safety seats) .....................163
Inspection/maintenance
(I/M) testing ..............................270
Instrument panel
cleaning ...................................281
cluster ..................................8, 281
lighting up
panel and interior .....................29
location of components ..............8
J
Jack ....................................217±218
positioning .......................217, 219
storage .....................217±218, 222
Jump-starting your vehicle ......222
K
Keyless entry system ...............121
autolock ...................................124
keypad .....................................121
locking and unlocking doors ..122
programming entry code .......121
Keys ...........................127±128, 130
key in ignition chime ...............13
positions of the ignition ...........89
L
Lamps
autolamp system .......................30
bulb replacement
specifications chart ................274
cargo lamps ...............................29
daytime running light ...............28
Index
307