2002 FORD EXPLORER automatic transmission
[x] Cancel search: automatic transmissionPage 193 of 312

Water intrusion into the transmission may damage the transmission.
If the rear axle is submerged in water, the rear axle lubricant should be
checked and changed, if necessary. The rear axle is filled with a
synthetic lubricant and does not normally require a lubricant change for
the life of the vehicle. Rear axle lubricant quantities should not need to
be checked unless a leak is suspected.
Driving on hilly or sloping terrain
When driving on a hill, avoid driving crosswise or turning on steep
slopes. You could lose traction and slip sideways. Drive straight up,
straight down or avoid the hill completely. Know the conditions on the
other side of a hill before driving over the crest.
When climbing a steep hill, start in a lower gear rather than downshifting
to a lower gear from a higher gear once the ascent has started. This
reduces the strain on the engine.
When descending a steep hill, avoid sudden braking. Shift to a lower gear
when added engine braking is desired.
When speed control is on and you are driving uphill, your vehicle speed
may drop considerably, especially if you are carrying a heavy load.
If vehicle speed drops more than 16 km/h (10 mph), the speed control
will cancel automatically. Resume speed with accelerator pedal.
If speed control cancels after climbing the hill, reset speed by pressing and
holding the SET ACCEL button (to resume speeds over 50 km/h (30 mph).
Automatic transmissions may shift frequently while driving up steep
grades. Eliminate frequent shifting by shifting out ofD(Overdrive) into
D (Drive).
Driving on snow and ice
A 4WD vehicle has advantages over 2WD vehicles in snow and ice but
can skid like any other vehicle.
Avoid sudden applications of power and quick changes of direction on
snow and ice. Apply the accelerator slowly and steadily when starting
from a full stop.
When braking, apply the brakes as you normally would. In order to allow
the anti-lock brake system (ABS) to operate properly, keep steady
pressure on the brake pedal.
Allow more stopping distance and drive slower than usual. Consider
using one of the lower gears.
Driving
193
Page 198 of 312
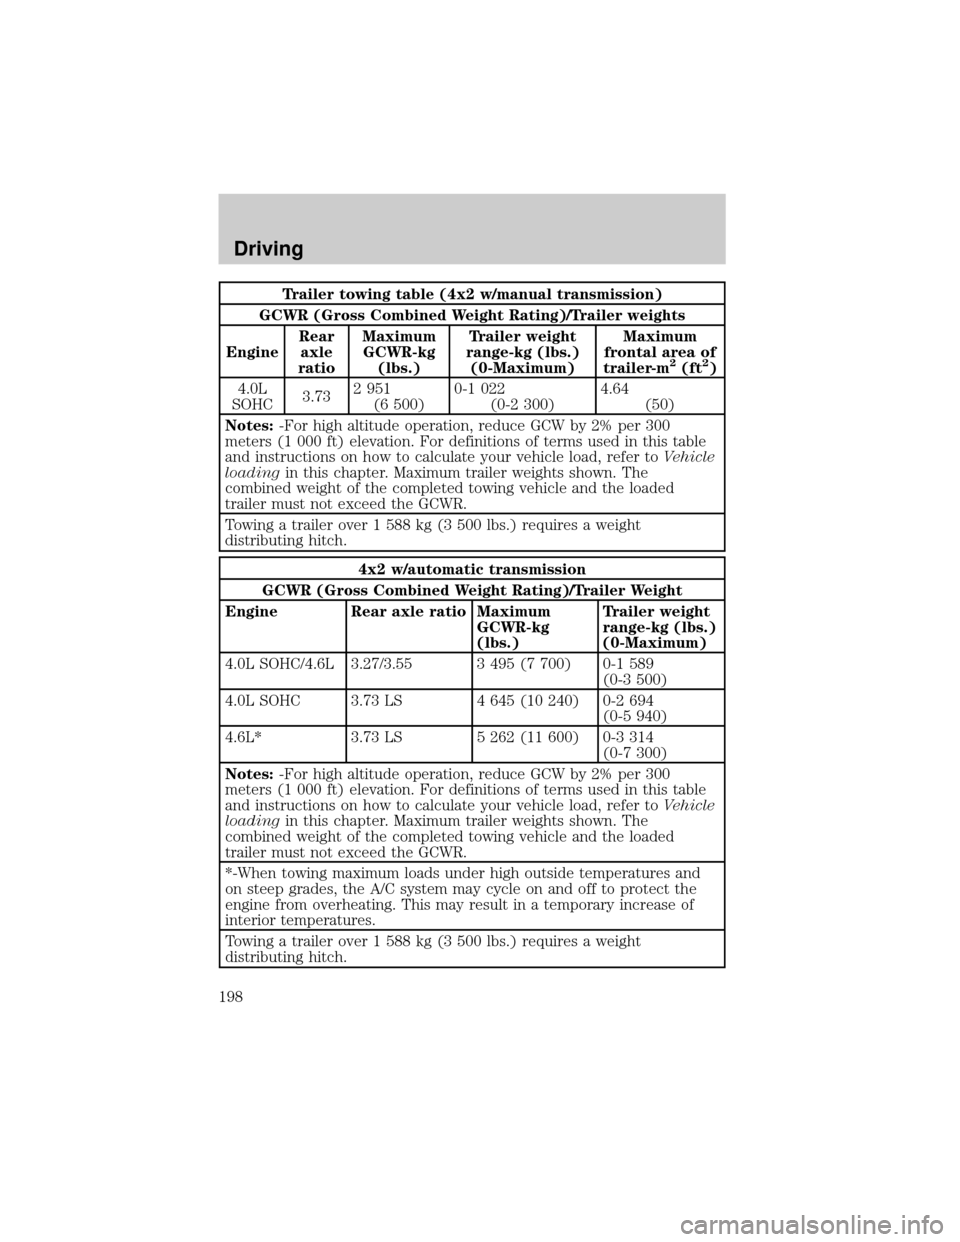
Trailer towing table (4x2 w/manual transmission)
GCWR (Gross Combined Weight Rating)/Trailer weights
EngineRear
axle
ratioMaximum
GCWR-kg
(lbs.)Trailer weight
range-kg (lbs.)
(0-Maximum)Maximum
frontal area of
trailer-m
2(ft2)
4.0L
SOHC3.732 951
(6 500)0-1 022
(0-2 300)4.64
(50)
Notes:-For high altitude operation, reduce GCW by 2% per 300
meters (1 000 ft) elevation. For definitions of terms used in this table
and instructions on how to calculate your vehicle load, refer toVehicle
loadingin this chapter. Maximum trailer weights shown. The
combined weight of the completed towing vehicle and the loaded
trailer must not exceed the GCWR.
Towing a trailer over 1 588 kg (3 500 lbs.) requires a weight
distributing hitch.
4x2 w/automatic transmission
GCWR (Gross Combined Weight Rating)/Trailer Weight
Engine Rear axle ratio Maximum
GCWR-kg
(lbs.)Trailer weight
range-kg (lbs.)
(0-Maximum)
4.0L SOHC/4.6L 3.27/3.55 3 495 (7 700) 0-1 589
(0-3 500)
4.0L SOHC 3.73 LS 4 645 (10 240) 0-2 694
(0-5 940)
4.6L* 3.73 LS 5 262 (11 600) 0-3 314
(0-7 300)
Notes:-For high altitude operation, reduce GCW by 2% per 300
meters (1 000 ft) elevation. For definitions of terms used in this table
and instructions on how to calculate your vehicle load, refer toVehicle
loadingin this chapter. Maximum trailer weights shown. The
combined weight of the completed towing vehicle and the loaded
trailer must not exceed the GCWR.
*-When towing maximum loads under high outside temperatures and
on steep grades, the A/C system may cycle on and off to protect the
engine from overheating. This may result in a temporary increase of
interior temperatures.
Towing a trailer over 1 588 kg (3 500 lbs.) requires a weight
distributing hitch.
Driving
198
Page 199 of 312
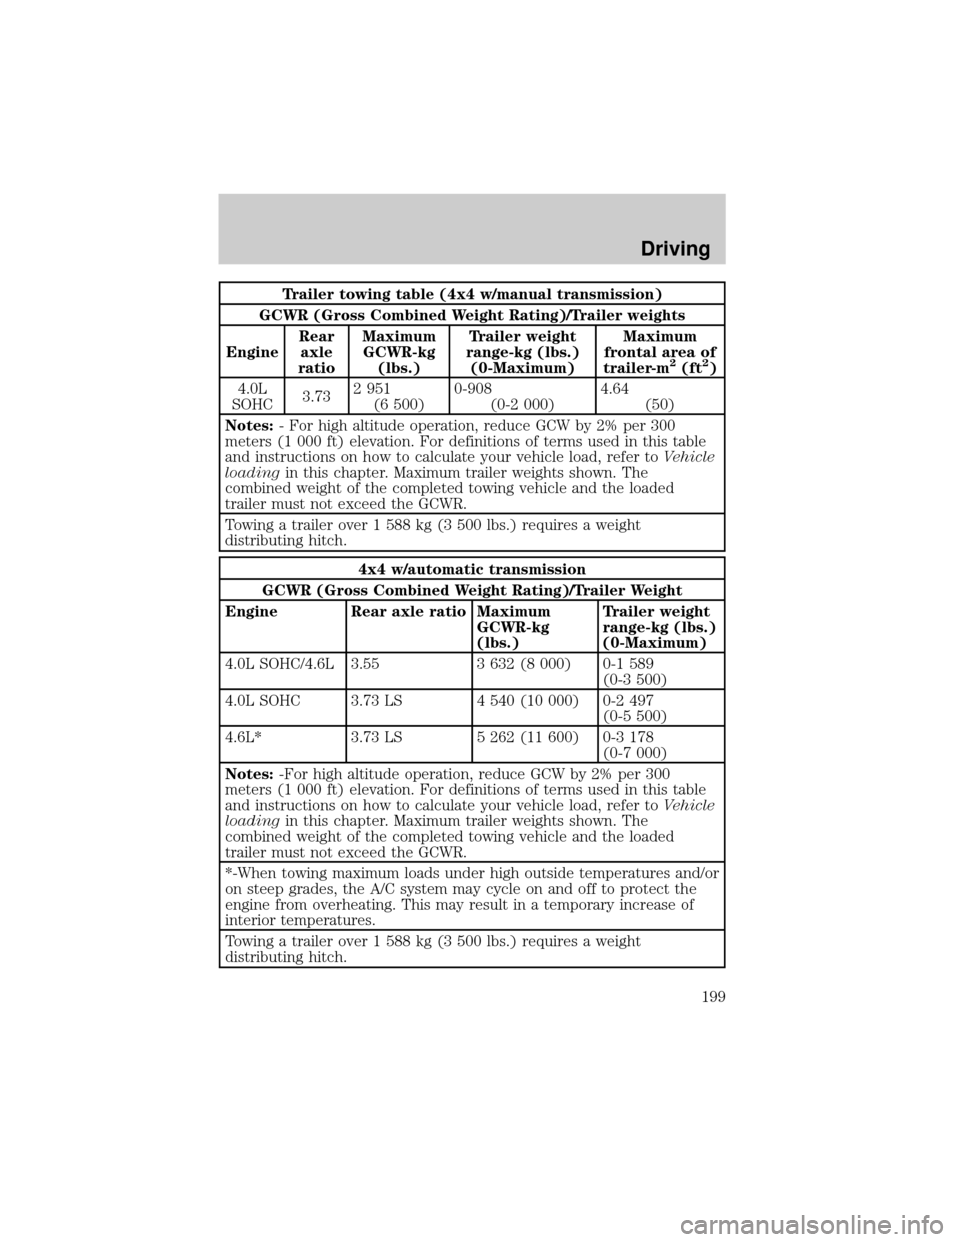
Trailer towing table (4x4 w/manual transmission)
GCWR (Gross Combined Weight Rating)/Trailer weights
EngineRear
axle
ratioMaximum
GCWR-kg
(lbs.)Trailer weight
range-kg (lbs.)
(0-Maximum)Maximum
frontal area of
trailer-m
2(ft2)
4.0L
SOHC3.732 951
(6 500)0-908
(0-2 000)4.64
(50)
Notes:- For high altitude operation, reduce GCW by 2% per 300
meters (1 000 ft) elevation. For definitions of terms used in this table
and instructions on how to calculate your vehicle load, refer toVehicle
loadingin this chapter. Maximum trailer weights shown. The
combined weight of the completed towing vehicle and the loaded
trailer must not exceed the GCWR.
Towing a trailer over 1 588 kg (3 500 lbs.) requires a weight
distributing hitch.
4x4 w/automatic transmission
GCWR (Gross Combined Weight Rating)/Trailer Weight
Engine Rear axle ratio Maximum
GCWR-kg
(lbs.)Trailer weight
range-kg (lbs.)
(0-Maximum)
4.0L SOHC/4.6L 3.55 3 632 (8 000) 0-1 589
(0-3 500)
4.0L SOHC 3.73 LS 4 540 (10 000) 0-2 497
(0-5 500)
4.6L* 3.73 LS 5 262 (11 600) 0-3 178
(0-7 000)
Notes:-For high altitude operation, reduce GCW by 2% per 300
meters (1 000 ft) elevation. For definitions of terms used in this table
and instructions on how to calculate your vehicle load, refer toVehicle
loadingin this chapter. Maximum trailer weights shown. The
combined weight of the completed towing vehicle and the loaded
trailer must not exceed the GCWR.
*-When towing maximum loads under high outside temperatures and/or
on steep grades, the A/C system may cycle on and off to protect the
engine from overheating. This may result in a temporary increase of
interior temperatures.
Towing a trailer over 1 588 kg (3 500 lbs.) requires a weight
distributing hitch.
Driving
199
Page 200 of 312
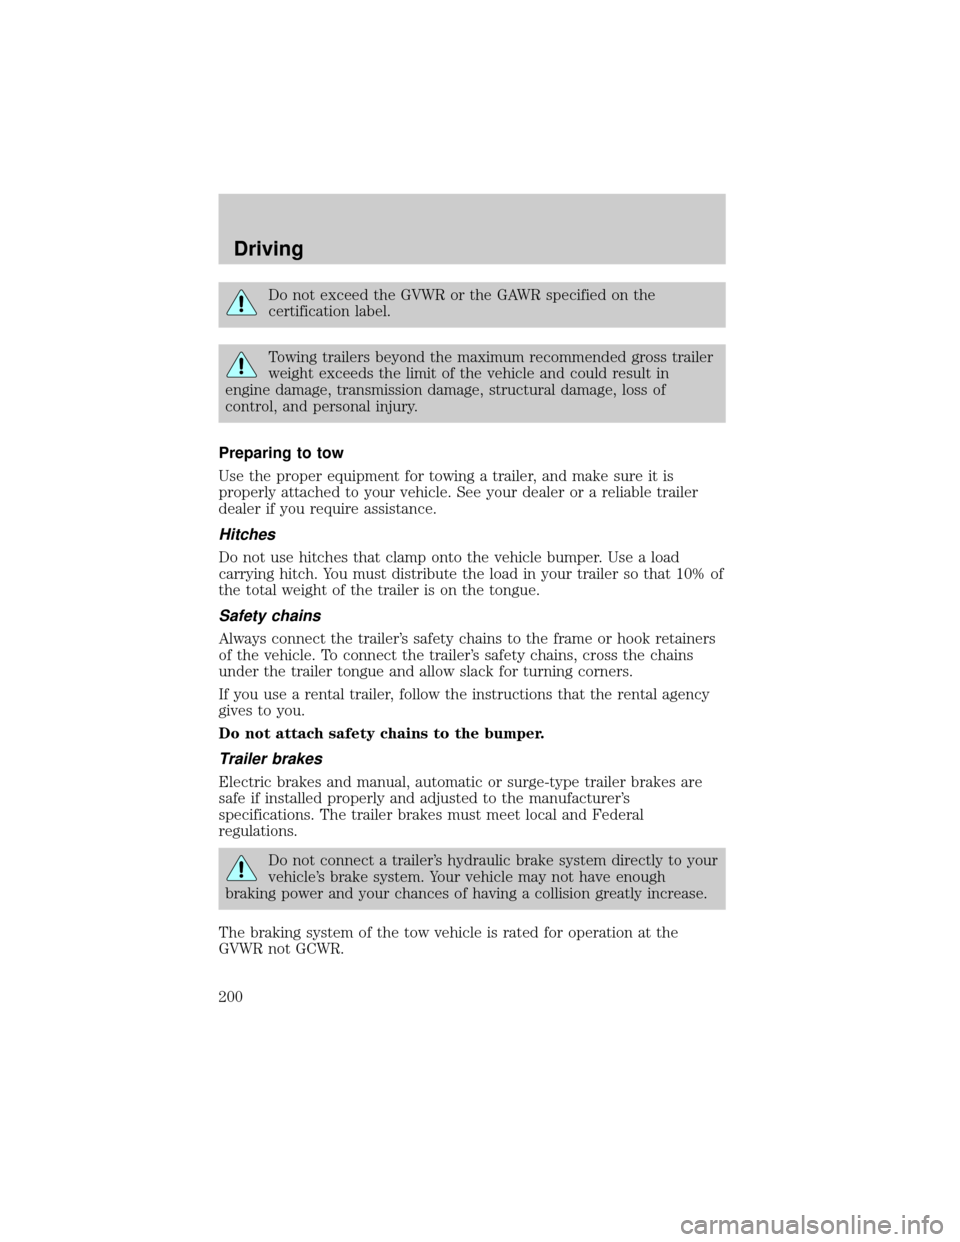
Do not exceed the GVWR or the GAWR specified on the
certification label.
Towing trailers beyond the maximum recommended gross trailer
weight exceeds the limit of the vehicle and could result in
engine damage, transmission damage, structural damage, loss of
control, and personal injury.
Preparing to tow
Use the proper equipment for towing a trailer, and make sure it is
properly attached to your vehicle. See your dealer or a reliable trailer
dealer if you require assistance.
Hitches
Do not use hitches that clamp onto the vehicle bumper. Use a load
carrying hitch. You must distribute the load in your trailer so that 10% of
the total weight of the trailer is on the tongue.
Safety chains
Always connect the trailer's safety chains to the frame or hook retainers
of the vehicle. To connect the trailer's safety chains, cross the chains
under the trailer tongue and allow slack for turning corners.
If you use a rental trailer, follow the instructions that the rental agency
gives to you.
Do not attach safety chains to the bumper.
Trailer brakes
Electric brakes and manual, automatic or surge-type trailer brakes are
safe if installed properly and adjusted to the manufacturer's
specifications. The trailer brakes must meet local and Federal
regulations.
Do not connect a trailer's hydraulic brake system directly to your
vehicle's brake system. Your vehicle may not have enough
braking power and your chances of having a collision greatly increase.
The braking system of the tow vehicle is rated for operation at the
GVWR not GCWR.
Driving
200
Page 201 of 312
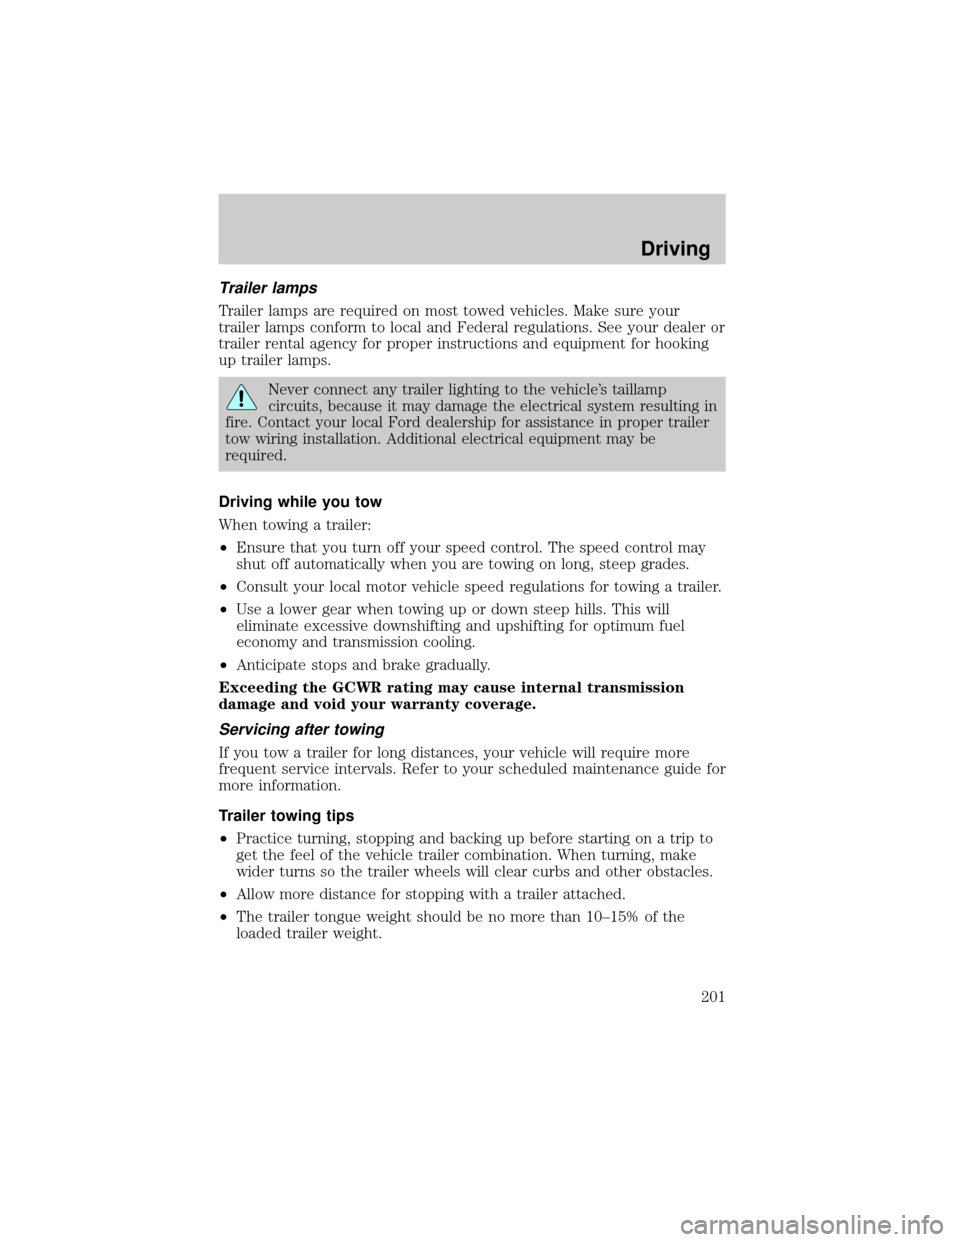
Trailer lamps
Trailer lamps are required on most towed vehicles. Make sure your
trailer lamps conform to local and Federal regulations. See your dealer or
trailer rental agency for proper instructions and equipment for hooking
up trailer lamps.
Never connect any trailer lighting to the vehicle's taillamp
circuits, because it may damage the electrical system resulting in
fire. Contact your local Ford dealership for assistance in proper trailer
tow wiring installation. Additional electrical equipment may be
required.
Driving while you tow
When towing a trailer:
²Ensure that you turn off your speed control. The speed control may
shut off automatically when you are towing on long, steep grades.
²Consult your local motor vehicle speed regulations for towing a trailer.
²Use a lower gear when towing up or down steep hills. This will
eliminate excessive downshifting and upshifting for optimum fuel
economy and transmission cooling.
²Anticipate stops and brake gradually.
Exceeding the GCWR rating may cause internal transmission
damage and void your warranty coverage.
Servicing after towing
If you tow a trailer for long distances, your vehicle will require more
frequent service intervals. Refer to your scheduled maintenance guide for
more information.
Trailer towing tips
²Practice turning, stopping and backing up before starting on a trip to
get the feel of the vehicle trailer combination. When turning, make
wider turns so the trailer wheels will clear curbs and other obstacles.
²Allow more distance for stopping with a trailer attached.
²The trailer tongue weight should be no more than 10±15% of the
loaded trailer weight.
Driving
201
Page 202 of 312

²After you have traveled 80 km (50 miles), thoroughly check your
hitch, electrical connections and trailer wheel lug nuts.
²When stopped in traffic for long periods of time in hot weather, place
the gearshift in P (Park) (automatic transmissions) or N (Neutral)
(manual transmissions). This aids engine cooling and air conditioner
efficiency.
²Vehicles with trailers should not be parked on a grade. If you must
park on a grade, place wheel chocks under the trailer's wheels.
Launching or retrieving a boat
When backing down a ramp during boat launching or retrieval,
²Do not allow the static water level to rise above the bottom edge of
the rear bumper and
²Do not allow waves to break higher than 15 cm (6 inches) above the
bottom edge of the rear bumper.
Exceeding these limits may allow water to enter critical vehicle
components, adversely affecting driveability, emissions, reliability and
causing internal transmission damage.
Replace the rear axle lubricant anytime the axle has been submerged in
water. Rear axle lubricant quantities are not to be checked or changed
unless a leak is suspected or repair required.
Disconnect the wiring to the trailer before backing the trailer into the
water. Reconnect the wiring to the trailer after the trailer is removed
from the water.
Recreational towing (all wheels on the ground)
Follow these guidelines for your specific powertrain combination to tow
your vehicle with all four wheels on the ground (such as behind a
recreational vehicle).
These guidelines are designed to ensure that your transmission is not
damaged due to insufficient lubrication.
Driving
202
Page 220 of 312
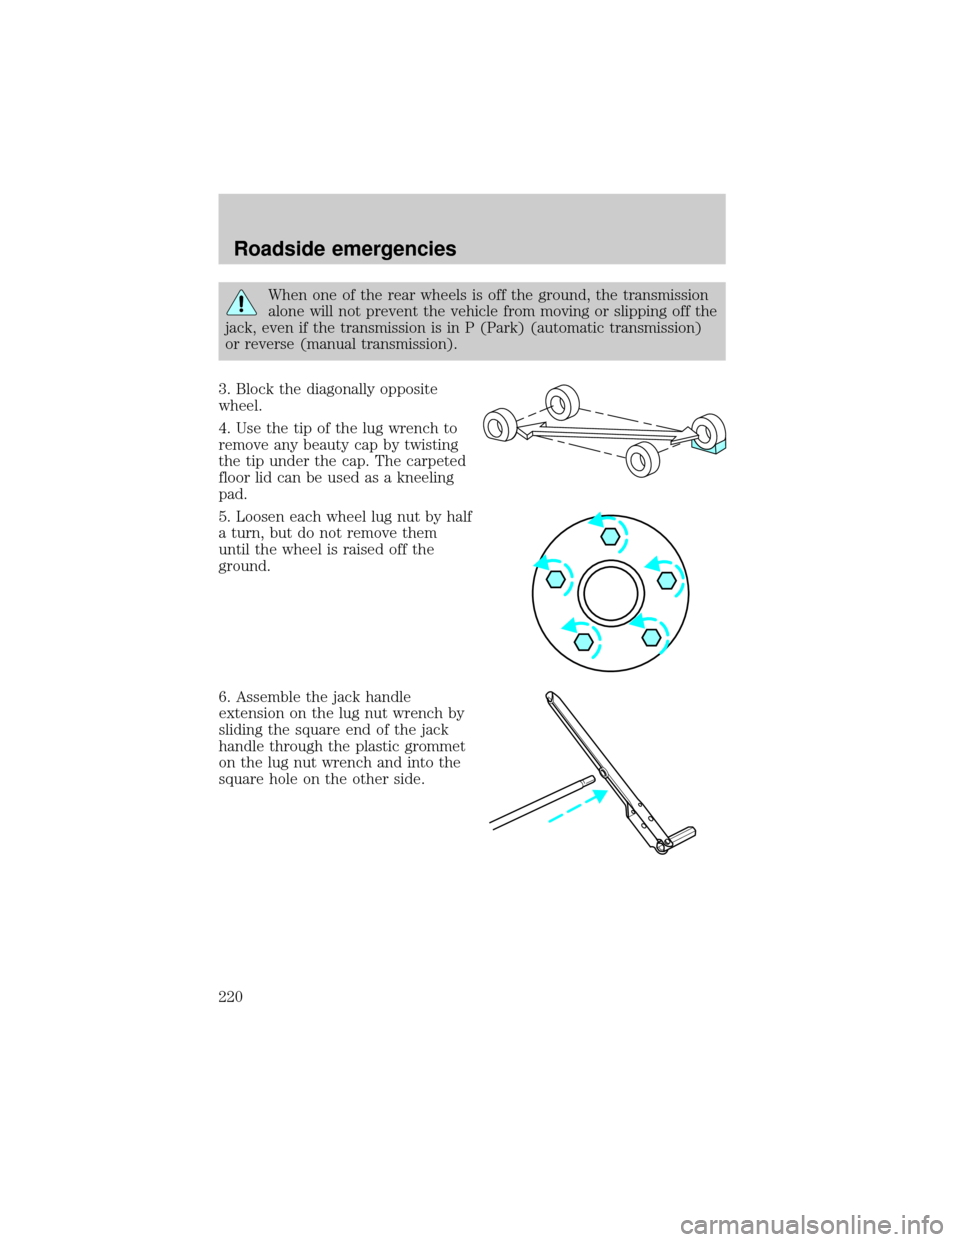
When one of the rear wheels is off the ground, the transmission
alone will not prevent the vehicle from moving or slipping off the
jack, even if the transmission is in P (Park) (automatic transmission)
or reverse (manual transmission).
3. Block the diagonally opposite
wheel.
4. Use the tip of the lug wrench to
remove any beauty cap by twisting
the tip under the cap. The carpeted
floor lid can be used as a kneeling
pad.
5. Loosen each wheel lug nut by half
a turn, but do not remove them
until the wheel is raised off the
ground.
6. Assemble the jack handle
extension on the lug nut wrench by
sliding the square end of the jack
handle through the plastic grommet
on the lug nut wrench and into the
square hole on the other side.
Roadside emergencies
220
Page 223 of 312
Do not attempt to push start your vehicle. Automatic
transmissions do not have push-start capability.
Preparing your vehicle
When the battery is disconnected or a new battery is installed, the
transmission must relearn its adaptive strategy. As a result of this, the
transmission may shift firmly. This operation is considered normal and
will not effect function or durability of the transmission. Over time, the
adaptive learning process will fully update transmission operation to its
optimum shift feel.
1.Use only a 12±volt supply to start your vehicle.
2. Do not disconnect the battery of the disabled vehicle as this could
damage the vehicle's electrical system.
3.
Park the booster vehicle close to the hood of the disabled vehicle
making sure the two vehiclesdo nottouch. Set the parking brake on both
vehicles and stay clear of the engine cooling fan and other moving parts.
4. Check all battery terminals and remove any excessive corrosion before
you attach the battery cables. Ensure that vent caps are tight and level.
5. Turn the heater fan on in both vehicles to protect any electrical
surges. Turn all other accessories off.
Connecting the jumper cables
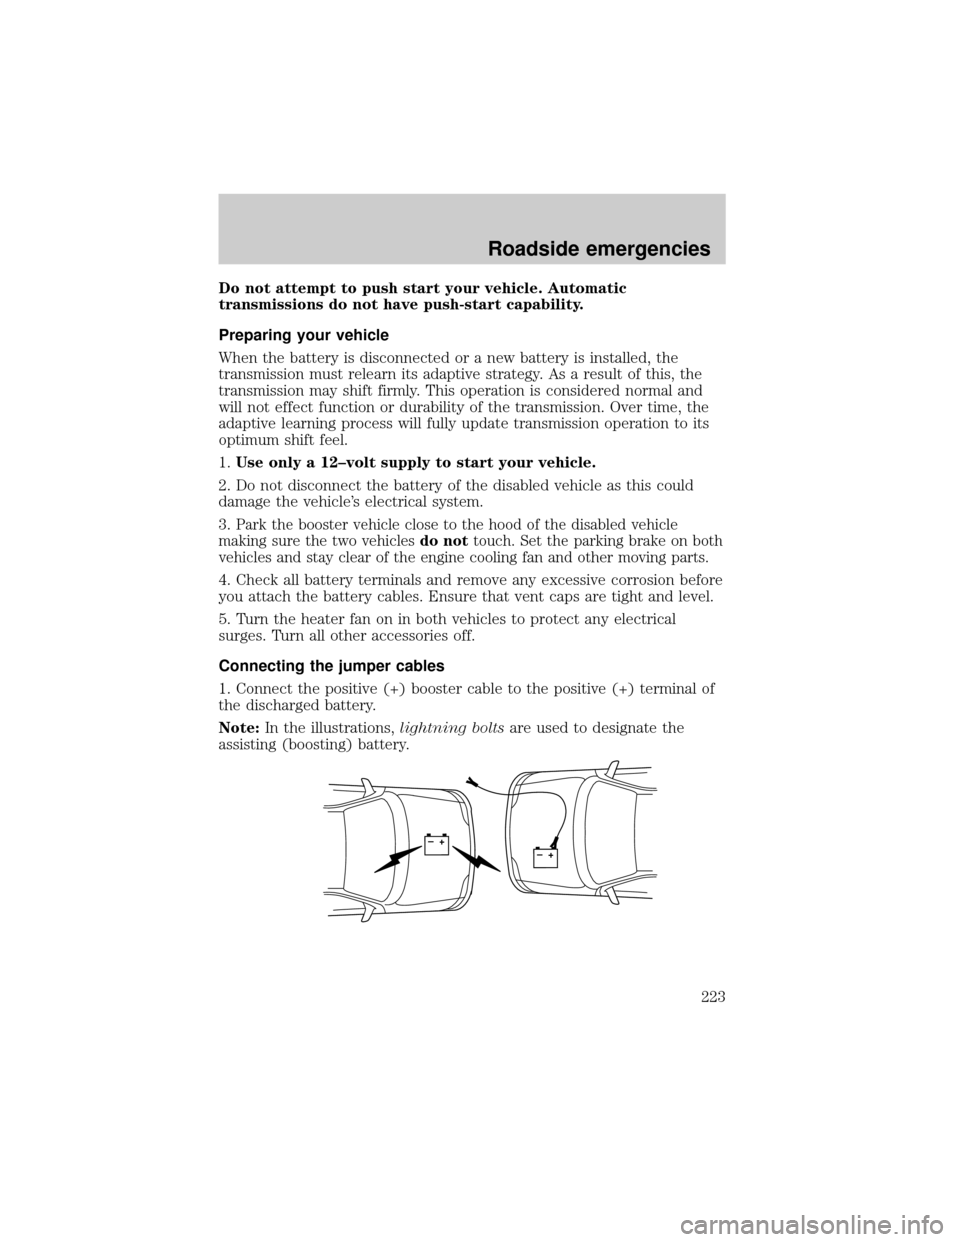
1. Connect the positive (+) booster cable to the positive (+) terminal of
the discharged battery.
Note:In the illustrations,lightning boltsare used to designate the
assisting (boosting) battery.
+–+–
Roadside emergencies
223