Page 170 of 256

Make sure the spare tire and jacking equipment are stowed and
secured in the proper storage location.
Never run the engine with one wheel off the ground.
Tire change procedure
Preparing to change the tire
To prevent the vehicle from moving when you change a tire, be
sure the parking brake is set, then block (in both directions) the
wheel that is diagonally opposite (other side and end of the vehicle) to
the tire being changed.
1. Park on a level surface.
2. Activate the warning flashers.
3. Place the gearshift in P (Park).
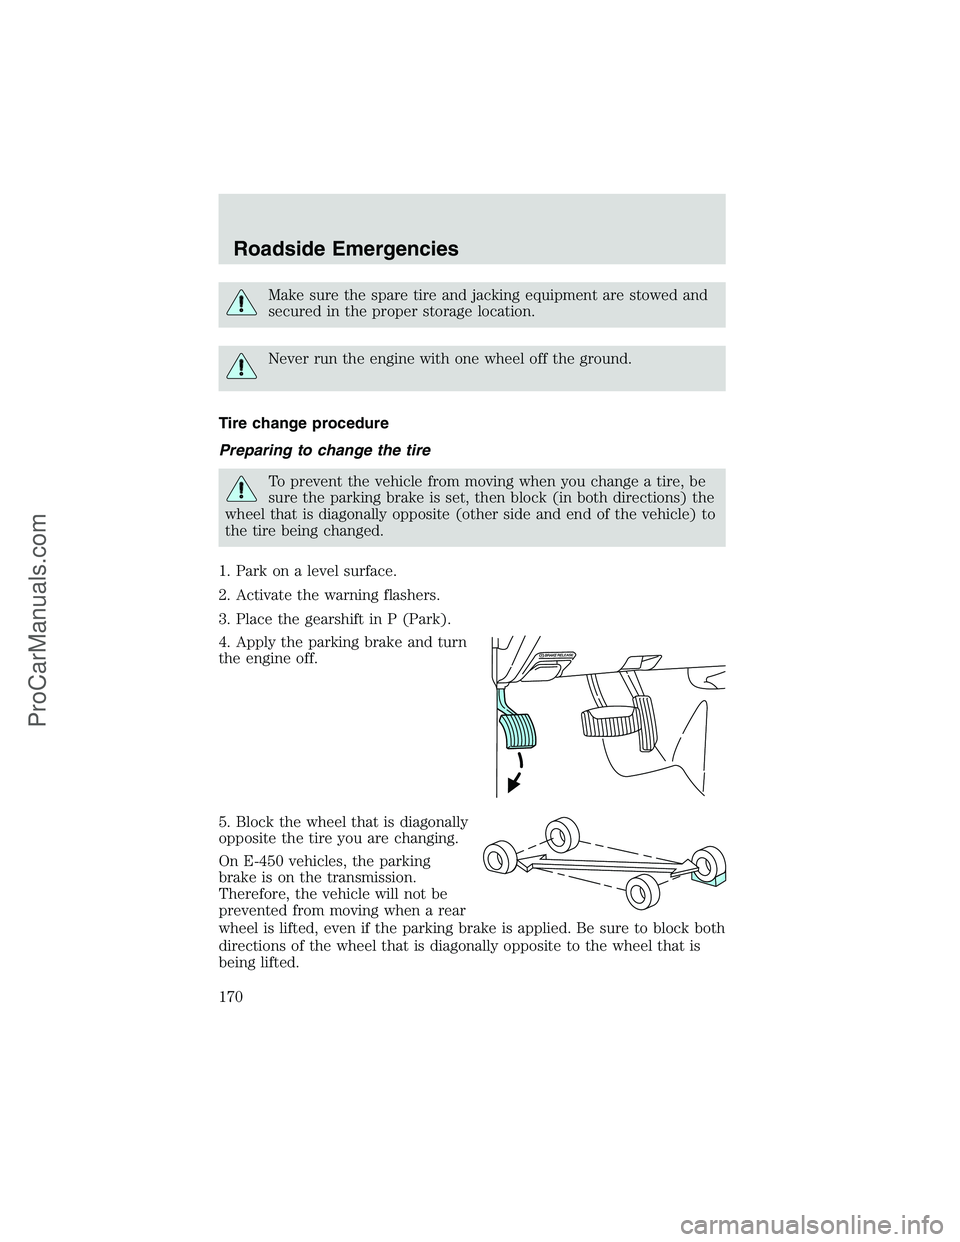
4. Apply the parking brake and turn
the engine off.
5. Block the wheel that is diagonally
opposite the tire you are changing.
On E-450 vehicles, the parking
brake is on the transmission.
Therefore, the vehicle will not be
prevented from moving when a rear
wheel is lifted, even if the parking brake is applied. Be sure to block both
directions of the wheel that is diagonally opposite to the wheel that is
being lifted.
Roadside Emergencies
170
ProCarManuals.com
Page 171 of 256

If the vehicle slips off the jack, you or someone else could be
seriously injured.
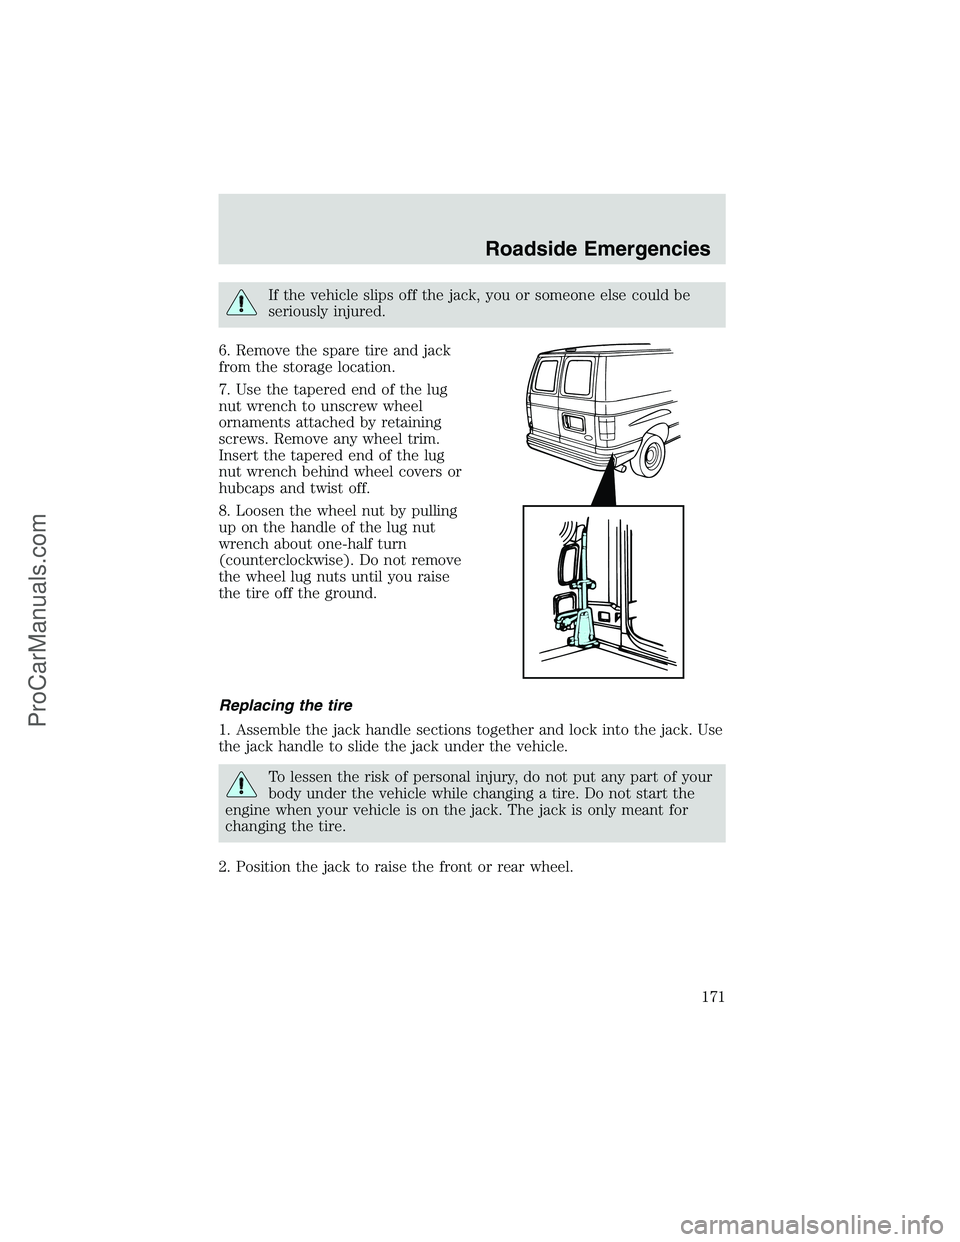
6. Remove the spare tire and jack
from the storage location.
7. Use the tapered end of the lug
nut wrench to unscrew wheel
ornaments attached by retaining
screws. Remove any wheel trim.
Insert the tapered end of the lug
nut wrench behind wheel covers or
hubcaps and twist off.
8. Loosen the wheel nut by pulling
up on the handle of the lug nut
wrench about one-half turn
(counterclockwise). Do not remove
the wheel lug nuts until you raise
the tire off the ground.
Replacing the tire
1. Assemble the jack handle sections together and lock into the jack. Use
the jack handle to slide the jack under the vehicle.
To lessen the risk of personal injury, do not put any part of your
body under the vehicle while changing a tire. Do not start the
engine when your vehicle is on the jack. The jack is only meant for
changing the tire.
2. Position the jack to raise the front or rear wheel.
Roadside Emergencies
171
ProCarManuals.com
Page 173 of 256

Front axle jacking points - All
models except E-550:
•All models except E-550
Place the jack under thepinon the
front surface of the front axle.
Do not place the jack under or
on the steering linkage.
•Turn the jack handle clockwise
until the wheel is completely off
the ground.
•Remove the lug nuts with the lug
nut wrench.
•Replace the flat tire with the
spare tire.
Front axle jacking points -
E-550:
Place the jack under the front axle
directly below the springs.
Do not place the jack under or
on the steering linkage.
•Slide the notched end of the jack
handle over the release valve and use the handle to slide the jack
under the vehicle. Make sure the valve is closed by turning it
clockwise.
•Insert the jack handle into the
pump linkage.
•Use an up-and-down motion with
the jack handle to raise the wheel
completely off the ground.
If your vehicle has single rear wheels, thread the lug nuts on the studs
with the beveled face toward the wheel.
If your vehicle has dual rear wheels, thread the two element swiveling
lug nuts on the studs with the flange facing toward the wheel.
Roadside Emergencies
173
ProCarManuals.com
Page 174 of 256

3. Use the lug nut wrench to screw the lug nut snugly against the wheel.
4. Lower the vehicle by turning the jack handle counterclockwise.
5. Remove the jack and fully tighten the lug nuts in the following
pattern:
•5-lug wheel
•8-lug wheel
Never use wheels or lug
nuts different than the
original equipment as this could
damage the wheel or mounting
system. This damage could allow
the wheels to come off while the
vehicle is being driven.
6. Install any wheel covers, ornaments or hub caps. Make sure they are
screwed or snapped in place.
7. Stow the jack, handle and lug wrench.
8. Unblock the wheels.
On vehicles equipped with single rear wheels, retighten the lug nuts to
the specified torque at 800 km (500 miles) of operation after any wheel
change or any time the lug nuts are loosened.
On vehicles equipped with dual rear wheels, retighten the wheel lug nuts
to the specified torque at 160 km (100 miles), and again at 800 km
(500 miles) of new vehicle operation.
1
4 3
2 5
1
3 4
27 6
5 8
Roadside Emergencies
174
ProCarManuals.com
Page 192 of 256

PAINT CHIPS
Your dealer has touch-up paint and sprays to match your vehicle’s color.
Take your color code (printed on a sticker in the driver’s door jam) to
your dealer to ensure you get the correct color.
•Remove particles such as bird droppings, tree sap, insect deposits, tar
spots, road salt and industrial fallout before repairing paint chips.
•Always read the instructions before using the products.
ALUMINUM WHEELS AND COVERS
Aluminum wheel rims or covers are coated with a clearcoat paint finish.
In order to maintain their shine:
•Clean with Motorcraft Wheel and Tire Cleaner (ZC-37–A), which is
available from your dealer.
•Never apply any cleaning chemical to hot or warm wheel rims or
covers.
•Some automatic car washes may cause damage to the finish on your
wheel rims or covers. Chemical-strength cleaners, or cleaning
chemicals, in combination with brush agitation to remove brake dust
and dirt, could wear away the clearcoat finish over time.
•Do not use hydrofluoric acid-based or high caustic-based wheel
cleaners, steel wool, fuels or strong household detergent.
•To remove tar and grease, use Ford Extra Strength Tar and Road Oil
Removal (B7A-19520–AA), available from your dealer.
ENGINE
Engines are more efficient when they are clean because grease and dirt
buildup keep the engine warmer than normal. When washing:
•Take care when using a power washer to clean the engine. The
high-pressure fluid could penetrate the sealed parts and cause
damage.
•Do not spray a hot engine with cold water to avoid cracking the
engine block or other engine components.
•Spray Motorcraft Engine Shampoo and Degreaser (ZC-20) on all parts
that require cleaning and pressure rinse clean.
Cleaning
192
ProCarManuals.com
Page 198 of 256

SERVICE RECOMMENDATIONS
To help you service your vehicle:
•We highlight do-it-yourself items in the engine compartment for easy
location.
•We provide a scheduled maintenance guide which makes tracking
routine service easy.
If your vehicle requires professional service, your dealership can provide
the necessary parts and service. Check yourWarranty Guide/Owner
Information Guideto find out which parts and services are covered.
Use only recommended fuels, lubricants, fluids and service parts
conforming to specifications. Motorcraft parts are designed and built to
provide the best performance in your vehicle.
PRECAUTIONS WHEN SERVICING YOUR VEHICLE
Be especially careful when inspecting or servicing your vehicle.
•Do not work on a hot engine.
•When the engine is running, make sure that loose clothing, jewelry or
long hair does not get caught up in moving parts.
•Do not work on a vehicle with the engine running in an enclosed
space, unless you are sure you have enough ventilation.
•Keep all lit cigarettes, open flames and other lit material away from
the battery and all fuel related parts.
If you disconnect the battery, the engine must“relearn”its idle
conditions before your vehicle will drive properly, as explained in the
Batterysection of this chapter.
Working with the engine off
1. Set the parking brake and ensure the gearshift is securely latched in P
(Park).
2. Turn off the engine and remove the key.
3. Block the wheels to prevent the vehicle from moving unexpectedly.
Working with the engine on
1. Set the parking brake and ensure the gearshift is securely latched in P
(Park).
2. Block the wheels to prevent the vehicle from moving unexpectedly.
Note:Do not start your engine with the air cleaner removed and do not
remove it while the engine is running.
Maintenance and Specifications
198
ProCarManuals.com
Page 202 of 256

•If the oil level is below the MIN
mark, add enough oil to raise the
level within the MIN-MAX range.
•Oil levels above the MAX mark may cause engine damage. Some oil
must be removed from the engine by a service technician.
7. Put the indicator back in and ensure it is fully seated.
Adding engine oil
1. Check the engine oil. For instructions, refer toChecking the engine
oilin this chapter.
2. If the engine oil level is not within the normal range, add only certified
engine oil of the recommended viscosity. Remove the engine oil filler cap
and use a funnel to pour the engine oil into the opening.
3. Recheck the engine oil level. Make sure the oil level is not above the
MAX mark on the engine oil level indicator (dipstick).
4. Install the indicator and ensure it is fully seated.
5. Fully install the engine oil filler cap by turning the filler cap clockwise
1/4 of a turn until three clicks are heard or until the cap is fully seated.
To avoid possible oil loss, DO NOT operate the vehicle with the
engine oil level indicator and/or the engine oil filler cap removed.
Maintenance and Specifications
202
ProCarManuals.com
Page 206 of 256
If the battery has been disconnected or a new battery has been installed,
the clock and radio settings must be reset once the battery is
reconnected.
•Always dispose of automotive
batteries in a responsible manner.
Follow your local authorized
standards for disposal. Call your
local authorized recycling center
to find out more about recycling
automotive batteries.
Disconnecting dual batteries (if equipped)
The primary battery is located under the hood.
The auxiliary battery is located on the passenger side frame rail.
LEAD
RETURN
RECYCLE
Maintenance and Specifications
206
ProCarManuals.com