2002 DODGE RAM battery
[x] Cancel search: batteryPage 2159 of 2255
WARNING: IF THE VEHICLE IS EQUIPPED WITH AIR
CONDITIONING, REVIEW THE WARNINGS AND
CAUTIONS IN PLUMBING BEFORE PERFORMING
THE FOLLOWING OPERATION. (Refer to 24 - HEAT-
ING & AIR CONDITIONING/PLUMBING - WARNING)
(Refer to 24 - HEATING & AIR CONDITIONING/
PLUMBING - CAUTION)
(1) Remove and disassemble the HVAC housing.
(Refer to 24 - HEATING & AIR CONDITIONING/
DISTRIBUTION/HVAC HOUSING - REMOVAL)
(Refer to 24 - HEATING & AIR CONDITIONING/
DISTRIBUTION/HVAC HOUSING - DISASSEMBLY)
(2) Remove the heat/defrost door actuator from the
HVAC housing. (Refer to 24 - HEATING & AIR CON-
DITIONING/CONTROLS/MODE DOOR ACTUATOR
- REMOVAL)
(3) Remove the heat/defrost door from the HVAC
housing.
REMOVAL - PANEL/DEFROST DOOR
WARNING: ON VEHICLES EQUIPPED WITH AIR-
BAGS, DISABLE THE AIRBAG SYSTEM BEFORE
ATTEMPTING ANY STEERING WHEEL, STEERING
COLUMN, OR INSTRUMENT PANEL COMPONENT
DIAGNOSIS OR SERVICE. DISCONNECT AND ISO-
LATE THE BATTERY NEGATIVE (GROUND) CABLE,
THEN WAIT TWO MINUTES FOR THE AIRBAG SYS-
TEM CAPACITOR TO DISCHARGE BEFORE PER-
FORMING FURTHER DIAGNOSIS OR SERVICE. THIS
IS THE ONLY SURE WAY TO DISABLE THE AIRBAG
SYSTEM. FAILURE TO TAKE THE PROPER PRE-
CAUTIONS COULD RESULT IN AN ACCIDENTAL
AIRBAG DEPLOYMENT AND POSSIBLE PERSONAL
INJURY.
(1) Disconnect and isolate the battery negative
cable.
(2) Remove the instrument panel assembly from
the vehicle(Refer to 23 - BODY/INSTRUMENT PAN-
EL/INSTRUMENT PANEL ASSEMBLY - REMOV-
AL).
(3) Remove the panel/defrost door actuator from
the HVAC housing. (Refer to 24 - HEATING & AIR
CONDITIONING/CONTROLS/MODE DOOR
ACTUATOR - REMOVAL)
(4) Remove the defroster and demister duct
adapter from the HVAC housing. ***L***
(5) Lift the panel/defrost door out of the top open-
ing of the HVAC housing.
INSTALLATION - HEAT/DEFROST DOOR
(1) Install the heat/defrost door in the HVAC hous-
ing.(2) Assemble the HVAC housing. (Refer to 24 -
HEATING & AIR CONDITIONING/DISTRIBUTION/
HVAC HOUSING - ASSEMBLY)
(3) Install the heat/defrost door actuator on the
HVAC housing. (Refer to 24 - HEATING & AIR CON-
DITIONING/CONTROLS/MODE DOOR ACTUATOR
- INSTALLATION)
(4) Install the HVAC housing in the vehicle. (Refer
to 24 - HEATING & AIR CONDITIONING/DISTRI-
BUTION/HVAC HOUSING - INSTALLATION)
INSTALLATION - PANEL/DEFROST DOOR
(1) Install the panel/defrost door through the top
opening of the HVAC housing.
(2) Install the defroster and demister duct adapter
on the HVAC housing. (Refer to 24 - HEATING &
AIR CONDITIONING/DISTRIBUTION/DEFROSTER
DUCTS - INSTALLATION)
(3) Install the panel/defrost door actuator on the
HVAC housing. (Refer to 24 - HEATING & AIR CON-
DITIONING/CONTROLS/MODE DOOR ACTUATOR
- REMOVAL)
(4) Install the instrument panel assembly in the
vehicle(Refer to 23 - BODY/INSTRUMENT PANEL/
INSTRUMENT PANEL ASSEMBLY - INSTALLA-
TION).
(5) Connect the battery negative cable.
RECIRCULATION DOOR
REMOVAL
WARNING: ON VEHICLES EQUIPPED WITH AIR-
BAGS, DISABLE THE AIRBAG SYSTEM BEFORE
ATTEMPTING ANY STEERING WHEEL, STEERING
COLUMN, OR INSTRUMENT PANEL COMPONENT
DIAGNOSIS OR SERVICE. DISCONNECT AND ISO-
LATE THE BATTERY NEGATIVE (GROUND) CABLE,
THEN WAIT TWO MINUTES FOR THE AIRBAG SYS-
TEM CAPACITOR TO DISCHARGE BEFORE PER-
FORMING FURTHER DIAGNOSIS OR SERVICE. THIS
IS THE ONLY SURE WAY TO DISABLE THE AIRBAG
SYSTEM. FAILURE TO TAKE THE PROPER PRE-
CAUTIONS COULD RESULT IN AN ACCIDENTAL
AIRBAG DEPLOYMENT AND POSSIBLE PERSONAL
INJURY.
WARNING: IF THE VEHICLE IS EQUIPPED WITH AIR
CONDITIONING, REVIEW THE WARNINGS AND
CAUTIONS IN PLUMBING BEFORE PERFORMING
THE FOLLOWING OPERATION. (Refer to 24 - HEAT-
ING & AIR CONDITIONING/PLUMBING - WARNING)
(Refer to 24 - HEATING & AIR CONDITIONING/
PLUMBING - CAUTION)
24 - 38 DISTRIBUTIONBR/BE
MODE DOOR (Continued)
Page 2169 of 2255
TIONING/PLUMBING - STANDARD PROCEDURE -
REFRIGERANT RECOVERY)
(2) Disconnect and isolate the battery negative
cable.
(3) Remove the serpentine drive belt(Refer to 7 -
COOLING/ACCESSORY DRIVE/DRIVE BELTS -
REMOVAL), (Refer to 7 - COOLING/ACCESSORY
DRIVE/DRIVE BELTS - REMOVAL) or (Refer to 7 -
COOLING/ACCESSORY DRIVE/DRIVE BELTS -
REMOVAL).
(4) Unplug the compressor clutch coil wire harness
connector.
(5) Remove the bolt that secures the refrigerant
line manifold to the compressor. Install plugs in, or
tape over all of the opened refrigerant line fittings.
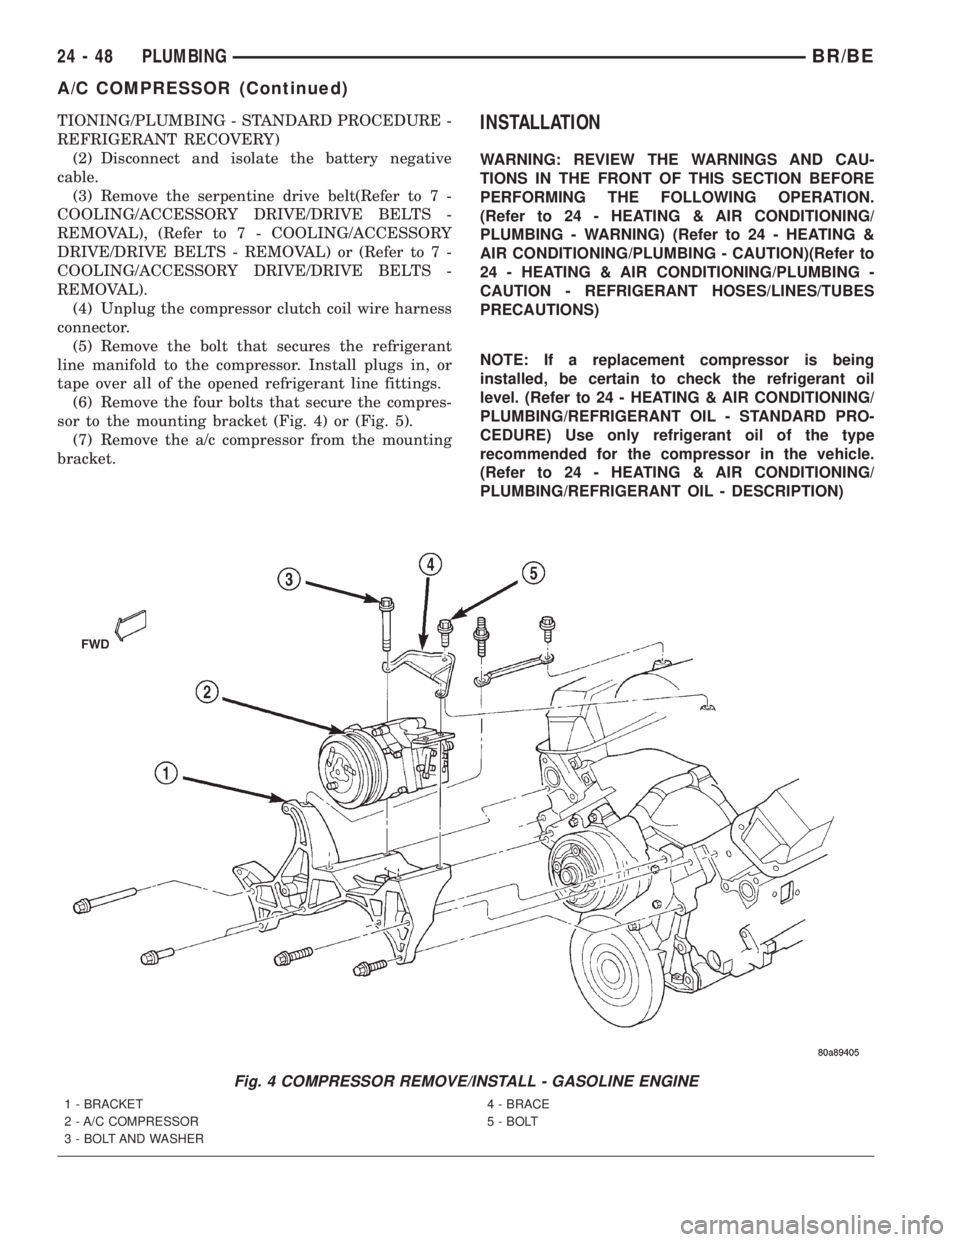
(6) Remove the four bolts that secure the compres-
sor to the mounting bracket (Fig. 4) or (Fig. 5).
(7) Remove the a/c compressor from the mounting
bracket.INSTALLATION
WARNING: REVIEW THE WARNINGS AND CAU-
TIONS IN THE FRONT OF THIS SECTION BEFORE
PERFORMING THE FOLLOWING OPERATION.
(Refer to 24 - HEATING & AIR CONDITIONING/
PLUMBING - WARNING) (Refer to 24 - HEATING &
AIR CONDITIONING/PLUMBING - CAUTION)(Refer to
24 - HEATING & AIR CONDITIONING/PLUMBING -
CAUTION - REFRIGERANT HOSES/LINES/TUBES
PRECAUTIONS)
NOTE: If a replacement compressor is being
installed, be certain to check the refrigerant oil
level. (Refer to 24 - HEATING & AIR CONDITIONING/
PLUMBING/REFRIGERANT OIL - STANDARD PRO-
CEDURE) Use only refrigerant oil of the type
recommended for the compressor in the vehicle.
(Refer to 24 - HEATING & AIR CONDITIONING/
PLUMBING/REFRIGERANT OIL - DESCRIPTION)
Fig. 4 COMPRESSOR REMOVE/INSTALL - GASOLINE ENGINE
1 - BRACKET
2 - A/C COMPRESSOR
3 - BOLT AND WASHER4 - BRACE
5 - BOLT
24 - 48 PLUMBINGBR/BE
A/C COMPRESSOR (Continued)
Page 2170 of 2255
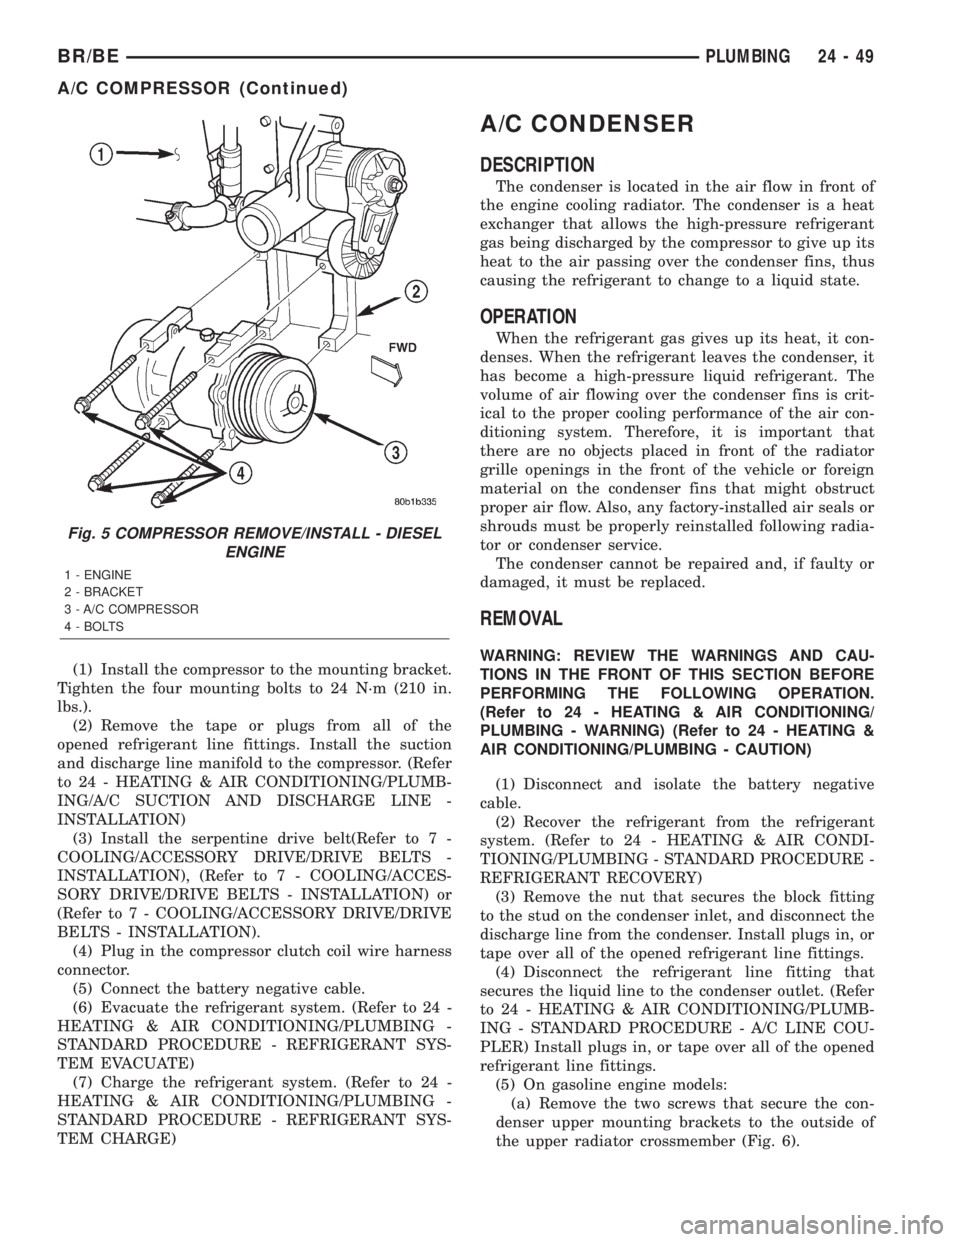
(1) Install the compressor to the mounting bracket.
Tighten the four mounting bolts to 24 N´m (210 in.
lbs.).
(2) Remove the tape or plugs from all of the
opened refrigerant line fittings. Install the suction
and discharge line manifold to the compressor. (Refer
to 24 - HEATING & AIR CONDITIONING/PLUMB-
ING/A/C SUCTION AND DISCHARGE LINE -
INSTALLATION)
(3) Install the serpentine drive belt(Refer to 7 -
COOLING/ACCESSORY DRIVE/DRIVE BELTS -
INSTALLATION), (Refer to 7 - COOLING/ACCES-
SORY DRIVE/DRIVE BELTS - INSTALLATION) or
(Refer to 7 - COOLING/ACCESSORY DRIVE/DRIVE
BELTS - INSTALLATION).
(4) Plug in the compressor clutch coil wire harness
connector.
(5) Connect the battery negative cable.
(6) Evacuate the refrigerant system. (Refer to 24 -
HEATING & AIR CONDITIONING/PLUMBING -
STANDARD PROCEDURE - REFRIGERANT SYS-
TEM EVACUATE)
(7) Charge the refrigerant system. (Refer to 24 -
HEATING & AIR CONDITIONING/PLUMBING -
STANDARD PROCEDURE - REFRIGERANT SYS-
TEM CHARGE)
A/C CONDENSER
DESCRIPTION
The condenser is located in the air flow in front of
the engine cooling radiator. The condenser is a heat
exchanger that allows the high-pressure refrigerant
gas being discharged by the compressor to give up its
heat to the air passing over the condenser fins, thus
causing the refrigerant to change to a liquid state.
OPERATION
When the refrigerant gas gives up its heat, it con-
denses. When the refrigerant leaves the condenser, it
has become a high-pressure liquid refrigerant. The
volume of air flowing over the condenser fins is crit-
ical to the proper cooling performance of the air con-
ditioning system. Therefore, it is important that
there are no objects placed in front of the radiator
grille openings in the front of the vehicle or foreign
material on the condenser fins that might obstruct
proper air flow. Also, any factory-installed air seals or
shrouds must be properly reinstalled following radia-
tor or condenser service.
The condenser cannot be repaired and, if faulty or
damaged, it must be replaced.
REMOVAL
WARNING: REVIEW THE WARNINGS AND CAU-
TIONS IN THE FRONT OF THIS SECTION BEFORE
PERFORMING THE FOLLOWING OPERATION.
(Refer to 24 - HEATING & AIR CONDITIONING/
PLUMBING - WARNING) (Refer to 24 - HEATING &
AIR CONDITIONING/PLUMBING - CAUTION)
(1) Disconnect and isolate the battery negative
cable.
(2) Recover the refrigerant from the refrigerant
system. (Refer to 24 - HEATING & AIR CONDI-
TIONING/PLUMBING - STANDARD PROCEDURE -
REFRIGERANT RECOVERY)
(3) Remove the nut that secures the block fitting
to the stud on the condenser inlet, and disconnect the
discharge line from the condenser. Install plugs in, or
tape over all of the opened refrigerant line fittings.
(4) Disconnect the refrigerant line fitting that
secures the liquid line to the condenser outlet. (Refer
to 24 - HEATING & AIR CONDITIONING/PLUMB-
ING - STANDARD PROCEDURE - A/C LINE COU-
PLER) Install plugs in, or tape over all of the opened
refrigerant line fittings.
(5) On gasoline engine models:
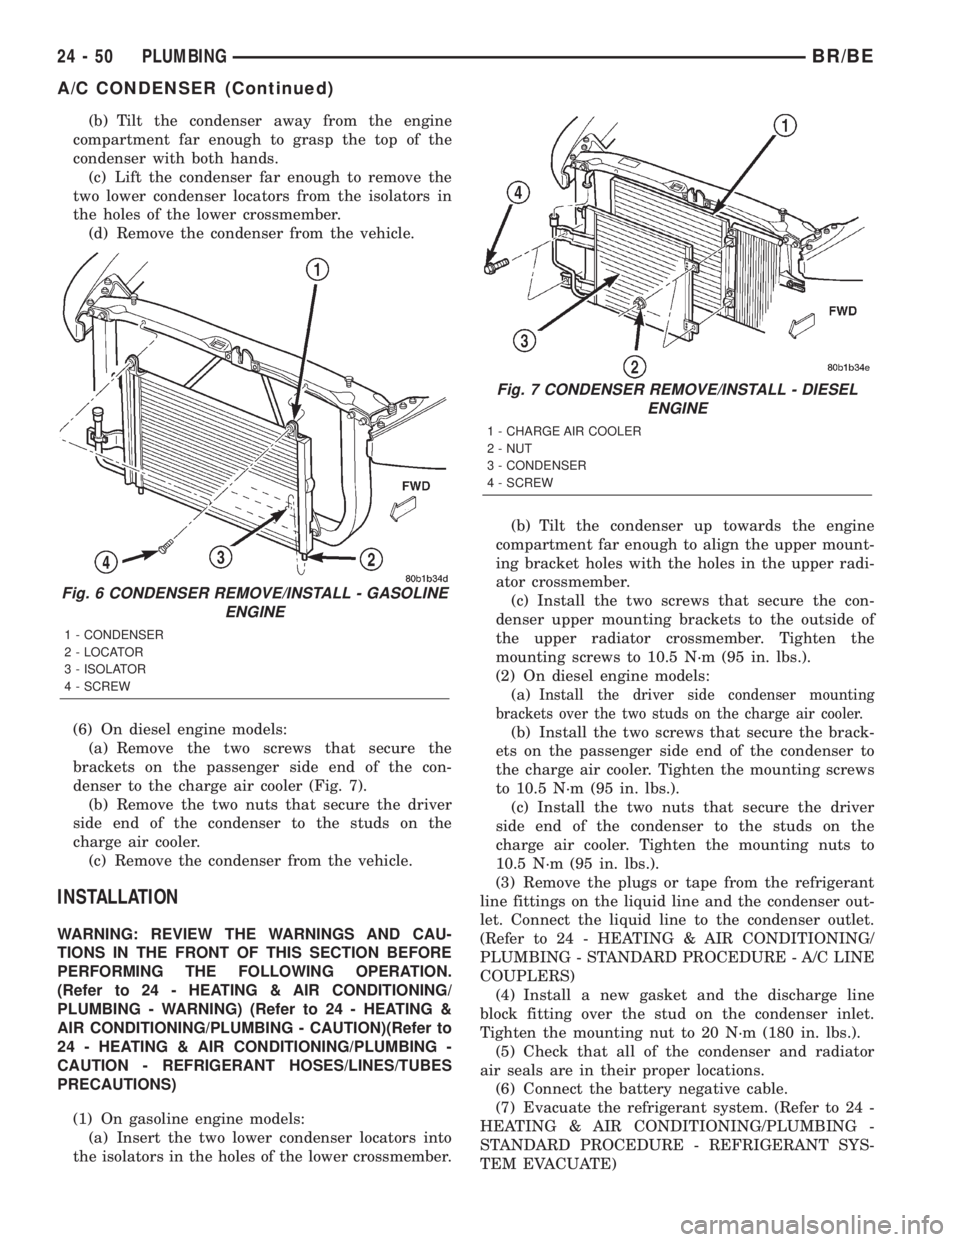
(a) Remove the two screws that secure the con-
denser upper mounting brackets to the outside of
the upper radiator crossmember (Fig. 6).
Fig. 5 COMPRESSOR REMOVE/INSTALL - DIESEL
ENGINE
1 - ENGINE
2 - BRACKET
3 - A/C COMPRESSOR
4 - BOLTS
BR/BEPLUMBING 24 - 49
A/C COMPRESSOR (Continued)
Page 2171 of 2255
(b) Tilt the condenser away from the engine
compartment far enough to grasp the top of the
condenser with both hands.
(c) Lift the condenser far enough to remove the
two lower condenser locators from the isolators in
the holes of the lower crossmember.
(d) Remove the condenser from the vehicle.
(6) On diesel engine models:
(a) Remove the two screws that secure the
brackets on the passenger side end of the con-
denser to the charge air cooler (Fig. 7).
(b) Remove the two nuts that secure the driver
side end of the condenser to the studs on the
charge air cooler.
(c) Remove the condenser from the vehicle.
INSTALLATION
WARNING: REVIEW THE WARNINGS AND CAU-
TIONS IN THE FRONT OF THIS SECTION BEFORE
PERFORMING THE FOLLOWING OPERATION.
(Refer to 24 - HEATING & AIR CONDITIONING/
PLUMBING - WARNING) (Refer to 24 - HEATING &
AIR CONDITIONING/PLUMBING - CAUTION)(Refer to
24 - HEATING & AIR CONDITIONING/PLUMBING -
CAUTION - REFRIGERANT HOSES/LINES/TUBES
PRECAUTIONS)
(1) On gasoline engine models:
(a) Insert the two lower condenser locators into
the isolators in the holes of the lower crossmember.(b) Tilt the condenser up towards the engine
compartment far enough to align the upper mount-
ing bracket holes with the holes in the upper radi-
ator crossmember.
(c) Install the two screws that secure the con-
denser upper mounting brackets to the outside of
the upper radiator crossmember. Tighten the
mounting screws to 10.5 N´m (95 in. lbs.).
(2) On diesel engine models:
(a)
Install the driver side condenser mounting
brackets over the two studs on the charge air cooler.
(b) Install the two screws that secure the brack-
ets on the passenger side end of the condenser to
the charge air cooler. Tighten the mounting screws
to 10.5 N´m (95 in. lbs.).
(c) Install the two nuts that secure the driver
side end of the condenser to the studs on the
charge air cooler. Tighten the mounting nuts to
10.5 N´m (95 in. lbs.).
(3) Remove the plugs or tape from the refrigerant
line fittings on the liquid line and the condenser out-
let. Connect the liquid line to the condenser outlet.
(Refer to 24 - HEATING & AIR CONDITIONING/
PLUMBING - STANDARD PROCEDURE - A/C LINE
COUPLERS)
(4) Install a new gasket and the discharge line
block fitting over the stud on the condenser inlet.
Tighten the mounting nut to 20 N´m (180 in. lbs.).
(5) Check that all of the condenser and radiator
air seals are in their proper locations.
(6) Connect the battery negative cable.
(7) Evacuate the refrigerant system. (Refer to 24 -
HEATING & AIR CONDITIONING/PLUMBING -
STANDARD PROCEDURE - REFRIGERANT SYS-
TEM EVACUATE)
Fig. 6 CONDENSER REMOVE/INSTALL - GASOLINE
ENGINE
1 - CONDENSER
2 - LOCATOR
3 - ISOLATOR
4 - SCREW
Fig. 7 CONDENSER REMOVE/INSTALL - DIESEL
ENGINE
1 - CHARGE AIR COOLER
2 - NUT
3 - CONDENSER
4 - SCREW
24 - 50 PLUMBINGBR/BE
A/C CONDENSER (Continued)
Page 2172 of 2255
(8) Charge the refrigerant system. (Refer to 24 -
HEATING & AIR CONDITIONING/PLUMBING -
STANDARD PROCEDURE - REFRIGERANT SYS-
TEM CHARGE)
NOTE: If the condenser is replaced, add 30 millili-
ters (1 fluid ounce) of refrigerant oil to the refriger-
ant system. Use only refrigerant oil of the type
recommended for the compressor in the vehicle.
(Refer to 24 - HEATING & AIR CONDITIONING/
PLUMBING/REFRIGERANT OIL - DESCRIPTION)
SUCTION AND DISCHARGE
LINE
REMOVAL
WARNING: REVIEW THE WARNINGS AND CAU-
TIONS IN THE FRONT OF THIS SECTION BEFORE
PERFORMING THE FOLLOWING OPERATION.
(Refer to 24 - HEATING & AIR CONDITIONING/
PLUMBING - WARNING) (Refer to 24 - HEATING &
AIR CONDITIONING/PLUMBING - CAUTION)(1) Disconnect and isolate the battery negative
cable.
(2) Recover the refrigerant from the refrigerant
system. (Refer to 24 - HEATING & AIR CONDI-
TIONING/PLUMBING - STANDARD PROCEDURE -
REFRIGERANT RECOVERY)
(3) Unplug the wire harness connector from the a/c
high pressure switch.
(4) Disconnect the suction line refrigerant line cou-
pler at the accumulator. (Refer to 24 - HEATING &
AIR CONDITIONING/PLUMBING - STANDARD
PROCEDURE - A/C LINE COUPLER) Install plugs
in, or tape over all of the opened refrigerant line fit-
tings.
(5) Remove the nut that secures the block fitting
to the stud on the condenser inlet and disconnect the
discharge line from the condenser. Install plugs in, or
tape over all of the opened refrigerant line fittings.
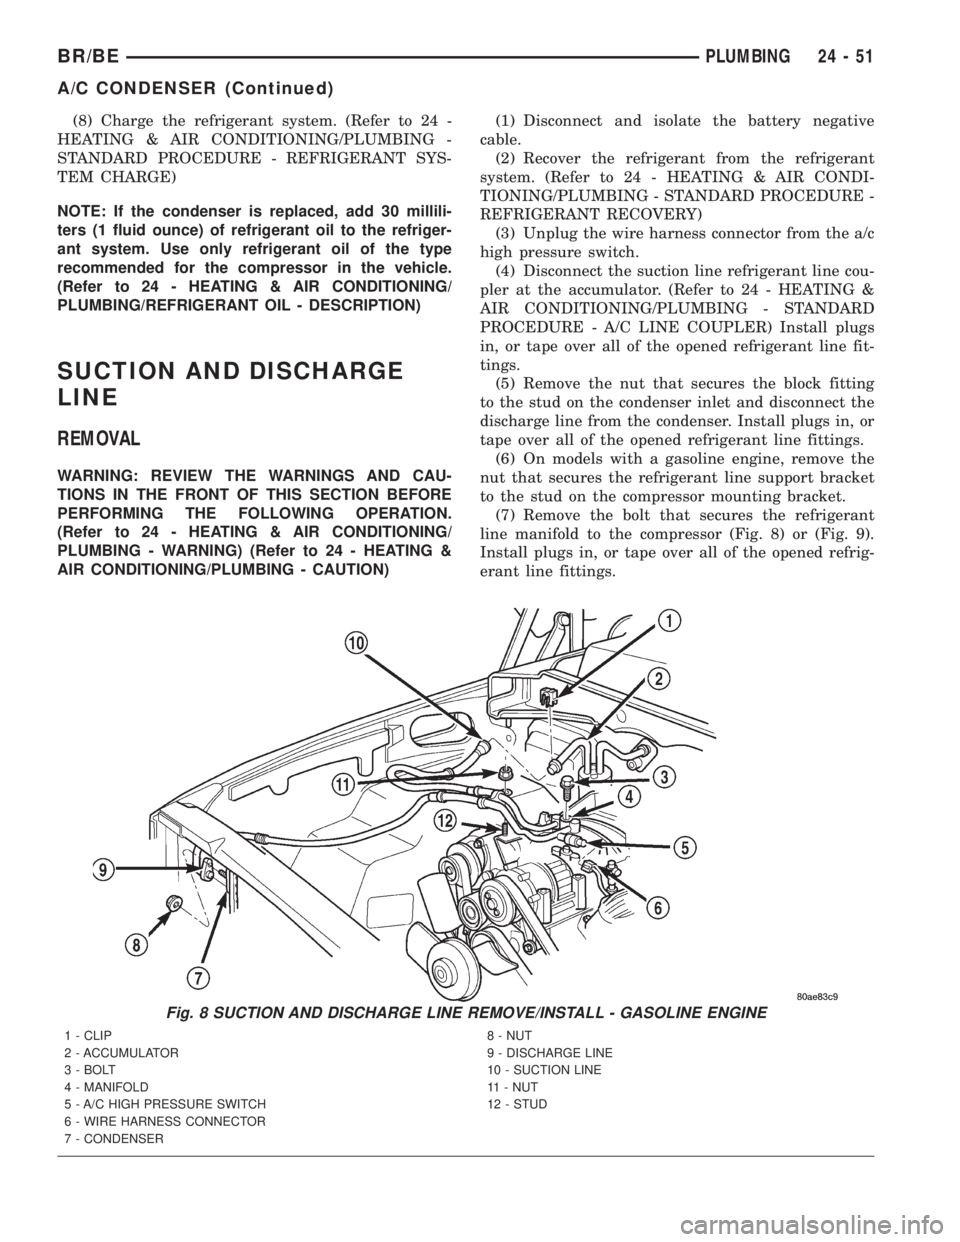
(6) On models with a gasoline engine, remove the
nut that secures the refrigerant line support bracket
to the stud on the compressor mounting bracket.
(7) Remove the bolt that secures the refrigerant
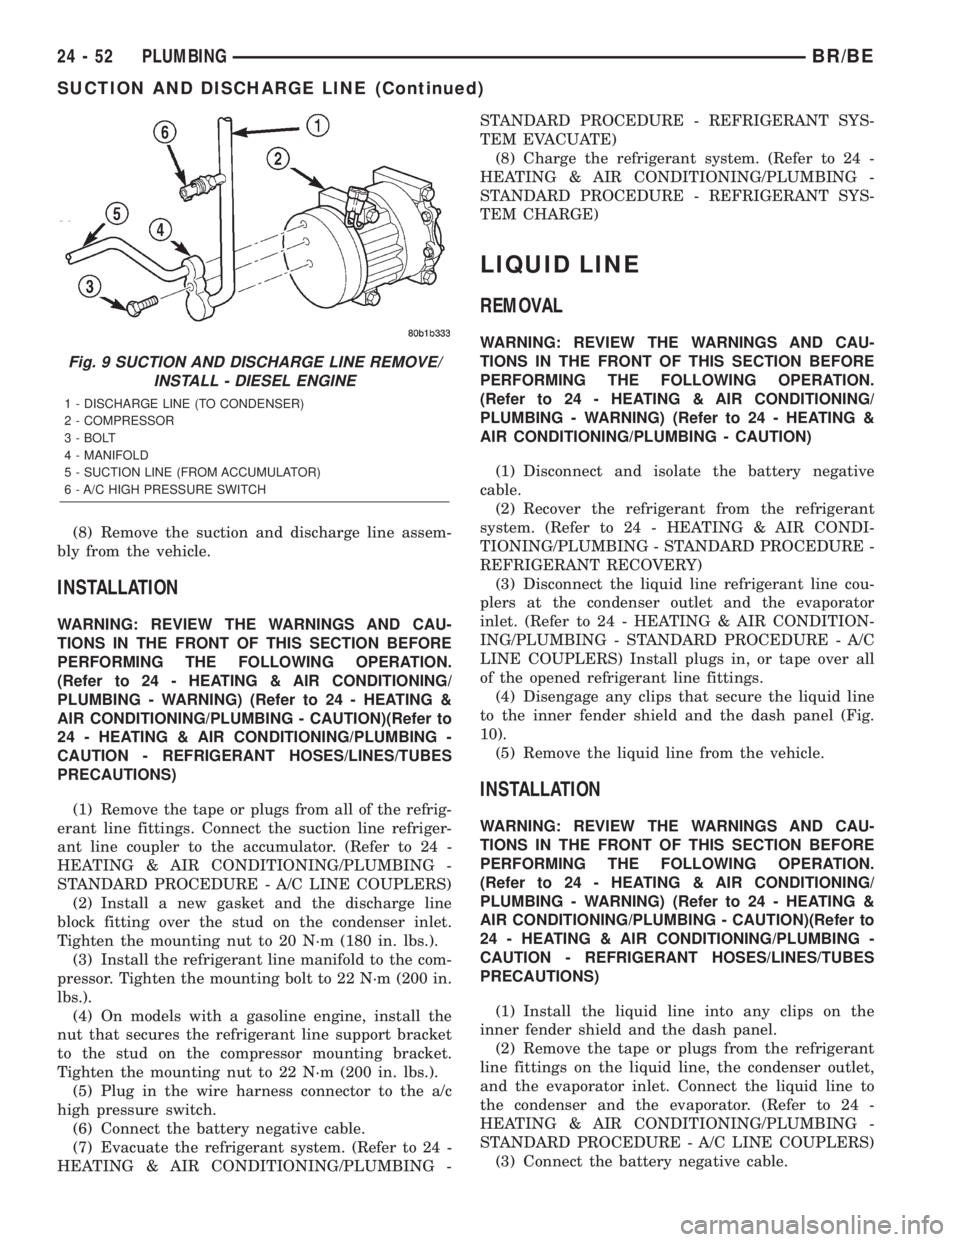
line manifold to the compressor (Fig. 8) or (Fig. 9).
Install plugs in, or tape over all of the opened refrig-
erant line fittings.
Fig. 8 SUCTION AND DISCHARGE LINE REMOVE/INSTALL - GASOLINE ENGINE
1 - CLIP
2 - ACCUMULATOR
3 - BOLT
4 - MANIFOLD
5 - A/C HIGH PRESSURE SWITCH
6 - WIRE HARNESS CONNECTOR
7 - CONDENSER8 - NUT
9 - DISCHARGE LINE
10 - SUCTION LINE
11 - NUT
12 - STUD
BR/BEPLUMBING 24 - 51
A/C CONDENSER (Continued)
Page 2173 of 2255
(8) Remove the suction and discharge line assem-
bly from the vehicle.
INSTALLATION
WARNING: REVIEW THE WARNINGS AND CAU-
TIONS IN THE FRONT OF THIS SECTION BEFORE
PERFORMING THE FOLLOWING OPERATION.
(Refer to 24 - HEATING & AIR CONDITIONING/
PLUMBING - WARNING) (Refer to 24 - HEATING &
AIR CONDITIONING/PLUMBING - CAUTION)(Refer to
24 - HEATING & AIR CONDITIONING/PLUMBING -
CAUTION - REFRIGERANT HOSES/LINES/TUBES
PRECAUTIONS)
(1) Remove the tape or plugs from all of the refrig-
erant line fittings. Connect the suction line refriger-
ant line coupler to the accumulator. (Refer to 24 -
HEATING & AIR CONDITIONING/PLUMBING -
STANDARD PROCEDURE - A/C LINE COUPLERS)
(2) Install a new gasket and the discharge line
block fitting over the stud on the condenser inlet.
Tighten the mounting nut to 20 N´m (180 in. lbs.).
(3) Install the refrigerant line manifold to the com-
pressor. Tighten the mounting bolt to 22 N´m (200 in.
lbs.).
(4) On models with a gasoline engine, install the
nut that secures the refrigerant line support bracket
to the stud on the compressor mounting bracket.
Tighten the mounting nut to 22 N´m (200 in. lbs.).
(5) Plug in the wire harness connector to the a/c
high pressure switch.
(6) Connect the battery negative cable.
(7) Evacuate the refrigerant system. (Refer to 24 -
HEATING & AIR CONDITIONING/PLUMBING -STANDARD PROCEDURE - REFRIGERANT SYS-
TEM EVACUATE)
(8) Charge the refrigerant system. (Refer to 24 -
HEATING & AIR CONDITIONING/PLUMBING -
STANDARD PROCEDURE - REFRIGERANT SYS-
TEM CHARGE)
LIQUID LINE
REMOVAL
WARNING: REVIEW THE WARNINGS AND CAU-
TIONS IN THE FRONT OF THIS SECTION BEFORE
PERFORMING THE FOLLOWING OPERATION.
(Refer to 24 - HEATING & AIR CONDITIONING/
PLUMBING - WARNING) (Refer to 24 - HEATING &
AIR CONDITIONING/PLUMBING - CAUTION)
(1) Disconnect and isolate the battery negative
cable.
(2) Recover the refrigerant from the refrigerant
system. (Refer to 24 - HEATING & AIR CONDI-
TIONING/PLUMBING - STANDARD PROCEDURE -
REFRIGERANT RECOVERY)
(3) Disconnect the liquid line refrigerant line cou-
plers at the condenser outlet and the evaporator
inlet. (Refer to 24 - HEATING & AIR CONDITION-
ING/PLUMBING - STANDARD PROCEDURE - A/C
LINE COUPLERS) Install plugs in, or tape over all
of the opened refrigerant line fittings.
(4) Disengage any clips that secure the liquid line
to the inner fender shield and the dash panel (Fig.
10).
(5) Remove the liquid line from the vehicle.
INSTALLATION
WARNING: REVIEW THE WARNINGS AND CAU-
TIONS IN THE FRONT OF THIS SECTION BEFORE
PERFORMING THE FOLLOWING OPERATION.
(Refer to 24 - HEATING & AIR CONDITIONING/
PLUMBING - WARNING) (Refer to 24 - HEATING &
AIR CONDITIONING/PLUMBING - CAUTION)(Refer to
24 - HEATING & AIR CONDITIONING/PLUMBING -
CAUTION - REFRIGERANT HOSES/LINES/TUBES
PRECAUTIONS)
(1) Install the liquid line into any clips on the
inner fender shield and the dash panel.
(2) Remove the tape or plugs from the refrigerant
line fittings on the liquid line, the condenser outlet,
and the evaporator inlet. Connect the liquid line to
the condenser and the evaporator. (Refer to 24 -
HEATING & AIR CONDITIONING/PLUMBING -
STANDARD PROCEDURE - A/C LINE COUPLERS)
(3) Connect the battery negative cable.
Fig. 9 SUCTION AND DISCHARGE LINE REMOVE/
INSTALL - DIESEL ENGINE
1 - DISCHARGE LINE (TO CONDENSER)
2 - COMPRESSOR
3 - BOLT
4 - MANIFOLD
5 - SUCTION LINE (FROM ACCUMULATOR)
6 - A/C HIGH PRESSURE SWITCH
24 - 52 PLUMBINGBR/BE
SUCTION AND DISCHARGE LINE (Continued)
Page 2176 of 2255
ACCUMULATOR
DESCRIPTION
The accumulator is mounted in the engine com-
partment between the a/c evaporator outlet tube and
the compressor inlet.
OPERATION
Refrigerant enters the accumulator canister as a
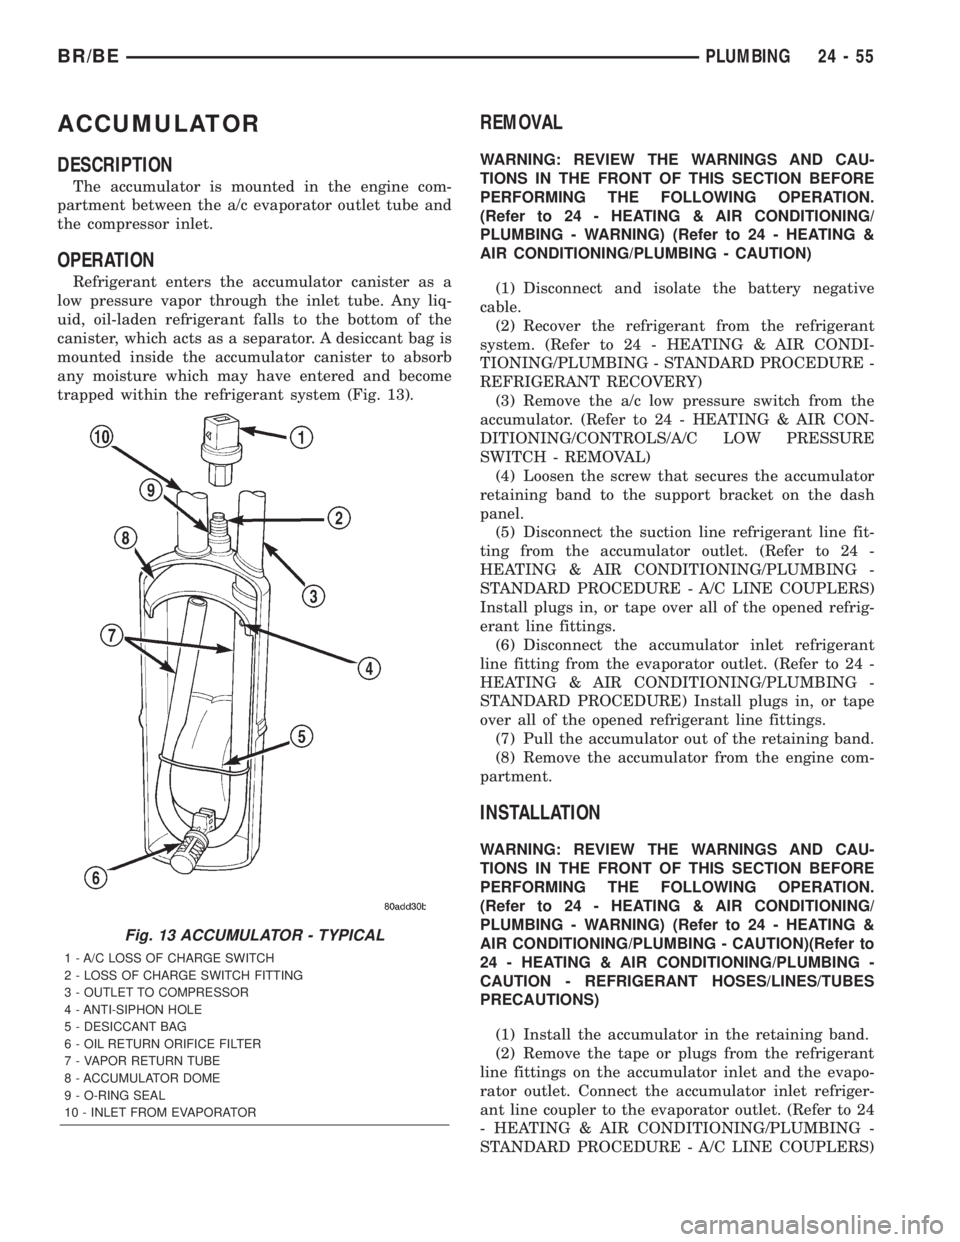
low pressure vapor through the inlet tube. Any liq-
uid, oil-laden refrigerant falls to the bottom of the
canister, which acts as a separator. A desiccant bag is
mounted inside the accumulator canister to absorb
any moisture which may have entered and become
trapped within the refrigerant system (Fig. 13).
REMOVAL
WARNING: REVIEW THE WARNINGS AND CAU-
TIONS IN THE FRONT OF THIS SECTION BEFORE
PERFORMING THE FOLLOWING OPERATION.
(Refer to 24 - HEATING & AIR CONDITIONING/
PLUMBING - WARNING) (Refer to 24 - HEATING &
AIR CONDITIONING/PLUMBING - CAUTION)
(1) Disconnect and isolate the battery negative
cable.
(2) Recover the refrigerant from the refrigerant
system. (Refer to 24 - HEATING & AIR CONDI-
TIONING/PLUMBING - STANDARD PROCEDURE -
REFRIGERANT RECOVERY)
(3) Remove the a/c low pressure switch from the
accumulator. (Refer to 24 - HEATING & AIR CON-
DITIONING/CONTROLS/A/C LOW PRESSURE
SWITCH - REMOVAL)
(4) Loosen the screw that secures the accumulator
retaining band to the support bracket on the dash
panel.
(5) Disconnect the suction line refrigerant line fit-
ting from the accumulator outlet. (Refer to 24 -
HEATING & AIR CONDITIONING/PLUMBING -
STANDARD PROCEDURE - A/C LINE COUPLERS)
Install plugs in, or tape over all of the opened refrig-
erant line fittings.
(6) Disconnect the accumulator inlet refrigerant
line fitting from the evaporator outlet. (Refer to 24 -
HEATING & AIR CONDITIONING/PLUMBING -
STANDARD PROCEDURE) Install plugs in, or tape
over all of the opened refrigerant line fittings.
(7) Pull the accumulator out of the retaining band.
(8) Remove the accumulator from the engine com-
partment.
INSTALLATION
WARNING: REVIEW THE WARNINGS AND CAU-
TIONS IN THE FRONT OF THIS SECTION BEFORE
PERFORMING THE FOLLOWING OPERATION.
(Refer to 24 - HEATING & AIR CONDITIONING/
PLUMBING - WARNING) (Refer to 24 - HEATING &
AIR CONDITIONING/PLUMBING - CAUTION)(Refer to
24 - HEATING & AIR CONDITIONING/PLUMBING -
CAUTION - REFRIGERANT HOSES/LINES/TUBES
PRECAUTIONS)
(1) Install the accumulator in the retaining band.
(2) Remove the tape or plugs from the refrigerant
line fittings on the accumulator inlet and the evapo-
rator outlet. Connect the accumulator inlet refriger-
ant line coupler to the evaporator outlet. (Refer to 24
- HEATING & AIR CONDITIONING/PLUMBING -
STANDARD PROCEDURE - A/C LINE COUPLERS)
Fig. 13 ACCUMULATOR - TYPICAL
1 - A/C LOSS OF CHARGE SWITCH
2 - LOSS OF CHARGE SWITCH FITTING
3 - OUTLET TO COMPRESSOR
4 - ANTI-SIPHON HOLE
5 - DESICCANT BAG
6 - OIL RETURN ORIFICE FILTER
7 - VAPOR RETURN TUBE
8 - ACCUMULATOR DOME
9 - O-RING SEAL
10 - INLET FROM EVAPORATOR
BR/BEPLUMBING 24 - 55
Page 2177 of 2255
(3) Tighten the accumulator retaining band screw
to 4.5 N´m (40 in. lbs.).
(4) Remove the tape or plugs from the refrigerant
line fittings on the suction line and the accumulator
outlet. Connect the suction line refrigerant line cou-
pler to the accumulator outlet. (Refer to 24 - HEAT-
ING & AIR CONDITIONING/PLUMBING -
STANDARD PROCEDURE - A/C LINE COUPLERS)
(5) Reinstall the a/c low pressure switch on the
accumulator. (Refer to 24 - HEATING & AIR CON-
DITIONING/CONTROLS/A/C LOW PRESSURE
SWITCH - INSTALLATION)
(6) Connect the battery negative cable.
(7) Evacuate the refrigerant system. (Refer to 24 -
HEATING & AIR CONDITIONING/PLUMBING -
STANDARD PROCEDURE - REFRIGERANT SYS-
TEM EVACUATE)
(8) Charge the refrigerant system. (Refer to 24 -
HEATING & AIR CONDITIONING/PLUMBING -
STANDARD PROCEDURE - REFRIGERANT SYS-
TEM CHARGE)
NOTE: If the accumulator is replaced, add 60 milli-
liters (2 fluid ounces) of refrigerant oil to the refrig-
erant system. Use only refrigerant oil of the type
recommended for the compressor in the vehicle.
HEATER CORE
DESCRIPTION
The heater core is located in the HVAC housing,
under the instrument panel. It is a heat exchanger
made of rows of tubes and fins.
The heater core is not repairable and if damaged it
must be replaced.
OPERATION
Engine coolant is circulated through heater hoses
to the heater core at all times. As the coolant flows
through the heater core, heat removed from the
engine is transferred to the heater core fins and
tubes. Air directed through the heater core picks up
the heat from the heater core fins. The blend door
allows control of the heater output air temperature
by controlling how much of the air flowing through
the HVAC housing is directed through the heater
core. The blower motor speed controls the volume of
air flowing through the HVAC housing.
The heater core cannot be repaired and, if faulty or
damaged, it must be replaced.
REMOVAL
(1) Remove the HVAC housing from the vehicle.
(Refer to 24 - HEATING & AIR CONDITIONING/
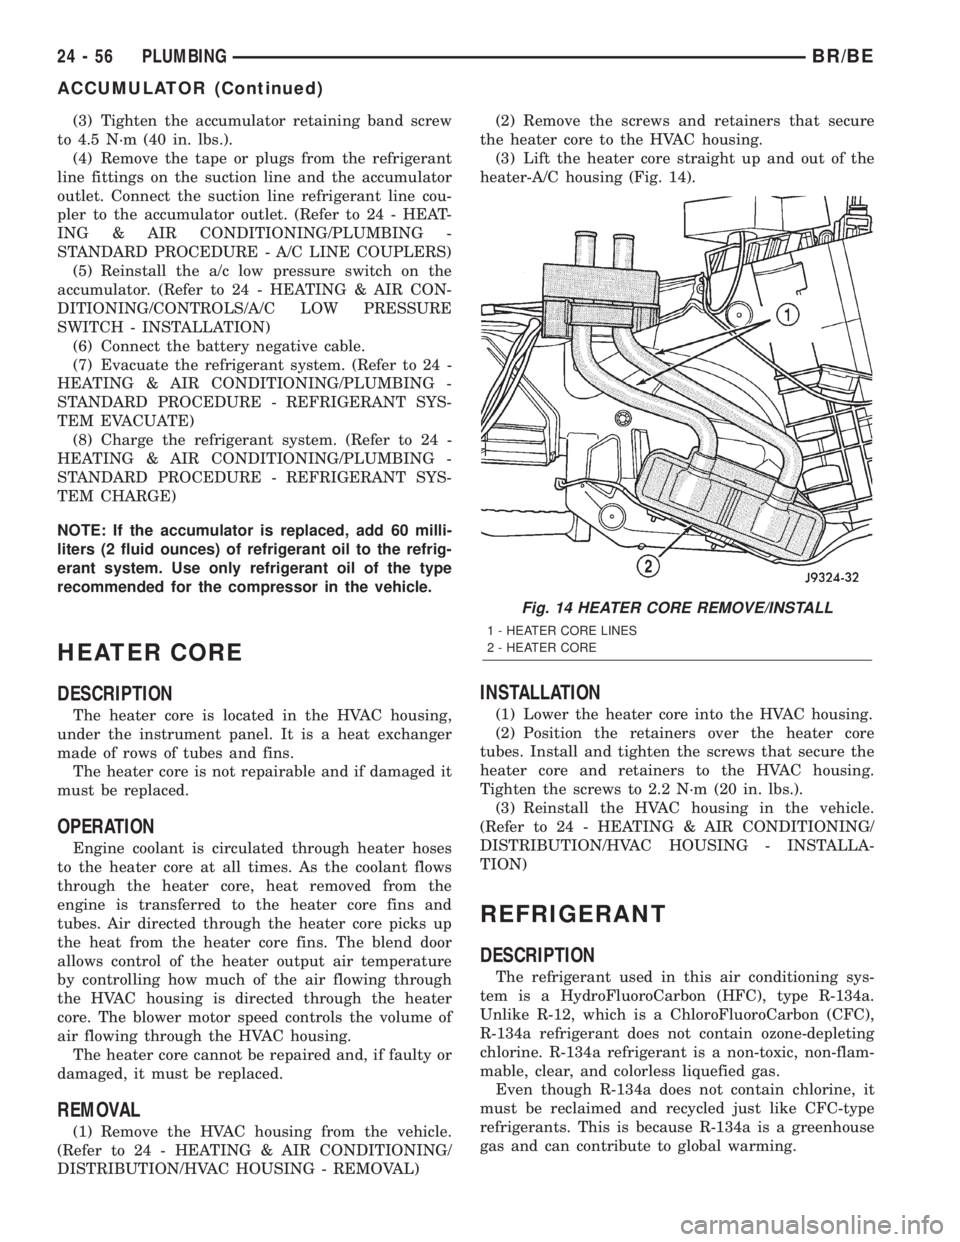
DISTRIBUTION/HVAC HOUSING - REMOVAL)(2) Remove the screws and retainers that secure
the heater core to the HVAC housing.
(3) Lift the heater core straight up and out of the
heater-A/C housing (Fig. 14).
INSTALLATION
(1) Lower the heater core into the HVAC housing.
(2) Position the retainers over the heater core
tubes. Install and tighten the screws that secure the
heater core and retainers to the HVAC housing.
Tighten the screws to 2.2 N´m (20 in. lbs.).
(3) Reinstall the HVAC housing in the vehicle.
(Refer to 24 - HEATING & AIR CONDITIONING/
DISTRIBUTION/HVAC HOUSING - INSTALLA-
TION)
REFRIGERANT
DESCRIPTION
The refrigerant used in this air conditioning sys-
tem is a HydroFluoroCarbon (HFC), type R-134a.
Unlike R-12, which is a ChloroFluoroCarbon (CFC),
R-134a refrigerant does not contain ozone-depleting
chlorine. R-134a refrigerant is a non-toxic, non-flam-
mable, clear, and colorless liquefied gas.
Even though R-134a does not contain chlorine, it
must be reclaimed and recycled just like CFC-type
refrigerants. This is because R-134a is a greenhouse
gas and can contribute to global warming.
Fig. 14 HEATER CORE REMOVE/INSTALL
1 - HEATER CORE LINES
2 - HEATER CORE
24 - 56 PLUMBINGBR/BE
ACCUMULATOR (Continued)