2002 DODGE RAM audio
[x] Cancel search: audioPage 353 of 2255
(2) Use an ohmmeter to check the switch resis-
tances as shown in the Remote Radio Switch Test
chart. If the remote radio switch resistances check
OK, go to Step 3. If not OK, replace the faulty
switch.
REMOTE RADIO SWITCH TEST
SWITCH SWITCH POSITION RESISTANCE
Right
(White)Volume Up 7320 Ohms
Right
(White)Volume Down 1210 Ohms
Left
(Black)Seek Up 4530 Ohms
Left
(Black)Seek Down 2050 Ohms
Left
(Black)Pre-Set Station
Advance10 Ohms
(3) Check for continuity between the ground cir-
cuit cavity of the remote radio switch wire harness
connector and a good ground. There should be conti-
nuity. If OK, go to Step 4. If not OK, repair the open
ground circuit to ground as required.
(4) Disconnect the 18-way wire harness connector
from the Central Timer Module (CTM). Check for
continuity between the radio control mux circuit cav-
ity of the remote radio switch wire harness connector
and a good ground. There should be no continuity. If
OK, go to Step 5. If not OK, repair the shorted radio
control mux circuit as required.
(5) Check for continuity between the radio control
mux circuit cavities of the remote radio switch wire
harness connector and the 18-way CTM wire harness
connector. There should be continuity. If OK, refer to
the proper Diagnostic Procedures manual to test the
CTM and the Chrysler Collision Detection (CCD)
data bus. If not OK, repair the open radio control
mux circuit as required.
REMOVAL
(1) Disconnect and isolate the battery negative
cable.
(2) Remove the driver side airbag module from the
steering wheel. Refer to Electrical, Restraints for the
procedures.
(3) Remove the speed control switch located on the
same side of the steering wheel as the remote radio
switch that is being serviced. Refer to Electrical,
Speed Control for the procedures.
(4) Disconnect the steering wheel wire harness
connector from the connector receptacle of the remote
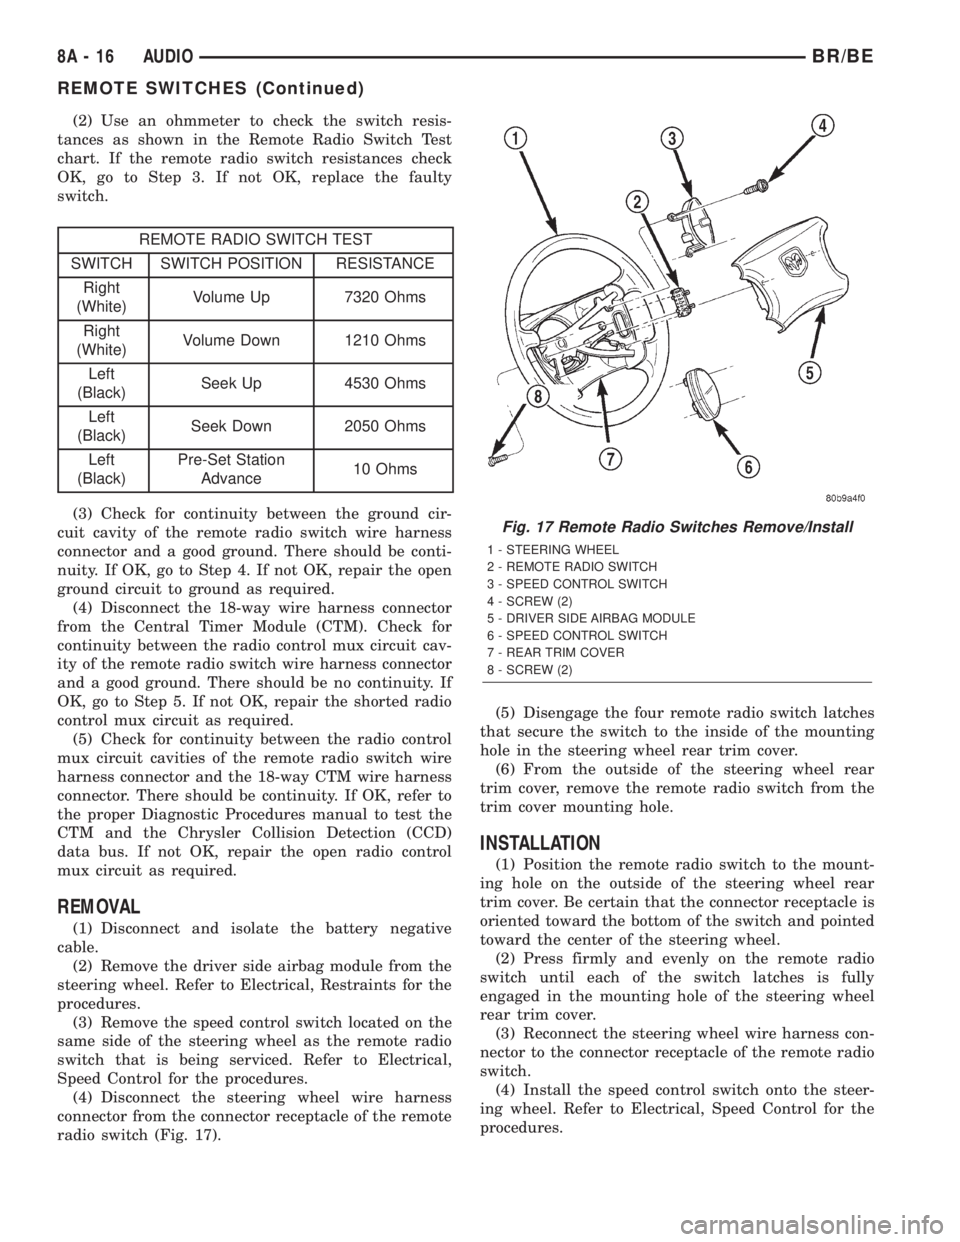
radio switch (Fig. 17).(5) Disengage the four remote radio switch latches
that secure the switch to the inside of the mounting
hole in the steering wheel rear trim cover.
(6) From the outside of the steering wheel rear
trim cover, remove the remote radio switch from the
trim cover mounting hole.
INSTALLATION
(1) Position the remote radio switch to the mount-
ing hole on the outside of the steering wheel rear
trim cover. Be certain that the connector receptacle is
oriented toward the bottom of the switch and pointed
toward the center of the steering wheel.
(2) Press firmly and evenly on the remote radio
switch until each of the switch latches is fully
engaged in the mounting hole of the steering wheel
rear trim cover.
(3) Reconnect the steering wheel wire harness con-
nector to the connector receptacle of the remote radio
switch.
(4) Install the speed control switch onto the steer-
ing wheel. Refer to Electrical, Speed Control for the
procedures.
Fig. 17 Remote Radio Switches Remove/Install
1 - STEERING WHEEL
2 - REMOTE RADIO SWITCH
3 - SPEED CONTROL SWITCH
4 - SCREW (2)
5 - DRIVER SIDE AIRBAG MODULE
6 - SPEED CONTROL SWITCH
7 - REAR TRIM COVER
8 - SCREW (2)
8A - 16 AUDIOBR/BE
REMOTE SWITCHES (Continued)
Page 354 of 2255

(5) Install the driver side airbag module onto the
steering wheel. Refer to Electrical, Restraints for the
procedures.
(6) Reconnect the battery negative cable.
SPEAKER
DESCRIPTION
STANDARD
The standard equipment speaker system includes
speakers in four locations. One full-range 15.2 by
22.9 centimeter (6.0 by 9.0 inch) speaker is located in
each front door. There is also one full-range 13.3 cen-
timeter (5.25 inch) diameter speaker located in each
rear cab side panel for the standard cab and the club
cab models, or in each rear door of the quad cab mod-
els.
PREMIUM
The optional premium speaker system features
Infinity model speakers in six locations. Each of the
standard front door speakers are replaced with Infin-
ity model speakers that include integral dual 30 watt
amplifiers. Each of the standard rear speakers is also
replaced by an Infinity model speaker. The premium
speaker system also includes an additional Infinity
tweeter mounted in the A-pillar garnish molding. The
total available power of the premium speaker system
is about 120 watts.
OPERATION
STANDARD
Each of the four full-range speakers used in the
standard speaker system is driven by the amplifier
that is integral to the factory-installed radio receiver.
For complete circuit diagrams, refer to the appropri-
ate wiring information. The wiring information
includes wiring diagrams, proper wire and connector
repair procedures, details of wire harness routing
and retention, connector pin-out information and
location views for the various wire harness connec-
tors, splices and grounds.
PREMIUM
The Infinity speakers used in the premium speaker
system are driven by dual amplifiers that are inte-
gral to each of the front door speakers. One of these
dual amplifiers drives the front door speaker and the
A-pillar mounted tweeter for that side of the vehicle,
while the other amplifier drives the rear speaker for
that side of the vehicle. For complete circuit dia-
grams, to refer to the appropriate wiring information.
The wiring information includes wiring diagrams,proper wire and connector repair procedures, details
of wire harness routing and retention, connector pin-
out information and location views for the various
wire harness connectors, splices and grounds.
DIAGNOSIS AND TESTING - SPEAKER
For complete circuit diagrams, refer to the appro-
priate wiring information. The wiring information
includes wiring diagrams, proper wire and connector
repair procedures, details of wire harness routing
and retention, connector pin-out information and
location views for the various wire harness connec-
tors, splices and grounds.
WARNING: ON VEHICLES EQUIPPED WITH AIR-
BAGS, REFER TO ELECTRICAL, RESTRAINTS
BEFORE ATTEMPTING ANY STEERING WHEEL,
STEERING COLUMN, OR INSTRUMENT PANEL
COMPONENT DIAGNOSIS OR SERVICE. FAILURE
TO TAKE THE PROPER PRECAUTIONS COULD
RESULT IN ACCIDENTAL AIRBAG DEPLOYMENT
AND POSSIBLE PERSONAL INJURY.
CAUTION: The speaker output of the radio receiver
is a ªfloating groundº system. Do not allow any
speaker lead to short to ground, as damage to the
radio receiver may result.
(1) Turn the ignition switch to the On position.
Turn the radio receiver on. Adjust the balance and
fader controls to check the performance of each indi-
vidual speaker. Note the speaker locations that are
not performing correctly. If only an Infinity A-pillar
or an Infinity rear speaker is inoperative, go to Step
8. If any other speaker is inoperative, go to Step 2.
NOTE: If the vehicle is equipped with the Infinity
premium speaker package and all of the speakers
are inoperative, refer to Filter, Choke, and Speaker
Relay in the Diagnosis and Testing section of this
group.
(2) Turn the radio receiver off. Turn the ignition
switch to the Off position. Disconnect and isolate the
battery negative cable. Remove the radio receiver
from the instrument panel. Check both the feed (+)
circuit and return (±) circuit cavities for the inopera-
tive speaker location(s) in the radio receiver wire
harness connectors for continuity to ground. In each
case, there should be no continuity. If OK, go to Step
3. If not OK, repair the shorted speaker feed (+)
and/or return (±) circuit(s) to the speaker as required.
(3) If the inoperative speaker is an Infinity-ampli-
fied speaker, go to Step 5. If the vehicle is equipped
with the standard speaker system, check the resis-
tance between the speaker feed (+) circuit and return
BR/BEAUDIO 8A - 17
REMOTE SWITCHES (Continued)
Page 355 of 2255
(±) circuit cavities of the radio receiver wire harness
connectors for the inoperative speaker location(s).
The meter should read between 2.5 and 4 ohms
(speaker resistance). If OK, go to Step 4. If not OK,
go to Step 5.
(4) Install a known good radio receiver. Connect
the battery negative cable. Turn the ignition switch
to the On position. Turn on the radio receiver and
test the speaker operation. If OK, replace the faulty
radio receiver. If not OK, turn the radio receiver off,
turn the ignition switch to the Off position, discon-
nect and isolate the battery negative cable, remove
the test radio receiver, and go to Step 5.
(5) Disconnect the wire harness connector at the
inoperative standard speaker system speaker or at
the Infinity-amplified front door-mounted speaker.
Check for continuity between the speaker feed (+) cir-
cuit cavities of the radio receiver wire harness con-
nector and the speaker wire harness connector for
the inoperative speaker location. Repeat the check
between the speaker return (±) circuit cavities of the
radio receiver wire harness connector and the
speaker wire harness connector for the inoperative
speaker location. In each case, there should be conti-
nuity. If OK with an Infinity-amplified front door-
mounted speaker, go to Step 6. If OK with the
standard speaker system, replace the faulty speaker.
If not OK, repair the open speaker feed (+) and/or
return (±) circuit(s) as required.
(6) Check for continuity between the ground cir-
cuit cavity in the body half of the wire harness con-
nector for the Infinity-amplified front door-mounted
speaker on the same side of the vehicle as the inop-
erative speaker and a good ground. There should be
continuity. If OK, go to Step 7. If not OK, repair the
open ground circuit to ground as required.
(7) Install the radio receiver. Connect the battery
negative cable. Turn the ignition switch to the On
position. Turn the radio receiver on. Check for bat-
tery voltage at the radio choke output circuit cavity
of the wire harness connector for the Infinity-ampli-
fied front door-mounted speaker on the same side of
the vehicle as the inoperative speaker. If OK, go to
Step 8. If not OK, repair the open radio choke output
circuit to the filter, choke, and speaker relay as
required.
(8) Turn the radio receiver off. Turn the ignition
switch to the Off position. Disconnect and isolate the
battery negative cable. Disconnect the wire harness
connector for the Infinity-amplified front door-
mounted speaker on the same side of the vehicle as
the inoperative speaker. Check both the amplified
feed (+) circuit and amplified return (±) circuit cavi-
ties for the inoperative speaker location in the body
half of the front door speaker wire harness connector
for continuity to ground. In each case, there shouldbe no continuity. If OK, go to Step 9. If not OK,
repair the shorted amplified feed (+) and/or amplified
return (±) circuit(s) as required.
(9) Disconnect the wire harness connector at the
inoperative speaker. Check for continuity between
the amplified feed (+) circuit cavities in the body half
of the wire harness connector for the Infinity-ampli-
fied front door-mounted speaker on the same side of
the vehicle as the inoperative speaker and the inop-
erative speaker wire harness connector. Repeat the
check between the amplified return (±) circuit cavi-
ties in the body half of the wire harness connector for
the Infinity-amplified front door-mounted speaker on
the same side of the vehicle as the inoperative
speaker and the inoperative speaker wire harness
connector. In each case, there should be continuity. If
OK, go to Step 10. If not OK, repair the open ampli-
fied feed (+) and/or amplified return (±) circuit(s) as
required.
(10) Check the resistance between the amplified
feed (+) circuit and amplified return (±) circuit cavi-
ties for the inoperative speaker in the body half of
the wire harness connector for the Infinity-amplified
front door-mounted speaker on the same side of the
vehicle as the inoperative speaker. The meter should
read between 2.5 and 4 ohms (speaker resistance). If
OK, replace the faulty front door-mounted Infinity
speaker and amplifier unit. If not OK, replace the
faulty A-pillar or rear-mounted Infinity speaker.
A-PILLAR TWEETER SPEAKER
REMOVAL
The A-pillar-mounted tweeters are used only with
the optional Infinity premium speaker package.
(1) Disconnect and isolate the battery negative
cable.
(2) If the vehicle is so equipped, remove the grab
handle from the A-pillar. Refer to Body, Interior for
the procedures.
(3) Disengage the trim from the A-pillar. Refer to
Body, Interior for the procedures.
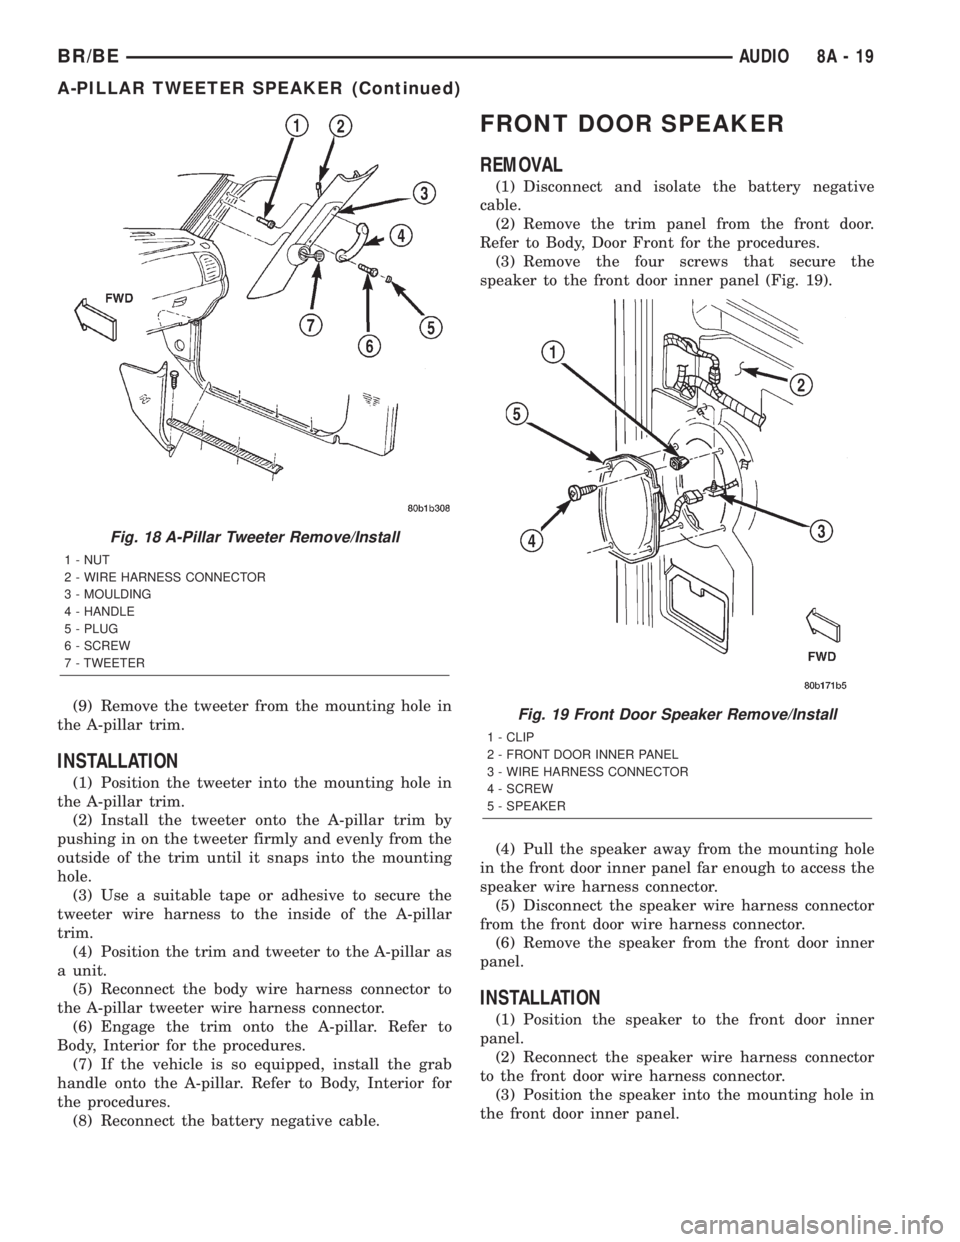
(4) Pull the trim away from the A-pillar far enough
to access the tweeter wire harness connector (Fig.
18).
(5) Disconnect the body wire harness connector
from the A-pillar tweeter wire harness connector.
(6) Remove the trim and tweeter from the A-pillar
as a unit.
(7) Disengage the tweeter wire harness retainers
from the heat stakes on the back of the A-pillar trim.
(8) Disengage the tweeter from the A-pillar trim
by pushing out on the tweeter firmly and evenly from
the inside of the trim until it unsnaps from the
mounting hole.
8A - 18 AUDIOBR/BE
SPEAKER (Continued)
Page 356 of 2255
(9) Remove the tweeter from the mounting hole in
the A-pillar trim.
INSTALLATION
(1) Position the tweeter into the mounting hole in
the A-pillar trim.
(2) Install the tweeter onto the A-pillar trim by
pushing in on the tweeter firmly and evenly from the
outside of the trim until it snaps into the mounting
hole.
(3) Use a suitable tape or adhesive to secure the
tweeter wire harness to the inside of the A-pillar
trim.
(4) Position the trim and tweeter to the A-pillar as
a unit.
(5) Reconnect the body wire harness connector to
the A-pillar tweeter wire harness connector.
(6) Engage the trim onto the A-pillar. Refer to
Body, Interior for the procedures.
(7) If the vehicle is so equipped, install the grab
handle onto the A-pillar. Refer to Body, Interior for
the procedures.
(8) Reconnect the battery negative cable.
FRONT DOOR SPEAKER
REMOVAL
(1) Disconnect and isolate the battery negative
cable.
(2) Remove the trim panel from the front door.
Refer to Body, Door Front for the procedures.
(3) Remove the four screws that secure the
speaker to the front door inner panel (Fig. 19).
(4) Pull the speaker away from the mounting hole
in the front door inner panel far enough to access the
speaker wire harness connector.
(5) Disconnect the speaker wire harness connector
from the front door wire harness connector.
(6) Remove the speaker from the front door inner
panel.
INSTALLATION
(1) Position the speaker to the front door inner
panel.
(2) Reconnect the speaker wire harness connector
to the front door wire harness connector.
(3) Position the speaker into the mounting hole in
the front door inner panel.
Fig. 18 A-Pillar Tweeter Remove/Install
1 - NUT
2 - WIRE HARNESS CONNECTOR
3 - MOULDING
4 - HANDLE
5 - PLUG
6 - SCREW
7 - TWEETER
Fig. 19 Front Door Speaker Remove/Install
1 - CLIP
2 - FRONT DOOR INNER PANEL
3 - WIRE HARNESS CONNECTOR
4 - SCREW
5 - SPEAKER
BR/BEAUDIO 8A - 19
A-PILLAR TWEETER SPEAKER (Continued)
Page 357 of 2255
(4) Install and tighten the four screws that secure
the speaker to the front door inner panel. Tighten
the screws to 4 N´m (35 in. lbs.).
(5) Install the trim panel onto the front door. Refer
to Body, Door Front for the procedures.
(6) Reconnect the battery negative cable.
REAR CAB SIDE PANEL
SPEAKER
REMOVAL
(1) Disconnect and isolate the battery negative
cable.
(2) Remove the trim from the rear cab side panel.
Refer to Body, Interior for the procedures.
(3) Remove the two screws that secure the speaker
to the cab side inner panel (Fig. 20) or (Fig. 21).
(4) Pull the speaker away from the mounting hole
in the cab side inner panel far enough to access the
body wire harness connector.
(5) Disconnect the body wire harness connector
from the speaker connector receptacle.
(6) Remove the speaker from the cab side inner
panel.
INSTALLATION
(1) Position the speaker to the cab side inner
panel.
(2) Reconnect the body wire harness connector to
the speaker connector receptacle.(3) Position the speaker into the mounting hole in
the cab side inner panel.
(4) Install and tighten the two screws that secure
the speaker to the cab side inner panel. Tighten the
screws to 4 N´m (35 in. lbs.).
(5) Install the trim onto the rear cab side panel.
Refer to Body, Interior for the procedures.
(6) Reconnect the battery negative cable.
REAR DOOR SPEAKER
REMOVAL
(1) Disconnect and isolate the battery negative
cable.
(2) Remove the trim panel from the rear door.
(3) Remove the two screws that secure the speaker
to the rear door inner panel (Fig. 22).
(4) Pull the speaker away from the mounting hole
in the rear door inner panel far enough to access the
door wire harness connector.
(5) Disconnect the door wire harness connector
from the speaker connector receptacle.
(6) Remove the speaker from the rear door inner
panel.
Fig. 20 Rear Speaker Remove/Install - Standard Cab
1 - CLIP
2 - SPEAKER
3 - SCREW
4 - WIRE HARNESS CONNECTOR
5 - CAB SIDE INNER PANEL
Fig. 21 Rear Speaker Remove/Install - Club Cab
1 - WIRE HARNESS CONNECTOR
2 - CAB SIDE INNER PANEL
3 - SPEAKER
4 - SCREW
5 - CLIP
8A - 20 AUDIOBR/BE
FRONT DOOR SPEAKER (Continued)
Page 358 of 2255
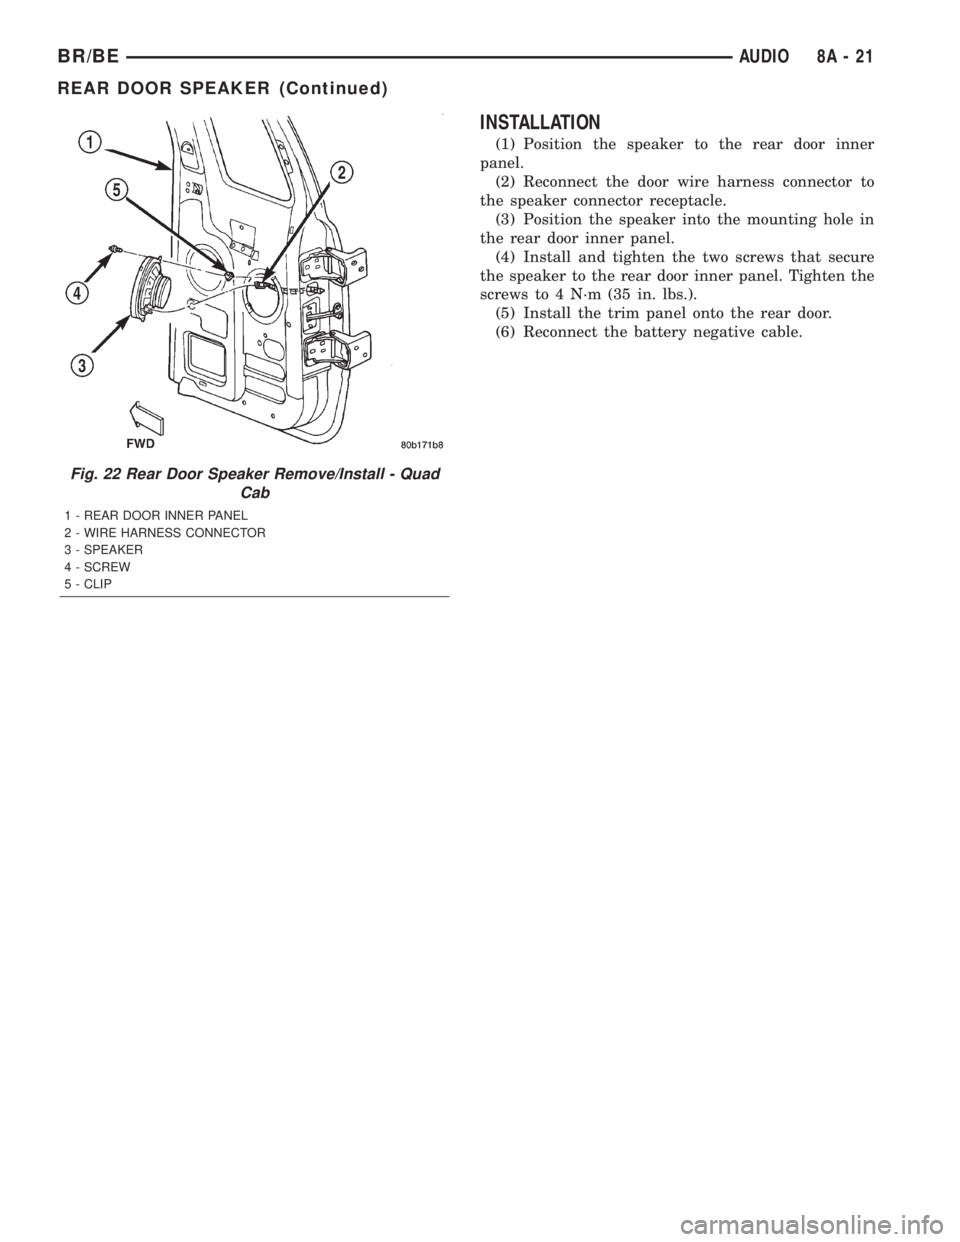
INSTALLATION
(1) Position the speaker to the rear door inner
panel.
(2) Reconnect the door wire harness connector to
the speaker connector receptacle.
(3) Position the speaker into the mounting hole in
the rear door inner panel.
(4) Install and tighten the two screws that secure
the speaker to the rear door inner panel. Tighten the
screws to 4 N´m (35 in. lbs.).
(5) Install the trim panel onto the rear door.
(6) Reconnect the battery negative cable.
Fig. 22 Rear Door Speaker Remove/Install - Quad
Cab
1 - REAR DOOR INNER PANEL
2 - WIRE HARNESS CONNECTOR
3 - SPEAKER
4 - SCREW
5 - CLIP
BR/BEAUDIO 8A - 21
REAR DOOR SPEAKER (Continued)
Page 403 of 2255

Excessive IOD can be caused by:
²Electrical items left on.
²Faulty or improperly adjusted switches.
²Faulty or shorted electronic modules and compo-
nents.
²An internally shorted generator.
²Intermittent shorts in the wiring.
If the IOD is over thirty-five milliamperes, the
problem must be found and corrected before replac-
ing a battery. In most cases, the battery can becharged and returned to service after the excessive
IOD condition has been corrected.
(1) Verify that all electrical accessories are off.
Turn off all lamps, remove the ignition key, and close
all doors. If the vehicle is equipped with an illumi-
nated entry system or an electronically tuned radio,
allow the electronic timer function of these systems
to automatically shut off (time out). This may take
up to three minutes. See the Electronic Module Igni-
tion-Off Draw Table for more information.
ELECTRONIC MODULE IGNITION-OFF DRAW (IOD) TABLE
ModuleTime Out?
(If Yes, Interval And Wake-Up Input)IOD IOD After Time Out
Radio No 1 to 3 milliamperes N/A
Audio Power
AmplifierNo up to 1 milliampere N/A
Central Timer
Module (CTM)No4.75 milliamperes
(max.)N/A
Powertrain Control
Module (PCM)No 0.95 milliampere N/A
ElectroMechanical
Instrument Cluster
(EMIC)No 0.44 milliampere N/A
Combination Flasher No 0.08 milliampere N/A
(2) Determine that the underhood lamp is operat-
ing properly, then disconnect the lamp wire harness
connector or remove the lamp bulb.
(3) Disconnect the battery negative cable.
(4) Set an electronic digital multi-meter to its
highest amperage scale. Connect the multi-meter
between the disconnected battery negative cable ter-
minal clamp and the battery negative terminal post.
Make sure that the doors remain closed so that the
illuminated entry system is not activated. The multi-
meter amperage reading may remain high for up to
three minutes, or may not give any reading at all
while set in the highest amperage scale, depending
upon the electrical equipment in the vehicle. The
multi-meter leads must be securely clamped to the
battery negative cable terminal clamp and the bat-
tery negative terminal post. If continuity between the
battery negative terminal post and the negative cable
terminal clamp is lost during any part of the IOD
test, the electronic timer function will be activated
and all of the tests will have to be repeated.
(5) After about three minutes, the high-amperage
IOD reading on the multi-meter should become very
low or nonexistent, depending upon the electrical
equipment in the vehicle. If the amperage reading
remains high, remove and replace each fuse or circuit
breaker in the Power Distribution Center (PDC) andthen in the Junction Block (JB), one at a time until
the amperage reading becomes very low, or nonexist-
ent. Refer to the appropriate wiring information in
this service manual for complete PDC and JB fuse,
circuit breaker, and circuit identification. This will
isolate each circuit and identify the circuit that is the
source of the high-amperage IOD. If the amperage
reading remains high after removing and replacing
each fuse and circuit breaker, disconnect the wire
harness from the generator. If the amperage reading
now becomes very low or nonexistent, refer to Charg-
ing System for the proper charging system diagnosis
and testing procedures. After the high-amperage IOD
has been corrected, switch the multi-meter to pro-
gressively lower amperage scales and, if necessary,
repeat the fuse and circuit breaker remove-and-re-
place process to identify and correct all sources of
excessive IOD. It is now safe to select the lowest mil-
liampere scale of the multi-meter to check the low-
amperage IOD.
CAUTION: Do not open any doors, or turn on any
electrical accessories with the lowest milliampere
scale selected, or the multi-meter may be damaged.
(6) Observe the multi-meter reading. The low-am-
perage IOD should not exceed thirty-five milliam-
peres (0.035 ampere). If the current draw exceeds
8F - 14 BATTERY SYSTEMBR/BE
BATTERY (Continued)
Page 662 of 2255

WIRING
TABLE OF CONTENTS
page page
AIRBAG SYSTEM.................... 8W-43-1
AIR CONDITIONING-HEATER........... 8W-42-1
ALL WHEEL ANTILOCK BRAKES........ 8W-35-1
AUDIO SYSTEM..................... 8W-47-1
BUS COMMUNICATIONS.............. 8W-18-1
CENTRAL TIMER MODULE............. 8W-45-1
CHARGING SYSTEM.................. 8W-20-1
COMPONENT INDEX.................. 8W-02-1
CONNECTOR/GROUND/SPLICE
LOCATION........................ 8W-91-1
CONNECTOR PIN-OUTS............... 8W-80-1
FRONT LIGHTING.................... 8W-50-1
FUEL/IGNITION SYSTEM.............. 8W-30-1
GROUND DISTRIBUTION.............. 8W-15-1
HORN/CIGAR LIGHTER/POWER OUTLET . . 8W-41-1
INSTRUMENT CLUSTER............... 8W-40-1
INTERIOR LIGHTING.................. 8W-44-1
JUNCTION BLOCK.................... 8W-12-1OVERHEAD CONSOLE................. 8W-49-1
POWER DISTRIBUTION............... 8W-10-1
POWER DISTRIBUTION............... 8W-97-1
POWER DOOR LOCKS................ 8W-61-1
POWER MIRRORS................... 8W-62-1
POWER SEATS...................... 8W-63-1
POWER WINDOWS................... 8W-60-1
REAR LIGHTING..................... 8W-51-1
REAR WHEEL ANTILOCK BRAKES....... 8W-34-1
SPLICE INFORMATION................ 8W-70-1
STARTING SYSTEM.................. 8W-21-1
TRAILER TOW....................... 8W-54-1
TRANSMISSION CONTROL SYSTEM..... 8W-31-1
TURN SIGNALS...................... 8W-52-1
VEHICLE SPEED CONTROL............ 8W-33-1
VEHICLE THEFT SECURITY SYSTEM..... 8W-39-1
WIPERS............................ 8W-53-1
WIRING DIAGRAM INFORMATION....... 8W-01-1 BR/BEWIRING 8W - 1