2002 CHRYSLER VOYAGER torque
[x] Cancel search: torquePage 1725 of 2399
DIAGNOSIS AND TESTING - CLUTCH AIR
PRESSURE TESTS
Inoperative clutches can be located using a series
of tests by substituting air pressure for fluid pressure
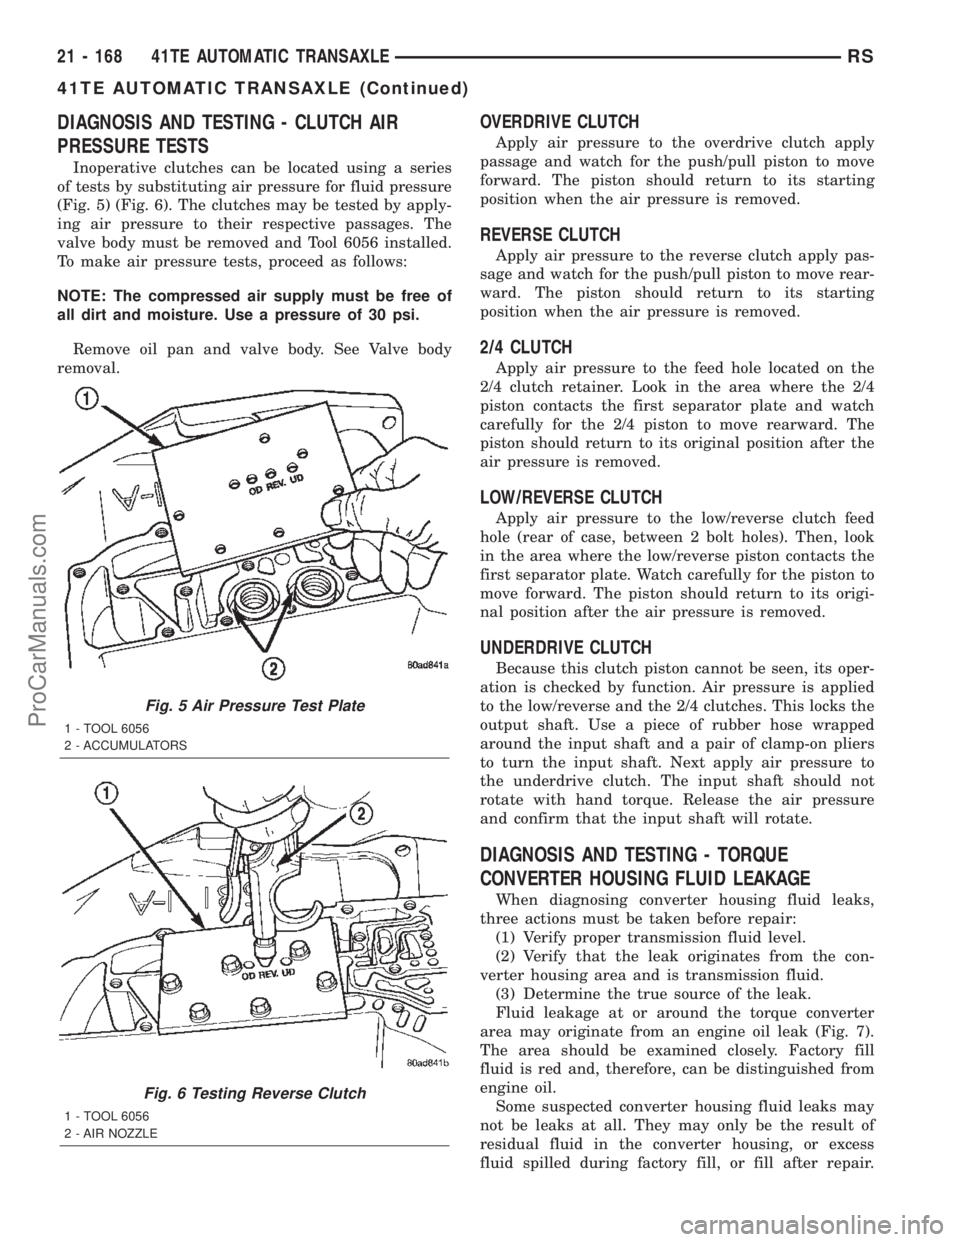
(Fig. 5) (Fig. 6). The clutches may be tested by apply-
ing air pressure to their respective passages. The
valve body must be removed and Tool 6056 installed.
To make air pressure tests, proceed as follows:
NOTE: The compressed air supply must be free of
all dirt and moisture. Use a pressure of 30 psi.
Remove oil pan and valve body. See Valve body
removal.
OVERDRIVE CLUTCH
Apply air pressure to the overdrive clutch apply
passage and watch for the push/pull piston to move
forward. The piston should return to its starting
position when the air pressure is removed.
REVERSE CLUTCH
Apply air pressure to the reverse clutch apply pas-
sage and watch for the push/pull piston to move rear-
ward. The piston should return to its starting
position when the air pressure is removed.
2/4 CLUTCH
Apply air pressure to the feed hole located on the
2/4 clutch retainer. Look in the area where the 2/4
piston contacts the first separator plate and watch
carefully for the 2/4 piston to move rearward. The
piston should return to its original position after the
air pressure is removed.
LOW/REVERSE CLUTCH
Apply air pressure to the low/reverse clutch feed
hole (rear of case, between 2 bolt holes). Then, look
in the area where the low/reverse piston contacts the
first separator plate. Watch carefully for the piston to
move forward. The piston should return to its origi-
nal position after the air pressure is removed.
UNDERDRIVE CLUTCH
Because this clutch piston cannot be seen, its oper-
ation is checked by function. Air pressure is applied
to the low/reverse and the 2/4 clutches. This locks the
output shaft. Use a piece of rubber hose wrapped
around the input shaft and a pair of clamp-on pliers
to turn the input shaft. Next apply air pressure to
the underdrive clutch. The input shaft should not
rotate with hand torque. Release the air pressure
and confirm that the input shaft will rotate.
DIAGNOSIS AND TESTING - TORQUE
CONVERTER HOUSING FLUID LEAKAGE
When diagnosing converter housing fluid leaks,
three actions must be taken before repair:
(1) Verify proper transmission fluid level.
(2) Verify that the leak originates from the con-
verter housing area and is transmission fluid.
(3) Determine the true source of the leak.
Fluid leakage at or around the torque converter
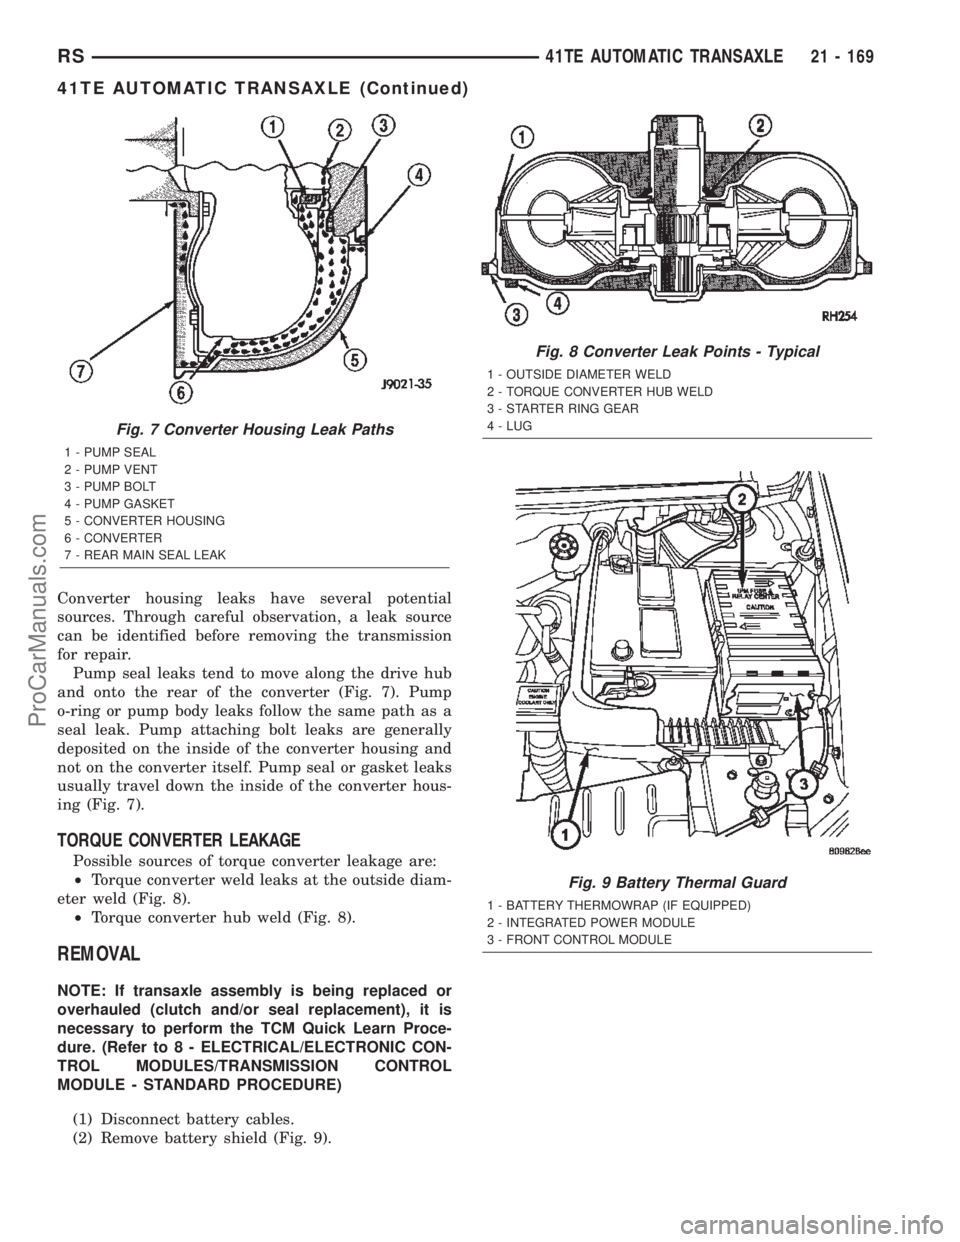
area may originate from an engine oil leak (Fig. 7).
The area should be examined closely. Factory fill
fluid is red and, therefore, can be distinguished from
engine oil.
Some suspected converter housing fluid leaks may
not be leaks at all. They may only be the result of
residual fluid in the converter housing, or excess
fluid spilled during factory fill, or fill after repair.
Fig. 5 Air Pressure Test Plate
1 - TOOL 6056
2 - ACCUMULATORS
Fig. 6 Testing Reverse Clutch
1 - TOOL 6056
2 - AIR NOZZLE
21 - 168 41TE AUTOMATIC TRANSAXLERS
41TE AUTOMATIC TRANSAXLE (Continued)
ProCarManuals.com
Page 1726 of 2399
Converter housing leaks have several potential
sources. Through careful observation, a leak source
can be identified before removing the transmission
for repair.
Pump seal leaks tend to move along the drive hub
and onto the rear of the converter (Fig. 7). Pump
o-ring or pump body leaks follow the same path as a
seal leak. Pump attaching bolt leaks are generally
deposited on the inside of the converter housing and
not on the converter itself. Pump seal or gasket leaks
usually travel down the inside of the converter hous-
ing (Fig. 7).
TORQUE CONVERTER LEAKAGE
Possible sources of torque converter leakage are:
²Torque converter weld leaks at the outside diam-
eter weld (Fig. 8).
²Torque converter hub weld (Fig. 8).
REMOVAL
NOTE: If transaxle assembly is being replaced or
overhauled (clutch and/or seal replacement), it is
necessary to perform the TCM Quick Learn Proce-
dure. (Refer to 8 - ELECTRICAL/ELECTRONIC CON-
TROL MODULES/TRANSMISSION CONTROL
MODULE - STANDARD PROCEDURE)
(1) Disconnect battery cables.
(2) Remove battery shield (Fig. 9).
Fig. 7 Converter Housing Leak Paths
1 - PUMP SEAL
2 - PUMP VENT
3 - PUMP BOLT
4 - PUMP GASKET
5 - CONVERTER HOUSING
6 - CONVERTER
7 - REAR MAIN SEAL LEAK
Fig. 8 Converter Leak Points - Typical
1 - OUTSIDE DIAMETER WELD
2 - TORQUE CONVERTER HUB WELD
3 - STARTER RING GEAR
4 - LUG
Fig. 9 Battery Thermal Guard
1 - BATTERY THERMOWRAP (IF EQUIPPED)
2 - INTEGRATED POWER MODULE
3 - FRONT CONTROL MODULE
RS41TE AUTOMATIC TRANSAXLE21 - 169
41TE AUTOMATIC TRANSAXLE (Continued)
ProCarManuals.com
Page 1728 of 2399
(18) AWD models: Remove power transfer unit.
(Refer to 21 - TRANSMISSION/TRANSAXLE/
POWER TRANSFER UNIT - REMOVAL)
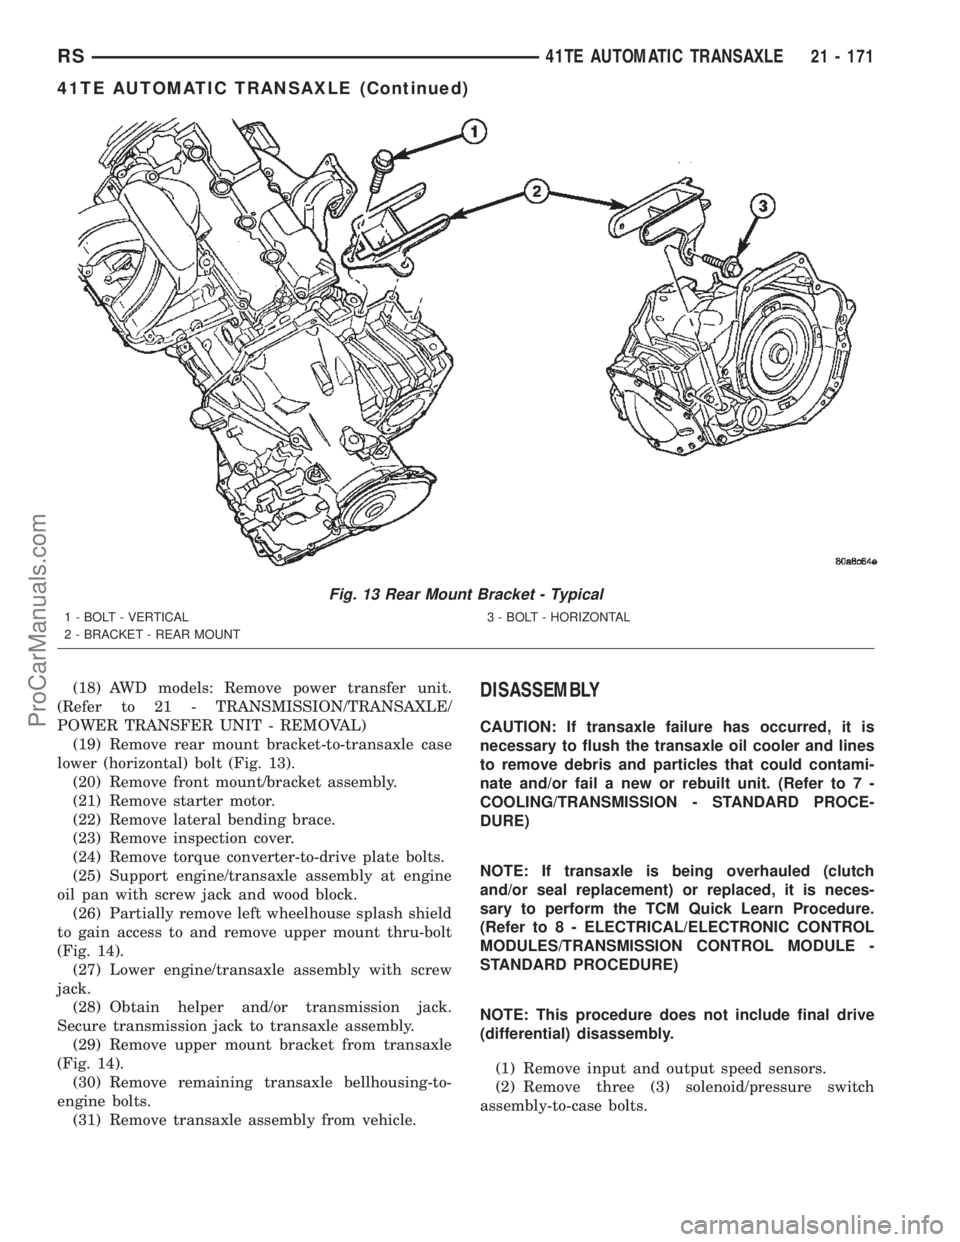
(19) Remove rear mount bracket-to-transaxle case
lower (horizontal) bolt (Fig. 13).
(20) Remove front mount/bracket assembly.
(21) Remove starter motor.
(22) Remove lateral bending brace.
(23) Remove inspection cover.
(24) Remove torque converter-to-drive plate bolts.
(25) Support engine/transaxle assembly at engine
oil pan with screw jack and wood block.
(26) Partially remove left wheelhouse splash shield
to gain access to and remove upper mount thru-bolt
(Fig. 14).
(27) Lower engine/transaxle assembly with screw
jack.
(28) Obtain helper and/or transmission jack.
Secure transmission jack to transaxle assembly.
(29) Remove upper mount bracket from transaxle
(Fig. 14).
(30) Remove remaining transaxle bellhousing-to-
engine bolts.
(31) Remove transaxle assembly from vehicle.DISASSEMBLY
CAUTION: If transaxle failure has occurred, it is
necessary to flush the transaxle oil cooler and lines
to remove debris and particles that could contami-
nate and/or fail a new or rebuilt unit. (Refer to 7 -
COOLING/TRANSMISSION - STANDARD PROCE-
DURE)
NOTE: If transaxle is being overhauled (clutch
and/or seal replacement) or replaced, it is neces-
sary to perform the TCM Quick Learn Procedure.
(Refer to 8 - ELECTRICAL/ELECTRONIC CONTROL
MODULES/TRANSMISSION CONTROL MODULE -
STANDARD PROCEDURE)
NOTE: This procedure does not include final drive
(differential) disassembly.
(1) Remove input and output speed sensors.
(2) Remove three (3) solenoid/pressure switch
assembly-to-case bolts.
Fig. 13 Rear Mount Bracket - Typical
1 - BOLT - VERTICAL
2 - BRACKET - REAR MOUNT3 - BOLT - HORIZONTAL
RS41TE AUTOMATIC TRANSAXLE21 - 171
41TE AUTOMATIC TRANSAXLE (Continued)
ProCarManuals.com
Page 1748 of 2399
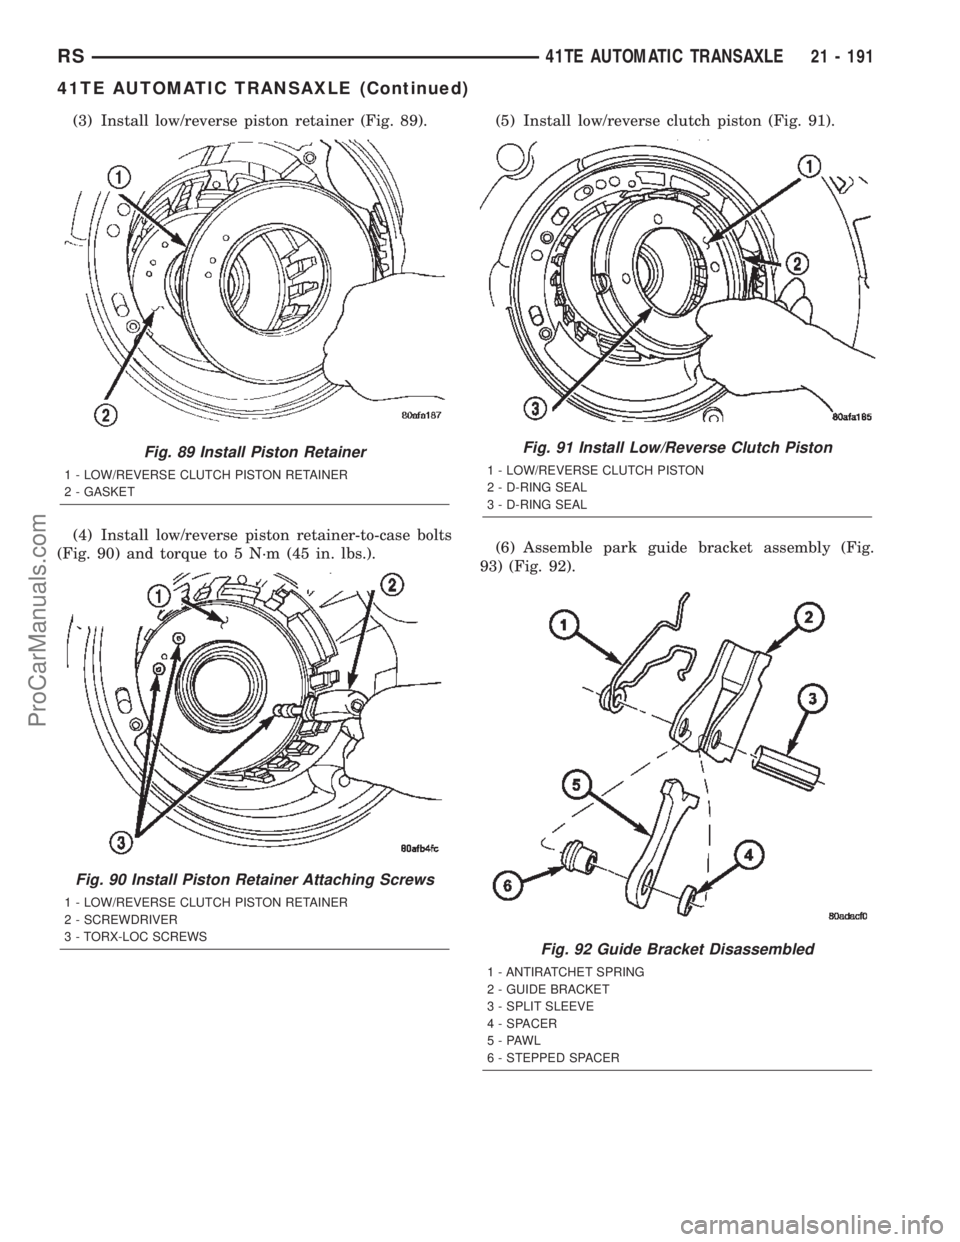
(3) Install low/reverse piston retainer (Fig. 89).
(4) Install low/reverse piston retainer-to-case bolts
(Fig. 90) and torque to 5 N´m (45 in. lbs.).(5) Install low/reverse clutch piston (Fig. 91).
(6) Assemble park guide bracket assembly (Fig.
93) (Fig. 92).
Fig. 89 Install Piston Retainer
1 - LOW/REVERSE CLUTCH PISTON RETAINER
2 - GASKET
Fig. 90 Install Piston Retainer Attaching Screws
1 - LOW/REVERSE CLUTCH PISTON RETAINER
2 - SCREWDRIVER
3 - TORX-LOC SCREWS
Fig. 91 Install Low/Reverse Clutch Piston
1 - LOW/REVERSE CLUTCH PISTON
2 - D-RING SEAL
3 - D-RING SEAL
Fig. 92 Guide Bracket Disassembled
1 - ANTIRATCHET SPRING
2 - GUIDE BRACKET
3 - SPLIT SLEEVE
4 - SPACER
5-PAWL
6 - STEPPED SPACER
RS41TE AUTOMATIC TRANSAXLE21 - 191
41TE AUTOMATIC TRANSAXLE (Continued)
ProCarManuals.com
Page 1751 of 2399
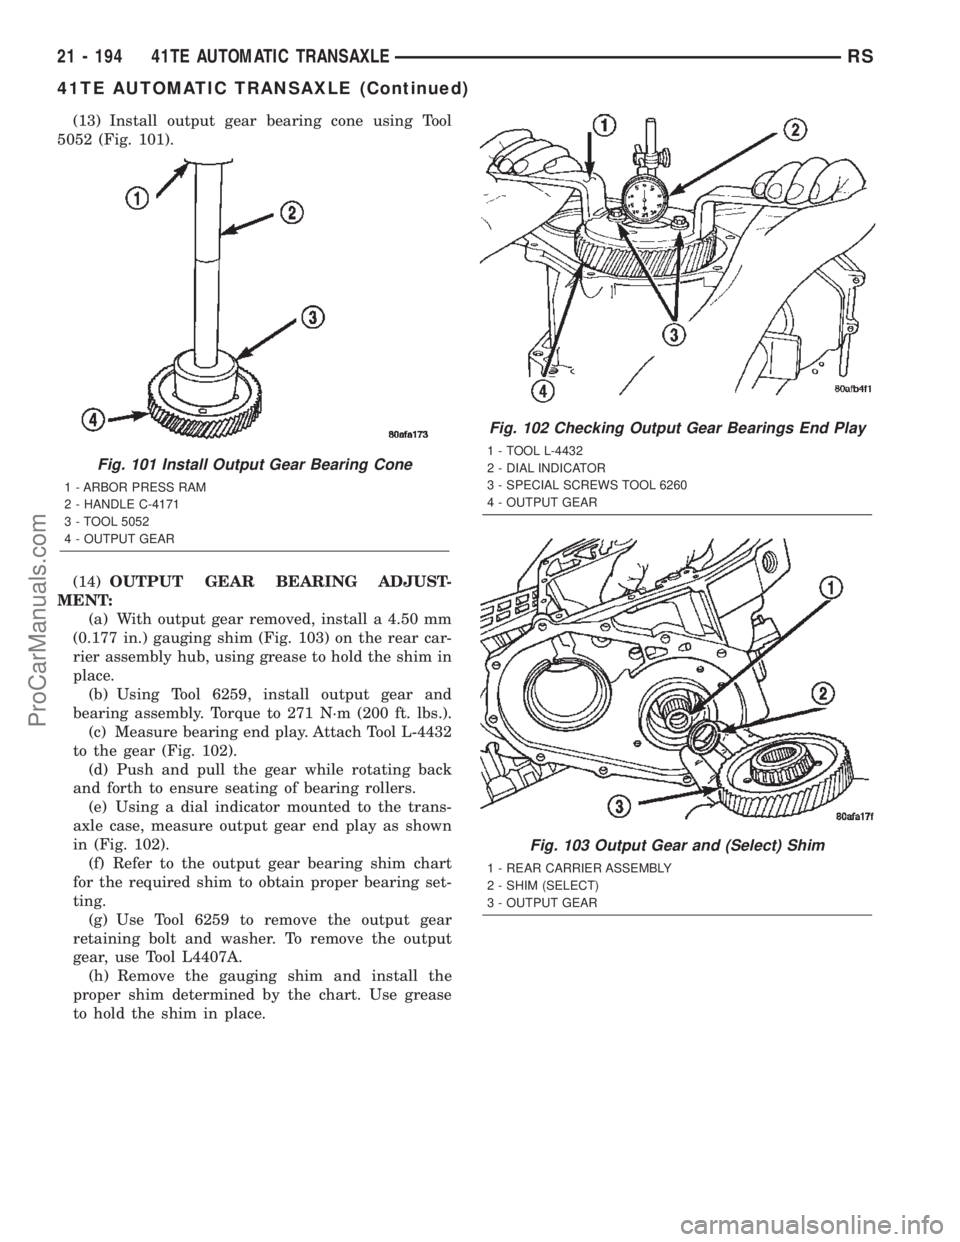
(13) Install output gear bearing cone using Tool
5052 (Fig. 101).
(14)OUTPUT GEAR BEARING ADJUST-
MENT:
(a) With output gear removed, install a 4.50 mm
(0.177 in.) gauging shim (Fig. 103) on the rear car-
rier assembly hub, using grease to hold the shim in
place.
(b) Using Tool 6259, install output gear and
bearing assembly. Torque to 271 N´m (200 ft. lbs.).
(c) Measure bearing end play. Attach Tool L-4432
to the gear (Fig. 102).
(d) Push and pull the gear while rotating back
and forth to ensure seating of bearing rollers.
(e) Using a dial indicator mounted to the trans-
axle case, measure output gear end play as shown
in (Fig. 102).
(f) Refer to the output gear bearing shim chart
for the required shim to obtain proper bearing set-
ting.
(g) Use Tool 6259 to remove the output gear
retaining bolt and washer. To remove the output
gear, use Tool L4407A.
(h) Remove the gauging shim and install the
proper shim determined by the chart. Use grease
to hold the shim in place.
Fig. 101 Install Output Gear Bearing Cone
1 - ARBOR PRESS RAM
2 - HANDLE C-4171
3 - TOOL 5052
4 - OUTPUT GEAR
Fig. 102 Checking Output Gear Bearings End Play
1 - TOOL L-4432
2 - DIAL INDICATOR
3 - SPECIAL SCREWS TOOL 6260
4 - OUTPUT GEAR
Fig. 103 Output Gear and (Select) Shim
1 - REAR CARRIER ASSEMBLY
2 - SHIM (SELECT)
3 - OUTPUT GEAR
21 - 194 41TE AUTOMATIC TRANSAXLERS
41TE AUTOMATIC TRANSAXLE (Continued)
ProCarManuals.com
Page 1753 of 2399
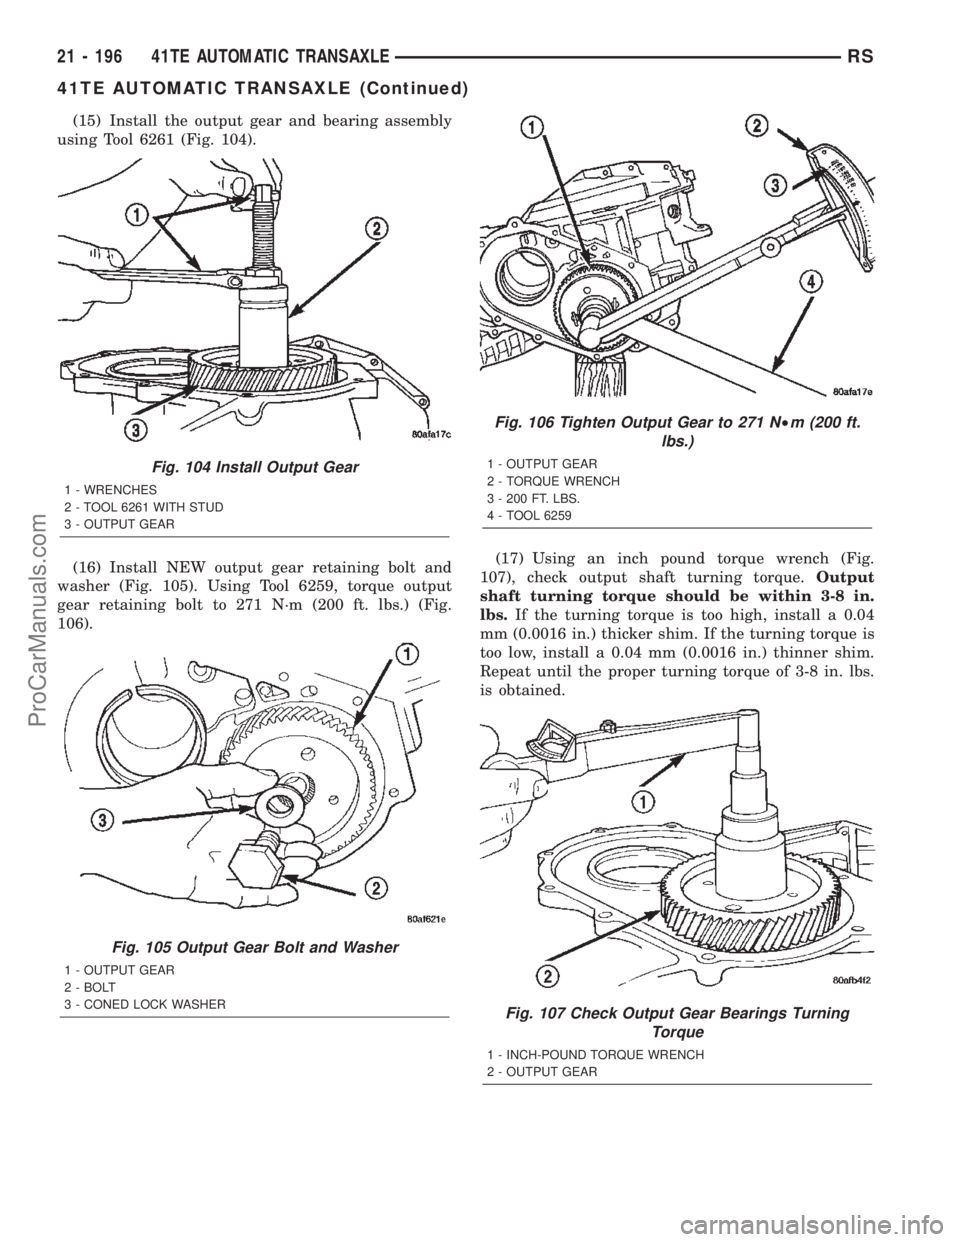
(15) Install the output gear and bearing assembly
using Tool 6261 (Fig. 104).
(16) Install NEW output gear retaining bolt and
washer (Fig. 105). Using Tool 6259, torque output
gear retaining bolt to 271 N´m (200 ft. lbs.) (Fig.
106).(17) Using an inch pound torque wrench (Fig.
107), check output shaft turning torque.Output
shaft turning torque should be within 3-8 in.
lbs.If the turning torque is too high, install a 0.04
mm (0.0016 in.) thicker shim. If the turning torque is
too low, install a 0.04 mm (0.0016 in.) thinner shim.
Repeat until the proper turning torque of 3-8 in. lbs.
is obtained.
Fig. 104 Install Output Gear
1 - WRENCHES
2 - TOOL 6261 WITH STUD
3 - OUTPUT GEAR
Fig. 105 Output Gear Bolt and Washer
1 - OUTPUT GEAR
2 - BOLT
3 - CONED LOCK WASHER
Fig. 106 Tighten Output Gear to 271 N²m (200 ft.
lbs.)
1 - OUTPUT GEAR
2 - TORQUE WRENCH
3 - 200 FT. LBS.
4 - TOOL 6259
Fig. 107 Check Output Gear Bearings Turning
Torque
1 - INCH-POUND TORQUE WRENCH
2 - OUTPUT GEAR
21 - 196 41TE AUTOMATIC TRANSAXLERS
41TE AUTOMATIC TRANSAXLE (Continued)
ProCarManuals.com
Page 1754 of 2399
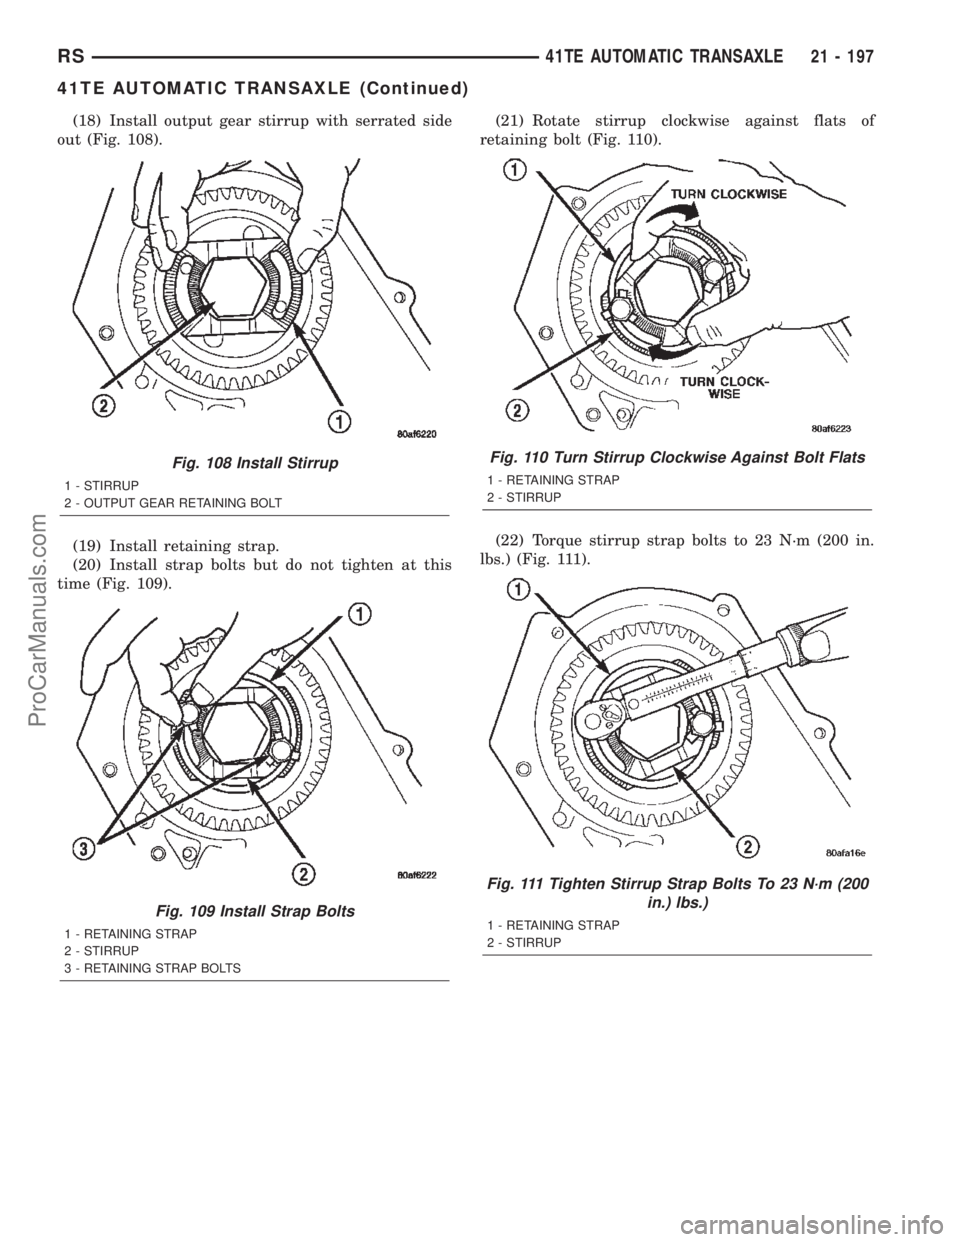
(18) Install output gear stirrup with serrated side
out (Fig. 108).
(19) Install retaining strap.
(20) Install strap bolts but do not tighten at this
time (Fig. 109).(21) Rotate stirrup clockwise against flats of
retaining bolt (Fig. 110).
(22) Torque stirrup strap bolts to 23 N´m (200 in.
lbs.) (Fig. 111).
Fig. 108 Install Stirrup
1 - STIRRUP
2 - OUTPUT GEAR RETAINING BOLT
Fig. 109 Install Strap Bolts
1 - RETAINING STRAP
2 - STIRRUP
3 - RETAINING STRAP BOLTS
Fig. 110 Turn Stirrup Clockwise Against Bolt Flats
1 - RETAINING STRAP
2 - STIRRUP
Fig. 111 Tighten Stirrup Strap Bolts To 23 N´m (200
in.) lbs.)
1 - RETAINING STRAP
2 - STIRRUP
RS41TE AUTOMATIC TRANSAXLE21 - 197
41TE AUTOMATIC TRANSAXLE (Continued)
ProCarManuals.com
Page 1759 of 2399
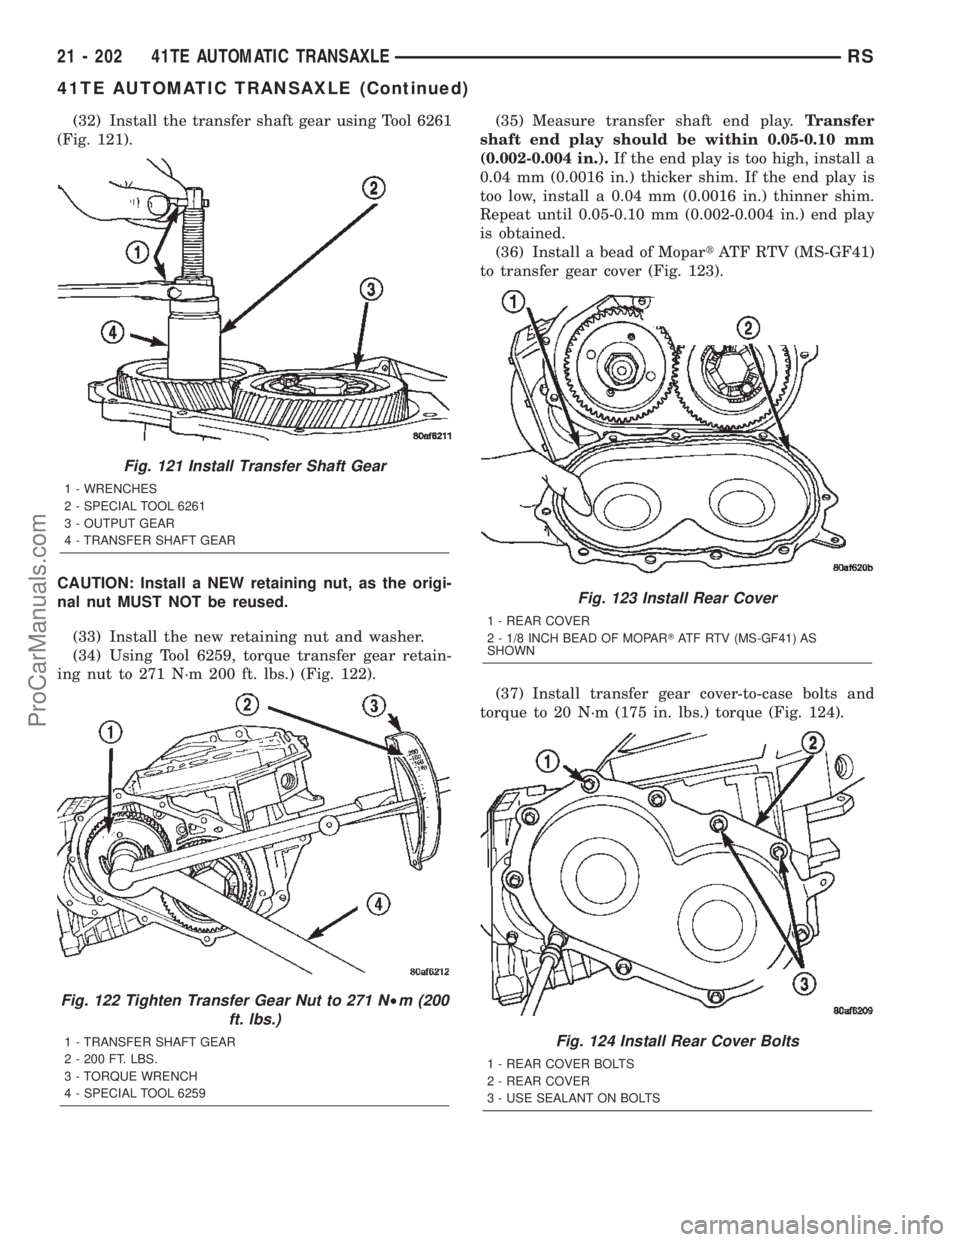
(32) Install the transfer shaft gear using Tool 6261
(Fig. 121).
CAUTION: Install a NEW retaining nut, as the origi-
nal nut MUST NOT be reused.
(33) Install the new retaining nut and washer.
(34) Using Tool 6259, torque transfer gear retain-
ing nut to 271 N´m 200 ft. lbs.) (Fig. 122).(35) Measure transfer shaft end play.Transfer
shaft end play should be within 0.05-0.10 mm
(0.002-0.004 in.).If the end play is too high, install a
0.04 mm (0.0016 in.) thicker shim. If the end play is
too low, install a 0.04 mm (0.0016 in.) thinner shim.
Repeat until 0.05-0.10 mm (0.002-0.004 in.) end play
is obtained.
(36) Install a bead of MopartATF RTV (MS-GF41)
to transfer gear cover (Fig. 123).
(37) Install transfer gear cover-to-case bolts and
torque to 20 N´m (175 in. lbs.) torque (Fig. 124).
Fig. 121 Install Transfer Shaft Gear
1 - WRENCHES
2 - SPECIAL TOOL 6261
3 - OUTPUT GEAR
4 - TRANSFER SHAFT GEAR
Fig. 122 Tighten Transfer Gear Nut to 271 N²m (200
ft. lbs.)
1 - TRANSFER SHAFT GEAR
2 - 200 FT. LBS.
3 - TORQUE WRENCH
4 - SPECIAL TOOL 6259
Fig. 123 Install Rear Cover
1 - REAR COVER
2 - 1/8 INCH BEAD OF MOPARTATF RTV (MS-GF41) AS
SHOWN
Fig. 124 Install Rear Cover Bolts
1 - REAR COVER BOLTS
2 - REAR COVER
3 - USE SEALANT ON BOLTS
21 - 202 41TE AUTOMATIC TRANSAXLERS
41TE AUTOMATIC TRANSAXLE (Continued)
ProCarManuals.com