Page 1819 of 2399
(24) Using Tool 6057 and an arbor press, compress
return OD/Reverse piston return spring just enough
to remove snap ring (Fig. 251) (Fig. 252).(25) Remove input shaft to input clutch hub snap
ring (Fig. 253).
(26) Using a suitably sized socket and an arbor
press, remove input shaft from input shaft hub (Fig.
254).
Fig. 251 Remove Snap Ring
1 - ARBOR PRESS RAM (COMPRESS RETURN SPRING JUST
ENOUGH TO REMOVE OR INSTALL SNAP RING)
2 - SCREWDRIVER
3 - SNAP RING
4 - SPECIAL TOOL 6057
5 - OD/REVERSE PISTON
6 - RETURN SPRING
Fig. 252 Snap Ring and Return Spring
1 - OD/REVERSE PISTON
2 - RETURN SPRING
3 - SNAP RING
4 - O-RING
Fig. 253 Remove Input Shaft Snap Ring
1 - INPUT SHAFT
2 - SHARP-POINTED TOOL
3 - SNAP RING
4 - O-RINGS
5 - SEALS
Fig. 254 Remove Input Shaft
1 - ARBOR PRESS RAM
2 - SOCKET
3 - SEAL
4 - O-RINGS
5 - INPUT SHAFT
6 - SEAL
7 - INPUT SHAFT HUB ASSEMBLY
21 - 262 41TE AUTOMATIC TRANSAXLERS
INPUT CLUTCH ASSEMBLY (Continued)
ProCarManuals.com
Page 1820 of 2399
ASSEMBLY
Use petrolatum on all seals to ease assembly of
components.
(1) Using an arbor press, install input shaft to
input shaft hub (Fig. 255).
(2) Install input shaft snap ring (Fig. 256).(3) Using an arbor press and Tool 6057, Install
OD/Reverse piston return spring and snap ring (Fig.
257) (Fig. 258).
Fig. 255 Install Input Shaft
1 - INPUT SHAFT
2 - ARBOR PRESS RAM
3 - INPUT SHAFT HUB ASSEMBLY
Fig. 256 Install Input Shaft Snap Ring
1 - INPUT SHAFT
2 - SCREWDRIVER (DO NOT SCRATCH BEARING SURFACE)
3 - SNAP RING
4 - O-RINGS
5 - SEALS
Fig. 257 Return Spring and Snap Ring
1 - OD/REVERSE PISTON
2 - RETURN SPRING
3 - SNAP RING
4 - O-RING
Fig. 258 Install Snap Ring
1 - ARBOR PRESS RAM (COMPRESS RETURN SPRING JUST
ENOUGH TO REMOVE OR INSTALL SNAP RING)
2 - SCREWDRIVER
3 - SNAP RING
4 - SPECIAL TOOL 6057
5 - OD/REVERSE PISTON
6 - RETURN SPRING
RS41TE AUTOMATIC TRANSAXLE21 - 263
INPUT CLUTCH ASSEMBLY (Continued)
ProCarManuals.com
Page 1821 of 2399
(4) Install the OD/Reverse piston assembly to the
input clutch retainer as shown in (Fig. 259).
(5) Install the input hub/shaft assy. to the OD/Re-
verse piston/clutch retainer assy. (Fig. 260).(6) Install input hub tapered snap ring (Fig. 261).
(7) Install UD clutch piston (Fig. 262).
Fig. 259 Install OD/Reverse Piston
1 - PUSH DOWN TO INSTALL OVERDRIVE/REVERSE PISTON
2 - INPUT CLUTCHES RETAINER
Fig. 260 Install Input Shaft Hub Assembly
1 - PUSH DOWN TO INSTALL INPUT SHAFT HUB ASSEMBLY
(ROTATE TO ALIGN SPLINES)
2 - OD/REV. PISTON
Fig. 261 Install Input Hub Tapered Snap Ring
1 - INPUT SHAFT
2 - INPUT HUB SNAP RING (TAPERED SIDE UP WITH TABS IN
CAVITY)
3 - SNAP RING PLIERS
Fig. 262 Underdrive Clutch Piston
1 - PISTON
21 - 264 41TE AUTOMATIC TRANSAXLERS
INPUT CLUTCH ASSEMBLY (Continued)
ProCarManuals.com
Page 1822 of 2399
(8) Install UD piston return spring and Tool 5067
as shown in (Fig. 263).
(9) Using Tool 5059A and an arbor press, Install
the UD spring retainer and snap ring. (Fig. 264) (Fig.
265) Compress just enough to install snap ring.
CAUTION: Compress return spring just enough to
install snap ring.(10) Install the UD clutch pack. Leave out upper
disc, until snap ring is installed (Fig. 266).
Fig. 263 Seal Compressor Special Tool 5067
1 - PISTON RETURN SPRING
2 - SPECIAL TOOL 5067
3 - INPUT SHAFT CLUTCHES RETAINER ASSEMBLY
Fig. 264 UD Return Spring and Retainer
1 - UNDERDRIVE SPRING RETAINER
2 - SNAP RING
3 - SEAL
4 - PISTON RETURN SPRING
Fig. 265 Install UD Spring Retainer and Snap Ring
1 - ARBOR PRESS RAM
2 - SNAP RING PLIERS
3 - SNAP RING
4 - OD/REVERSE PISTON
5 - TOOL 5067
6 - TOOL 5059A
Fig. 266 Underdrive Clutch Pack
1 - CLUTCH PLATE
2 - ONE UD CLUTCH DISC
3 - CLUTCH DISC
RS41TE AUTOMATIC TRANSAXLE21 - 265
INPUT CLUTCH ASSEMBLY (Continued)
ProCarManuals.com
Page 1823 of 2399
(11) Install the UD clutch flat snap ring (Fig. 267).
(12) Install the last UD clutch disc (Fig. 268).(13) Install the OD/UD clutch reaction plate and
snap ring (Fig. 269) (Fig. 270). The OD/UD clutches
reaction plate has a step on both sides. Install the
OD/UD clutches reaction plate tapered step side up.
Fig. 267 UD Clutch Flat Snap Ring
1 - UNDERDRIVE CLUTCH REACTION PLATE FLAT SNAP RING
2 - SCREWDRIVER
Fig. 268 Install Last UD Clutch Disc
1 - ONE UNDERDRIVE CLUTCH DISC
Fig. 269 OD/UD Reaction Plate
1 - OD/UD CLUTCH REACTION PLATE (TAPERED STEP SIDE
UP)
Fig. 270 Tapered Snap Ring
1 - OVERDRIVE/UNDERDRIVE CLUTCHES REACTION PLATE
TAPERED SNAP RING
2 - SCREWDRIVER (DO NOT SCRATCH REACTION PLATE)
21 - 266 41TE AUTOMATIC TRANSAXLERS
INPUT CLUTCH ASSEMBLY (Continued)
ProCarManuals.com
Page 1824 of 2399

NOTE: Snap ring ends must be located within one
finger of the input clutch hub. Be sure that snap
ring is fully seated, by pushing with screwdriver,
into snap ring groove all the way around.
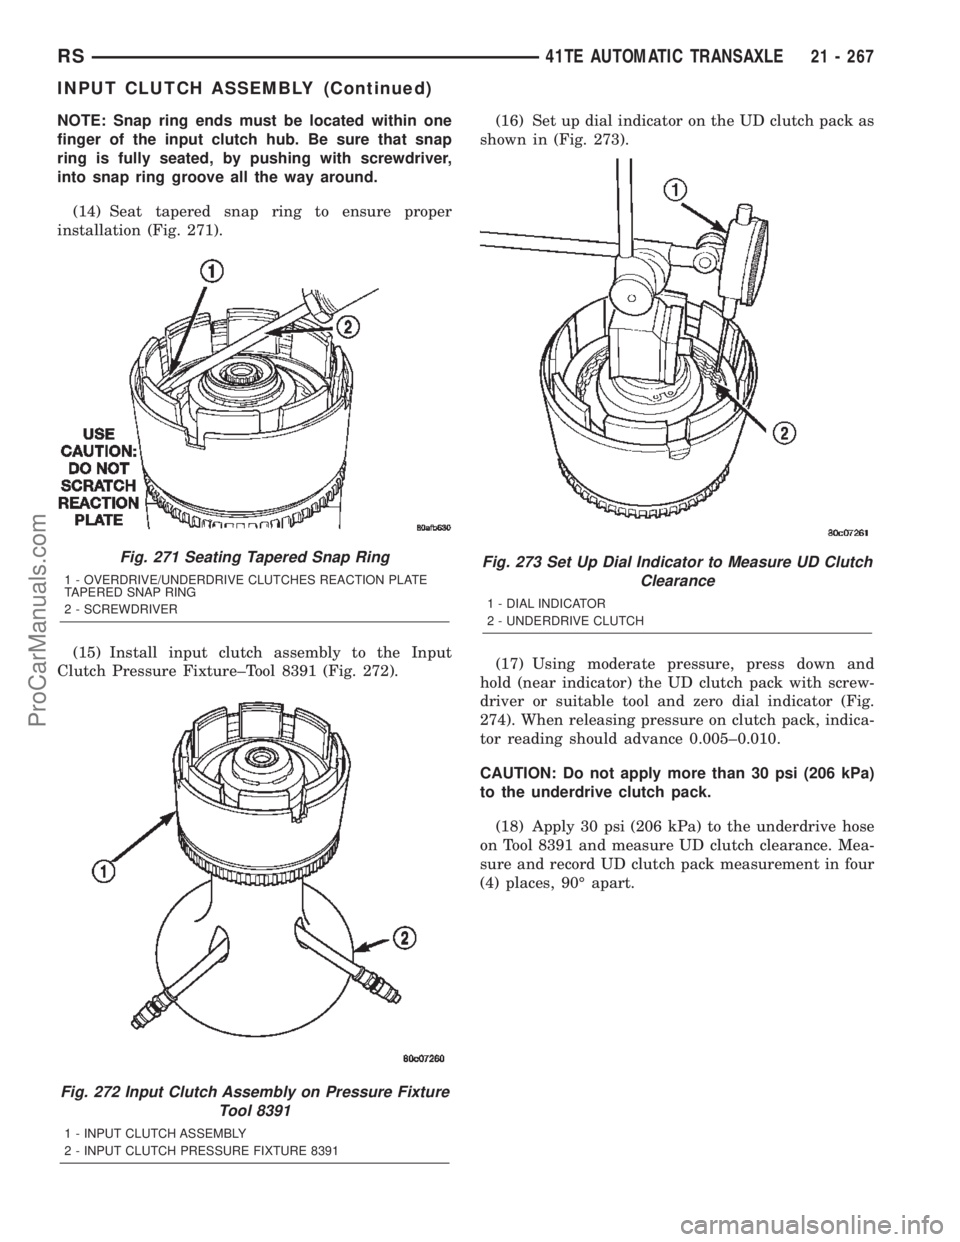
(14) Seat tapered snap ring to ensure proper
installation (Fig. 271).
(15) Install input clutch assembly to the Input
Clutch Pressure Fixture±Tool 8391 (Fig. 272).(16) Set up dial indicator on the UD clutch pack as
shown in (Fig. 273).
(17) Using moderate pressure, press down and
hold (near indicator) the UD clutch pack with screw-
driver or suitable tool and zero dial indicator (Fig.
274). When releasing pressure on clutch pack, indica-
tor reading should advance 0.005±0.010.
CAUTION: Do not apply more than 30 psi (206 kPa)
to the underdrive clutch pack.
(18) Apply 30 psi (206 kPa) to the underdrive hose
on Tool 8391 and measure UD clutch clearance. Mea-
sure and record UD clutch pack measurement in four
(4) places, 90É apart.
Fig. 271 Seating Tapered Snap Ring
1 - OVERDRIVE/UNDERDRIVE CLUTCHES REACTION PLATE
TAPERED SNAP RING
2 - SCREWDRIVER
Fig. 272 Input Clutch Assembly on Pressure Fixture
Tool 8391
1 - INPUT CLUTCH ASSEMBLY
2 - INPUT CLUTCH PRESSURE FIXTURE 8391
Fig. 273 Set Up Dial Indicator to Measure UD Clutch
Clearance
1 - DIAL INDICATOR
2 - UNDERDRIVE CLUTCH
RS41TE AUTOMATIC TRANSAXLE21 - 267
INPUT CLUTCH ASSEMBLY (Continued)
ProCarManuals.com
Page 1825 of 2399

(19) Take average of four measurements and com-
pare with UD clutch pack clearance specification.
Underdrive clutch pack clearance must be 0.94-
1.50 mm (0.037-0.059 in.).
(20) If necessary, select the proper reaction plate
to achieve specifications:
UNDERDRIVE REACTION PLATE THICKNESS
4659939AB 5.837-5.937 mm (0.230-0.234 in.)
4659940AB 6.147-6.248 mm (0.242-0.246 in.)
4659941AB 6.457-6.557 mm (0.254-0.258 in.)
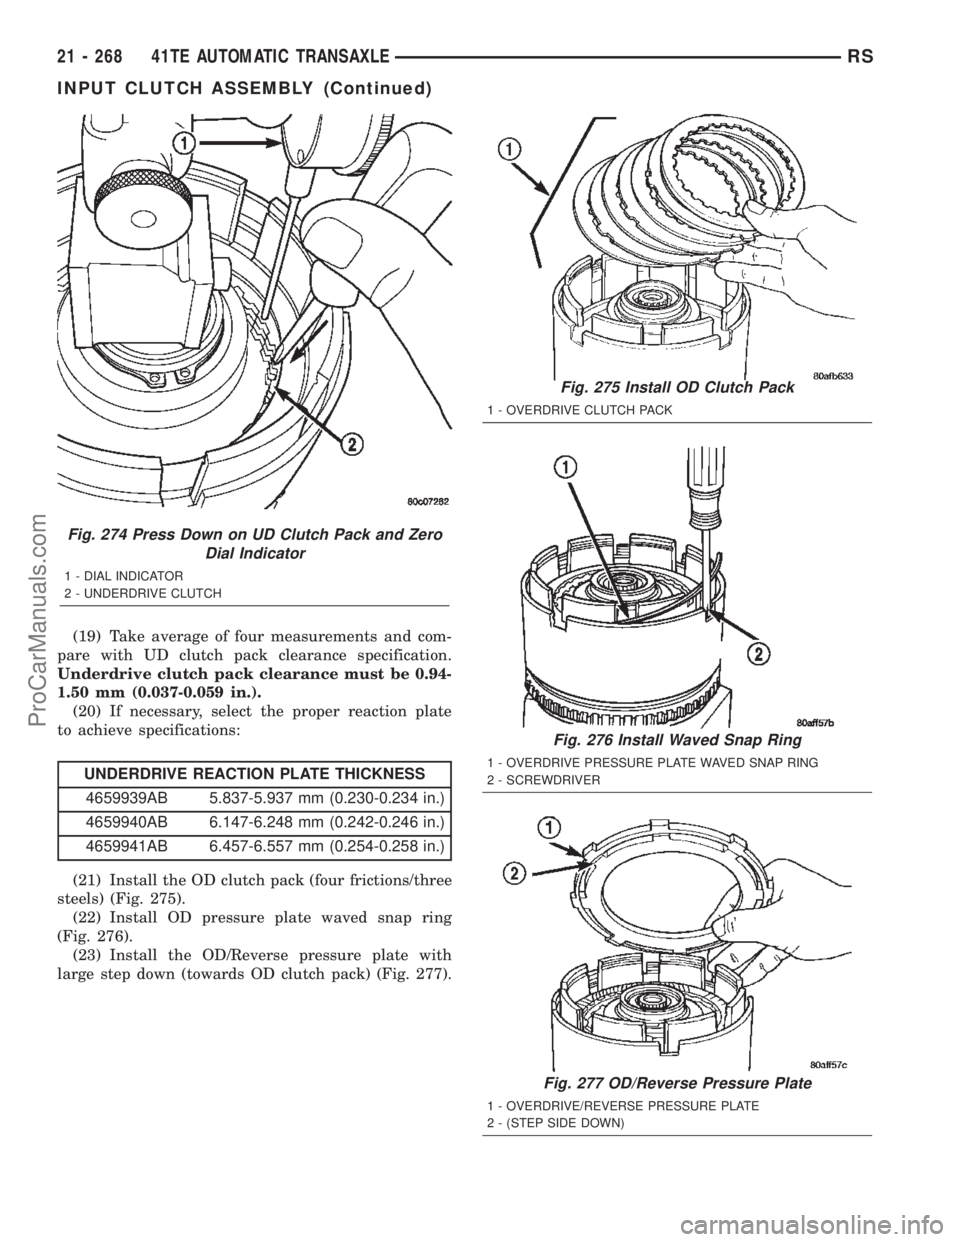
(21) Install the OD clutch pack (four frictions/three
steels) (Fig. 275).
(22) Install OD pressure plate waved snap ring
(Fig. 276).
(23) Install the OD/Reverse pressure plate with
large step down (towards OD clutch pack) (Fig. 277).
Fig. 274 Press Down on UD Clutch Pack and Zero
Dial Indicator
1 - DIAL INDICATOR
2 - UNDERDRIVE CLUTCH
Fig. 275 Install OD Clutch Pack
1 - OVERDRIVE CLUTCH PACK
Fig. 276 Install Waved Snap Ring
1 - OVERDRIVE PRESSURE PLATE WAVED SNAP RING
2 - SCREWDRIVER
Fig. 277 OD/Reverse Pressure Plate
1 - OVERDRIVE/REVERSE PRESSURE PLATE
2 - (STEP SIDE DOWN)
21 - 268 41TE AUTOMATIC TRANSAXLERS
INPUT CLUTCH ASSEMBLY (Continued)
ProCarManuals.com
Page 1826 of 2399

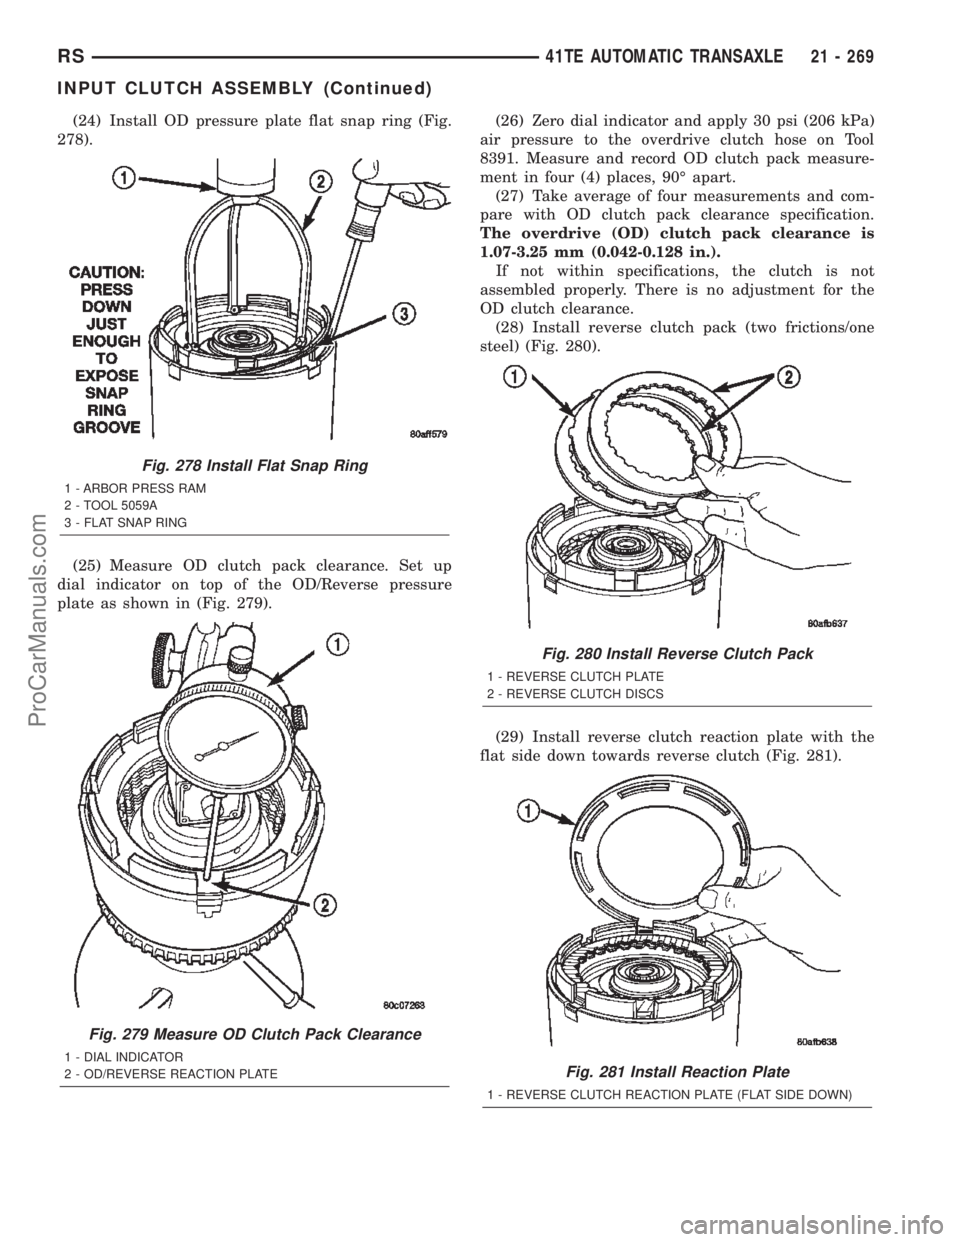
(24) Install OD pressure plate flat snap ring (Fig.
278).
(25) Measure OD clutch pack clearance. Set up
dial indicator on top of the OD/Reverse pressure
plate as shown in (Fig. 279).(26) Zero dial indicator and apply 30 psi (206 kPa)
air pressure to the overdrive clutch hose on Tool
8391. Measure and record OD clutch pack measure-
ment in four (4) places, 90É apart.
(27) Take average of four measurements and com-
pare with OD clutch pack clearance specification.
The overdrive (OD) clutch pack clearance is
1.07-3.25 mm (0.042-0.128 in.).
If not within specifications, the clutch is not
assembled properly. There is no adjustment for the
OD clutch clearance.
(28) Install reverse clutch pack (two frictions/one
steel) (Fig. 280).
(29) Install reverse clutch reaction plate with the
flat side down towards reverse clutch (Fig. 281).
Fig. 278 Install Flat Snap Ring
1 - ARBOR PRESS RAM
2 - TOOL 5059A
3 - FLAT SNAP RING
Fig. 279 Measure OD Clutch Pack Clearance
1 - DIAL INDICATOR
2 - OD/REVERSE REACTION PLATE
Fig. 280 Install Reverse Clutch Pack
1 - REVERSE CLUTCH PLATE
2 - REVERSE CLUTCH DISCS
Fig. 281 Install Reaction Plate
1 - REVERSE CLUTCH REACTION PLATE (FLAT SIDE DOWN)
RS41TE AUTOMATIC TRANSAXLE21 - 269
INPUT CLUTCH ASSEMBLY (Continued)
ProCarManuals.com