Page 1955 of 2399
(9) Install 2nd gear friction cone (Fig. 261).
(10) Install 2nd gear reactor ring (Fig. 262).
(11) Install 2nd gear to intermediate shaft (Fig.
263).
(12) Press 3/4 cluster gear onto intermediate shaft
using cup 8481 (Fig. 264).
Fig. 261 2nd Gear Friction Cone
1 - 2ND GEAR FRICTION CONE
Fig. 262 2nd Gear Reactor Ring
1 - 2ND GEAR REACTOR RING
Fig. 263 2nd Gear
1 - 2ND GEAR
2 - INTERMEDIATE SHAFT
Fig. 264 Install 3/4 Cluster Gear using Tool 8481
1 - ARBOR PRESS
2 - INSTALLER 8481
3 - 3/4 CLUSTER GEAR
21 - 398 T850 MANUAL TRANSAXLERS
INTERMEDIATE SHAFT (Continued)
ProCarManuals.com
Page 1956 of 2399
(13) InstallNEW3/4 cluster gear snap ring (Fig.
265).
(14) Install 5th gear to intermediate shaft (Fig.
266).(15) Install 5th gear blocker ring to synchronizer
(Fig. 267).
(16) Install 5th gear synchronizer assembly to
intermediate shaft (Fig. 268).When installing 5/R
synchronizer, make sure to align oil slots on
synchronizer hub face with oil hole in the shaft
splined hub journal.
Fig. 265 3/4 Cluster Gear Snap Ring
1 - SNAP RING
Fig. 266 5th Gear Installation
1 - 5th GEAR
Fig. 267 5th Gear Blocker Ring to Synchro
1 - 5th GEAR BLOCKER RING
2 - 5/R SYNCHRONIZER
Fig. 268 Install 5/R Synchro and 5th Blocker Ring to
5th Gear
1 - 5/R SYNCHRONIZER
2 - 5TH GEAR BLOCKER RING
3 - 5TH GEAR
RST850 MANUAL TRANSAXLE21 - 399
INTERMEDIATE SHAFT (Continued)
ProCarManuals.com
Page 1957 of 2399
(17) InstallNEW5/R synchro snap ring (Fig. 269).
(18) Install reverse gear blocker ring (Fig. 270).
(19) Install reverse gear needle bearing (Fig. 271).
(20) Install reverse gear to intermediate shaft.
(21) Install intermediate shaft sealed roller bear-
ing and thrust washer using installer 8482 (Fig. 272).
Fig. 269 5/R Synchro Snap Ring
1 - SNAP RING
Fig. 270 Reverse Gear Blocker Ring
1 - REVERSE BLOCKER RING
2 - 5/R SYNCHRONIZER
Fig. 271 Reverse Gear Needle Bearing
1 - NEEDLE BEARING
Fig. 272 Sealed Roller Bearing Installatiion
1 - ARBOR PRESS
2 - REMOVER/INSTALLER 8482
3 - SEALED ROLLER BEARING
4 - THRUST WASHER
21 - 400 T850 MANUAL TRANSAXLERS
INTERMEDIATE SHAFT (Continued)
ProCarManuals.com
Page 1958 of 2399
(22) InstallNEWintermediate shaft sealed bear-
ing snap ring (Fig. 273).
SHIFT COVER
DESCRIPTION
The shift cover assembly (Fig. 274) (Fig. 275) is
operated by the gearshift crossover and selector
cables, and operates the shift fork/shaft system. It
consists of crossover and selector lever mechanisms,
transaxle vent, a main shift selector shaft, and the
5-R blockout mechanism. The shift cover is only ser-
viced as an assembly.
Fig. 274 Shift Lever Identification
1 - SHIFT COVER ASSEMBLY
2 - VENT
3 - CROSSOVER LEVER
4 - SELECTOR LEVER
Fig. 273 Intermediate Shaft Bearing Snap Ring
1 - SNAP RING
2 - BEARING
Fig. 275 Shift Cover Assembly Components
1 - SHAFT
2 - 5-R BLOCKOUT PIN/CAM
3 - SHIFT SELECTOR
4 - SHIFT BLOCKER
5 - SELECTOR LEVER/DETENT
RST850 MANUAL TRANSAXLE21 - 401
INTERMEDIATE SHAFT (Continued)
ProCarManuals.com
Page 1959 of 2399

SHIFT FORK AND SHAFT
DESCRIPTION
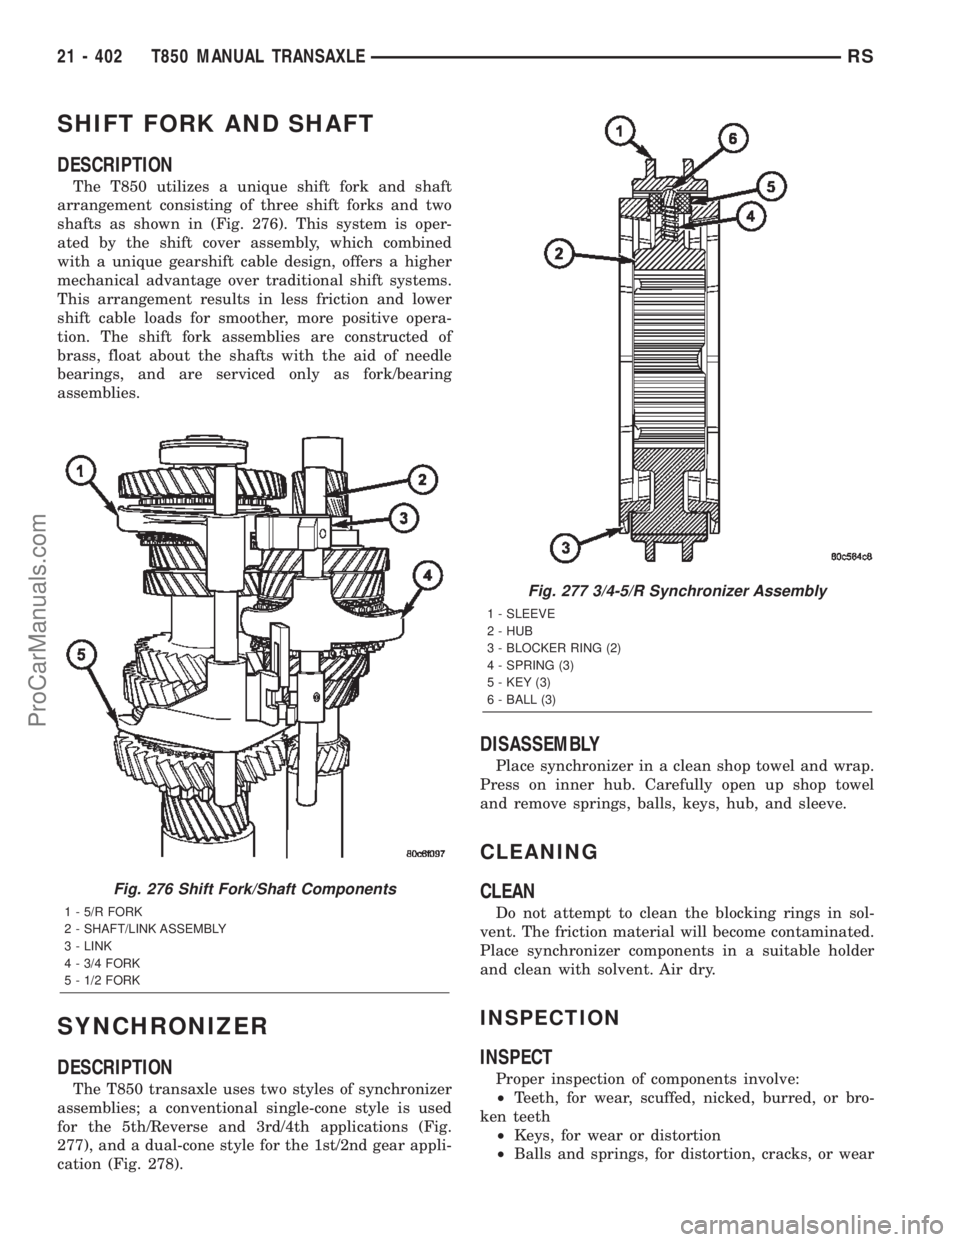
The T850 utilizes a unique shift fork and shaft
arrangement consisting of three shift forks and two
shafts as shown in (Fig. 276). This system is oper-
ated by the shift cover assembly, which combined
with a unique gearshift cable design, offers a higher
mechanical advantage over traditional shift systems.
This arrangement results in less friction and lower
shift cable loads for smoother, more positive opera-
tion. The shift fork assemblies are constructed of
brass, float about the shafts with the aid of needle
bearings, and are serviced only as fork/bearing
assemblies.
SYNCHRONIZER
DESCRIPTION
The T850 transaxle uses two styles of synchronizer
assemblies; a conventional single-cone style is used
for the 5th/Reverse and 3rd/4th applications (Fig.
277), and a dual-cone style for the 1st/2nd gear appli-
cation (Fig. 278).
DISASSEMBLY
Place synchronizer in a clean shop towel and wrap.
Press on inner hub. Carefully open up shop towel
and remove springs, balls, keys, hub, and sleeve.
CLEANING
CLEAN
Do not attempt to clean the blocking rings in sol-
vent. The friction material will become contaminated.
Place synchronizer components in a suitable holder
and clean with solvent. Air dry.
INSPECTION
INSPECT
Proper inspection of components involve:
²Teeth, for wear, scuffed, nicked, burred, or bro-
ken teeth
²Keys, for wear or distortion
²Balls and springs, for distortion, cracks, or wear
Fig. 276 Shift Fork/Shaft Components
1 - 5/R FORK
2 - SHAFT/LINK ASSEMBLY
3 - LINK
4 - 3/4 FORK
5 - 1/2 FORK
Fig. 277 3/4-5/R Synchronizer Assembly
1 - SLEEVE
2 - HUB
3 - BLOCKER RING (2)
4 - SPRING (3)
5 - KEY (3)
6 - BALL (3)
21 - 402 T850 MANUAL TRANSAXLERS
ProCarManuals.com
Page 1964 of 2399

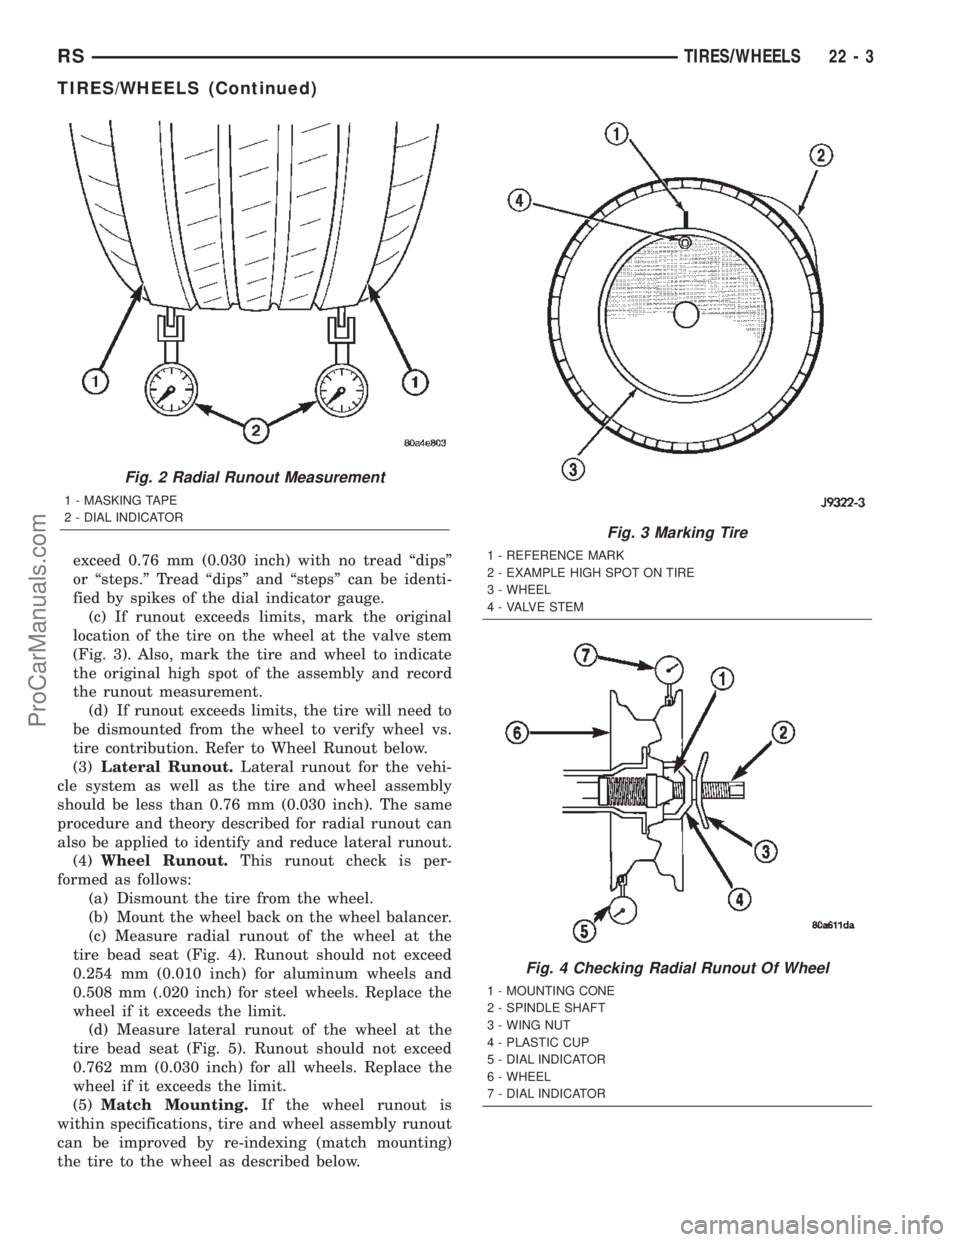
exceed 0.76 mm (0.030 inch) with no tread ªdipsº
or ªsteps.º Tread ªdipsº and ªstepsº can be identi-
fied by spikes of the dial indicator gauge.
(c) If runout exceeds limits, mark the original
location of the tire on the wheel at the valve stem
(Fig. 3). Also, mark the tire and wheel to indicate
the original high spot of the assembly and record
the runout measurement.
(d) If runout exceeds limits, the tire will need to
be dismounted from the wheel to verify wheel vs.
tire contribution. Refer to Wheel Runout below.
(3)Lateral Runout.Lateral runout for the vehi-
cle system as well as the tire and wheel assembly
should be less than 0.76 mm (0.030 inch). The same
procedure and theory described for radial runout can
also be applied to identify and reduce lateral runout.
(4)Wheel Runout.This runout check is per-
formed as follows:
(a) Dismount the tire from the wheel.
(b) Mount the wheel back on the wheel balancer.
(c) Measure radial runout of the wheel at the
tire bead seat (Fig. 4). Runout should not exceed
0.254 mm (0.010 inch) for aluminum wheels and
0.508 mm (.020 inch) for steel wheels. Replace the
wheel if it exceeds the limit.
(d) Measure lateral runout of the wheel at the
tire bead seat (Fig. 5). Runout should not exceed
0.762 mm (0.030 inch) for all wheels. Replace the
wheel if it exceeds the limit.
(5)Match Mounting.If the wheel runout is
within specifications, tire and wheel assembly runout
can be improved by re-indexing (match mounting)
the tire to the wheel as described below.
Fig. 2 Radial Runout Measurement
1 - MASKING TAPE
2 - DIAL INDICATOR
Fig. 3 Marking Tire
1 - REFERENCE MARK
2 - EXAMPLE HIGH SPOT ON TIRE
3 - WHEEL
4 - VALVE STEM
Fig. 4 Checking Radial Runout Of Wheel
1 - MOUNTING CONE
2 - SPINDLE SHAFT
3 - WING NUT
4 - PLASTIC CUP
5 - DIAL INDICATOR
6 - WHEEL
7 - DIAL INDICATOR
RSTIRES/WHEELS22-3
TIRES/WHEELS (Continued)
ProCarManuals.com
Page 1965 of 2399

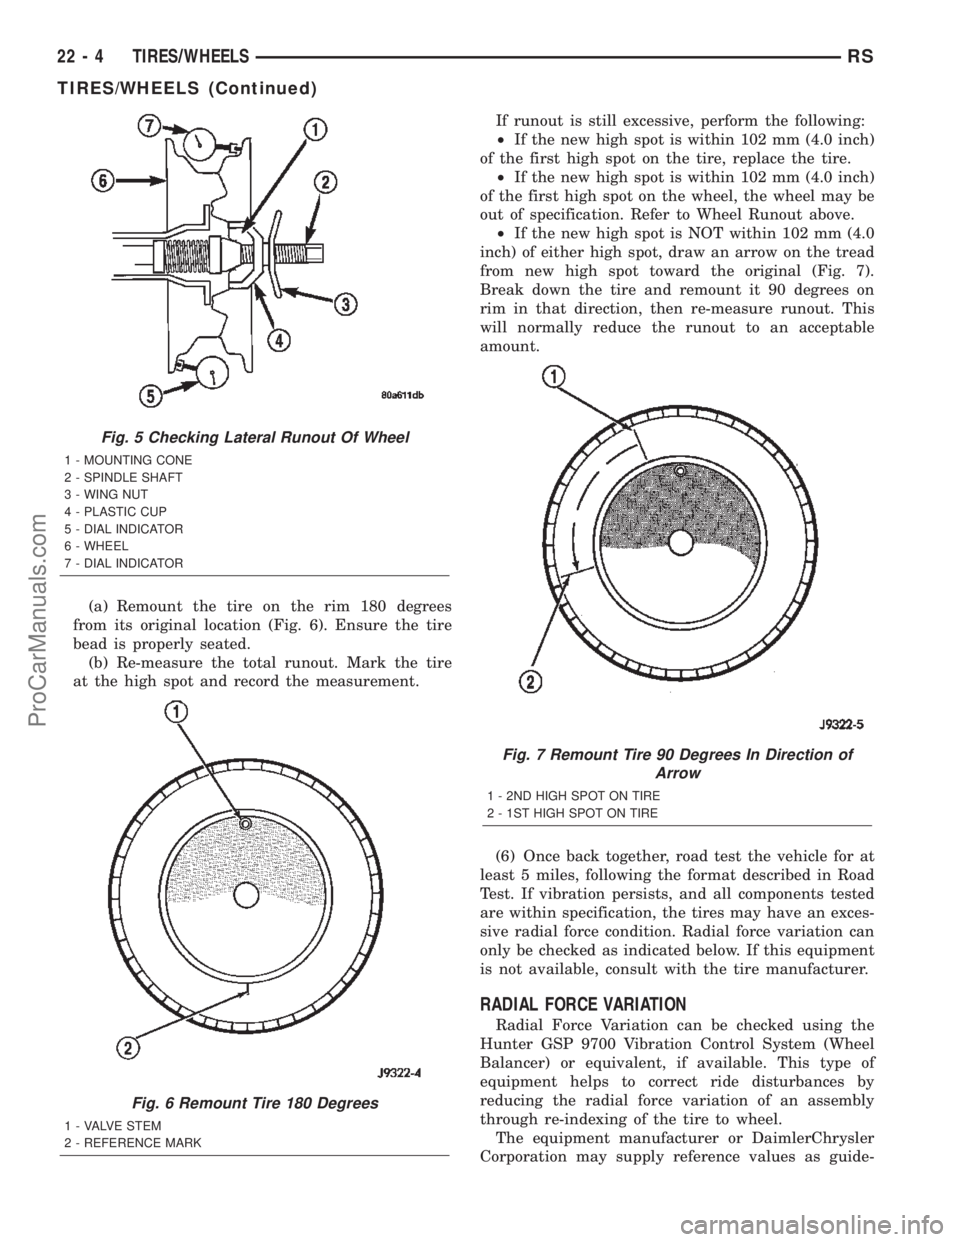
(a) Remount the tire on the rim 180 degrees
from its original location (Fig. 6). Ensure the tire
bead is properly seated.
(b) Re-measure the total runout. Mark the tire
at the high spot and record the measurement.If runout is still excessive, perform the following:
²If the new high spot is within 102 mm (4.0 inch)
of the first high spot on the tire, replace the tire.
²If the new high spot is within 102 mm (4.0 inch)
of the first high spot on the wheel, the wheel may be
out of specification. Refer to Wheel Runout above.
²If the new high spot is NOT within 102 mm (4.0
inch) of either high spot, draw an arrow on the tread
from new high spot toward the original (Fig. 7).
Break down the tire and remount it 90 degrees on
rim in that direction, then re-measure runout. This
will normally reduce the runout to an acceptable
amount.
(6) Once back together, road test the vehicle for at
least 5 miles, following the format described in Road
Test. If vibration persists, and all components tested
are within specification, the tires may have an exces-
sive radial force condition. Radial force variation can
only be checked as indicated below. If this equipment
is not available, consult with the tire manufacturer.
RADIAL FORCE VARIATION
Radial Force Variation can be checked using the
Hunter GSP 9700 Vibration Control System (Wheel
Balancer) or equivalent, if available. This type of
equipment helps to correct ride disturbances by
reducing the radial force variation of an assembly
through re-indexing of the tire to wheel.
The equipment manufacturer or DaimlerChrysler
Corporation may supply reference values as guide-
Fig. 5 Checking Lateral Runout Of Wheel
1 - MOUNTING CONE
2 - SPINDLE SHAFT
3 - WING NUT
4 - PLASTIC CUP
5 - DIAL INDICATOR
6 - WHEEL
7 - DIAL INDICATOR
Fig. 6 Remount Tire 180 Degrees
1 - VALVE STEM
2 - REFERENCE MARK
Fig. 7 Remount Tire 90 Degrees In Direction of
Arrow
1 - 2ND HIGH SPOT ON TIRE
2 - 1ST HIGH SPOT ON TIRE
22 - 4 TIRES/WHEELSRS
TIRES/WHEELS (Continued)
ProCarManuals.com
Page 2004 of 2399

(12) Remove front door trim panel from vehicle.
INSTALLATION
(1) Hold top of trim panel away from door to gain
access to latch linkage.
(2) Place linkage rod in position on latch handle.
(3) Engage clip to hold linkage rod to inside latch
release handle.
(4) Place front door trim panel in position on door.
(5) Install trim panel into inner belt molding at
top of door.
(6) Install clips to attach door trim to door frame
around perimeter of panel.
(7) If equipped, install screw to attach door trim to
door panel behind inside latch release handle.
(8) If equipped, connect power switch into wire
connector.
(9) Place power accessary switch in position on
door trim.
(10) Connect wire connector into memory seat/mir-
ror switch and install switch into trim panel.
(11) Install screws to attach accessary switch
panel to door trim.
(12) Install screw cover into switch panel.
(13) If equipped, install window crank.
(14) If equipped, install screws to attach trim
panel to door inside map pocket.
(15) If equipped, install screw to attach door pull
cup to inner door panel.
(16) If equipped, install screws to attach door
assist handle to inner door panel.
(17) Connect wire connector into courtesy lamp.
(18) Install lamp in door trim.
(19) Install switch bezel.
WATERSHIELD
REMOVAL
(1) Remove door trim panel.
(2) Remove the front door speaker.
(3) Peel watershield away from adhesive around
perimeter of inner door panel.
INSTALLATION
(1) Insure that enough adhesive remains to
securely retain the water dam. Replace as necessary.
(2) Place the sound shield into position and press
securely to adhesive making sure to properly route
wiring and linkages.
(3) Install door trim panel.
WINDOW CRANK
REMOVAL
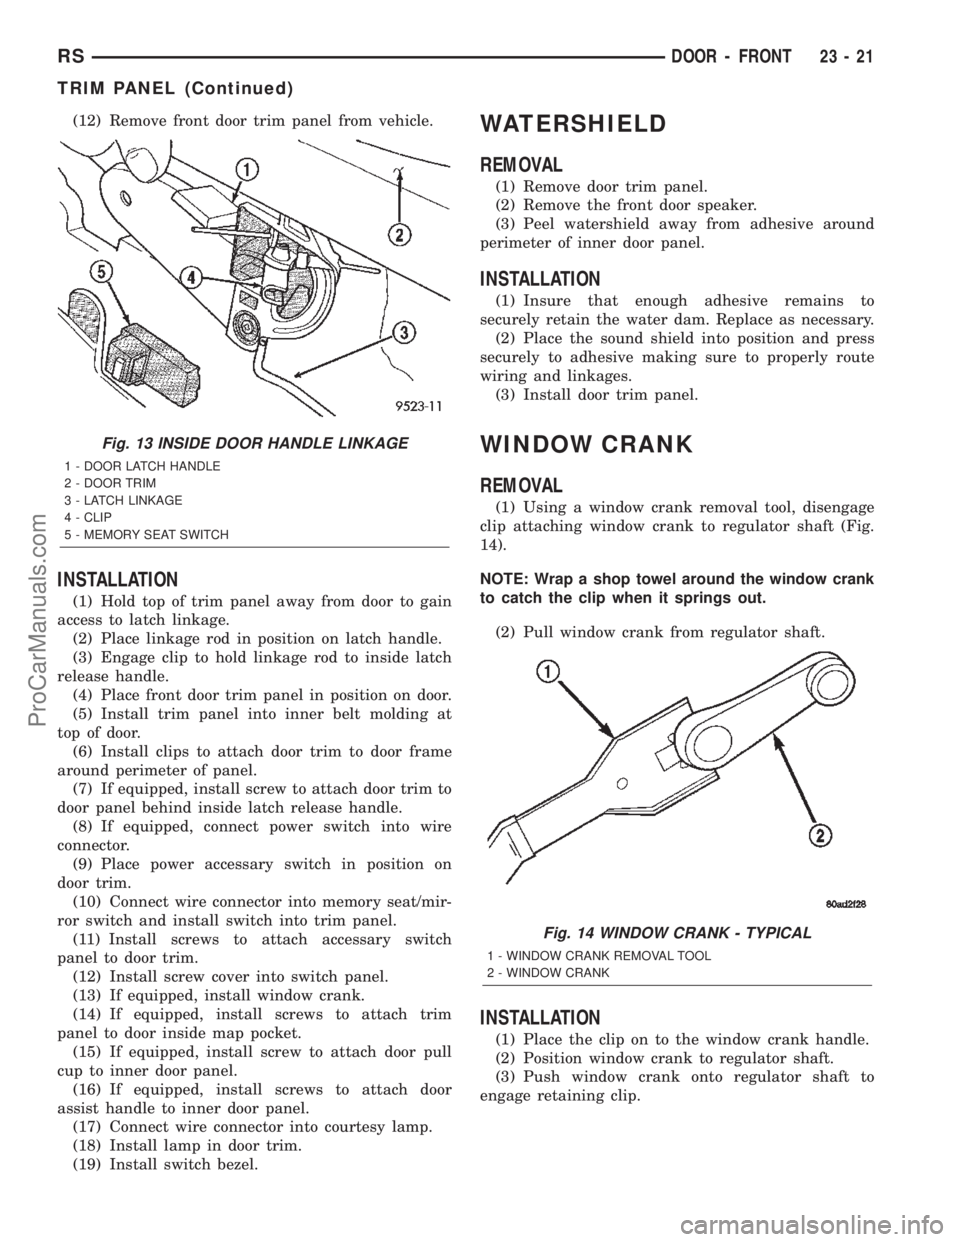
(1) Using a window crank removal tool, disengage
clip attaching window crank to regulator shaft (Fig.
14).
NOTE: Wrap a shop towel around the window crank
to catch the clip when it springs out.
(2) Pull window crank from regulator shaft.
INSTALLATION
(1) Place the clip on to the window crank handle.
(2) Position window crank to regulator shaft.
(3) Push window crank onto regulator shaft to
engage retaining clip.
Fig. 13 INSIDE DOOR HANDLE LINKAGE
1 - DOOR LATCH HANDLE
2 - DOOR TRIM
3 - LATCH LINKAGE
4 - CLIP
5 - MEMORY SEAT SWITCH
Fig. 14 WINDOW CRANK - TYPICAL
1 - WINDOW CRANK REMOVAL TOOL
2 - WINDOW CRANK
RSDOOR - FRONT23-21
TRIM PANEL (Continued)
ProCarManuals.com