2002 CHRYSLER CARAVAN air condition
[x] Cancel search: air conditionPage 646 of 2399

FRONT WASHER PUMP
MOTOR
REMOVAL
(1) Disconnect and isolate the battery negative
cable.
(2) Remove the engine fresh air housing inside the
engine compartment (Refer to 9 - ENGINE/AIR
INTAKE SYSTEM/AIR CLEANER HOUSING -
REMOVAL).
(3) Disconnect the washer hose at the in-line con-
nector forward of the cowl grille so that the in-line
connector remains with the washer hose from the
fresh air plenum.
(4) Disconnect the washer hose from the hose clip
located on the front fender side shield.
(5) Remove the filler tube screw.
(6) Hoist and support vehicle on hoist or jack
stands.
(7) Remove the right front wheel and tire assembly
(Refer to 22 - TIRES/WHEELS - REMOVAL).
(8) Disconnect the left right front wheelhouse
splash shield and move aside (Refer to 23 - BODY/
EXTERIOR/WHEELHOUSE SPLASH SHIELD -
REMOVAL).
(9) Drain washer fluid from the reservoir and into
a suitable clean container. This can be done by dis-
connecting the windshield washer hose from the
front (outboard) washer pump and allowing the
washer fluid to drain into a container through a tem-
porary jumper hose connected to the front washer
pump.
(10) Disconnect the electrical body harness connec-
tors to the washer pump motors and the fluid level
sensor. Slide the red lock on the connector to the
release position, then, depress the black tab and pull
the connector off the pump or sensor.
(11) Remove the two reservoir mounting screws.
(12) Disconnect the reservoir from the body mount
by raising the reservoir upward slightly and then
down so that the reservoir filler neck and front
washer hose pull through the opening in the front
fender side shield.
(13) Remove pump from reservoir by pulling pump
upper retention tab away from reservoir cavity and
then lifting pump up from mounting grommet. Do
not damage reservoir/pump sealing surface or punc-
ture reservoir during removal.
(14) Remove pump grommet and discard.
INSTALLATION
(1) Use new grommet when installing a new pump
assembly.
(2) Assure pump upper retention tab is pressed
into reservoir slot and that pump is rotated flatagainst the reservoir and that pump connector is fac-
ing up in the fully seated position. Assure the pump
is aligned to and fully seated in the reservoir cavity.
(3) Push filler neck and front washer hose through
the opening in the front fender side shield. Connect
the reservoir to the body mount by lowering the res-
ervoir down.
(4) Install the two reservoir mounting screws.
Torque screws to 8.5 - 11.3 N´m (75 - 100 in. lbs.).
(5) Connect the electrical body harness connectors
to the washer pump motors and the fluid level sen-
sor. Slide the red lock on the connector to the closed
or locked position.
(6) Assure that washer hose is properly routed to
prevent pinching and possible inoperative washers.
(7) Connect the left right front wheelhouse splash
shield and move aside (Refer to 23 - BODY/EXTERI-
OR/WHEELHOUSE SPLASH SHIELD - INSTALLA-
TION).
(8) Install the right front wheel and tire assembly
(Refer to 22 - TIRES/WHEELS - INSTALLATION).
(9) lower vehicle from hoist or jack stands.
(10) Install the filler tube screw. Torque screw to
8.5 - 11.3 N´m (75 - 100 in. lbs.).
(11) Connect the washer hose to the hose clip
located on the front fender side shield.
(12) Connect the washer hose at the in-line con-
nector forward of the cowl grille.
(13) Install the engine fresh air housing inside the
engine compartment (Refer to 9 - ENGINE/AIR
INTAKE SYSTEM/AIR CLEANER HOUSING -
INSTALLATION).
(14) Connect the battery negative cable.
(15) Verify system operation.
FRONT WIPER ARMS
STANDARD PROCEDURE - FRONT WIPER ARM
ALIGNMENT
(1) Verify wiper blade element condition and wiper
arm spring tension. Run wipers in low speed mode
while applying water to the windshield. Observe the
wiper blade that is chattering or skipping across the
windshield. If the wiper element is not rolling over
when the wiper direction reverses, align the wiper
arm. The extension bar portion of the wiper arm
must be twisted in the proper direction to allow the
wiper element to roll over when the direction
reverses.
(2) Place two small adjustable wrenches placed 50
mm (2 in.) apart on the wiper arm extension rod.
(3) Twist the extension rod slightly in the opposite
direction that the element is laying on the wind-
shield while holding the wrench closest to the pivot
stationary.
RSWIPERS/WASHERS8R-9
ProCarManuals.com
Page 649 of 2399

HEADLAMP WASHER TEST
CONDITION POSSIBLE CAUSE CORRECTION
HEADLAMP WASHER
SYSTEM WILL NOT FLOW
WASHER FLUID.1. NO WASHER FLUID IN
RESERVOIR.1. FILL RESERVOIR.
2. JUNCTION BLOCK FUSE
#5 BLOWN.2. SHORT CIRCUIT BETWEEN JUNCTION BLOCK
FUSE #5 AND WIPER SWITCH TERMINAL #1.
SHORT IN WIPER SWITCH. IF NOT OK, REPAIR
CIRCUIT OR REFER TO WIPER/WASHER
SWITCH DIAGNOSTIC PROCEDURES.
3. HEADLAMP WASHER
HOSE NOT FLOWING FLUID.3. ASSURE WASHER HOSE IS NOT PINCHED,
LOOSE, BROKEN, OR DISCONNECTED. IF NOT
OK, PROPERLY ROUTE OR REPAIR WASHER
HOSE.
4. MOTOR CONNECTOR
LOOSE.4. PROPERLY SEAT CONNECTOR TO MOTOR.
5. MOTOR CONNECTOR
TERMINALS BENT.5. REPAIR TERMINALS AND PROPERLY SEAT
CONNECTOR TO MOTOR.
6. OPEN POWER CIRCUIT
TO SWITCH.6. OPEN OR DEFECTIVE CIRCUIT BETWEEN
JUNCTION BLOCK FUSE #5 AND WASHER
SWITCH CONNECTOR TERMINAL #1. IF NOT OK,
REPAIR CIRCUIT.
7. OPEN OR DEFECTIVE
WIPER/WASHER SWITCH.7. CONNECT AN OHMMETER ACROSS WIPER/
WASHER SWITCH TERMINAL #1 AND #2 AND
DEPRESS WASHER BUTTON AND CHECK FOR
CONTINUITY. IF NOT OK, REFER TO WIPER/
WASHER SWITCH DIAGNOSTIC PROCEDURES.
8. OPEN POWER CIRCUIT
TO MOTOR.8. OPEN OR DEFECTIVE CIRCUIT BETWEEN
WIPER/WASHER SWITCH CONNECTOR
TERMINAL #2 AND MOTOR CONNECTOR
TERMINAL #1. IF NOT OK, REPAIR CIRCUIT.
9. OPEN OR DEFECTIVE
MOTOR GROUND CIRCUIT.9. OPEN OR DEFECTIVE CIRCUIT BETWEEN
WASHER MOTOR CONNECTOR GROUND
TERMINAL #2 AND LEFT HEADLAMP GROUND
#5 OR ENGINE GROUND #1 OR 2.
10. OPEN CIRCUIT IN
HEADLAMP WASHER
MOTOR.10. CHECK FOR AN OPEN CIRCUIT ON MOTOR
BETWEEN POWER TERMINAL #1 AND GROUND
TERMINAL #2. IF NOT OK, REPLACE WASHER
MOTOR.
11. SEIZED MOTOR
BEARINGS.11. APPLY DIRECT BATTERY VOLTAGE TO
MOTOR TERMINALS. IF MOTOR DOES NOT
RUN, REPLACE MOTOR.
12. DEFECTIVE HEADLAMP
WASHER RELAY.12. REPLACE THE HEADLAMP WASHER RELAY.
ONE HEADLAMP WASHER
NOZZLE WILL NOT FLOW
WASHER FLUID.1. HEADLAMP WASHER
HOSE NOT FLOWING FLUID.1. REPAIR OR REPLACE THE HEADLAMP
WASHER HOSE.
2. PLUGGED HEADLAMP
WASHER NOZZLE.2. REPLACE HEADLAMP WASHER NOZZLE.
8R - 12 WIPERS/WASHERSRS
HEADLAMP WASHERS - EXPORT (Continued)
ProCarManuals.com
Page 658 of 2399

WIRING
TABLE OF CONTENTS
page page
WIRING DIAGRAM INFORMATION....... 8W-01-1
COMPONENT INDEX.................. 8W-02-1
POWER DISTRIBUTION............... 8W-10-1
GROUND DISTRIBUTION.............. 8W-15-1
BUS COMMUNICATIONS.............. 8W-18-1
CHARGING SYSTEM.................. 8W-20-1
STARTING SYSTEM.................. 8W-21-1
FUEL/IGNITION SYSTEM.............. 8W-30-1
TRANSMISSION CONTROL SYSTEM..... 8W-31-1
VEHICLE SPEED CONTROL............ 8W-33-1
ANTILOCK BRAKES................... 8W-35-1
VEHICLE THEFT SECURITY SYSTEM..... 8W-39-1
INSTRUMENT CLUSTER............... 8W-40-1
HORN/CIGAR LIGHTER/POWER OUTLET . . 8W-41-1
AIR CONDITIONING-HEATER........... 8W-42-1
AIRBAG SYSTEM.................... 8W-43-1
INTERIOR LIGHTING.................. 8W-44-1
BODY CONTROL MODULE............. 8W-45-1MESSAGE CENTER................... 8W-46-1
AUDIO SYSTEM..................... 8W-47-1
REAR WINDOW DEFOGGER............ 8W-48-1
OVERHEAD CONSOLE................. 8W-49-1
FRONT LIGHTING.................... 8W-50-1
REAR LIGHTING..................... 8W-51-1
TURN SIGNALS...................... 8W-52-1
WIPERS............................ 8W-53-1
TRAILER TOW....................... 8W-54-1
POWER WINDOWS................... 8W-60-1
POWER DOOR LOCKS................ 8W-61-1
POWER MIRRORS................... 8W-62-1
POWER SEATS...................... 8W-63-1
SPLICE INFORMATION................ 8W-70-1
CONNECTOR PIN-OUTS............... 8W-80-1
CONNECTOR/GROUND/SPLICE
LOCATION........................ 8W-91-1
POWER DISTRIBUTION SYSTEM........ 8W-97-1 RSWIRING
8W-1
ProCarManuals.com
Page 868 of 2399

8W-42 AIR CONDITIONING-HEATER
Component Page
A/C Compressor Clutch............ 8W-42-14, 16
A/C Compressor Clutch Relay....... 8W-42-14, 16
A/C Pressure Sensor.............. 8W-42-14, 16
A/C- Heater Control.......... 8W-42-2, 3, 4, 5, 7
ATC Remote Sensor................. 8W-42-11
Auto Temp Control...... 8W-42-8, 9, 10, 11, 12, 13
Battery........................... 8W-42-17
Blower Motor Resistor................ 8W-42-2
Body Control Module........... 8W-42-4, 7, 9, 13
Diagnostic Junction Port............. 8W-42-4, 9
Driver Blend Door Actuator......... 8W-42-5, 10
ECM/PCM Relay.................... 8W-42-17
Electric Wiper De-Icer............... 8W-42-3, 8
Engine Control Module............ 8W-42-16, 17
Evaporator Temperature Sensor...... 8W-42-5, 10
Front Blower Module................ 8W-42-11
Front Blower Motor................ 8W-42-2, 11
Front Blower Motor Relay........... 8W-42-2, 11
Front Control Module......... 8W-42-2, 6, 11, 12
Fuse 10......................... 8W-42-2, 11
Fuse 12......................... 8W-42-6, 12
Fuse 14............................ 8W-42-8
Fuse 16........................... 8W-42-17
Fuse 18........................ 8W-42-14, 16
Fuse 27........................ 8W-42-15, 18
Fuselink.......................... 8W-42-17
G102.......................... 8W-42-15, 18Component Page
G103.......................... 8W-42-14, 16
G200.............. 8W-42-2, 3, 4, 6, 8, 9, 11, 12
G300........................... 8W-42-7, 13
G302............................. 8W-42-12
Integrated Power
Module . . 8W-42-2, 6, 8, 11, 12, 14, 15, 16, 17, 18
Mode Door Actuator............... 8W-42-5, 10
Passenger Blend Door Actuator....... 8W-42-5, 10
Powertrain Control Module......... 8W-42-14, 15
Radiator Fan No. 1............ 8W-42-15, 17, 18
Radiator Fan No. 2............... 8W-42-15, 18
Radiator Fan Relay.................. 8W-42-15
Radiator Fan Relay No. 1.......... 8W-42-17, 18
Radiator Fan Relay No. 2............. 8W-42-18
Radiator Fan Relay No. 3............. 8W-42-18
Rear A/C-Heater Unit............... 8W-42-6, 7
Rear Auto Temp Control Switch........ 8W-42-13
Rear Blower Front Control Switch....... 8W-42-6
Rear Blower Motor.................. 8W-42-12
Rear Blower Motor Power Module...... 8W-42-12
Rear Blower Motor Relay........... 8W-42-6, 12
Rear Blower Rear Control Switch...... 8W-42-6, 7
Rear Mode Motor................... 8W-42-12
Rear Temperature Motor.............. 8W-42-12
Recirculation Door Actuator......... 8W-42-5, 10
TXV Solenoid...................... 8W-42-12
RS8W-42 AIR CONDITIONING-HEATER8W-42-1
ProCarManuals.com
Page 1205 of 2399

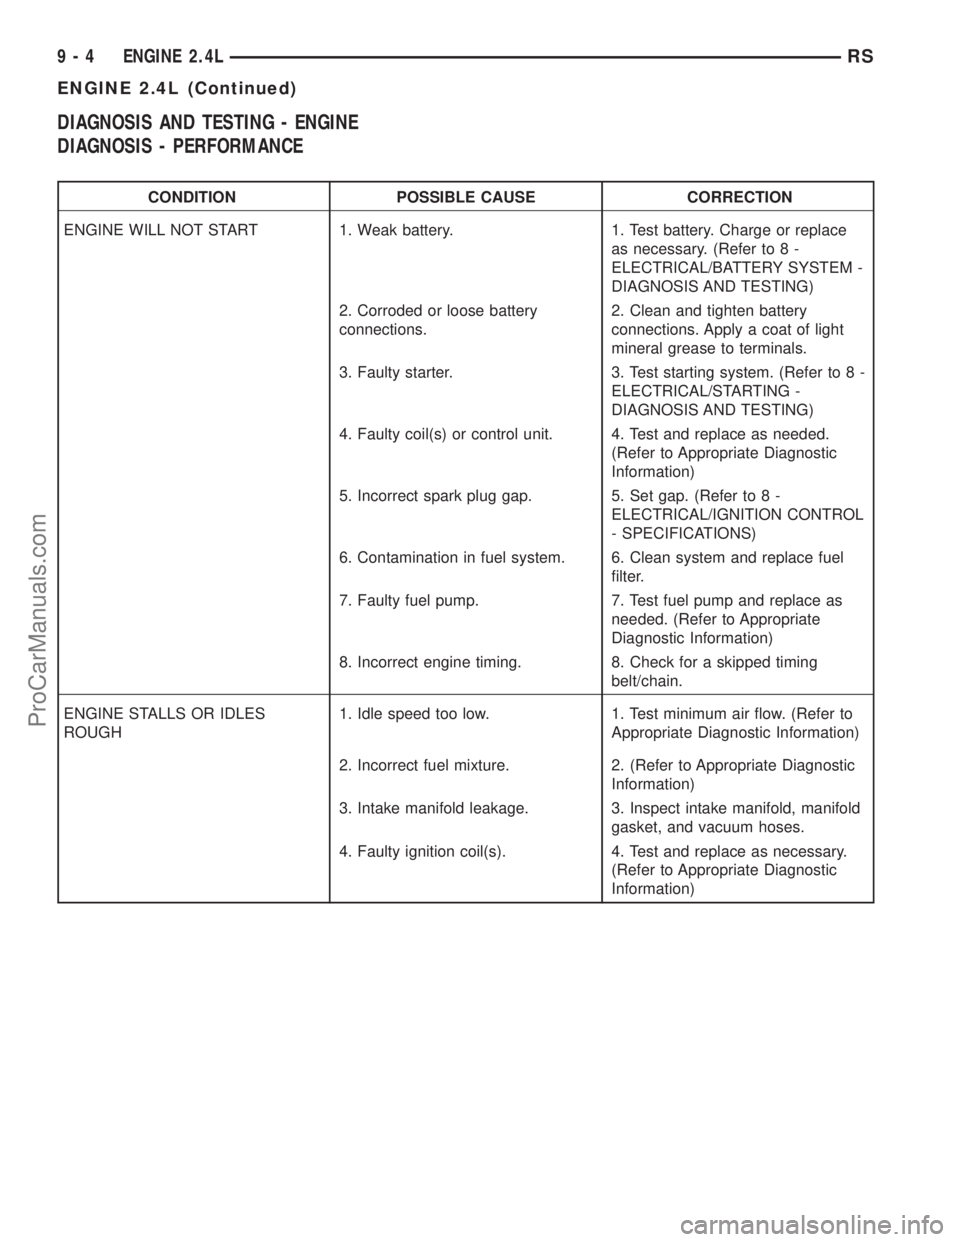
DIAGNOSIS AND TESTING - ENGINE
DIAGNOSIS - PERFORMANCE
CONDITION POSSIBLE CAUSE CORRECTION
ENGINE WILL NOT START 1. Weak battery. 1. Test battery. Charge or replace
as necessary. (Refer to 8 -
ELECTRICAL/BATTERY SYSTEM -
DIAGNOSIS AND TESTING)
2. Corroded or loose battery
connections.2. Clean and tighten battery
connections. Apply a coat of light
mineral grease to terminals.
3. Faulty starter. 3. Test starting system. (Refer to 8 -
ELECTRICAL/STARTING -
DIAGNOSIS AND TESTING)
4. Faulty coil(s) or control unit. 4. Test and replace as needed.
(Refer to Appropriate Diagnostic
Information)
5. Incorrect spark plug gap. 5. Set gap. (Refer to 8 -
ELECTRICAL/IGNITION CONTROL
- SPECIFICATIONS)
6. Contamination in fuel system. 6. Clean system and replace fuel
filter.
7. Faulty fuel pump. 7. Test fuel pump and replace as
needed. (Refer to Appropriate
Diagnostic Information)
8. Incorrect engine timing. 8. Check for a skipped timing
belt/chain.
ENGINE STALLS OR IDLES
ROUGH1. Idle speed too low. 1. Test minimum air flow. (Refer to
Appropriate Diagnostic Information)
2. Incorrect fuel mixture. 2. (Refer to Appropriate Diagnostic
Information)
3. Intake manifold leakage. 3. Inspect intake manifold, manifold
gasket, and vacuum hoses.
4. Faulty ignition coil(s). 4. Test and replace as necessary.
(Refer to Appropriate Diagnostic
Information)
9 - 4 ENGINE 2.4LRS
ENGINE 2.4L (Continued)
ProCarManuals.com
Page 1207 of 2399

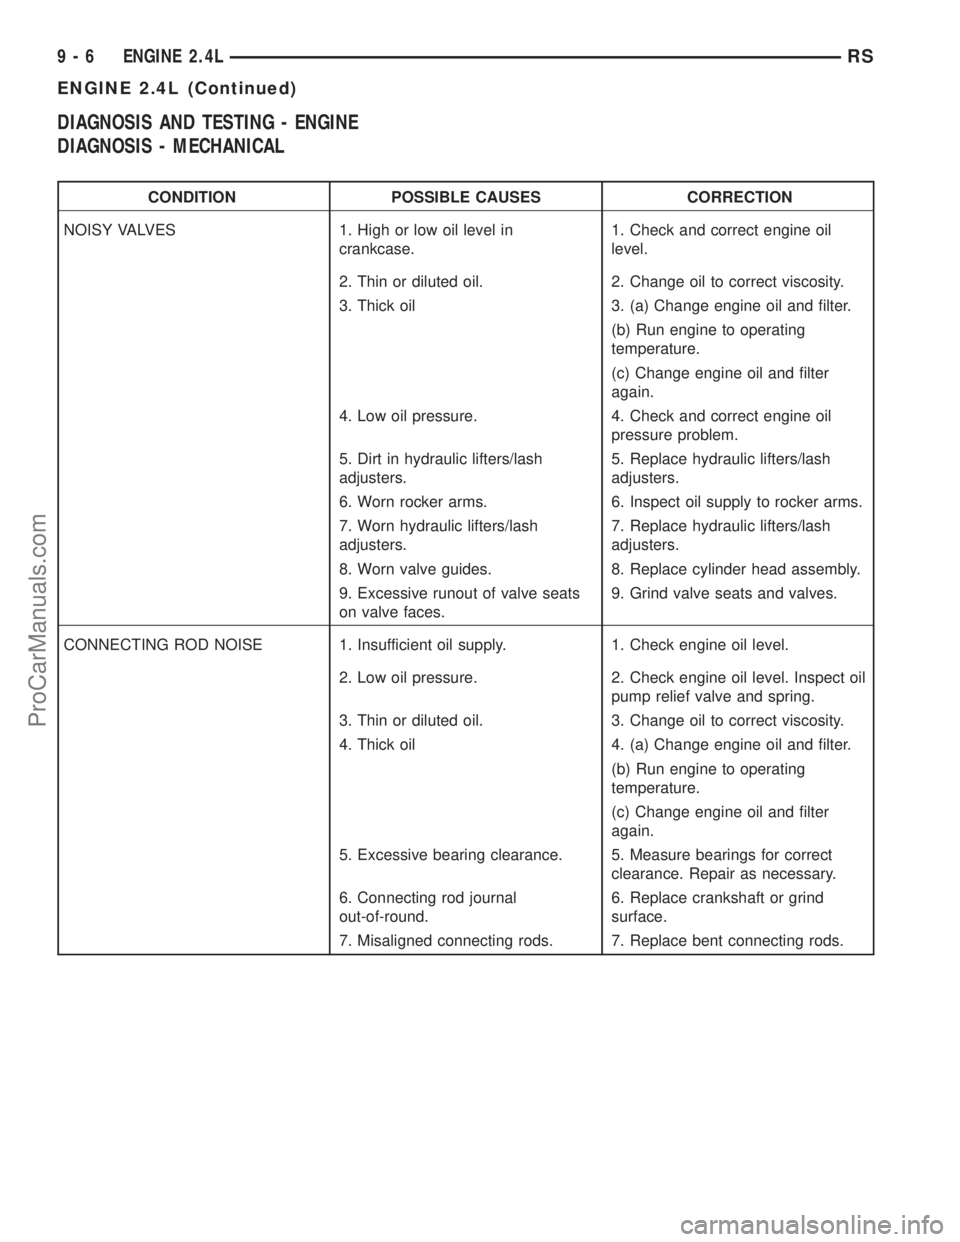
DIAGNOSIS AND TESTING - ENGINE
DIAGNOSIS - MECHANICAL
CONDITION POSSIBLE CAUSES CORRECTION
NOISY VALVES 1. High or low oil level in
crankcase.1. Check and correct engine oil
level.
2. Thin or diluted oil. 2. Change oil to correct viscosity.
3. Thick oil 3. (a) Change engine oil and filter.
(b) Run engine to operating
temperature.
(c) Change engine oil and filter
again.
4. Low oil pressure. 4. Check and correct engine oil
pressure problem.
5. Dirt in hydraulic lifters/lash
adjusters.5. Replace hydraulic lifters/lash
adjusters.
6. Worn rocker arms. 6. Inspect oil supply to rocker arms.
7. Worn hydraulic lifters/lash
adjusters.7. Replace hydraulic lifters/lash
adjusters.
8. Worn valve guides. 8. Replace cylinder head assembly.
9. Excessive runout of valve seats
on valve faces.9. Grind valve seats and valves.
CONNECTING ROD NOISE 1. Insufficient oil supply. 1. Check engine oil level.
2. Low oil pressure. 2. Check engine oil level. Inspect oil
pump relief valve and spring.
3. Thin or diluted oil. 3. Change oil to correct viscosity.
4. Thick oil 4. (a) Change engine oil and filter.
(b) Run engine to operating
temperature.
(c) Change engine oil and filter
again.
5. Excessive bearing clearance. 5. Measure bearings for correct
clearance. Repair as necessary.
6. Connecting rod journal
out-of-round.6. Replace crankshaft or grind
surface.
7. Misaligned connecting rods. 7. Replace bent connecting rods.
9 - 6 ENGINE 2.4LRS
ENGINE 2.4L (Continued)
ProCarManuals.com
Page 1208 of 2399

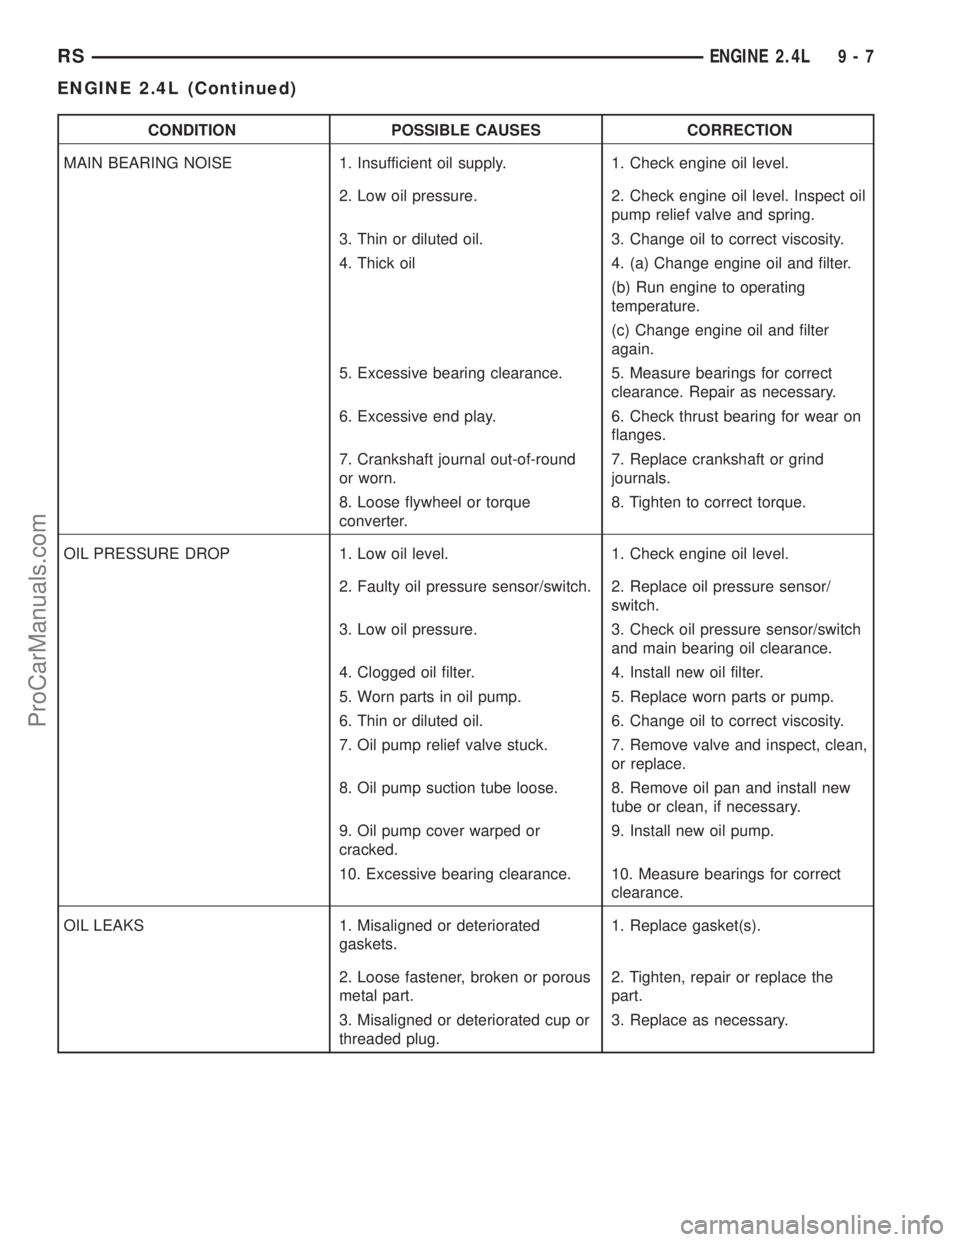
CONDITION POSSIBLE CAUSES CORRECTION
MAIN BEARING NOISE 1. Insufficient oil supply. 1. Check engine oil level.
2. Low oil pressure. 2. Check engine oil level. Inspect oil
pump relief valve and spring.
3. Thin or diluted oil. 3. Change oil to correct viscosity.
4. Thick oil 4. (a) Change engine oil and filter.
(b) Run engine to operating
temperature.
(c) Change engine oil and filter
again.
5. Excessive bearing clearance. 5. Measure bearings for correct
clearance. Repair as necessary.
6. Excessive end play. 6. Check thrust bearing for wear on
flanges.
7. Crankshaft journal out-of-round
or worn.7. Replace crankshaft or grind
journals.
8. Loose flywheel or torque
converter.8. Tighten to correct torque.
OIL PRESSURE DROP 1. Low oil level. 1. Check engine oil level.
2. Faulty oil pressure sensor/switch. 2. Replace oil pressure sensor/
switch.
3. Low oil pressure. 3. Check oil pressure sensor/switch
and main bearing oil clearance.
4. Clogged oil filter. 4. Install new oil filter.
5. Worn parts in oil pump. 5. Replace worn parts or pump.
6. Thin or diluted oil. 6. Change oil to correct viscosity.
7. Oil pump relief valve stuck. 7. Remove valve and inspect, clean,
or replace.
8. Oil pump suction tube loose. 8. Remove oil pan and install new
tube or clean, if necessary.
9. Oil pump cover warped or
cracked.9. Install new oil pump.
10. Excessive bearing clearance. 10. Measure bearings for correct
clearance.
OIL LEAKS 1. Misaligned or deteriorated
gaskets.1. Replace gasket(s).
2. Loose fastener, broken or porous
metal part.2. Tighten, repair or replace the
part.
3. Misaligned or deteriorated cup or
threaded plug.3. Replace as necessary.
RSENGINE 2.4L9-7
ENGINE 2.4L (Continued)
ProCarManuals.com
Page 1209 of 2399

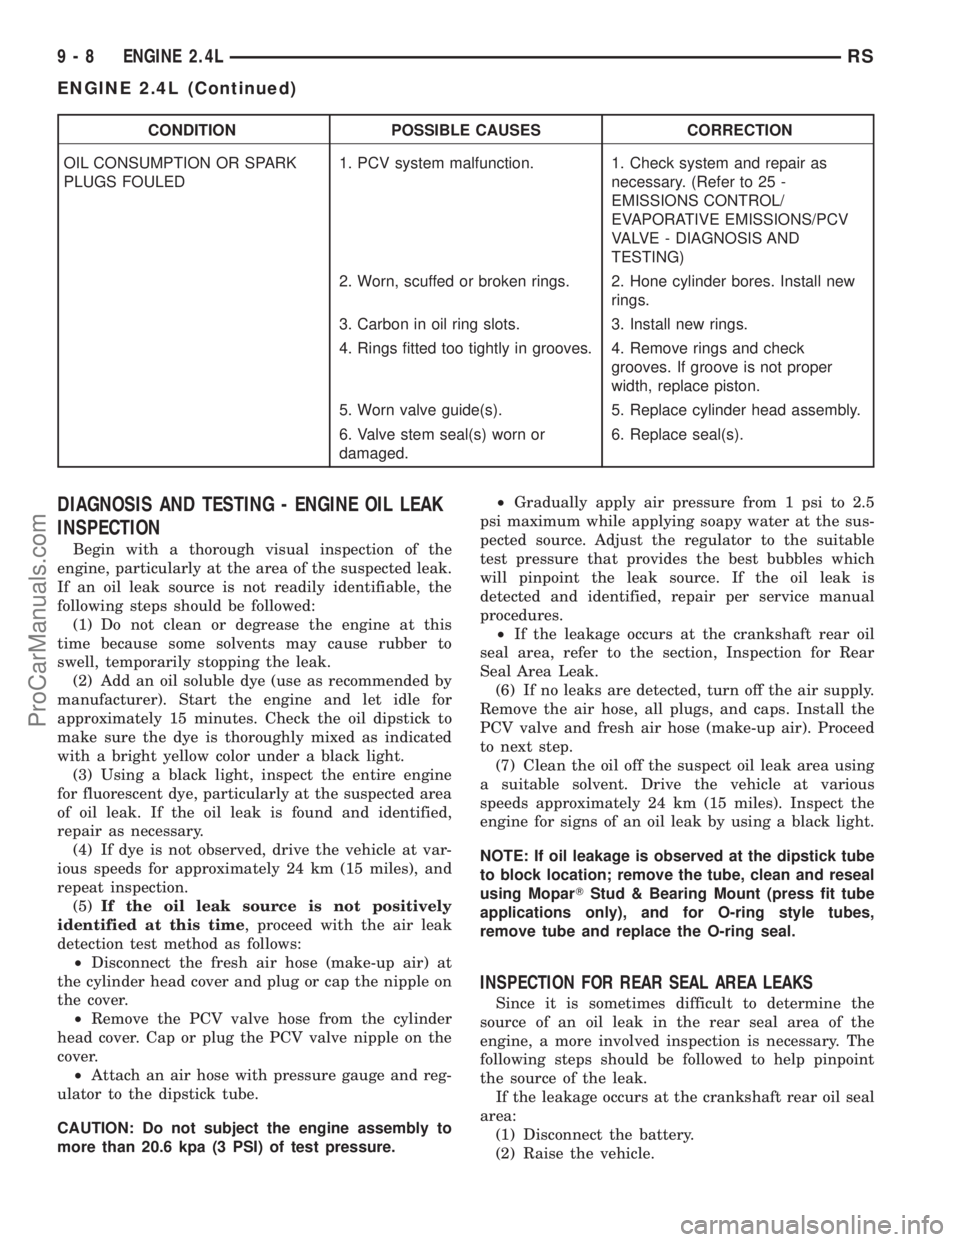
CONDITION POSSIBLE CAUSES CORRECTION
OIL CONSUMPTION OR SPARK
PLUGS FOULED1. PCV system malfunction. 1. Check system and repair as
necessary. (Refer to 25 -
EMISSIONS CONTROL/
EVAPORATIVE EMISSIONS/PCV
VALVE - DIAGNOSIS AND
TESTING)
2. Worn, scuffed or broken rings. 2. Hone cylinder bores. Install new
rings.
3. Carbon in oil ring slots. 3. Install new rings.
4. Rings fitted too tightly in grooves. 4. Remove rings and check
grooves. If groove is not proper
width, replace piston.
5. Worn valve guide(s). 5. Replace cylinder head assembly.
6. Valve stem seal(s) worn or
damaged.6. Replace seal(s).
DIAGNOSIS AND TESTING - ENGINE OIL LEAK
INSPECTION
Begin with a thorough visual inspection of the
engine, particularly at the area of the suspected leak.
If an oil leak source is not readily identifiable, the
following steps should be followed:
(1) Do not clean or degrease the engine at this
time because some solvents may cause rubber to
swell, temporarily stopping the leak.
(2) Add an oil soluble dye (use as recommended by
manufacturer). Start the engine and let idle for
approximately 15 minutes. Check the oil dipstick to
make sure the dye is thoroughly mixed as indicated
with a bright yellow color under a black light.
(3) Using a black light, inspect the entire engine
for fluorescent dye, particularly at the suspected area
of oil leak. If the oil leak is found and identified,
repair as necessary.
(4) If dye is not observed, drive the vehicle at var-
ious speeds for approximately 24 km (15 miles), and
repeat inspection.
(5)If the oil leak source is not positively
identified at this time, proceed with the air leak
detection test method as follows:
²Disconnect the fresh air hose (make-up air) at
the cylinder head cover and plug or cap the nipple on
the cover.
²Remove the PCV valve hose from the cylinder
head cover. Cap or plug the PCV valve nipple on the
cover.
²Attach an air hose with pressure gauge and reg-
ulator to the dipstick tube.
CAUTION: Do not subject the engine assembly to
more than 20.6 kpa (3 PSI) of test pressure.²Gradually apply air pressure from 1 psi to 2.5
psi maximum while applying soapy water at the sus-
pected source. Adjust the regulator to the suitable
test pressure that provides the best bubbles which
will pinpoint the leak source. If the oil leak is
detected and identified, repair per service manual
procedures.
²If the leakage occurs at the crankshaft rear oil
seal area, refer to the section, Inspection for Rear
Seal Area Leak.
(6) If no leaks are detected, turn off the air supply.
Remove the air hose, all plugs, and caps. Install the
PCV valve and fresh air hose (make-up air). Proceed
to next step.
(7) Clean the oil off the suspect oil leak area using
a suitable solvent. Drive the vehicle at various
speeds approximately 24 km (15 miles). Inspect the
engine for signs of an oil leak by using a black light.
NOTE: If oil leakage is observed at the dipstick tube
to block location; remove the tube, clean and reseal
using MoparTStud & Bearing Mount (press fit tube
applications only), and for O-ring style tubes,
remove tube and replace the O-ring seal.
INSPECTION FOR REAR SEAL AREA LEAKS
Since it is sometimes difficult to determine the
source of an oil leak in the rear seal area of the
engine, a more involved inspection is necessary. The
following steps should be followed to help pinpoint
the source of the leak.
If the leakage occurs at the crankshaft rear oil seal
area:
(1) Disconnect the battery.
(2) Raise the vehicle.
9 - 8 ENGINE 2.4LRS
ENGINE 2.4L (Continued)
ProCarManuals.com