Page 109 of 486

2-
2-1
Section 2 Features and Controls
Here you can learn about the many standard and optional features on your vehicle, and information on starting,
shifting and braking. Also explained are the instrument panel and the warning systems that tell you if everything is
working properly
-- and what to do if you have a problem.
2
-2 Windows
2
-5 Keys
2-7 Door Locks
2-10 Remote Keyless Entry System (Option)
2-17 Multifunction Alarm Locks and
Lighting Choices
2
-27 Dual Sliding Doors
2
-29 Power Sliding Door (Option)
2
-36 Liftgate
2
-37 Theft
2
-38 Content Theft-Deterrent (Option)
2
-40 PASS-Key� III
2
-43 New Vehicle ªBreak-Inº
2-43 Ignition Positions
2
-45 Starting Your Engine
2
-46 Engine Coolant Heater (If Equipped)
2
-47 Automatic Transaxle Operation
2
-52 Parking Brake
2
-53 Shifting Into PARK (P)2
-56 Shifting Out of PARK (P)
2
-57 Parking Over Things That Burn
2
-57 Engine Exhaust
2
-58 Running Your Engine While You're Parked
2
-59 Turn Signal/Multifunction Lever
2
-67 Exterior Lamps
2-68 Interior Lamps
2-74 Storage Compartments
2-87 Accessory Inflator System (Option)
2
-89 Accessory Power Outlets
2
-90 OnStar� System (If Equipped)
2
-94 HomeLink� Transmitter (Option)
2
-98 The Instrument Panel -- Your
Information System
2
-102 Warning Lights, Gages, Messages
and Indicators
2
-112 Message Center
2-120 Driver Information Center (DIC) (Option)
2-123 Rear Parking Assist (Option)
Page 184 of 486
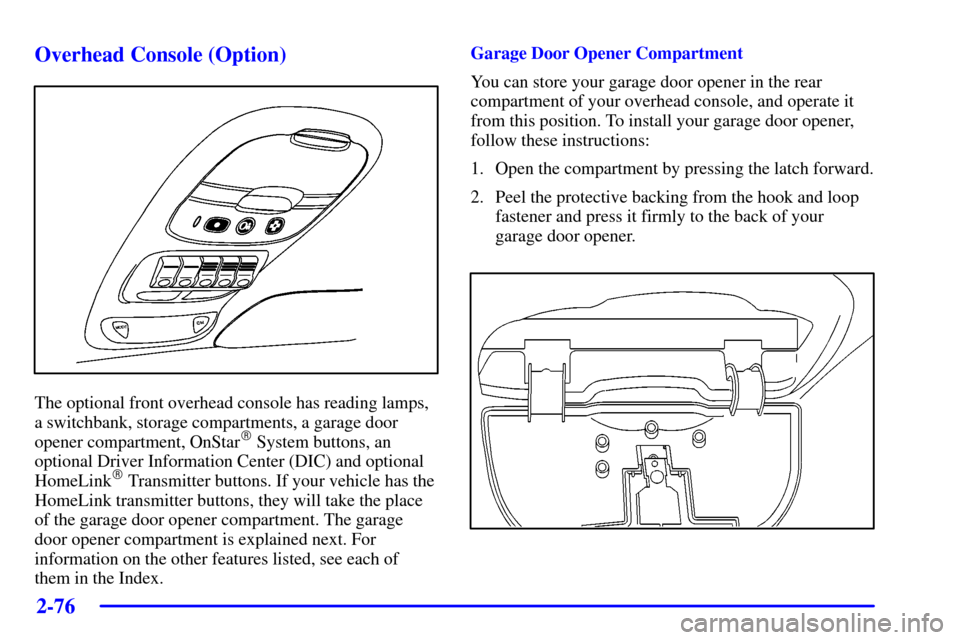
2-76 Overhead Console (Option)
The optional front overhead console has reading lamps,
a switchbank, storage compartments, a garage door
opener compartment, OnStar
� System buttons, an
optional Driver Information Center (DIC) and optional
HomeLink
� Transmitter buttons. If your vehicle has the
HomeLink transmitter buttons, they will take the place
of the garage door opener compartment. The garage
door opener compartment is explained next. For
information on the other features listed, see each of
them in the Index.Garage Door Opener Compartment
You can store your garage door opener in the rear
compartment of your overhead console, and operate it
from this position. To install your garage door opener,
follow these instructions:
1. Open the compartment by pressing the latch forward.
2. Peel the protective backing from the hook and loop
fastener and press it firmly to the back of your
garage door opener.
Page 202 of 486

This device complies with Part 15 of the FCC Rules.
Operation is subject to the following two conditions:
(1) this device may not cause harmful interference,
and")
2-94
HomeLink� Transmitter (Option)
This device complies with Part 15 of the FCC Rules.
Operation is subject to the following two conditions:
(1) this device may not cause harmful interference,
and (2) this device must accept any interference
received, including interference that may cause
undesired operation.This device complies with RSS
-210 of Industry Canada.
Operation is subject to the following two conditions:
(1) this device may not cause interference, and (2) this
device must accept any interference, including
interference that may cause undesired operation of
the device.
Changes and modifications to this system by other than
an authorized service facility could void authorization to
use this equipment.
Programming the HomeLink Transmitter
Do not use the HomeLink Transmitter with any garage
door opener that does not have the ªstop and reverseº
safety feature. This includes any garage door opener
model manufactured before April 1, 1982.
Be sure that people and objects are clear of the garage
door you are programming.
It is recommended that a new battery be installed in
your hand
-held transmitter for quicker and more
accurate transmission on the radio frequency.
Page 203 of 486

2-95
Your vehicle's engine should be turned off while
programming the transmitter. Follow these steps to
program up to three channels:
1. Decide which one of the three channels (one of the
HomeLink buttons) you want to program.
2. Press and hold the desired button on HomeLink
through Step 3.
3. When the HomeLink indicator light begins to blink
slowly (this may take up to 30 seconds), hold the
hand
-held transmitter about 1 to 3 inches (3 to 8 cm)
away from HomeLink and then press and hold the
transmit button on the hand
-held transmitter.
Continue to hold both buttons until the indicator
light on HomeLink begins to flash rapidly (this may
take up to 90 seconds).If you have trouble programming HomeLink, make
sure that you have followed the directions exactly as
described and that the battery in the hand
-held
transmitter is not weak. If you still cannot program it,
move the hand
-held transmitter to the left or right or
forward or backward or flip it upside down. HomeLink
may not work with older garage door openers that do
not meet current Federal Consumer Safety Standards.
If you cannot program the transmitter after repeated
attempts, refer to ªTraining a Garage Door Opener with
a ªRolling Codeº Featureº later in this section or contact
the manufacturer of HomeLink at 1
-800-355-3515, or
on the internet at www.homelink.com.
Be sure to keep the original hand
-held transmitter
in case you need to erase and reprogram the
HomeLink Transmitter.
Page 204 of 486

If you have not previously programmed the hand-held
transmitter to HomeLink, see ªProgramming the
HomeLink Transmitter")
2-96 Training a Garage Door Opener with a
ªRolling Codeº Feature (If Equipped)
If you have not previously programmed the hand-held
transmitter to HomeLink, see ªProgramming the
HomeLink Transmitterº listed previously. If you have
completed this programming already, you now need to
train the garage door opener motor head unit to
recognize HomeLink.
1. Find the ªLearnº or ªSmartº button on the garage
door opener motor head unit. The exact location and
color of the button will vary by garage door opener
brand. If you have difficulty finding the Learn or
Smart button, refer to your garage door opener
owner's manual or contact the manufacturer of
HomeLink at 1
-800-355-3515, or on the internet
at www.homelink.com.
Because of the steps involved, it may be helpful to
have another person available to assist you in
programming the transmitter.2. Press the Learn or Smart button on the garage
door opener motor head unit. An indicator light will
begin to flash when the motor head unit enters the
training mode.
Following this step, you have 30 seconds to
start Step 3.
3. Return to HomeLink in your vehicle and firmly
press and release the programmed HomeLink button
three times.
The rolling
-code garage door opener should now
recognize HomeLink. You may either use HomeLink or
the hand
-held transmitter to open the garage door.
If after following these instructions, you still have
problems training the garage door opener, contact the
manufacturer of HomeLink at 1
-800-355-3515, or on
the internet at www.homelink.com.
Page 205 of 486

2-97
Canadian Programming
Canadian Owners: During programming, the
hand
-held transmitter may automatically stop
transmitting after two seconds. In this case, you should
press and hold the HomeLink button (see Steps 2 and 3
under ªProgramming the HomeLink Transmitterº)
while you press and re
-press (cycle) your hand-held
transmitter every two seconds until HomeLink
is trained.
Operating the HomeLink Transmitter
Press and hold the appropriate button on HomeLink for
at least half of a second. The indicator light will come
on while the signal is being transmitted.
Erasing Channels
To erase all three programmed channels, hold down the
two outside buttons until the indicator light begins to
flash (approximately 20 seconds). Release both buttons.
Resetting Defaults
To reset HomeLink to default settings, hold down the
two outside buttons until the indicator light begins to
flash (approximately 20 seconds). Continue to hold both
buttons until the HomeLink indicator light turns off and
then release both buttons.
Accessories
Accessories for the HomeLink Transmitter are available
from the manufacturer of the unit. If you would like
additional information, please contact the manufacturer
of HomeLink at 1
-800-355-3515, or on the internet
at www.homelink.com.