Page 291 of 432
4-59 When You Are Ready to Leave After
Parking on a Hill
1. Apply your regular brakes and hold the pedal down
while you:
�start your engine,
�shift into a gear, and
�release the parking brake.
2. Let up on the brake pedal.
3. Drive slowly until the trailer is clear of the chocks.
4. Stop and have someone pick up and store the chocks.
Maintenance When Trailer Towing
Your vehicle will need service more often when you're
pulling a trailer. See the Maintenance Schedule for
more on this. Things that are especially important
in trailer operation are automatic transmission fluid
(don't overfill), engine oil, axle lubricant, belt, cooling
system and brake system. Each of these is covered in
this manual, and the Index will help you find them
quickly. If you're trailering, it's a good idea to review
these sections before you start your trip.
Check periodically to see that all hitch nuts and bolts
are tight.
Page 296 of 432

5-4
1. Check the other vehicle. It must have a 12-volt
battery with a negative ground system.
NOTICE:
If the other system isn't a 12-volt system with a
negative ground, both vehicles can be damaged.
2. Get the vehicles close enough so the jumper cables
can reach, but be sure the vehicles aren't touching
each other. If they are, it could cause a ground
connection you don't want. You wouldn't be able
to start your vehicle, and the bad grounding could
damage the electrical systems.
To avoid the possibility of the vehicles rolling, set
the parking brake firmly on both vehicles involved
in the jump start procedure. Put an automatic
transmission in PARK (P) or a manual transmission
in NEUTRAL before setting the parking brake.
If you have a four
-wheel-drive vehicle, be sure
the transfer case is not in NEUTRAL (N).
NOTICE:
If you leave your radio on, it could be badly
damaged. The repairs wouldn't be covered by
your warranty.
3. Turn off the ignition on both vehicles. Unplug
unnecessary accessories plugged into the cigarette
lighter or accessory power outlets (if equipped). Turn
off the radio and all lamps that aren't needed. This
will avoid sparks and help to save both batteries.
And it could save your radio!
4. Open both hoods and locate the batteries. Find the
positive (+) and negative (
-) terminals on each
battery. Your vehicle has a remote negative (
-) jump
starting terminal. You should always use this remote
terminal instead of the terminal on the battery.
The remote negative (
-) terminal is located on the
front engine lift bracket and is marked ªGND.º
See ªEngine Compartment Overviewº in the Index
for more information on location.
Page 327 of 432

6-
6-1
Section 6 Service and Appearance Care
Here you will find information about the care of your vehicle. This section begins with service and fuel information,
and then it shows how to check important fluid and lubricant levels. There is also technical information about your
vehicle, and a part devoted to its appearance care.
6
-2 Service
6
-3 Fuel
6
-5 Fuels in Foreign Countries
6
-6 Filling Your Tank
6
-8 Filling a Portable Fuel Container
6
-8 Checking Things Under the Hood
6
-11 Engine Oil
6
-16 Engine Air Cleaner/Filter
6
-18 Automatic Transmission Fluid
6
-21 Rear Axle
6
-22 Four-Wheel Drive
6
-24 Engine Coolant
6
-27 Radiator Pressure Cap
6
-28 Power Steering Fluid
6
-29 Windshield Washer Fluid
6
-30 Brakes6
-34 Battery
6
-35 Bulb Replacement
6
-36 Windshield Wiper Blade Replacement
6
-38 Tires
6
-46 Appearance Care
6
-47 Cleaning the Inside of Your Vehicle
6
-49 Care of Safety Belts
6
-50 Cleaning the Outside of Your Vehicle
6
-54 GM Vehicle Care/Appearance Materials
6
-55 Vehicle Identification Number (VIN)
6
-55 Service Parts Identification Label
6
-56 Electrical System
6
-63 Replacement Bulbs
6
-63 Capacities and Specifications
6
-63 Normal Maintenance Replacement Parts
Page 337 of 432

6-11
A. Coolant Recovery Tank
B. Engine Air Cleaner/Filter
C. Windshield Washer Fluid Reservoir
D. Engine Air Cleaner/Filter Indicator
E. Power Steering Fluid Reservoir
F. Automatic Transmission Dipstick
G. Engine Oil Dipstick
H. Radiator Pressure Cap
I. Engine Oil Fill Cap
J. Front Engine Lift Bracket Marked ªGNDº
K. Brake Master Cylinder
L. Battery
M. Engine Compartment Fuse Block
Before closing the hood, be sure all filler caps are on
properly. Then lift the hood to relieve pressure on the
hood prop. Remove the hood prop from its slot in the
hood and return the prop to its retainer. Then pull the
hood down firmly to close. It will latch when dropped
from 6 to 8 inches (15 to 20 cm) without pressing on
the hood.Engine Oil
If the CHECK OIL LEVEL message appears on the
instrument cluster, it means you need to check your
engine oil level right away. For more information,
see ªCheck Oil Level Messageº in the Index.
You should check your engine oil level regularly;
this is an added reminder.
Checking Engine Oil
It's a good idea to check your engine oil every time you
get fuel. In order to get an accurate reading, the oil must
be warm and the vehicle must be on level ground.
The engine oil dipstick
handle is a yellow ring
located in the engine
compartment toward the
passenger's side of the
vehicle. See ªEngine
Compartment Overviewº
in the Index for more
information on location.
Page 344 of 432

6-18
Automatic Transmission Fluid
When to Check and Change
A good time to check your automatic transmission fluid
level is when the engine oil is changed.
Change both the fluid and filter every 50,000 miles
(83 000 km) if the vehicle is mainly driven under one
or more of these conditions:
�In heavy city traffic where the outside temperature
regularly reaches 90�F (32�C) or higher.
�In hilly or mountainous terrain.
�When doing frequent trailer towing.
�Uses such as found in taxi, police or delivery service.
If you do not use your vehicle under any of
these conditions, change the fluid and filter
every 100,000 miles (166 000 km).
See ªScheduled Maintenance Servicesº in the Index.
How to Check
Because this operation can be a little difficult, you may
choose to have this done at the dealership service department.
If you do it yourself, be sure to follow all the instructions
here, or you could get a false reading on the dipstick.
NOTICE:
Too much or too little fluid can damage your
transmission. Too much can mean that some of
the fluid could come out and fall on hot engine
parts or exhaust system parts, starting a fire.
Too little fluid could cause the transmission to
overheat. Be sure to get an accurate reading if
you check your transmission fluid.
Wait at least 30 minutes before checking the
transmission fluid level if you have been driving:
�When outside temperatures are above 90�F (32�C).
�At high speed for quite a while.
�In heavy traffic
-- especially in hot weather.
�While pulling a trailer.
Page 346 of 432

6-20
Then, without shutting off the engine, follow
these steps:
Locate the handle with the
transmission and lock
symbols for the automatic
transmission dipstick in
the engine compartment
on the passenger's side of
the vehicle.
See ªEngine Compartment Overviewº
in the Index for more information on location.
1. Flip the handle up and then pull out the dipstick and
wipe it with a clean rag or paper towel.
2. Push it back in all the way, wait three seconds and
then pull it back out again.
3. If the fluid level is in the acceptable range, push
the dipstick back in all the way; then flip the handle
down to lock the dipstick in place.
How to Add Fluid
Refer to the Maintenance Schedule to determine what
kind of transmission fluid to use. See ªRecommended
Fluids and Lubricantsº in the Index.
Add fluid only after checking the transmission fluid
while it is hot. (A cold check is used only as a reference.)
If the fluid level is low, add only enough of the proper
fluid to bring the level up to the HOT area for a hot
check. It doesn't take much fluid, generally less than
one pint (0.5 L). Don't overfill.
Page 347 of 432
6-21
NOTICE:
We recommend you use only fluid labeled
DEXRON�-III, because fluid with that label is
made especially for your automatic transmission.
Damage caused by fluid other than DEXRON
�-III
is not covered by your new vehicle warranty.
�After adding fluid, recheck the fluid level as
described under ªHow to Check.º
�When the correct fluid level is obtained, push the
dipstick back in all the way; then flip the handle
down to lock the dipstick in place.
Rear Axle
When to Check Lubricant
Refer to the Maintenance Schedule to determine
how often to check the lubricant. See ªScheduled
Maintenance Servicesº in the Index.
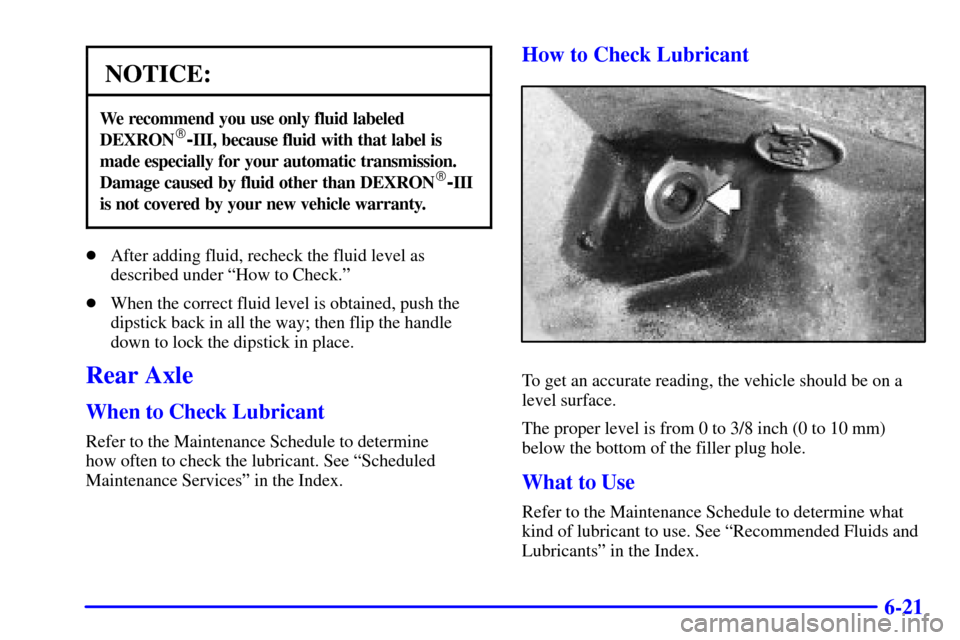
How to Check Lubricant
To get an accurate reading, the vehicle should be on a
level surface.
The proper level is from 0 to 3/8 inch (0 to 10 mm)
below the bottom of the filler plug hole.
What to Use
Refer to the Maintenance Schedule to determine what
kind of lubricant to use. See ªRecommended Fluids and
Lubricantsº in the Index.
Page 389 of 432

6-63
Replacement Bulbs
Lamps Number
Tail and Stoplamps 3157. . . . . . . . . . . . . . . . . . . . .
Rear Turn Signal Lamps 3157. . . . . . . . . . . . . . . . .
For any bulb not listed here contact your dealer.
Capacities and Specifications
Engine Specifications
Engine Description ªVORTECº 4200. . . . . . . . . . . .
Type L6. . . . . . . . . . . . . . . . . . . . . . . . . . . . . . . . . . . .
VIN Code S. . . . . . . . . . . . . . . . . . . . . . . . . . . . . . . . .
Firing Order 1
-5-3-6-2-4 . . . . . . . . . . . . . . . . . . . . . .
Spark Plug Gap 0.050 inches (1.25 mm). . . . . . . . . .
Wheel and Tires
Wheel Nut Torque 100 lb-ft (140 N´m) . . . . . . . . . . .
Capacities
Cooling System 13.9 quarts (13.1 L). . . . . . . . . . . . .
Crankcase 7.0 quarts (6.6 L). . . . . . . . . . . . . . . . . . . .
Transmission
(Drain and Refill) 5.0 quarts (4.7 L). . . . . . . . . . . .
Differential Fluid
Rear 4.0 pints (1.9 L). . . . . . . . . . . . . . . . . . . . . . . .
Front 2.6 pints (0.8 L). . . . . . . . . . . . . . . . . . . . . . .
Fuel Tank 18.7 U.S. gallons (75.7 L). . . . . . . . . . . . .
All capacities are approximate. When adding, be sure to
fill to the appropriate level, as recommended in this
manual. Recheck the fluid level after filling.
Normal Maintenance
Replacement Parts
Engine Oil Filter PF59*. . . . . . . . . . . . . . . . . . . . . . .
Engine Air Cleaner/Filter A2014C*. . . . . . . . . . . . . . .
Automatic Transmission
Filter Kit GM Part No. 24200796. . . . . . . . . . . . . . .
Spark Plugs 41
-965* . . . . . . . . . . . . . . . . . . . . . . . . . .
Fuel Filter GF831*. . . . . . . . . . . . . . . . . . . . . . . . . . . .
Windshield Wiper Blade 20.0 inches (50.8 cm). . . . .
Backglass Wiper Blade 14.0 inches (35.6 cm). . . . . .
*ACDelco
� part number