Page 204 of 497

3-2
Comfort Controls
Standard Comfort Controls
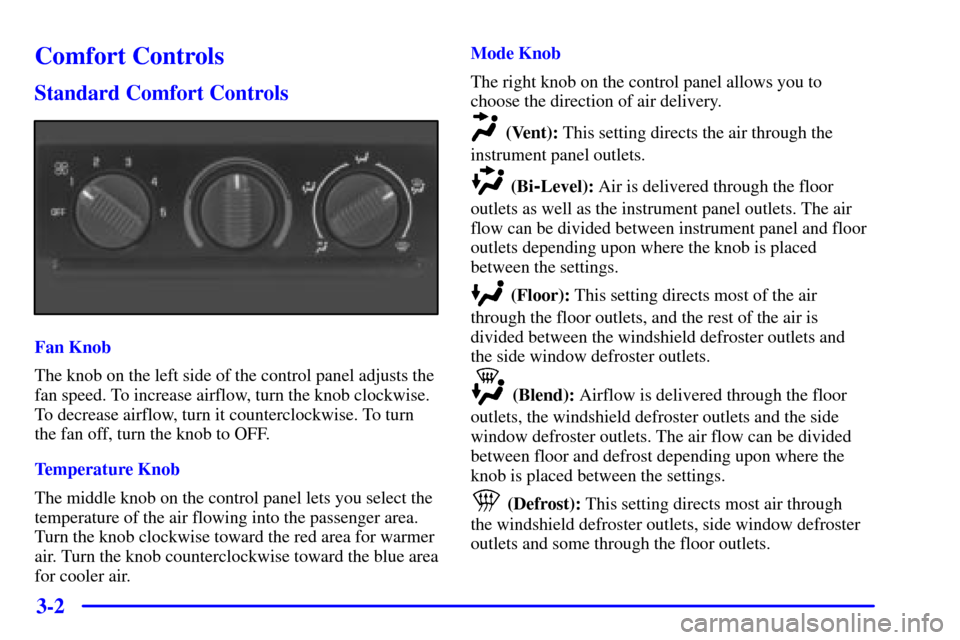
Fan Knob
The knob on the left side of the control panel adjusts the
fan speed. To increase airflow, turn the knob clockwise.
To decrease airflow, turn it counterclockwise. To turn
the fan off, turn the knob to OFF.
Temperature Knob
The middle knob on the control panel lets you select the
temperature of the air flowing into the passenger area.
Turn the knob clockwise toward the red area for warmer
air. Turn the knob counterclockwise toward the blue area
for cooler air.Mode Knob
The right knob on the control panel allows you to
choose the direction of air delivery.
(Vent): This setting directs the air through the
instrument panel outlets.
(Bi-Level): Air is delivered through the floor
outlets as well as the instrument panel outlets. The air
flow can be divided between instrument panel and floor
outlets depending upon where the knob is placed
between the settings.
(Floor): This setting directs most of the air
through the floor outlets, and the rest of the air is
divided between the windshield defroster outlets and
the side window defroster outlets.
(Blend): Airflow is delivered through the floor
outlets, the windshield defroster outlets and the side
window defroster outlets. The air flow can be divided
between floor and defrost depending upon where the
knob is placed between the settings.
(Defrost): This setting directs most air through
the windshield defroster outlets, side window defroster
outlets and some through the floor outlets.
Page 205 of 497

3-3 Heater and Air Conditioning Comfort
Controls (If Equipped)
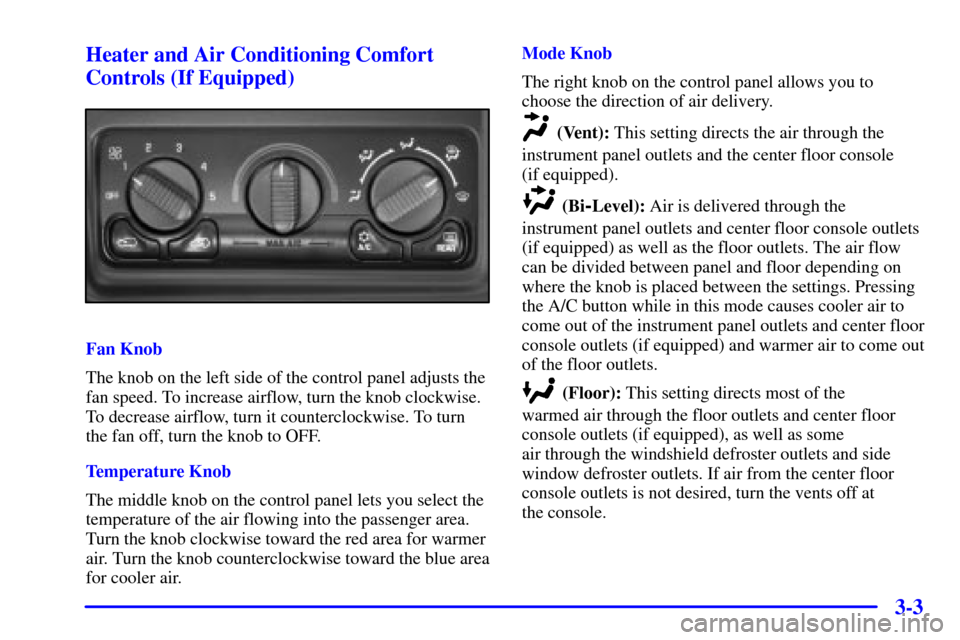
Fan Knob
The knob on the left side of the control panel adjusts the
fan speed. To increase airflow, turn the knob clockwise.
To decrease airflow, turn it counterclockwise. To turn
the fan off, turn the knob to OFF.
Temperature Knob
The middle knob on the control panel lets you select the
temperature of the air flowing into the passenger area.
Turn the knob clockwise toward the red area for warmer
air. Turn the knob counterclockwise toward the blue area
for cooler air.Mode Knob
The right knob on the control panel allows you to
choose the direction of air delivery.
(Vent): This setting directs the air through the
instrument panel outlets and the center floor console
(if equipped).
(Bi-Level): Air is delivered through the
instrument panel outlets and center floor console outlets
(if equipped) as well as the floor outlets. The air flow
can be divided between panel and floor depending on
where the knob is placed between the settings. Pressing
the A/C button while in this mode causes cooler air to
come out of the instrument panel outlets and center floor
console outlets (if equipped) and warmer air to come out
of the floor outlets.
(Floor): This setting directs most of the
warmed air through the floor outlets and center floor
console outlets (if equipped), as well as some
air through the windshield defroster outlets and side
window defroster outlets. If air from the center floor
console outlets is not desired, turn the vents off at
the console.
Page 211 of 497

3-9 Air Conditioning
On hot days, open the windows long enough to let hot
air inside escape. This reduces the time it takes for your
vehicle to cool down. Then keep your windows closed
for the air conditioner to work its best.
The recirculation button allows the air inside your
vehicle to be recirculated. This setting helps to
maximize your air conditioner's performance and your
vehicle's fuel economy. This setting also cools air the
fastest and can be used to keep unwanted odors and/or
dust from entering the vehicle. When using the air
conditioner, turn off the recirculation button after the
vehicle reaches a comfortable interior temperature.
When the right knob on the control panel is between
floor and defrost, the recirculation feature will not
function to reduce window fogging.
The A/C button, below the mode knob, allows the air
coming into your vehicle to be cooled. This setting is
useful for normal cooling on hot days.When you use A/C with the recirculation button pushed
in, turn off recirculation as soon as the vehicle reaches a
comfortable interior temperature.
Maximum air conditioning performance is obtained by
pressing the A/C button, the recirculation button and
turning the temperature knob fully counterclockwise to
the blue area. This setting also cools air the fastest. After
the vehicle's interior reaches a comfortable temperature,
press the outside air button to place the air conditioning
system in the normal mode.
Passenger Compartment Air Filter (If Equipped)
If your vehicle has air conditioning, it is equipped with
a passenger compartment air filter, which filters outside
air entering the vehicle. For information on replacing
the filter see ªPassenger Compartment Air Filterº in
the Index.
Page 319 of 497
4-91 Trailer Wiring Harness
Your vehicle is equipped with one of the following
wiring harnesses for towing a trailer or hauling a
slide
-in camper.
Basic Trailer Wiring Package
All regular, extended cab crew cab pickups have a
six
-wire trailer towing harness.
The six-wire harness is located at the rear of the vehicle
and is tied to the vehicle's frame. The harness requires
the installation of a trailer
-wiring harness connector,
which is available through your dealer.
The six
-wire harness contains the following
trailer circuits:
�Yellow: Left Stop/Turn Signal
�Dark Green: Right Stop/Turn Signal
�Brown: Taillamps
�White: Ground
�Light Green: Back
-up Lamps
�Light Blue: Center High
-Mounted
Stoplamp (CHMSL)
If you need to upgrade your vehicle to heavy
-duty
trailering, a brake controller harness and an underbody
harness with a seven
-pin universal heavy-duty trailer
connector are available from your dealer.
Page 320 of 497
4-92
Heavy-Duty Trailer Wiring Package (If Equipped)
Your pickup may be equipped with the eight-wire trailer
towing harness. This harness with a seven
-pin universal
heavy
-duty trailer connector is attached to a bracket on
the platform hitch.*
* The Center High
-Mounted Stoplamp (CHMSL) wire
is tied next to the trailer wiring harness for use with a
trailer, slide
-in camper or cap.The eight
-wire harness contains the following
trailer circuits:
�Yellow: Left Stop/Turn Signal
�Dark Green: Right Stop/Turn Signal
�Brown: Taillamps
�White: Ground
�Light Green: Back
-up Lamps
�Light Blue: CHMSL
�Red: Battery Feed
�Dark Blue: Trailer Brake
A jumper harness for an electric trailer brake controller
and a trailer battery feed fuse are included with this
trailering package. (See ªInstrument Panel Jumper
Wiring Harnessº later in this section.)
If you need to tow a light
-duty trailer with a standard
four
-way round pin connector, an adapter connector is
included with your vehicle.
Page 321 of 497

4-93
Camper/Fifth-Wheel Trailer Wiring Package
(If Equipped)
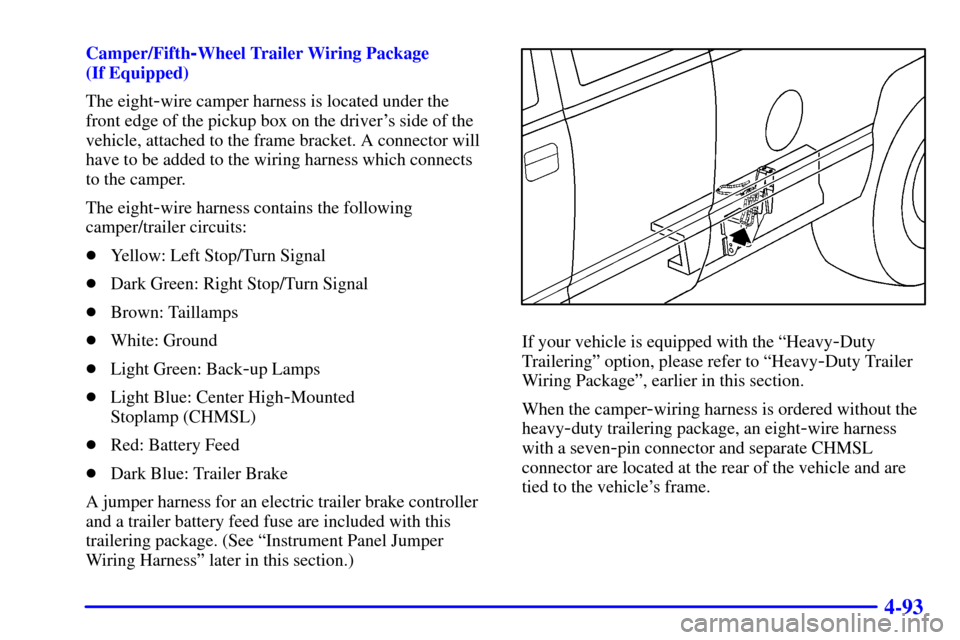
The eight
-wire camper harness is located under the
front edge of the pickup box on the driver's side of the
vehicle, attached to the frame bracket. A connector will
have to be added to the wiring harness which connects
to the camper.
The eight
-wire harness contains the following
camper/trailer circuits:
�Yellow: Left Stop/Turn Signal
�Dark Green: Right Stop/Turn Signal
�Brown: Taillamps
�White: Ground
�Light Green: Back
-up Lamps
�Light Blue: Center High
-Mounted
Stoplamp (CHMSL)
�Red: Battery Feed
�Dark Blue: Trailer Brake
A jumper harness for an electric trailer brake controller
and a trailer battery feed fuse are included with this
trailering package. (See ªInstrument Panel Jumper
Wiring Harnessº later in this section.)
If your vehicle is equipped with the ªHeavy-Duty
Traileringº option, please refer to ªHeavy
-Duty Trailer
Wiring Packageº, earlier in this section.
When the camper
-wiring harness is ordered without the
heavy
-duty trailering package, an eight-wire harness
with a seven
-pin connector and separate CHMSL
connector are located at the rear of the vehicle and are
tied to the vehicle's frame.