Page 259 of 360

6-20
As in the chart shown previously, SAE 5W-30 is best for
your vehicle. However, you can use SAE 10W
-30 if it's
going to be 0�F (
-18�C) or above. These numbers on an
oil container show its viscosity, or thickness. Do not use
other viscosity oils, such as SAE 20W
-50.
NOTICE:
Use only engine oil with the American Petroleum
Institute Certified For Gasoline Engines
starburst symbol. Failure to use the
recommended oil can result in engine damage not
covered by your warranty.
GM Goodwrench� oil meets all the requirements for
your vehicle.
If you are in an area where the temperature falls
below
-20�F (-29�C), consider using either an
SAE 5W
-30 synthetic oil or an SAE 0W-30 oil. Both
will provide easier cold starting and better protection for
your engine at extremely low temperatures.
Engine Oil Additives
Don't add anything to your oil. The recommended oils
with the starburst symbol are all you will need for good
performance and engine protection.
When to Change Engine Oil
If any one of these is true for you, use the short trip/city
maintenance schedule:
�Most trips are less than 5 miles (8 km). This is
particularly important when outside temperatures are
below freezing.
�Most trips include extensive idling (such as frequent
driving in stop
-and-go traffic).
�The vehicle is used for delivery service, police, taxi
or other commercial application.
Driving under these conditions causes engine oil to
break down sooner. If any one of these is true for your
vehicle, then you need to change your oil and filter
every 3,000 miles (5 000 km) or 3 months
-- whichever
occurs first.
If none of them is true, use the long trip/highway
maintenance schedule. Change the oil and filter every
7,500 miles (12 500 km) or 12 months
-- whichever
occurs first. Driving a vehicle with a fully warmed
engine under highway conditions will cause engine oil
to break down slower.
Page 260 of 360

6-21
If your vehicle is equipped with a 2.2L L4 ECOTEC
(L61) engine, it has a unique oil filter element. When
reinstalling the filter cap, do not exceed 18 lb
-ft
(25 N�m). Inspect the condition of the O
-ring and
replace if damaged.
What to Do with Used Oil
Used engine oil contains certain elements that may be
unhealthy for your skin and could even cause cancer.
Don't let used oil stay on your skin for very long. Clean
your skin and nails with soap and water, or a good hand
cleaner. Wash or properly throw away clothing or rags
containing used engine oil. See the manufacturer's
warnings about the use and disposal of oil products.
Used oil can be a threat to the environment. If you
change your own oil, be sure to drain all the oil from the
filter before disposal. Never dispose of oil by putting it
in the trash, pouring it on the ground, into sewers, or
into streams or bodies of water. Instead, recycle it by
taking it to a place that collects used oil. If you have a
problem properly disposing of your used oil, ask
your dealer, a service station or a local recycling center
for help.
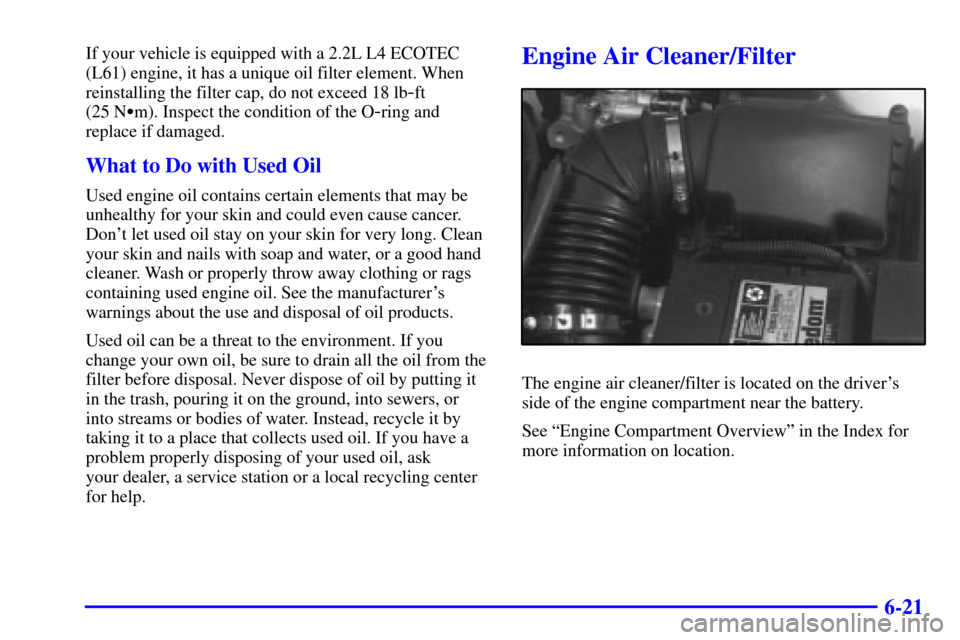
Engine Air Cleaner/Filter
The engine air cleaner/filter is located on the driver's
side of the engine compartment near the battery.
See ªEngine Compartment Overviewº in the Index for
more information on location.
Page 261 of 360
6-22
To check or replace the filter, remove the screws that
hold the cover on and lift off the cover. Be sure to
reinstall the cover tightly.
Refer to the Maintenance Schedule to determine when to
replace the air filter.
See ªScheduled Maintenance Servicesº in the Index.
CAUTION:
Operating the engine with the air cleaner/filter
off can cause you or others to be burned. The air
cleaner not only cleans the air, it stops flame if
the engine backfires. If it isn't there, and the
engine backfires, you could be burned. Don't
drive with it off, and be careful working on the
engine with the air cleaner/filter off.
NOTICE:
If the air cleaner/filter is off, a backfire can
cause a damaging engine fire. And, dirt can easily
get into your engine, which will damage it.
Always have the air cleaner/filter in place when
you're driving.
Page 262 of 360

6-23
Automatic Transaxle Fluid
It is not necessary to check the transaxle fluid level. A
transaxle fluid leak is the only reason for fluid loss. If a
leak occurs, take the vehicle to the dealership service
department and have it repaired as soon as possible. You
may also have your fluid level checked by your dealer
or service center when you have your oil changed.
Change both the fluid and filter every 50,000 miles
(83 000 km) if the vehicle is mainly driven under one or
more of these conditions:
�In heavy city traffic where the outside temperature
regularly reaches 90�F (32�C) or higher.
�In hilly or mountainous terrain.�When doing frequent trailer towing.
�Uses such as found in taxi, police or delivery service.
If you do not use your vehicle under any of these
conditions, the fluid and filter do not require changing.
NOTICE:
We recommend you use only fluid labeled
DEXRON�-III, because fluid with that label is
made especially for your automatic transaxle.
Damage caused by fluid other than
DEXRON
�-III is not covered by your new
vehicle warranty.
Page 263 of 360

6-24
Manual Transaxle Fluid
It is not necessary to check the transaxle fluid level. A
transaxle fluid leak is the only reason for fluid loss. If a
leak occurs, take the vehicle to the dealership service
department and have it repaired as soon as possible. You
may also have your fluid level checked by your dealer
or service center when you have your oil changed. See
ªRecommended Fluids and Lubricantsº in the Index for
the proper fluid to use.
Hydraulic Clutch
The hydraulic clutch linkage in your vehicle is
self
-adjusting. The clutch master cylinder reservoir is
filled with hydraulic clutch fluid.
It is not necessary to regularly check clutch fluid unless
you suspect there is a leak in the system. Adding fluid
won't correct a leak.
A fluid loss in this system could indicate a problem.
Have the system inspected and repaired.
When to Check and What to Use
Refer to the Maintenance
Schedule to determine how
often you should check the
fluid level in your clutch
master cylinder reservoir
and for the proper fluid. See
ªOwner Checks and
Servicesº and
ªRecommended Fluids and
Lubricantsº in the Index.
How to Check and Add Fluid
You do not need to check the fluid level unless you
suspect a clutch problem. To check the fluid level, take
the cap off. If the fluid reaches the step inside the
reservoir, the fluid level is correct. See ªEngine
Compartment Overviewº in the Index for more
information on location.
Page 272 of 360

6-33 Brake Wear
Your vehicle has front disc brakes and rear drum brakes.
Disc brake pads have built
-in wear indicators that
make a high
-pitched warning sound when the brake
pads are worn and new pads are needed. The sound may
come and go or be heard all the time your vehicle is
moving (except when you are pushing on the brake
pedal firmly).
CAUTION:
The brake wear warning sound means that soon
your brakes won't work well. That could lead to
an accident. When you hear the brake wear
warning sound, have your vehicle serviced.
NOTICE:
Continuing to drive with worn-out brake pads
could result in costly brake repair.
Some driving conditions or climates may cause a brake
squeal when the brakes are first applied or lightly
applied. This does not mean something is wrong with
your brakes.
See ªCaliper/Knuckle Maintenance Inspectionº in
Section 7 of this manual under Part C ªPeriodic
Maintenance Inspections.º
Properly torqued wheel nuts are necessary to help
prevent brake pulsation. When tires are rotated, inspect
brake pads for wear and evenly tighten wheel nuts in the
proper sequence to GM torque specifications.
Your rear drum brakes don't have wear indicators, but if
you ever hear brake rubbing noise, have the rear brake
linings inspected immediately. Also, the rear brake
drums should be removed and inspected each time the
tires are removed for rotation or changing. When you
have the front brake pads replaced, have the rear brakes
inspected, too.
Brake linings should always be replaced as complete
axle sets.
See ªBrake System Inspectionº in Section 7 of this
manual under Part C ªPeriodic Maintenance Inspections.º
Page 282 of 360

6-43
Tires
Your new vehicle comes with high-quality tires made by
a leading tire manufacturer. If you ever have questions
about your tire warranty and where to obtain service, see
your Chevrolet Warranty booklet for details.
CAUTION:
Poorly maintained and improperly used tires
are dangerous.
�Overloading your tires can cause
overheating as a result of too much friction.
You could have an air
-out and a serious
accident. See ªLoading Your Vehicleº in
the Index.
CAUTION: (Continued)
CAUTION: (Continued)
�Underinflated tires pose the same danger as
overloaded tires. The resulting accident
could cause serious injury. Check all tires
frequently to maintain the recommended
pressure. Tire pressure should be checked
when your tires are cold.
�Overinflated tires are more likely to be
cut, punctured or broken by a sudden
impact
-- such as when you hit a pothole.
Keep tires at the recommended pressure.
�Worn, old tires can cause accidents. If your
tread is badly worn, or if your tires have
been damaged, replace them.
Page 284 of 360

6-45 Tire Inspection and Rotation
Tires should be rotated every 6,000 to 8,000 miles
(10 000 to 13 000 km). Any time you notice unusual
wear, rotate your tires as soon as possible and check
wheel alignment. Also check for damaged tires or
wheels. See ªWhen It's Time for New Tiresº and
ªWheel Replacementº later in this section for
more information.
The purpose of regular rotation is to achieve more
uniform wear for all tires on the vehicle. The first
rotation is the most important. See ªScheduled
Maintenance Servicesº in the Index for
scheduled rotation intervals.
When rotating your tires, always use the correct rotation
pattern shown here.
Don't include the compact spare tire in your
tire rotation.
After the tires have been rotated, adjust the front and
rear inflation pressures as shown on the Tire
-Loading
Information label. Make certain that all wheel nuts
are properly tightened. See ªWheel Nut Torqueº in
the Index.
CAUTION:
Rust or dirt on a wheel, or on the parts to which
it is fastened, can make wheel nuts become loose
after a time. The wheel could come off and cause
an accident. When you change a wheel, remove
any rust or dirt from places where the wheel
attaches to the vehicle. In an emergency, you can
use a cloth or a paper towel to do this; but be
sure to use a scraper or wire brush later, if you
need to, to get all the rust or dirt off. See
ªChanging a Flat Tireº in the Index.