Page 120 of 331

3-14
Setting the Tone (Bass/Treble)
BASS: Press this knob lightly so it extends. Turn the
knob clockwise to increase bass and counterclockwise to
decrease bass.
TREB (Treble): Press this knob lightly so it extends.
Turn the knob clockwise to increase treble and
counterclockwise to decrease treble. If a station is
weak or noisy, you may want to decrease the treble.
Push these knobs back into their stored positions when
you're not using them.
AUTO TONE: This feature allows you to choose bass and
treble equalization settings designed for country/western,
jazz, talk, pop, rock and classical stations.
Each time you press the AUTO TONE button, this feature
will switch to one of these program types.
To return the bass and treble to the manual mode,
either press and release the AUTO TONE button until
the display goes blank or press and release the BASS or
TREB knobs and turn them until the display goes blank.Adjusting the Speakers (Balance/Fade)
BAL (Balance): Press this knob lightly so it extends.
Turn the knob clockwise to adjust sound to the right
speakers and counterclockwise to adjust sound to the
left speakers. The middle position balances the sound
between the speakers.
FADE: Press this knob lightly so it extends. Turn the
knob clockwise to adjust the sound to the front speakers
and counterclockwise to adjust sound to the rear
speakers. The middle position balances the sound
between the speakers.
Push these knobs back into their stored positions when
you're not using them.
Page 123 of 331

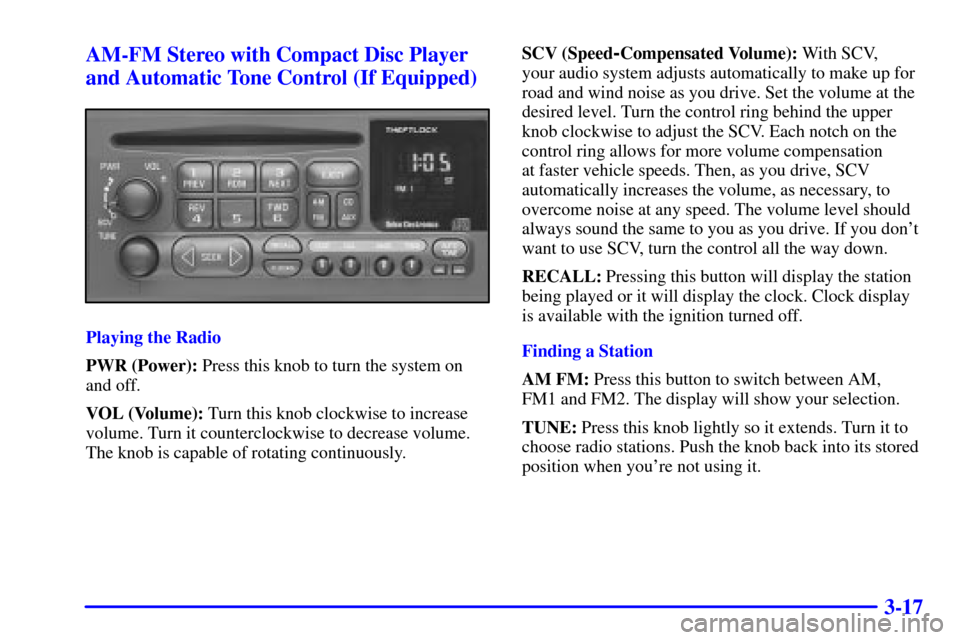
3-17 AM-FM Stereo with Compact Disc Player
and Automatic Tone Control (If Equipped)
Playing the Radio
PWR (Power): Press this knob to turn the system on
and off.
VOL (Volume): Turn this knob clockwise to increase
volume. Turn it counterclockwise to decrease volume.
The knob is capable of rotating continuously.SCV (Speed
-Compensated Volume): With SCV,
your audio system adjusts automatically to make up for
road and wind noise as you drive. Set the volume at the
desired level. Turn the control ring behind the upper
knob clockwise to adjust the SCV. Each notch on the
control ring allows for more volume compensation
at faster vehicle speeds. Then, as you drive, SCV
automatically increases the volume, as necessary, to
overcome noise at any speed. The volume level should
always sound the same to you as you drive. If you don't
want to use SCV, turn the control all the way down.
RECALL: Pressing this button will display the station
being played or it will display the clock. Clock display
is available with the ignition turned off.
Finding a Station
AM FM: Press this button to switch between AM,
FM1 and FM2. The display will show your selection.
TUNE: Press this knob lightly so it extends. Turn it to
choose radio stations. Push the knob back into its stored
position when you're not using it.
Page 125 of 331

3-19
Setting the Tone (Bass/Treble)
BASS: Press this knob lightly so it extends. Turn the
knob clockwise to increase bass and counterclockwise to
decrease bass.
TREB (Treble): Press this knob lightly so it extends.
Turn the knob clockwise to increase treble and
counterclockwise to decrease treble. If a station is weak
or noisy, you may want to decrease the treble.
Push these knobs back into their stored positions when
you're not using them.
AUTO TONE: This feature allows you to choose bass and
treble equalization settings designed for country/western,
jazz, talk, pop, rock and classical stations.
Each time you press the AUTO TONE button, this feature
will switch to one of these program types.
To return the bass and treble to the manual mode,
either press and release the AUTO TONE button until
the display goes blank or press and release the BASS or
TREB knobs and turn them until the display goes blank.Adjusting the Speakers (Balance/Fade)
BAL (Balance): Press this knob lightly so it extends.
Turn the knob clockwise to adjust sound to the right
speakers and counterclockwise to adjust sound to the
left speakers. The middle position balances the sound
between the speakers.
FADE: Press this knob lightly so it extends. Turn the
knob clockwise to adjust the sound to the front speakers
and counterclockwise for the rear speakers. The middle
position balances the sound between the speakers.
Push these knobs back into their stored positions when
you're not using them.
Page 143 of 331

4-11
An emergency like this requires close attention and a
quick decision. If you are holding the steering wheel at
the recommended 9 and 3 o'clock positions, you can
turn it a full 180 degrees very quickly without removing
either hand. But you have to act fast, steer quickly, and
just as quickly straighten the wheel once you have
avoided the object.
The fact that such emergency situations are always
possible is a good reason to practice defensive driving
at all times and wear safety belts properly.
Off-Road Recovery
You may find that your right wheels have dropped off the
edge of a road onto the shoulder while you're driving.
If the level of the shoulder is only slightly below the
pavement, recovery should be fairly easy. Ease off the
accelerator and then, if there is nothing in the way, steer
so that your vehicle straddles the edge of the pavement.
You can turn the steering wheel up to one
-quarter turn
until the right front tire contacts the pavement edge.
Then turn your steering wheel to go straight down
the roadway.
Page 190 of 331
5-18 How to Add Coolant to the Radiator
1. You can remove the radiator pressure cap when the
cooling system, including the radiator pressure cap
and upper radiator hose, is no longer hot. Turn the
pressure cap slowly counterclockwise until it first
stops. (Don't press down while turning the
pressure cap.)
If you hear a hiss, wait for that to stop. A hiss means
there is still some pressure left.
2. Then keep turning the pressure cap, but now push
down as you turn it. Remove the pressure cap.
Page 201 of 331

6-6
To remove the fuel cap, turn it slowly to the
left (counterclockwise).
CAUTION:
If you get gasoline on yourself and then
something ignites it, you could be badly burned.
Gasoline can spray out on you if you open the
fuel cap too quickly. This spray can happen if
your tank is nearly full, and is more likely in hot
weather. Open the fuel cap slowly and wait for
any ªhissº noise to stop. Then unscrew the cap
all the way.
Be careful not to spill gasoline. Clean gasoline from
painted surfaces as soon as possible. See ªCleaning the
Outside of Your Vehicleº in the Index.When you put the fuel cap back on, turn it to the right
(clockwise) until you hear a clicking sound. Make sure
you fully install the cap. The diagnostic system can
determine if the fuel cap has been left off or improperly
installed. This would allow fuel to evaporate into the
atmosphere. See ªMalfunction Indicator Lampº in
the Index.
NOTICE:
If you need a new fuel cap, be sure to get the
right type. Your dealer can get one for you.
If you get the wrong type, it may not fit properly.
This may cause your malfunction indicator lamp
to light and may damage your fuel tank and
emissions system. See ªMalfunction Indicator
Lampº in the Index.
Page 232 of 331
6-37 Front Parking/Turn Signal Lamps
(Sealed-Beam Headlamps)
1. Remove the screws at
the inside edge of the
parking/turn signal
lamp assembly.
2. Remove the lamp assembly by swinging it out from
the inside edge and sliding it out at the outside edge.
3. Squeeze the tab on the side of the lamp socket while
turning the socket counterclockwise.
4. Pull the socket out of the
lamp assembly.
5. Push in gently on the bulb, turn it counterclockwise
and remove it from the socket.
6. Put the new bulb into the socket, gently press in on
the bulb and turn it clockwise until it is tight.
7. Put the socket back into the lamp assembly and turn
it clockwise until it locks.
8. Put the parking/turn signal lamp assembly back into
the vehicle and tighten the screws.
Page 233 of 331
6-38 Roof Marker Lamps
1. Remove the screws and lift off the lens.
2. Pull the bulb straight out of the socket.
3. Put a new bulb into the socket and push it in until
it is tight.
4. Reinstall the lens and tighten the screws.
Taillamps
1. Using your hands, peel the rubber seal away from
the lens.
2. Lift the lens off the
lamp assembly.3. Slide the socket out of the lamp assembly.
4. Push in gently on
the bulb, turn it
counterclockwise
and remove it from
the socket.
5. Put in a new bulb and, pushing in gently, turn it
clockwise until it is tight.
6. Put the socket back in the lamp assembly and
reinstall the lens and lens seal.