Page 220 of 395

4-28
Your anti-lock brakes improve your vehicle's stability
when you make a hard stop on a slippery road. Even
though you have the anti
-lock braking system, you'll
want to begin stopping sooner than you would on dry
pavement. See ªAnti
-Lockº in the Index.
�Allow greater following distance on any
slippery road.
�Watch for slippery spots. The road might be fine
until you hit a spot that's covered with ice. On an
otherwise clear road, ice patches may appear in
shaded areas where the sun can't reach: around
clumps of trees, behind buildings or under bridges.
Sometimes the surface of a curve or an overpass may
remain icy when the surrounding roads are clear. If
you see a patch of ice ahead of you, brake before you
are on it. Try not to brake while you're actually on
the ice, and avoid sudden steering maneuvers.
If You're Caught in a Blizzard
If you are stopped by heavy snow, you could be in a
serious situation. You should probably stay with your
vehicle unless you know for sure that you are near help
and you can hike through the snow. Here are some
things to do to summon help and keep yourself and your
passengers safe:
�Turn on your hazard flashers.
Page 221 of 395

4-29
�Tie a red cloth to your vehicle to alert police that
you've been stopped by the snow.
�Put on extra clothing or wrap a blanket around you.
If you have no blankets or extra clothing, make body
insulators from newspapers, burlap bags, rags, floor
mats
-- anything you can wrap around yourself or
tuck under your clothing to keep warm.
You can run the engine to keep warm, but be careful.
CAUTION:
Snow can trap exhaust gases under your vehicle.
This can cause deadly CO (carbon monoxide) gas
to get inside. CO could overcome you and kill
you. You can't see it or smell it, so you might not
know it is in your vehicle. Clear away snow from
around the base of your vehicle, especially any
that is blocking your exhaust pipe. And check
around again from time to time to be sure snow
doesn't collect there.
Open a window just a little on the side of the
vehicle that's away from the wind. This will help
keep CO out.
Run your engine only as long as you must. This saves
fuel. When you run the engine, make it go a little faster
than just idle. That is, push the accelerator slightly. This
uses less fuel for the heat that you get and it keeps the
battery charged. You will need a well
-charged battery to
restart the vehicle, and possibly for signaling later on
with your headlamps. Let the heater run for a while.
Page 229 of 395

4-37 Total Weight on Your Vehicle's Tires
Be sure your vehicle's tires are inflated to the upper
limit for cold tires. You'll find these numbers on the
Tire
-Loading Information label at the rear edge of the
driver's door, or see ªLoading Your Vehicleº in the
Index. Then be sure you don't go over the GVW
limit for your vehicle, including the weight of the
trailer tongue.
Hitches
It's important to have the correct hitch equipment.
Crosswinds, large trucks going by and rough roads are a
few reasons why you'll need the right hitch. Here are
some rules to follow:
�The rear bumper on your vehicle is not intended for
hitches. Do not attach rental hitches or other
bumper
-type hitches to it. Use only a frame-mounted
hitch that does not attach to the bumper.
�Will you have to make any holes in the body of your
vehicle when you install a trailer hitch? If you do,
then be sure to seal the holes later when you remove
the hitch. If you don't seal them, deadly carbon
monoxide (CO) from your exhaust can get into your
vehicle. See ªCarbon Monoxideº in the Index. Dirt
and water can, too.
Safety Chains
You should always attach chains between your vehicle
and your trailer. Cross the safety chains under the tongue
of the trailer so that the tongue will not drop to the road
if it becomes separated from the hitch. Instructions
about safety chains may be provided by the hitch
manufacturer or by the trailer manufacturer. Follow the
manufacturer's recommendation for attaching safety
chains and do not attach them to the bumper. Always
leave just enough slack so you can turn with your rig.
And, never allow safety chains to drag on the ground.
Trailer Brakes
Be sure to read and follow the instructions for the trailer
brakes so you'll be able to install, adjust and maintain
them properly.
Because you have anti
-lock brakes, do not try to tap into
your vehicle's brake system. If you do, both brake
systems won't work well, or at all.
Page 249 of 395
5-16 How to Add Coolant to the Radiator
1. You can remove the radiator pressure cap when
the cooling system, including the radiator pressure
cap and upper radiator hose, is no longer hot.
Turn the pressure cap slowly counterclockwise until
it first stops. (Don't press down while turning the
pressure cap.)
If you hear a hiss, wait for that to stop.
A hiss means there is still some pressure left.
2. Then keep turning the pressure cap, but now push
down as you turn it. Remove the pressure cap.
Page 250 of 395
5-17
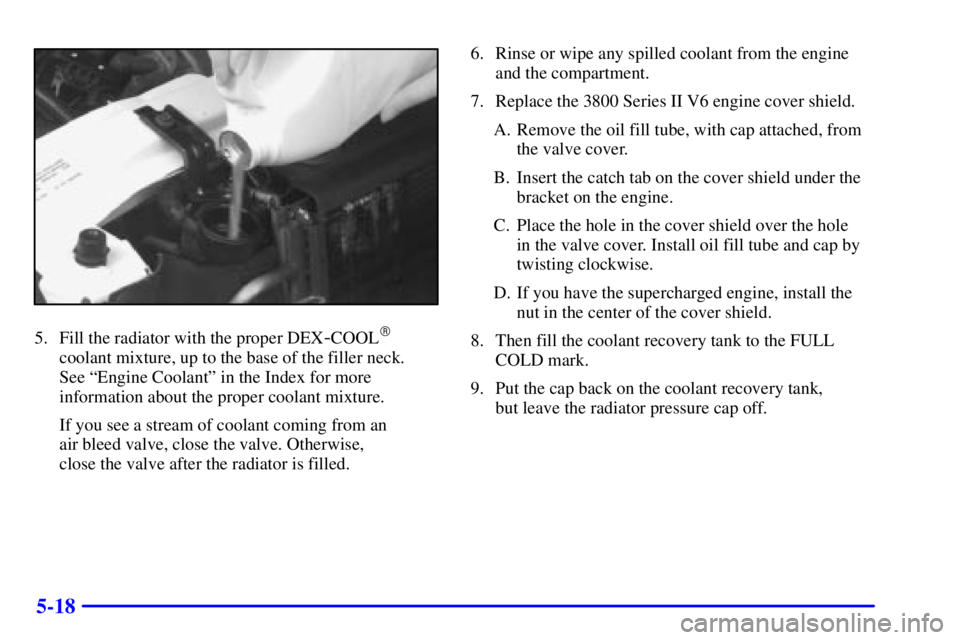
3. Remove the 3800 Series II V6 engine cover shield to
access the bleed valve.
A. Clean the area around the engine oil fill tube and
cap before removing. Twist the oil fill tube, with
cap attached, counterclockwise and remove it.
B. If you have the supercharged engine, remove the
nut in the center of the cover shield.C. Lift the engine cover shield at the front, slide the
catch tab out of the engine bracket and remove
the cover shield.
D. Put the oil fill tube, with cap attached, in the valve
cover oil fill hole until you're ready to replace the
cover shield.
There is one bleed valve.
It is located on the
thermostat housing.
4. After the engine cools, open the coolant air
bleed valve.
Page 251 of 395
5-18
5. Fill the radiator with the proper DEX-COOL�
coolant mixture, up to the base of the filler neck.
See ªEngine Coolantº in the Index for more
information about the proper coolant mixture.
If you see a stream of coolant coming from an
air bleed valve, close the valve. Otherwise,
close the valve after the radiator is filled.6. Rinse or wipe any spilled coolant from the engine
and the compartment.
7. Replace the 3800 Series II V6 engine cover shield.
A. Remove the oil fill tube, with cap attached, from
the valve cover.
B. Insert the catch tab on the cover shield under the
bracket on the engine.
C. Place the hole in the cover shield over the hole
in the valve cover. Install oil fill tube and cap by
twisting clockwise.
D. If you have the supercharged engine, install the
nut in the center of the cover shield.
8. Then fill the coolant recovery tank to the FULL
COLD mark.
9. Put the cap back on the coolant recovery tank,
but leave the radiator pressure cap off.
Page 253 of 395

5-20
If a Tire Goes Flat
It's unusual for a tire to ªblow outº while you're driving,
especially if you maintain your tires properly. If air goes
out of a tire, it's much more likely to leak out slowly.
But if you should ever have a ªblowout,º here are a
few tips about what to expect and what to do:
If a front tire fails, the flat tire will create a drag that
pulls the vehicle toward that side. Take your foot off
the accelerator pedal and grip the steering wheel firmly.
Steer to maintain lane position, and then gently brake
to a stop well out of the traffic lane.
A rear blowout, particularly on a curve, acts much like
a skid and may require the same correction you'd use
in a skid. In any rear blowout, remove your foot from
the accelerator pedal. Get the vehicle under control by
steering the way you want the vehicle to go. It may be
very bumpy and noisy, but you can still steer. Gently
brake to a stop
-- well off the road if possible.
If a tire goes flat, the next part shows how to use your
jacking equipment to change a flat tire safely.
Changing a Flat Tire
If a tire goes flat, avoid further tire and wheel damage
by driving slowly to a level place. Turn on your hazard
warning flashers.
CAUTION:
Changing a tire can cause an injury. The vehicle
can slip off the jack and roll over you or other
people. You and they could be badly injured.
Find a level place to change your tire. To help
prevent the vehicle from moving:
1. Set the parking brake firmly.
2. Put the shift lever in PARK (P).
3. Turn off the engine.
To be even more certain the vehicle won't move,
you can put blocks at the front and rear of the
tire farthest away from the one being changed.
That would be the tire on the other side of the
vehicle, at the opposite end.
Page 257 of 395
5-24
3. Turn the wheel wrench counterclockwise to lower
the jack head until it fits under the vehicle.
4. Near each wheel well is a notch in the plastic trim
panel to position the jack head. You'll find the word
JACK and an arrow stamped into the plastic near
each notch. Position the jack under the vehicle and
raise the jack head until it fits firmly against the
sheet metal next to the word JACK. Do not raise
the vehicle yet. Put the compact spare tire near you.
CAUTION:
Getting under a vehicle when it is jacked up is
dangerous. If the vehicle slips off the jack, you
could be badly injured or killed. Never get under
a vehicle when it is supported only by a jack.
CAUTION:
Raising your vehicle with the jack improperly
positioned can damage the vehicle and even
make the vehicle fall. To help avoid personal
injury and vehicle damage, be sure to fit the jack
lift head into the proper location before raising
the vehicle.