2002 BMW 745LI SEDAN reset
[x] Cancel search: resetPage 15 of 208
Cockpit
14
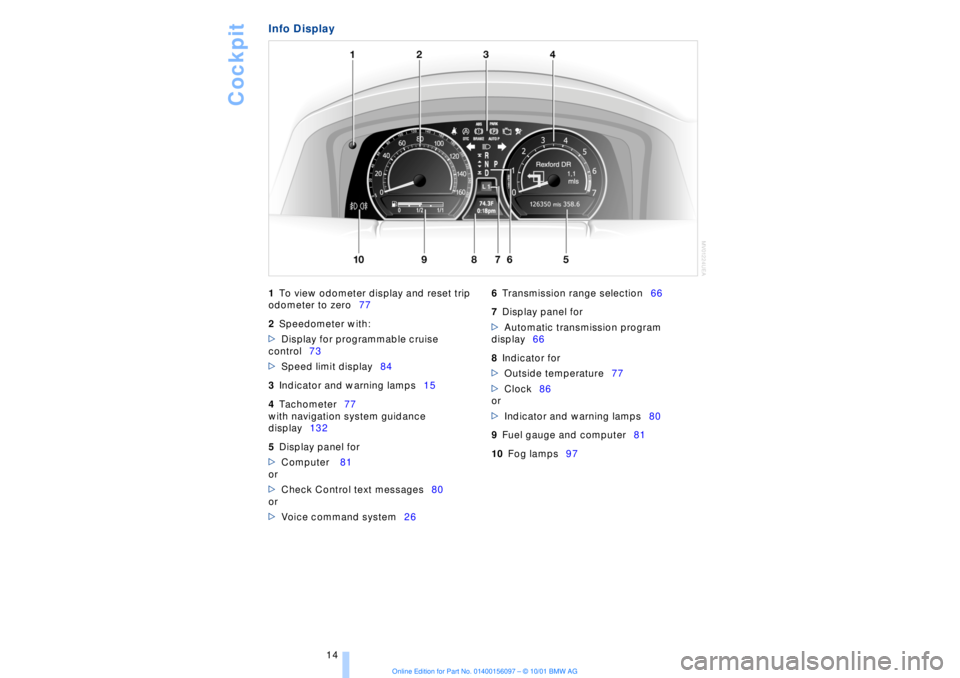
Info Display
1
To view odometer display and reset trip
odometer to zero77
2
Speedometer with:
>
Display for programmable cruise
control73
>
Speed limit display84
3
Indicator and warning lamps15
4
Tachometer77
with navigation system guidance
display132
5
Display panel for
>
Computer 81
or
>
Check Control text messages80
or
>
Voice command system26
6
Transmission range selection66
7
Display panel for
>
Automatic transmission program
display66
8
Indicator for
>
Outside temperature77
>
Clock86
or
>
Indicator and warning lamps80
9
Fuel gauge and computer81
10
Fog lamps97
Page 27 of 208
Voice command
26 The button must be used to terminate
unrestricted, open dialogs in which any text
might occur, such as those containing
names, notes, etc.
The system automatically switches
over to its telephone mode if you
receive a call during a dialog. The system
issues the voice message >Cancelled< and
"PROCESS TERMINATED" appears in the
Info Display, see Status displays below.<
Voice commandsThe voice command system operates on
the basis of specific, predefined
commands; these commands should be
spoken precisely as indicated. You can
listen to a selection from the command list
by activating the system, refer to page 26
and issuing the command >>Options<< or
>>What now<<.
The voice command system also features
an entry-level >>Main menu<< that allows
you to select individual accessories, refer
to page 26.Brief commandsAt the >>Main menu<< level you can use
"brief commands," refer to page 30 to
initiate direct execution of selected func-
tions without first proceeding to the
"systems" level.Special commands Special commands are available for
specific systems. In this Owner's Manual
you will find these commands in the
sections describing the individual systems.
Instructions for using the voice
command system are always identi-
fied by this pictogram.
>>>Pardon<< or >>Repeat<<
Repeats the last message issued by the
voice command system>>>Cancel<< or >>Exit<<
Terminates the voice command system
>>>Standard dialog<<
or >>Extended dialog<<
Comprehensive instructions and error
reports guide you through the system
>>>Short dialog<<
In this setting your guidance through the
system is provided exclusively in the form
of brief statements
>>>Help<<
Allows you to request information on
various systems
>>>Options<< or >>What now<<
Provides you with a listing of the
commands available for the selected
system. A corresponding list simulta-
neously appears in the Info Display, see
Status displays below
>>>Main menu<<
Provides access to submenus.
To make it easier for you to become
acquainted with the system, it is
preset to the >>Standard dialog<< or
>>Extended dialog<< mode at the
factory.<
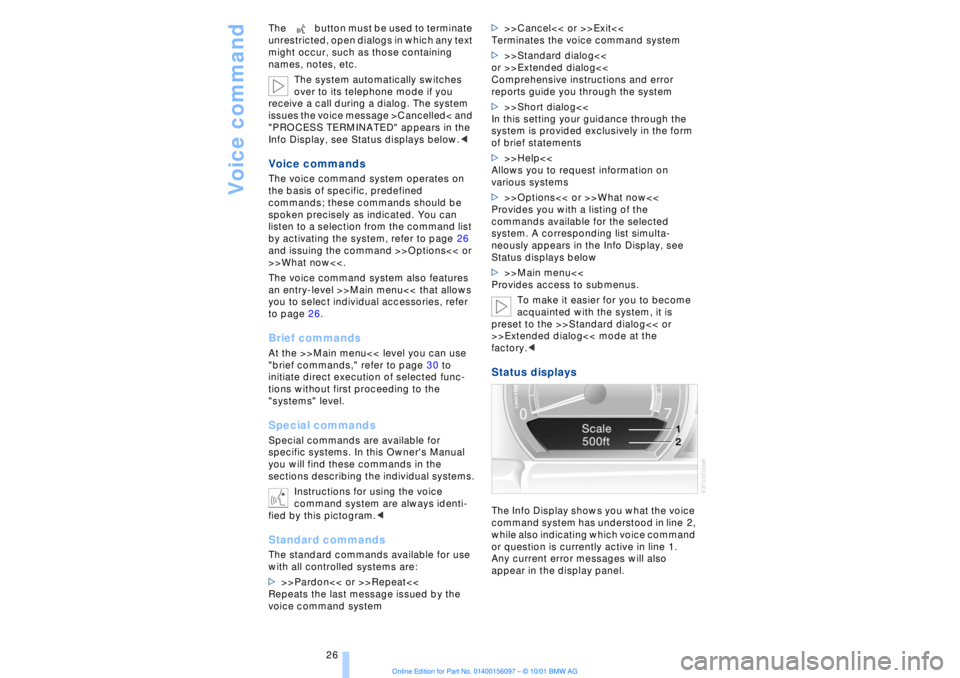
Status displaysThe Info Display shows you what the voice
command system has understood in line 2,
while also indicating which voice command
or question is currently active in line 1.
Any current error messages will also
appear in the display panel.
Page 48 of 208
At a glanceControlsDriving tipsCommunicationsNavigationEntertainmentMobilityReference
47
1Shoulder support:
You can use the adjustable upper backrest
for supplementary support in the shoulder
region. This provides a relaxed driving
position and helps relieve stress on the
shoulder muscles.
Make corrections in the forward/
backward adjustment of the seat to
ensure that the safety belt still fits firmly
against your body. If you do not do this, the
protection provided by the safety belt may
be reduced.
You can use the control knob to adjust
various functions after first selecting them
with the buttons.
1Forward/backward:
Tilt angle:
Backrest:
This button is always ready for operation
2Lumbar support, refer to page 46
3Shoulder support:
Head restraint height:
Backrest:
It is not possible to adjust the comfort
seats if the safety switch for the
power windows has been depressed, refer
to page 42.<
Adjusting passenger seat from the
rear The front passenger's seat can be adjusted
from the rear seating positions, for
instance, when a rear passenger desires
more legroom.
Press the button to activate this function,
refer to arrow.
You can use the control knob to adjust the
settings after selecting the desired function
with the buttons.
1Forward/backward:
Height:
Backrest:
2Head restraint height:
Press the button (see arrow) again to deac-
tivate this function.Resetting to standard adjustment
positionYou can use the button to return the rear
seats to their standard, or default positions.
Maintain pressure on the button until the
system completes the adjustment.
It will be necessary to return the rear
seats to their standard position before
using a child-restraint system (for
instance), refer to page 57.<
Page 74 of 208
At a glanceControlsDriving tipsCommunicationsNavigationEntertainmentMobilityReference
73
windshield before switching on either the
radio mode or the ignition.< Washer fluid Windshield and headlamp washers Capacity: approx. 8.2 quarts (7.8 liters)
Fill with water and Ð if required Ð with a
washer antifreeze (according to manufac-
turer's recommendations).
We recommend that you mix the
washer fluid before adding it to the
reservoir.<
Windshield washer antifreeze is flam-
mable. Always keep it well away from
sparks and open flames, and store it in
tightly closed containers well out of the
reach of children. Always observe the
instructions for use provided on the
container.< Programmable cruise
control The concept The programmable cruise control is avail-
able for use at speeds of approx. 18 mph
(30 km/h) and higher. The vehicle maintains
and stores the speed that you set using the
lever mounted on the steering column.
You can also use the multilevel preset
mode to store 6 speeds for later selection
with the lever on the steering column, refer
to page 75. This feature assists you in quickly adapting
vehicle speed to specific road conditions,
for instance, changes in speed limits.
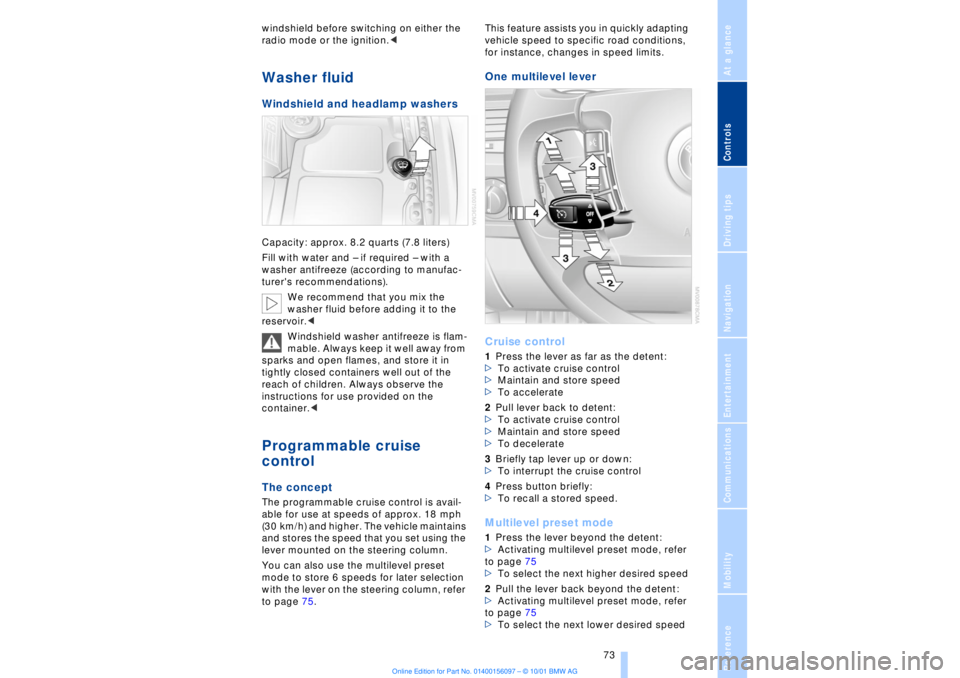
One multilevel lever
Cruise control 1Press the lever as far as the detent:
>To activate cruise control
>Maintain and store speed
>To accelerate
2Pull lever back to detent:
>To activate cruise control
>Maintain and store speed
>To decelerate
3Briefly tap lever up or down:
>To interrupt the cruise control
4Press button briefly:
>To recall a stored speed. Multilevel preset mode 1Press the lever beyond the detent:
>Activating multilevel preset mode, refer
to page 75
>To select the next higher desired speed
2Pull the lever back beyond the detent:
>Activating multilevel preset mode, refer
to page 75
>To select the next lower desired speed
Page 75 of 208
Driving
74 3Briefly tap lever up or down:
>To interrupt the cruise control
3Maintain pressure on lever for approx.
3 seconds:
>To cancel display of multilevel preset
mode in speedometer.
Press 1 or pull 2 the lever beyond the
detent to reactivate the display for the
multilevel preset mode.<
4Press button briefly:
>Select stored speed
4Maintain pressure on button for approx.
3 seconds:
>To store and delete speed settings, refer
to page 75.
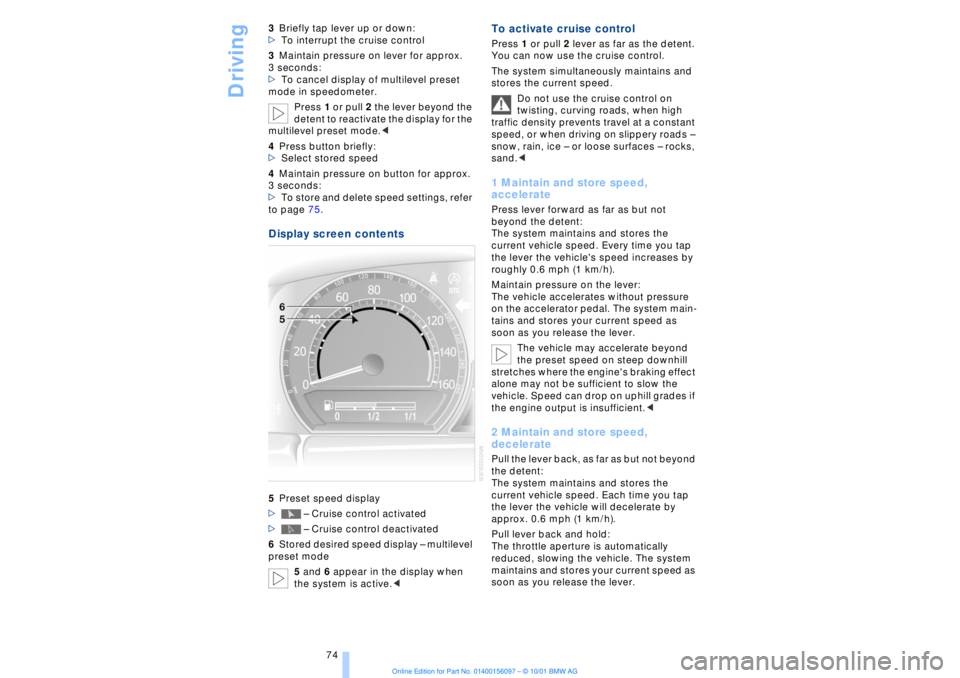
Display screen contents 5Preset speed display
> Ð Cruise control activated
> Ð Cruise control deactivated
6Stored desired speed display Ð multilevel
preset mode
5 and 6 appear in the display when
the system is active.<
To activate cruise control Press 1 or pull 2 lever as far as the detent.
You can now use the cruise control.
The system simultaneously maintains and
stores the current speed.
Do not use the cruise control on
twisting, curving roads, when high
traffic density prevents travel at a constant
speed, or when driving on slippery roads Ð
snow, rain, ice Ð or loose surfaces Ð rocks,
sand.< 1 Maintain and store speed,
accelerate Press lever forward as far as but not
beyond the detent:
The system maintains and stores the
current vehicle speed. Every time you tap
the lever the vehicle's speed increases by
roughly 0.6 mph (1 km/h).
Maintain pressure on the lever:
The vehicle accelerates without pressure
on the accelerator pedal. The system main-
tains and stores your current speed as
soon as you release the lever.
The vehicle may accelerate beyond
the preset speed on steep downhill
stretches where the engine's braking effect
alone may not be sufficient to slow the
vehicle. Speed can drop on uphill grades if
the engine output is insufficient.< 2 Maintain and store speed,
deceleratePull the lever back, as far as but not beyond
the detent:
The system maintains and stores the
current vehicle speed. Each time you tap
the lever the vehicle will decelerate by
approx. 0.6 mph (1 km/h).
Pull lever back and hold:
The throttle aperture is automatically
reduced, slowing the vehicle. The system
maintains and stores your current speed as
soon as you release the lever.
Page 76 of 208
At a glanceControlsDriving tipsCommunicationsNavigationEntertainmentMobilityReference
75
3 Interrupt cruise control Briefly press the lever up or down while the
cruise control is active. The status
message 5 in the Info Display is no longer
highlighted. You can use the cruise control
again as required.
In addition, cruise control is interrupted
automatically
>When you apply pressure to the brake
pedal
>when you select the automatic transmis-
sion's neutral range N
>when the DSC (Dynamic Stability
Control) system is in active operation. 4 To recall stored speed Briefly press button 4: The vehicle acceler-
ates to and maintains the last speed stored. To deactivate the cruise control The stored speed is deleted from the
system memory when you switch off the
ignition. To activate multilevel preset mode Push 1 or pull 2 the lever beyond the
detent.
The system maintains and stores the
current speed, which is also displayed as a
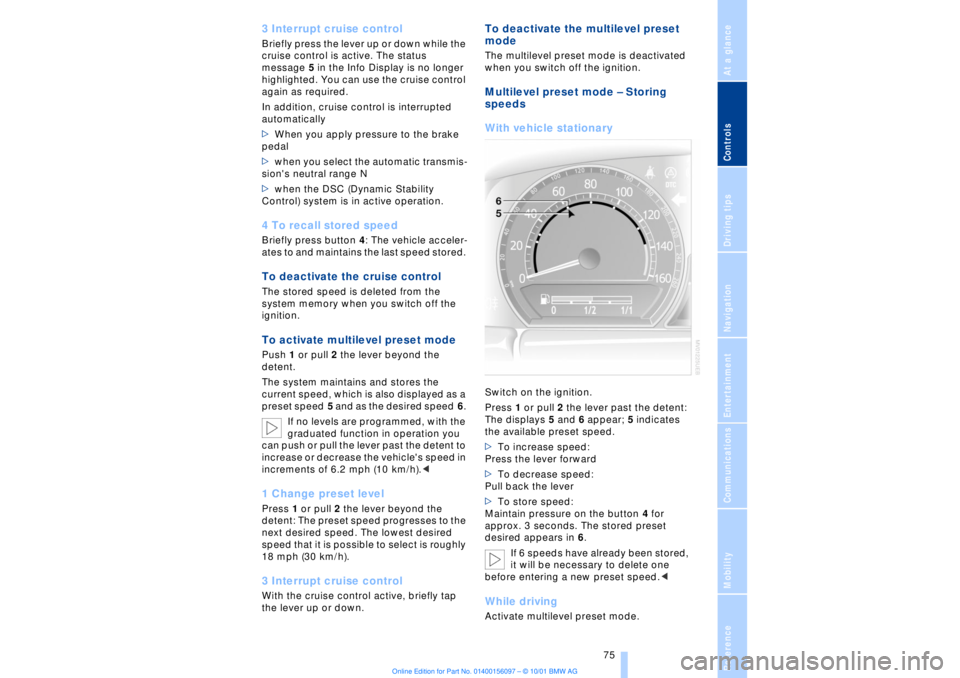
preset speed 5 and as the desired speed 6.
If no levels are programmed, with the
graduated function in operation you
can push or pull the lever past the detent to
increase or decrease the vehicle's speed in
increments of 6.2 mph (10 km/h).<1 Change preset level Press 1 or pull 2 the lever beyond the
detent: The preset speed progresses to the
next desired speed. The lowest desired
speed that it is possible to select is roughly
18 mph (30 km/h).3 Interrupt cruise control With the cruise control active, briefly tap
the lever up or down.
To deactivate the multilevel preset
modeThe multilevel preset mode is deactivated
when you switch off the ignition. Multilevel preset mode Ð Storing
speeds
With vehicle stationary Switch on the ignition.
Press 1 or pull 2 the lever past the detent:
The displays 5 and 6 appear; 5 indicates
the available preset speed.
>To increase speed:
Press the lever forward
>To decrease speed:
Pull back the lever
>To store speed:
Maintain pressure on the button 4 for
approx. 3 seconds. The stored preset
desired appears in 6.
If 6 speeds have already been stored,
it will be necessary to delete one
before entering a new preset speed.
Page 77 of 208
Driving
76 Maintain pressure on button 4 for approx.
3 seconds. The system adopts and
displays your current speed as a preset
speed.
If all of the graduations flash at once
this indicates that 6 speeds have
already been stored. You must then delete
at least one.<
To delete preset speeds Select the desired preset speed 5.
Maintain pressure on button 4 for approx.
3 seconds. The desired preset speed is
deleted.
Page 78 of 208
At a glanceControlsDriving tipsCommunicationsNavigationEntertainmentMobilityReference
77
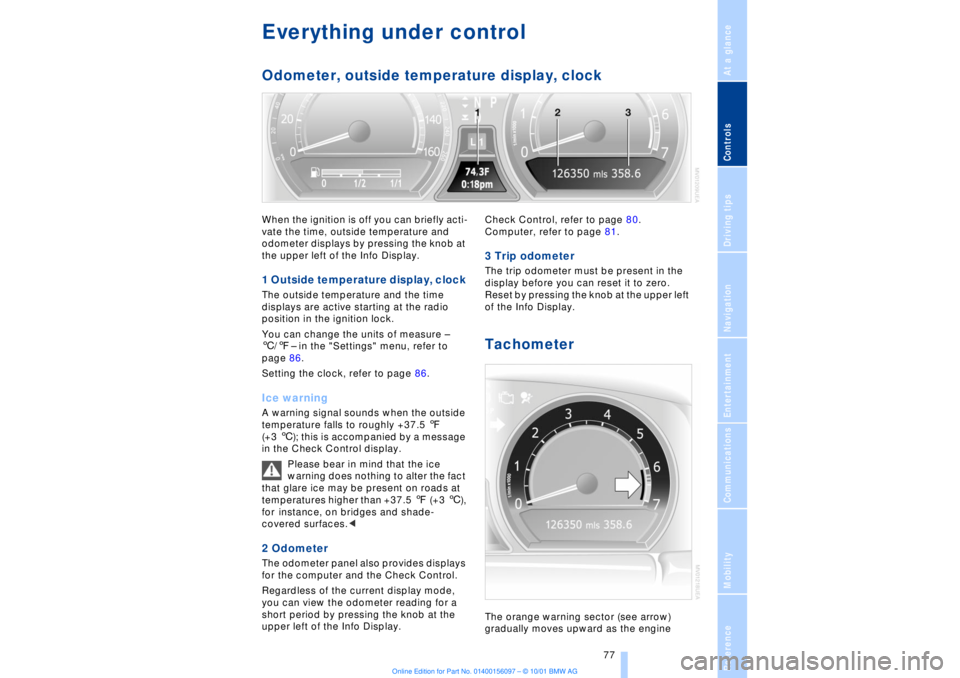
Everything under control Odometer, outside temperature display, clockWhen the ignition is off you can briefly acti-
vate the time, outside temperature and
odometer displays by pressing the knob at
the upper left of the Info Display. 1 Outside temperature display, clock The outside temperature and the time
displays are active starting at the radio
position in the ignition lock.
You can change the units of measure Ð
6/7Ð in the "Settings" menu, refer to
page 86.
Setting the clock, refer to page 86.Ice warning A warning signal sounds when the outside
temperature falls to roughly +37.5 7
(+3 6); this is accompanied by a message
in the Check Control display.
Please bear in mind that the ice
warning does nothing to alter the fact
that glare ice may be present on roads at
temperatures higher than +37.5 7 (+3 6),
for instance, on bridges and shade-
covered surfaces.< 2 Odometer The odometer panel also provides displays
for the computer and the Check Control.
Regardless of the current display mode,
you can view the odometer reading for a
short period by pressing the knob at the
upper left of the Info Display. Check Control, refer to page 80.
Computer, refer to page 81.
3 Trip odometer The trip odometer must be present in the
display before you can reset it to zero.
Reset by pressing the knob at the upper left
of the Info Display. Tachometer The orange warning sector (see arrow)
gradually moves upward as the engine