2002 BMW 525I SPORT WAGON wheel
[x] Cancel search: wheelPage 133 of 186

133n
OverviewControlsMaintenanceRepairsDataIndex
Information for your safetyThe factory-approved radial tires are
matched to the vehicle and have been
selected to provide optimum safety and
driving comfort.
It is not merely the tire's service life, but
also driving comfort and Ð above all else
Ð driving safety which depend on the
condition of the tires and the mainte-
nance of the specified tire pressure.
Incorrect inflation pressures are a
frequent cause of tire problems
and tire damage. Tire pressure also has
a major effect on your BMW's handling
response. We recommend that you
check the tire pressure Ð remember to
check the spare as well Ð before every
extended trip, as well as at least every
two weeks in normal use (refer to
page 26). Failure to observe these
precautions can result in incorrect tire
pressures, which cause instable
handling response as well as tire
damage, and can ultimately lead to an
accident.<
Tire tread Ð Tire damageInspect your tires frequently for tread
wear, signs of damage and for foreign
objects lodged in the tread. Check the
tread depth.
Tread depth should not be allowed to
go below 0.12 in (3 mm), even though
the legally specified minimum tread
depth is 0.063 in (1.6 mm). Tread wear
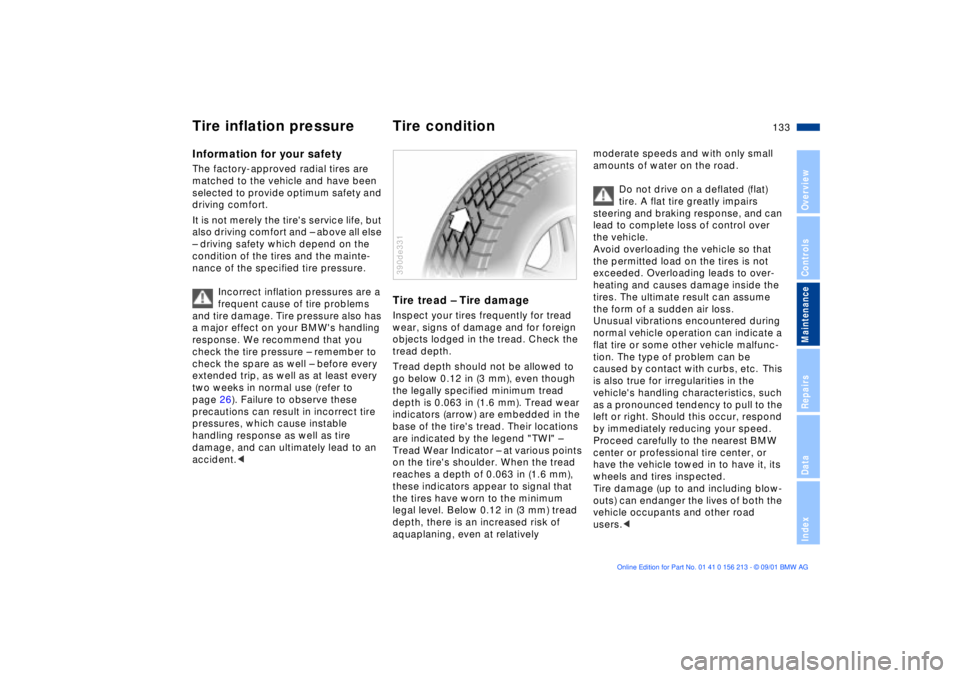
indicators (arrow) are embedded in the
base of the tire's tread. Their locations
are indicated by the legend "TWI" Ð
Tread Wear Indicator Ð at various points
on the tire's shoulder. When the tread
reaches a depth of 0.063 in (1.6 mm),
these indicators appear to signal that
the tires have worn to the minimum
legal level. Below 0.12 in (3 mm) tread
depth, there is an increased risk of
aquaplaning, even at relatively 390de331
moderate speeds and with only small
amounts of water on the road.
Do not drive on a deflated (flat)
tire. A flat tire greatly impairs
steering and braking response, and can
lead to complete loss of control over
the vehicle.
Avoid overloading the vehicle so that
the permitted load on the tires is not
exceeded. Overloading leads to over-
heating and causes damage inside the
tires. The ultimate result can assume
the form of a sudden air loss.
Unusual vibrations encountered during
normal vehicle operation can indicate a
flat tire or some other vehicle malfunc-
tion. The type of problem can be
caused by contact with curbs, etc. This
is also true for irregularities in the
vehicle's handling characteristics, such
as a pronounced tendency to pull to the
left or right. Should this occur, respond
by immediately reducing your speed.
Proceed carefully to the nearest BMW
center or professional tire center, or
have the vehicle towed in to have it, its
wheels and tires inspected.
Tire damage (up to and including blow-
outs) can endanger the lives of both the
vehicle occupants and other road
users.<
Tire inflation pressure Tire condition
Page 134 of 186

134n
Tire replacementTo maintain good handling and vehicle
response, use only tires of a single
tread configuration from a single manu-
facturer. BMW tests wheel and tire
combinations and approves them.DOT Quality GradesTreadwear
Traction AA A B C
Temperature A B C
All passenger vehicle tires must
conform to Federal Safety
Requirements in addition to these
grades.
when tested under controlled condi-
tions on a specified government test
course.
For example, a tire graded 150 would
wear one and one-half (1 1/2) times as
well on the government course as a tire
graded 100. The relative performance
of tires depends upon the actual condi-
tions of their use, however, and may
depart significantly from the norm due
to variations in driving habits, service
practices and differences in road char-
acteristics and climate.
TractionThe traction grades, from highest to
lowest, are AA, A, B and C.
Those grades represent the tire's ability
to stop on wet pavement as measured
under controlled conditions on speci-
fied government test surfaces of
asphalt and concrete. A tire marked C
may have poor traction performance.
The traction grade assigned to
this tire is based on straight-
ahead braking traction tests, and does
not include acceleration, cornering,
hydroplaning, or peak traction charac-
teristics.<
TemperatureThe temperature grades are A (the
highest), B and C, representing the
tire's resistance to the generation of
heat and its ability to dissipate heat
when tested under controlled condi-
tions on a specified indoor laboratory
test wheel.
Sustained high temperature can cause
the material of the tire to degenerate
and reduce tire life, and excessive
temperature can lead to sudden tire
failure. The grade C corresponds to a
level of performance which all
passenger vehicle tires must meet
under the Federal Motor Vehicle Safety
Standard No. 109. Grades B and A
represent higher levels of performance
on the laboratory test wheel than the
minimum required by law.
The temperature grade for this tire
is established for a tire that is
properly inflated and not overloaded.
Excessive speed, underinflation, or
excessive loading, either separately or
in combination, can cause heat buildup
and possible tire failure.<
Page 135 of 186

135n
OverviewControlsMaintenanceRepairsDataIndex
Tire replacement Wheel and tire combinationsUniform Tire Quality GradingQuality grades can be found where
applicable on the tire sidewall between
tread shoulder and maximum section
width. For example:
Treadwear 200 Traction AA
Temperature A
Do not use retreaded tires, since
driving safety may be impaired.
This is due to the possible variations in
casing structures and, in some cases,
to their extreme age, which can lead to
a decrease in their durability.< Tire ageThe date on which the tire was manu-
factured is indicated by the code on the
sidewall:
DOT ... 2601 indicates that the tire was
manufactured in Week 26 of the year
2001.
Although tires may have a theoretical
service life of up to 10 years, BMW
strongly recommends that you replace
all tires after an absolute maximum of
6 years.
The right choice
Never mount wheels and tires that
have not been specifically
approved by BMW for use on your
particular model. Although other wheels
and tires may theoretically have the
same dimensions, variations in factors
such as manufacturing tolerances can
result in contact between tire and body-
work, ultimately leading to serious acci-
dents. If non-approved wheels and tires
are used, BMW cannot evaluate their
suitability, and therefore cannot be held
liable for driving safety.<
BMW has tested certain tires for each
tire size, rated them according to road
safety and approved them. Your BMW
center can inform you which tires have
been tested in this way. Observe
possible national guidelines, e.g.
regarding entry into vehicle documents.
The correct wheel and tire combi-
nation affects different systems
such as ABS, ATC, ASC+T/DSC. The
function of these systems is impaired if
improper wheel and tire combinations
are used.
Always ensure that all of the tires
mounted on the vehicle are the same
series, from the same manufacturer and
with the same tread pattern. If you have
to mount the spare tire in response to a
flat, etc., you should remount a tire of
the correct specifications as soon as
possible.<
The use of rims and wheel bolts
that do not meet the specifica-
tions of the original factory-installed
equipment will affect the safe operation
of your vehicle and may cause an acci-
dent and personal injury.
Never mix tires of different design, such
as steel-belted radials with radial bias-
belted or bias-ply tires, etc. Mixing tire
types will adversely affect roadholding
and can lead to loss of vehicle
control.< Storage Store tires in a cool, dry place,
protecting them against light whenever
possible. Protect the tires against
contact with oil, grease and fuel.
Page 136 of 186

136n
Special characteristics of winter tires Snow chains
*
Choosing the right tireBMW recommends winter tires (M+S
radial tires) for operation under
inclement winter driving conditions.
While all-season tires (M+S designa-
tion) provide better winter traction than
summer tires with the load ratings H, V,
W, Y and ZR, they generally do not
achieve the performance of winter tires.
In the interests of safe tracking and
steering response, install radial tires
made by the same manufacturer and
with the same tread configuration on all
four wheels if you elect to mount winter
tires.Do not exceed specified
maximum speeds
Never exceed the maximum
speed for which the winter tires
are rated.
Unprofessional attempts by laymen to
service tires can lead to damage and
accidents.
Have this work performed by skilled
professionals only. Any BMW center
has the required technical knowledge
and the proper equipment and will be
happy to assist you.<
Tire condition, tire pressureWinter tires display a perceptible loss in
their ability to cope with winter driving
conditions once the tread wears to
below 0.16 in (4 mm), and should thus
be replaced.
Comply with the specified tire inflation
pressures Ñ and be sure to have the
wheel and tire assemblies balanced
every time you change the tires.BMW close-mesh tire chains
are
approved exclusively for use in combi-
nation with winter tires on the rear
wheel only. Comply with all manufac-
turer's safety precautions when
mounting the chains. Do not exceed a
speed of 30 mph (50 km/h) while
driving with mounted snow chains.
It is not possible to mount snow
chains on tires with 17-inch
wheels.<
Page 156 of 186

156n
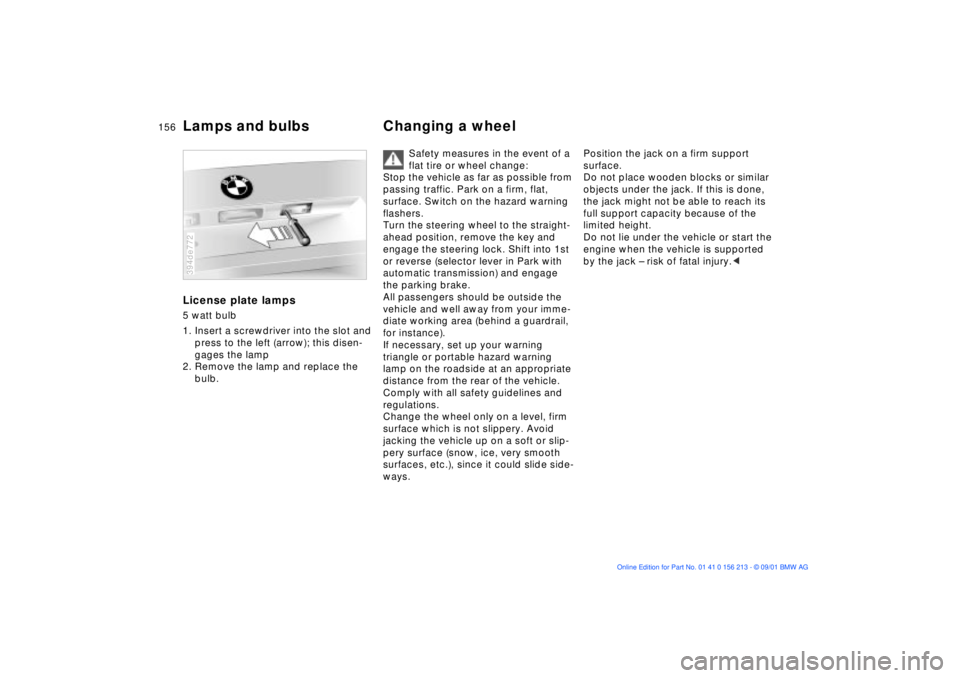
Lamps and bulbs Changing a wheelLicense plate lamps5 watt bulb
1. Insert a screwdriver into the slot and
press to the left (arrow); this disen-
gages the lamp
2. Remove the lamp and replace the
bulb.394de772
Safety measures in the event of a
flat tire or wheel change:
Stop the vehicle as far as possible from
passing traffic. Park on a firm, flat,
surface. Switch on the hazard warning
flashers.
Turn the steering wheel to the straight-
ahead position, remove the key and
engage the steering lock. Shift into 1st
or reverse (selector lever in Park with
automatic transmission) and engage
the parking brake.
All passengers should be outside the
vehicle and well away from your imme-
diate working area (behind a guardrail,
for instance).
If necessary, set up your warning
triangle or portable hazard warning
lamp on the roadside at an appropriate
distance from the rear of the vehicle.
Comply with all safety guidelines and
regulations.
Change the wheel only on a level, firm
surface which is not slippery. Avoid
jacking the vehicle up on a soft or slip-
pery surface (snow, ice, very smooth
surfaces, etc.), since it could slide side-
ways.
Position the jack on a firm support
surface.
Do not place wooden blocks or similar
objects under the jack. If this is done,
the jack might not be able to reach its
full support capacity because of the
limited height.
Do not lie under the vehicle or start the
engine when the vehicle is supported
by the jack Ð risk of fatal injury.<
Page 157 of 186

157n
OverviewControlsMaintenanceRepairsDataIndex
Changing a wheelWhat you will needIn order to avoid rattling noises later,
note the position of the tools when you
remove them and return them to their
original positions when you are through
using them.
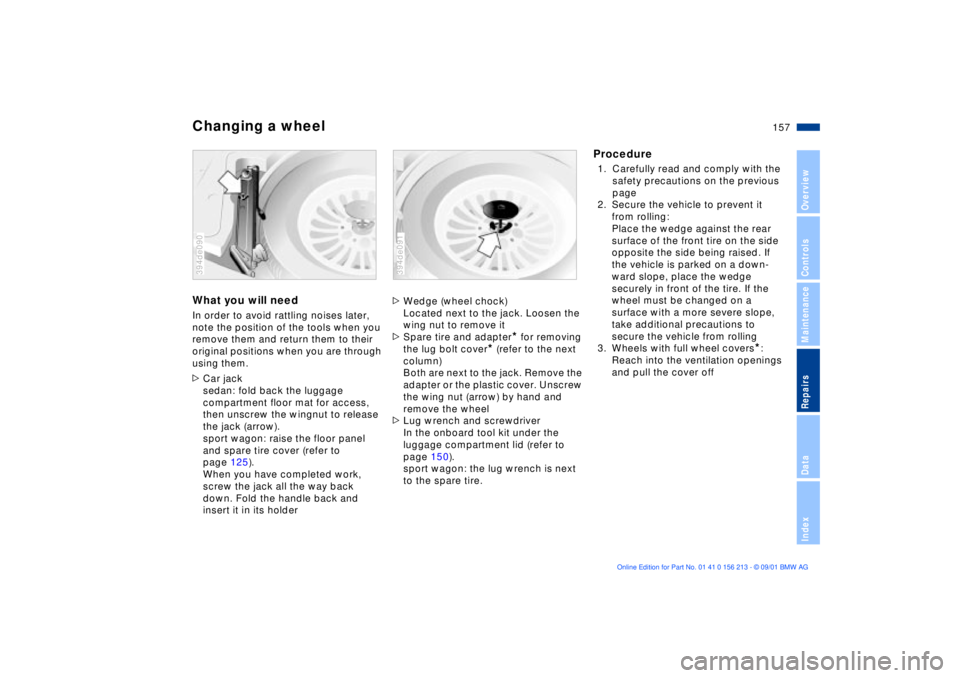
>Car jack
sedan: fold back the luggage
compartment floor mat for access,
then unscrew the wingnut to release
the jack (arrow).
sport wagon: raise the floor panel
and spare tire cover (refer to
page 125).
When you have completed work,
screw the jack all the way back
down. Fold the handle back and
insert it in its holder394de090
>Wedge (wheel chock)
Located next to the jack. Loosen the
wing nut to remove it
>Spare tire and adapter
* for removing
the lug bolt cover
* (refer to the next
column)
Both are next to the jack. Remove the
adapter or the plastic cover. Unscrew
the wing nut (arrow) by hand and
remove the wheel
>Lug wrench and screwdriver
In the onboard tool kit under the
luggage compartment lid (refer to
page 150).
sport wagon: the lug wrench is next
to the spare tire.
394de091
Procedure1. Carefully read and comply with the
safety precautions on the previous
page
2. Secure the vehicle to prevent it
from rolling:
Place the wedge against the rear
surface of the front tire on the side
opposite the side being raised. If
the vehicle is parked on a down-
ward slope, place the wedge
securely in front of the tire. If the
wheel must be changed on a
surface with a more severe slope,
take additional precautions to
secure the vehicle from rolling
3. Wheels with full wheel covers
*:
Reach into the ventilation openings
and pull the cover off
Page 158 of 186

158n
Changing a wheel4. Wheels with adapter
*: position the
lug bolt adapter on the lug bolt
cover. Then apply the lug wrench
and turn it to the left (refer to the
illustration)
5. Wheels with hub cover*: pry the
hub cover off with the screwdriver
in the slot
6. Loosen the lug bolts 1/2-turn
390de773
7. Position the jack at the jacking
point closest to the flat tire so that
the jack base is vertically below the
jacking point and the entire surface
of the head of the jack will move
into the square recess of the
jacking point (refer to the illustration
detail) when the jack is cranked
8. Jack the vehicle up until the wheel
you are changing is raised from the
ground
9. Unscrew the lug bolts and remove
the wheel
10. Remove accumulations of mud or
dirt from the mounting surfaces of
the wheel and hub. Clean the lug
bolts390de707
11. Position the spare wheel. Secure
the wheel by turning at least two lug
bolts into opposite bolt holes
12. Screw in the remaining lug bolts.
Tighten all the bolts securely in a
diagonal pattern
13. Lower the jack and remove it from
beneath the vehicle
14. Tighten the lug bolts in a diagonal
pattern
15. Wheels with full wheel covers:
Place the wheel cover with the
valve opening over the valve
(arrow). Use both hands to press
the cover securely onto the rim
For this light-weight wheel, use
only the full wheel cover installed
by the factory. Other wheel covers may
not fit securely.< 390de360
Page 159 of 186

159n
OverviewControlsMaintenanceRepairsDataIndex
Changing a wheel16. Wheels with hub covers:
Position the hub cover and press it
on tightly
17. If equipped with lug bolt covers:
Align the arrow on the cover with
the line in the wheel and press the
cover into place
18. Check and correct the tire inflation
pressure at the earliest opportunity.
For vehicles with Tire Pressure
Monitor (RDC)
*:
After mounting the spare tire or
correcting the inflation pressure,
reactivate the system. Refer to
page 99.
The vehicle jack is designed for
changing tires only. Do not
attempt to raise another vehicle model
with it or to raise any load of any kind.
To do so could cause accidents and
personal injury.
To ensure continued safety, have the
lug bolts checked with a calibrated
torque wrench [torque specification
72 lb-ft (100 Nm)] at the earliest
opportunity.<
When storing the wheel, take care to
ensure that you do not damage the
retaining pin in the spare tire recess.
If light-alloy wheels other than original
BMW light-alloy wheels have been
mounted, it may be necessary to use
different lug bolts for those wheels.
Replace the defective tire as soon as
possible and have the new wheel/tire
balanced.
Protect valve inserts against dirt using
screw-on valve stem caps. Dirty valve
stems frequently lead to slow pressure
loss.
Size 255/40 R17 94 W
* tires on
the rear axle:
In the event of a puncture or other tire
failure, it may be necessary to mount
the spare tire of different size at the
rear. This tire is suitable for use in all
load and speed ranges. Nevertheless,
you should remount a tire of the correct
size as soon as possible.<