Page 14 of 147
14n
1 Parking lamps/Low beams77
2
>
Turn signals59
>
Standing lamps78
>
High beams78
>
Headlamp flasher59
>
Computer663 Washer/Wiper system/
Rain sensor60
4 Hazard warning flashers
5 Central locking system286 Rear window defroster81, 85
7 Horn: the entire surface
8 Adjusting the steering wheel46
9 Fog lamps78
Cockpit
Page 15 of 147
15n
OverviewControlsMaintenanceRepairsDataIndex
1 Fuel gauge65
2 Indicator lamp for turn signals203 Speedometer
4 Indicator and warning
lamps17 to 205 Tachometer and Energy control64
6 Engine coolant temperature
gauge65
Instrument cluster
Page 17 of 147

17n
OverviewControlsMaintenanceRepairsDataIndex
Indicator and warning lamps
Technology that monitors itself
Indicator and warning lamps that are
identified by
l
are tested for proper
functioning whenever the ignition key is
turned. They each light up once for
different periods of time.
If a fault should occur in one of these
systems, the corresponding lamp does
not go out after the engine is started, or
it lights up while the vehicle is moving.
You will see how to react to this below.
Red: stop immediately
Battery charge current
l
The battery is no longer being
charged. Indicates a defective
alternator drive belt or a problem with
the alternator's charge circuit. Please
contact the nearest BMW center.
If the drive belt is defective, stop
and switch off the engine immedi-
ately to prevent overheating and
serious engine damage. If the drive belt
is defective, increased steering effort is
also required.
<
Engine oil pressure
l
Stop the vehicle immediately
and switch off engine. Check
the engine oil level and top off as
required. If the oil level is correct,
please contact the nearest BMW
center.
Do not continue driving, as the
engine could sustain serious
damage from inadequate lubrication.
<
Brake warning lamp
l
If the lamp comes on when the
parking brake is not engaged:
check the brake fluid level. Before
driving further, be sure to comply with
the instructions on pages 100 and 112
Brake warning lamp for Cana-
dian models.
Tire Pressure Monitor (RDC)/
Flat Tire Monitor
l
In addition, an acoustic signal is
sounded: a tire failure has occurred.
Reduce vehicle speed immediately to
stop the vehicle. Avoid hard brake
applications. As you steer the vehicle,
use caution and avoid overcorrecting.
For additional information: refer to
pages 73, 75
Page 20 of 147

20n
Indicator and warning lamps
Add washer fluid
The washer fluid is too low. Top
off the fluid at the earliest
opportunity. For additional information:
refer to page 108
SERVICE ENGINE SOON
l
If the indicator lamp comes on
either continuously or intermit-
tently, this indicates a fault in the emis-
sions-related electronic systems.
Although the vehicle remains opera-
tional, you should have the systems
checked by your BMW center at the
earliest possible opportunity.
For additional information: refer to
page 115
SERVICE ENGINE SOON
warning lamp for Canadian
models.
Engine electronics
l
There is a fault in the electronic
engine-management system.
You can continue to drive with reduced
engine output or engine speed. Please
have the system inspected at your
BMW center.
Add coolant
The coolant level is too low.
Add coolant at the earliest
opportunity. For additional information:
refer to page 111
Green: for your information
Turn signal indicator
Flashes when the turn signal is
operated.
Rapid flashing indicates a system
malfunction.
For additional information: refer to
page 59
Cruise control
Lights up when the cruise
control is activated. Available for
operation via the multifunction steering
wheel.
For additional information: refer to
page 62
Front fog lamps
Lights up whenever you switch
on the front fog lamps.
For additional information: refer to
page 78
Blue: for your information
High beams
Comes on when the high beams
are on or the headlamp flasher
is actuated.
For additional information: refer to
pages 59, 78
Page 31 of 147

31n
OverviewControlsMaintenanceRepairsDataIndex
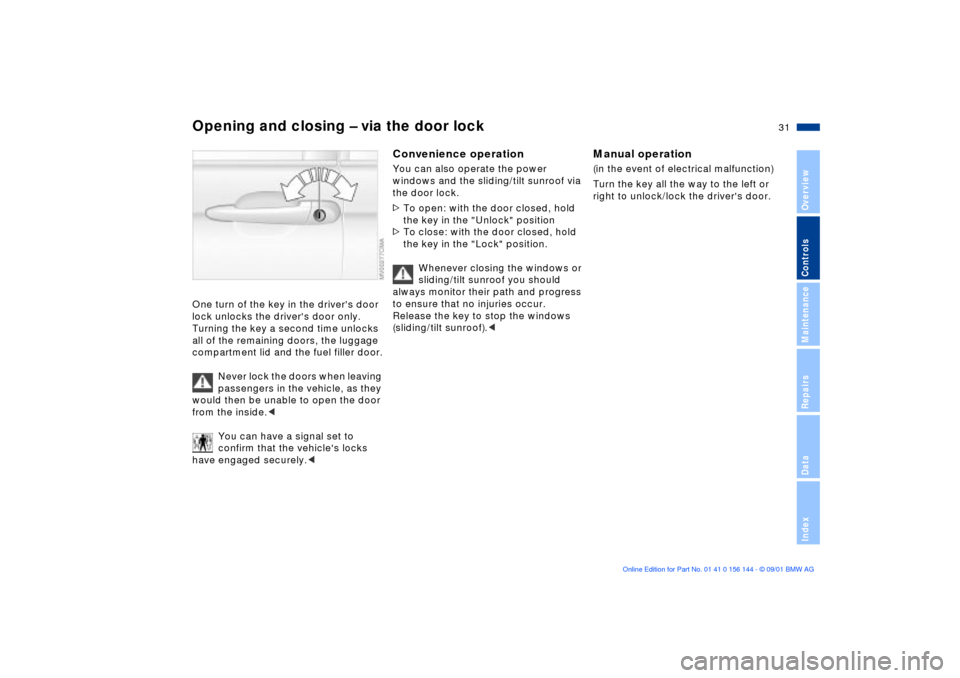
Opening and closing Ð via the door lockOne turn of the key in the driver's door
lock unlocks the driver's door only.
Turning the key a second time unlocks
all of the remaining doors, the luggage
compartment lid and the fuel filler door.
Never lock the doors when leaving
passengers in the vehicle, as they
would then be unable to open the door
from the inside.<
You can have a signal set to
confirm that the vehicle's locks
have engaged securely.<
Convenience operationYou can also operate the power
windows and the sliding/tilt sunroof via
the door lock.
>To open: with the door closed, hold
the key in the "Unlock" position
>To close: with the door closed, hold
the key in the "Lock" position.
Whenever closing the windows or
sliding/tilt sunroof you should
always monitor their path and progress
to ensure that no injuries occur.
Release the key to stop the windows
(sliding/tilt sunroof).<
Manual operation (in the event of electrical malfunction)
Turn the key all the way to the left or
right to unlock/lock the driver's door.
Page 56 of 147

56n
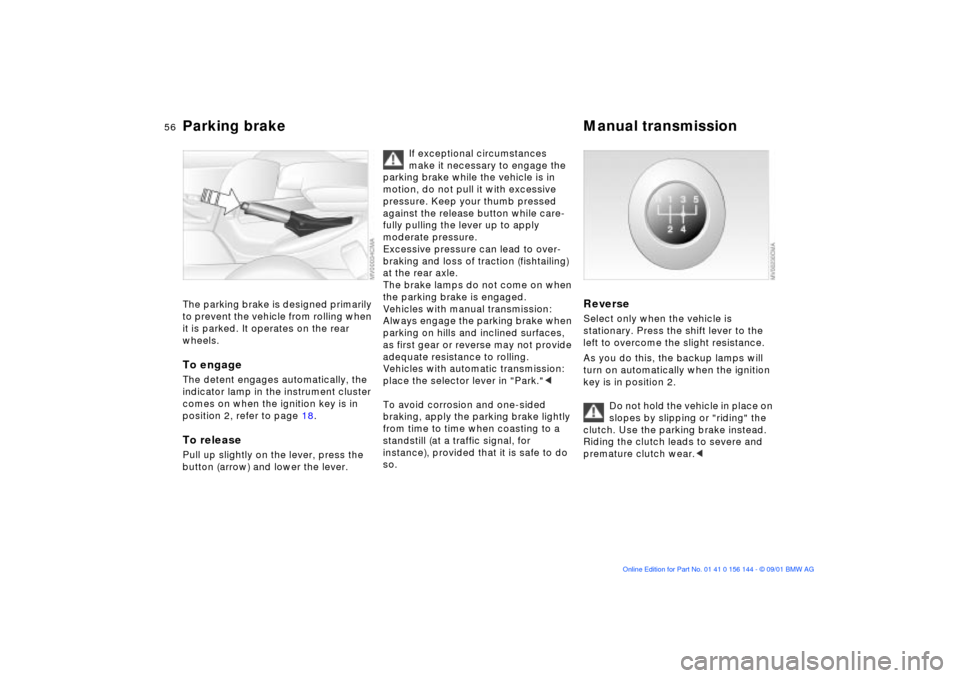
Parking brake Manual transmission The parking brake is designed primarily
to prevent the vehicle from rolling when
it is parked. It operates on the rear
wheels.To engageThe detent engages automatically, the
indicator lamp in the instrument cluster
comes on when the ignition key is in
position 2, refer to page 18.To releasePull up slightly on the lever, press the
button (arrow) and lower the lever.
If exceptional circumstances
make it necessary to engage the
parking brake while the vehicle is in
motion, do not pull it with excessive
pressure. Keep your thumb pressed
against the release button while care-
fully pulling the lever up to apply
moderate pressure.
Excessive pressure can lead to over-
braking and loss of traction (fishtailing)
at the rear axle.
The brake lamps do not come on when
the parking brake is engaged.
Vehicles with manual transmission:
Always engage the parking brake when
parking on hills and inclined surfaces,
as first gear or reverse may not provide
adequate resistance to rolling.
Vehicles with automatic transmission:
place the selector lever in "Park."<
To avoid corrosion and one-sided
braking, apply the parking brake lightly
from time to time when coasting to a
standstill (at a traffic signal, for
instance), provided that it is safe to do
so.
Reverse Select only when the vehicle is
stationary. Press the shift lever to the
left to overcome the slight resistance.
As you do this, the backup lamps will
turn on automatically when the ignition
key is in position 2.
Do not hold the vehicle in place on
slopes by slipping or "riding" the
clutch. Use the parking brake instead.
Riding the clutch leads to severe and
premature clutch wear.<
Page 59 of 147

59n
OverviewControlsMaintenanceRepairsDataIndex
Automatic transmission with Steptronic
*
Indicator/Headlamp ßasher
Available displays
P R N D SD M1 M2 M3 M4 M5
Electronic transmission control
module
If the indicator lamp comes on,
there is a malfunction in the
transmission system.
Bring the vehicle to a stop. Move the
transmission selector lever to "P."
Engage the parking brake and turn the
engine off (ignition key to position 0).
Wait a few seconds, then start the
engine.
If the indicator lamp goes out after a
few seconds, normal transmission
performance has been restored. You
may continue to drive as usual.
If the indicator lamp does not go out,
you can place the selector lever in all
positions. However, the vehicle will now
only operate in 3rd and 4th gear.
If this happens, avoid extreme engine
loads and consult the nearest BMW
center.
Never work in the engine
compartment when a drive gear
(forward or reverse) is engaged. If you
do this, the vehicle could move.<
For towing or jump-starting, refer to the
information beginning on page 128.
1 High beams (blue indicator lamp)
2 Headlamp flasher (blue indicator
lamp)
3 Turn signal indicator (green indicator
accompanied by periodic clicking
sound from the relay)To signal brieflyPress the lever up to but not beyond
the detent. It then returns to the center
position when released.
If the flashing of the turn signal
indicators and the clicking from
the relay are both faster than normal,
one of the turn signal indicators has
failed.<
Page 66 of 147

66n
Check Control Computer The following information and/or condi-
tions are indicated using symbols,
starting with the ignition key in
position 2, until the condition has been
corrected.
1 Check the low beams and high
beams, as well as the parking lamps
2 Door open
3 Luggage compartment lid open
4 Check tail or brake lamps
When you open the driver's door after
parking, a signal sounds to remind you
if the headlamps have not been
switched off.
Mode selectionWith ignition key in position 1 or 2, you
can request information from the
computer using the button in the turn
signal lever. By pressing the button
briefly toward the steering column, you
can call up a new function for display.
The displays appear in the following
order:
Time, outside temperature, average fuel
consumption, cruising range, average
vehicle speed.
Starting with ignition key position 1,
the last active setting is displayed.
ClockIf you wish to have a permanent time
display, you can make this adjustment
in the radio display (refer to the Radio
Owner's Manual).
You can adjust the clock and the time
display in the car radio as follows.