2002 BMW 325Ci CONVERTIBLE wheel
[x] Cancel search: wheelPage 116 of 159

116n
Wheel and tire combinationsThe right choice
Never mount wheels and tires that
have not been specifically
approved by BMW for use on your
particular model. Although other wheels
and tires may theoretically have the
same dimensions, variations in factors
such as manufacturing tolerances can
result in contact between tire and body-
work, ultimately leading to serious acci-
dents. BMW can not evaluate all tires
and wheels on the market, and is thus
unable to guarantee that the vehicle will
continue to perform safely if unap-
proved tires and/or wheels are
mounted.<
The correct wheel and tire combi-
nation affects various systems
that would otherwise be impaired, for
example ABS, ATC, ASC+T/DSC and
ADB/DBC.
For this reason, use only tires of the
same manufacture and tread configura-
tion. In the event of a flat tire, for
example, remount the approved wheel
and tire combination as soon as
possible.<
Page 117 of 159

117n
OverviewControlsMaintenanceRepairsDataIndex
Winter tiresChoosing the right tireBMW recommends winter tires (M+S
radial tires) for operation under
inclement winter driving conditions.
While all-season tires (M+S designa-
tion) provide better winter traction than
summer tires with the load ratings H, V,
W, Y and ZR, they generally do not
achieve the performance of winter tires.
In the interest of safe tracking and
steering response, install winter tires
made by the same manufacturer and
with the same tread configuration on all
four wheels.Never exceed the maximum
speed for which the winter tires
are rated.
Unprofessional attempts by laymen to
service tires can lead to damage and
accidents.
Have this work performed by trained
professionals only. Any BMW center
has the required technical knowledge
and the proper equipment and will be
happy to assist you.<
Tire condition, tire pressureOnce the tire wears to below 0.16 in
(4 mm), winter tires display a percep-
tible decrease in their ability to cope
with winter driving conditions, and
should be replaced in the interest of
safety.
Comply with the specified tire inflation
pressures Ñ and be sure to have the
wheel and tire assemblies balanced
every time you change the tires.
StorageStore tires in a cool, dry place,
protecting them against light whenever
possible. Protect the tires against
contact with oil, grease and fuel.Snow chains
*
BMW narrow-link snow chains are
intended for mounting on summer or
winter tires in pairs at the rear wheels
only. Comply with all manufacturer's
safety precautions when mounting the
chains.
You cannot mount snow chains with the
following tires:
225/50 R 16 92
225/45 R 17 91
245/40 ZR 17
Page 135 of 159

135n
OverviewControlsMaintenanceRepairsDataIndex
Changing a wheel
Safety precautions for replacing
flat tires and all wheel changes:
Stop the vehicle as far as possible from
passing traffic. Park on a firm, flat,
surface. Switch on the hazard warning
flashers. Turn the steering wheel to the
straight-ahead position and engage the
steering lock. Shift into 1st or reverse
(selector lever in Park with automatic
transmission) and engage the parking
brake.
All passengers should be outside the
vehicle and well away from your imme-
diate working area (behind a guardrail,
for example).
If a warning triangle or portable hazard
warning lamp is available, set it up on
the roadside at an appropriate distance
from the rear of the vehicle. Comply
with all safety guidelines and regula-
tions.
Change the wheel only on a level, firm
surface which is not slippery. Avoid
jacking the vehicle on a soft or slippery
support surface (snow, ice, loose
gravel, etc.), as either the vehicle or the
jack could slip sideways.
Position the jack on a firm support
surface.
Do not place wooden blocks or similar
objects under the jack. They could
prevent the jack from extending to its
full height and reduce its support
capacity.
Do not lie under the vehicle or start the
engine when the vehicle is supported
by the jack Ð risk of fatal injury.<
Your BMW is equipped with a space-
saver spare tire designed for temporary
use in maintaining the vehicle's mobility
in an emergency.
To remove the space-saver spare
tire, lift the floor panel in the
luggage compartment completely out,
refer to page 35.<
What you will needIn order to avoid rattling noises later,
note the position of the tools when you
remove them and return them to their
original position when you are through
using them.
>Jack 1
Raise the floor panel in the luggage
compartment, refer to page 35 and
undo the jack (arrow).
When you have completed work, fold
the handle back and insert it in its
holder
>Chock 2
Located behind the jack on the wall
in the luggage compartment. Loosen
the wingnut to remove it
Page 136 of 159

136n
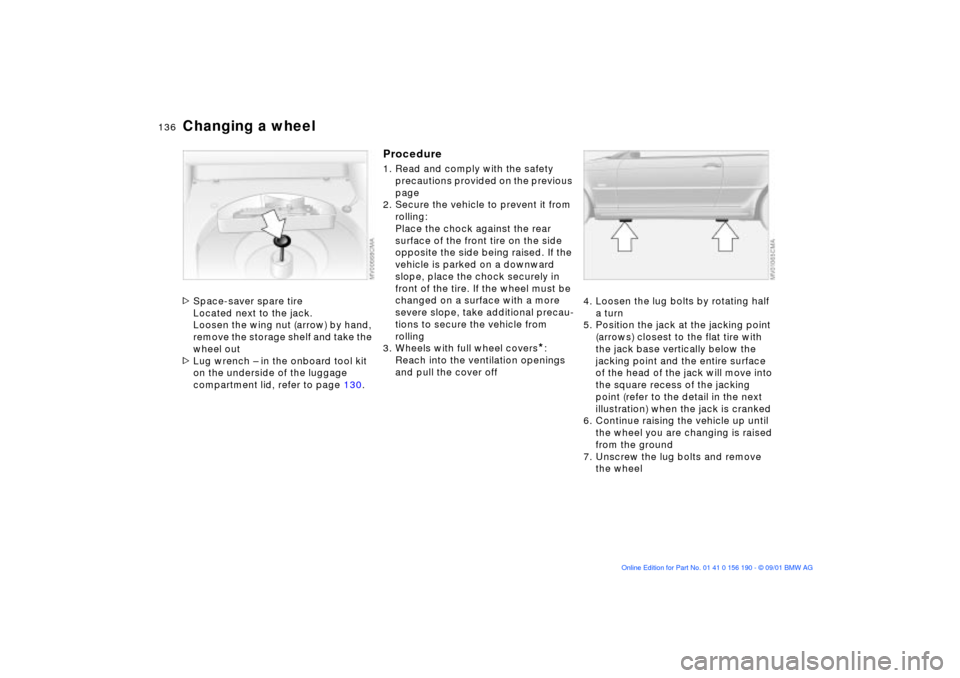
Changing a wheel>Space-saver spare tire
Located next to the jack.
Loosen the wing nut (arrow) by hand,
remove the storage shelf and take the
wheel out
>Lug wrench Ð in the onboard tool kit
on the underside of the luggage
compartment lid, refer to page 130.
Procedure1. Read and comply with the safety
precautions provided on the previous
page
2. Secure the vehicle to prevent it from
rolling:
Place the chock against the rear
surface of the front tire on the side
opposite the side being raised. If the
vehicle is parked on a downward
slope, place the chock securely in
front of the tire. If the wheel must be
changed on a surface with a more
severe slope, take additional precau-
tions to secure the vehicle from
rolling
3. Wheels with full wheel covers
*:
Reach into the ventilation openings
and pull the cover off4. Loosen the lug bolts by rotating half
a turn
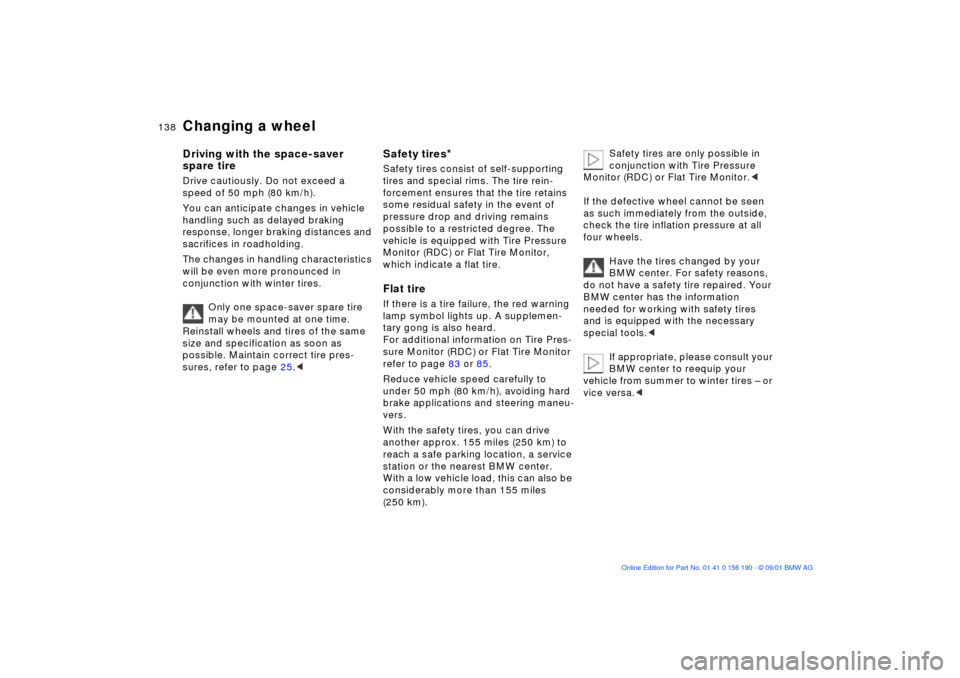
5. Position the jack at the jacking point
(arrows) closest to the flat tire with
the jack base vertically below the
jacking point and the entire surface
of the head of the jack will move into
the square recess of the jacking
point (refer to the detail in the next
illustration) when the jack is cranked
6. Continue raising the vehicle up until
the wheel you are changing is raised
from the ground
7. Unscrew the lug bolts and remove
the wheel
Page 137 of 159

137n
OverviewControlsMaintenanceRepairsDataIndex
Changing a wheel8. Remove accumulations of mud and
dirt from the mounting surfaces of
the wheel and hub. Clean the lug
bolts
9. Position the new wheel or the
space saver spare tire on the hub
and screw at least two lug bolts
finger-tight into opposite bolt holes
10. Screw in the remaining lug bolts
and screw in all the bolts in a diag-
onal pattern
11. Lower the jack and remove it from
beneath the vehicle
12. Tighten the lug bolts securely in a
diagonal pattern
13. Wheels with full wheel covers
*:
Place the wheel cover with the
valve opening (arrow) over the
valve. Use both hands to press the
cover securely onto the rim
14. Check and correct the tire inflation
pressure at the earliest opportunity.
Vehicles with Tire Pressure Monitor
(RDC)/Flat Tire Monitor:
After mounting the spare tire or
correcting the tire inflation pres-
sure, reactivate the system, refer to
page 83 or 85.
Protect valve stems and valves from dirt
using screw-on valve stem caps. Dirty
valve stems frequently lead to slow
pressure loss.
Only use original BMW full wheel
covers, otherwise, the trim piece
may not fit securely. The full wheel
cover may not be installed on the
space-saver spare tire, since this could
damage the cover.<
The vehicle jack is designed for
changing wheels only. Do not
attempt to raise another vehicle model
with it or to raise any load of any kind.
To do so could cause accidents and
personal injury.
To ensure continued safety, have the
tightness of the lug bolts checked with
a calibrated lug wrench [torque specifi-
cation: 72 lb ft (72 100 Nm] at the
earliest opportunity.<
When storing a wheel in the spare tire
recess take care to avoid bending the
threaded rod.
If light-alloy wheels other than original
BMW light-alloy wheels have been
mounted, it may be necessary to use
different lug bolts for those wheels.
Replace the defective tire as soon as
possible and have the new wheel/tire
balanced.
Page 138 of 159

138n
Changing a wheelDriving with the space-saver
spare tireDrive cautiously. Do not exceed a
speed of 50 mph (80 km/h).
You can anticipate changes in vehicle
handling such as delayed braking
response, longer braking distances and
sacrifices in roadholding.
The changes in handling characteristics
will be even more pronounced in
conjunction with winter tires.
Only one space-saver spare tire
may be mounted at one time.
Reinstall wheels and tires of the same
size and specification as soon as
possible. Maintain correct tire pres-
sures, refer to page 25.<
Safety tires
*
Safety tires consist of self-supporting
tires and special rims. The tire rein-
forcement ensures that the tire retains
some residual safety in the event of
pressure drop and driving remains
possible to a restricted degree. The
vehicle is equipped with Tire Pressure
Monitor (RDC) or Flat Tire Monitor,
which indicate a flat tire.Flat tireIf there is a tire failure, the red warning
lamp symbol lights up. A supplemen-
tary gong is also heard.
For additional information on Tire Pres-
sure Monitor (RDC) or Flat Tire Monitor
refer to page 83 or 85.
Reduce vehicle speed carefully to
under 50 mph (80 km/h), avoiding hard
brake applications and steering maneu-
vers.
With the safety tires, you can drive
another approx. 155 miles (250 km) to
reach a safe parking location, a service
station or the nearest BMW center.
With a low vehicle load, this can also be
considerably more than 155 miles
(250 km).Safety tires are only possible in
conjunction with Tire Pressure
Monitor (RDC) or Flat Tire Monitor.<
If the defective wheel cannot be seen
as such immediately from the outside,
check the tire inflation pressure at all
four wheels.
Have the tires changed by your
BMW center. For safety reasons,
do not have a safety tire repaired. Your
BMW center has the information
needed for working with safety tires
and is equipped with the necessary
special tools.<
If appropriate, please consult your
BMW center to reequip your
vehicle from summer to winter tires Ð or
vice versa.<
Page 141 of 159

141n
OverviewControlsMaintenanceRepairsDataIndex
Towing the vehicleTow fittingThe screw-in tow fitting is stored in the
onboard tool kit; be sure that it remains
in the vehicle at all times. This fitting is
designed for installation in the tow
sockets located at the front and rear of
the vehicle, and is intended for towing
on paved road surfaces only. This fitting
should not be used to pull a vehicle out
of deep snow, mud, sand, etc.
Always comply with all applicable
towing laws and regulations.Access to tow socketsFront:
Press out the cover panel with a screw-
driver inserted in the recess at the top.
Rear:
Press out the cover panel with a screw-
driver inserted in the recess at the top.
Screw the tow fitting all the way
in. Failure to screw the fitting all
the way in can cause thread damage.
Never attach tie-down hooks, chains,
straps, or tow hooks to tie rods, control
arms, or any other part of the vehicle
suspension, as severe damage to these
components will occur, leading to
possible accidents.<
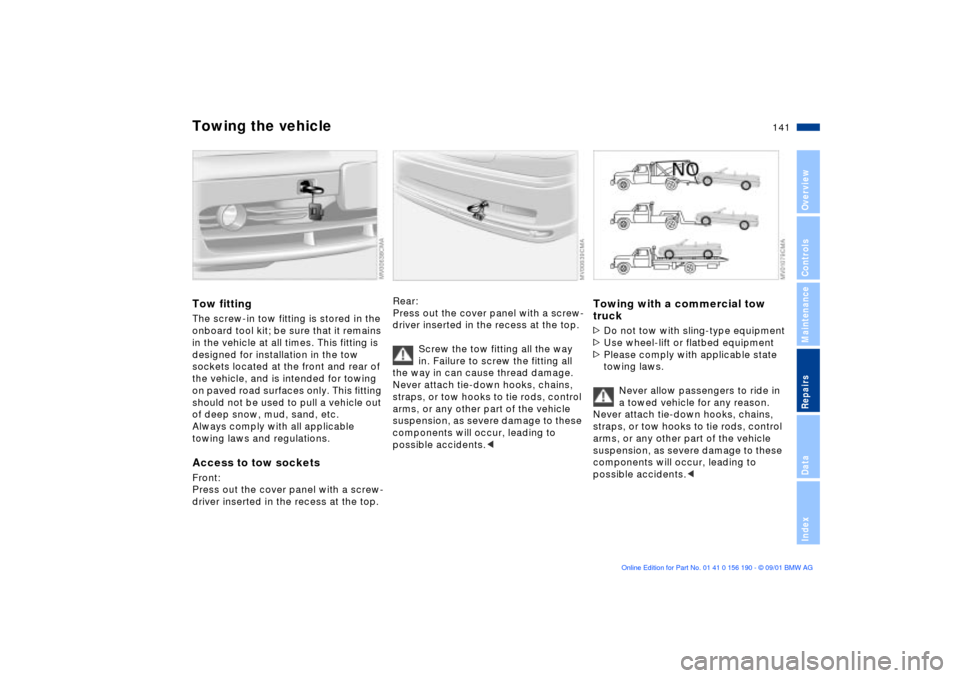
Towing with a commercial tow
truck>Do not tow with sling-type equipment
>Use wheel-lift or flatbed equipment
>Please comply with applicable state
towing laws.
Never allow passengers to ride in
a towed vehicle for any reason.
Never attach tie-down hooks, chains,
straps, or tow hooks to tie rods, control
arms, or any other part of the vehicle
suspension, as severe damage to these
components will occur, leading to
possible accidents.c
Page 150 of 159

Everything from A to ZA
ABS (Antilock Brake
System)19, 109
Access to the rear51
Accessories10
Activated-charcoal filter96
Adaptive Transmission
Control (ATC)68
ADB (Automatic Differential
Brake)81
Adding
brake fluid124
coolant123
engine oil121
washer fluids120
Adjusting
electric power seats49
head restraints50
lumbar support50
mirrors55
steering wheel54
Air conditioning90
temperature setting91
Air distribution91, 94
Air nozzles90
Air outlets
ventilation90, 93 Air supply91, 94
Airbags18, 56
sitting correctly48
Alarm system28, 36
Antifreeze and anti-
corrosion agents123
disposal123
Antilock Brake System
(ABS)19, 109
Anti-theft system28, 29, 32
Aquaplaning109
Armrest99
ASC+T (Automatic Stability
Control plus Traction)80
Ashtray
front100
rear101
ATC (Adaptive Transmission
Control)68
Attach vehicle vacuum
cleaner101
AUC (Automatic recircu-
lated-air control)95
Automatic climate
control93, 94
Automatic cruise control72 Automatic Differential Brake
(ADB)81
Automatic dimming feature,
mirrors56
Automatic headlight
control87
Automatic recirculated-air
control (AUC)95
Automatic Stability Control
plus Traction (ASC+T)80
Automatic transmission67
Automatic transmission with
Steptronic18, 67
Average fuel
consumption78
Average speed78
Axle loads146
B
Backup lamps66
bulb replacement133
Battery139
care139
charging139
disposal139
Battery charge current
indicator17 Belts, safety52
Beverage holder100
Blower91, 94
BMW High Performance
Synthetic Oil122
BMW Maintenance
System125
BMW sports seat,
adjustment49
BMW Universal
Transmitter97
Bore144
Bottle holder, refer to
beverage holder100
Brake fluid124
disposal124
warning lamp17, 124
Brake fluid level109
Brake hydraulic system,
warning lamp17
Brake lamps
bulb replacement133
Brake pads19
A-Z