Page 180 of 372
TheAvgdisplayshowsyouthe
average f uel economy since you
last reset the display.
The E/T is the elapsed time that
the ignition has been on. It
automatically resets to 0.0 when it
reaches twelve hours. This display
can be reset at any time.
The Trip display shows you the
total distance you have driven
since it was last reset. When it
passes 999.9, it stops displaying
tenths and goes to 1000. When it
passes 9999, it clears to 0.0.
The display also has manual
f unctions f or the Climate Control
System. Ref er to page . 125
Trip Computer
Comf ort and Convenience Feat ures176
T TR
RI IPP M
M E
ET
TE
ER
R
A
A V
VE
ER
RA A G
GE E F
FUUE EL
L
E
E C
CO ON NOOMM Y
Y
E
E
L
LAA P
PS
SE ED
D T
TI
IMM E
E
R
RA A N
NG GEE C
CLLOOC CKK C
CO
OM M P
PA
A S
SSS
I
IN NS STTA
A N
NT TA
A N
NE EO
OU USS F
FUUE EL
L M
M I
ILLE E A
A G
GE E
O
OU UTTS
SI IDD E
E T
TE
EM
M P
PE
ER
RA A T
TU
UR REE
01/09/07 12:23:06 31S3V610_181
Page 181 of 372
The display shows either the range
and Avg f uel economy, or the E/T
and Trip odometer. To change
between these, press and release the
TRIP button.
To reset the Avg f uel economy, E/T,
and Trip odometer, press and hold
the RESET button until you hear a
beep.The outside temperature, f uel
economy, range, and trip odometer
can be displayed in either English or
Metric units. To change between
units, press the TRIP button and
hold it f or f ive seconds.
Trip Computer
Changing and Resetting the
Display
Changing Units of Measurement
Comf ort and Convenience Feat ures177
01/09/07 12:23:13 31S3V610_182
Page 182 of 372
To set the clock:Push the CLOCK button. The
hours digits will start blinking. If
you want to only set the minutes,
go to step 4. To change the hours to a lower
number, press and hold the
MODE button. To change the
hours to a higher number, press
andholdtheA/Cbutton.
To set the minutes, press the
CLOCK button again. The
minutes digits will start blinking.
When the hours reach the desired
number, release the button. Use the MODE or A/C button to
set the minutes to the desired
number.
Press the CLOCK button again.
The clock will return to its normal
display.
1.
2.
3.4.
5.
6.
Setting the Clock
Trip Computer
Comf ort and Convenience Feat ures178
01/09/07 12:23:26 31S3V610_183
Page 183 of 372

�µ�µ
You can also quickly set the time to
the nearest hour. Press the CLOCK
button, then press the RESET button.
If the displayed time is before the
half hour, it will reset back to the
previous hour. If the displayed time
is af ter the half hour, it will reset
f orward to the next hour.
For example:
1:06 will reset to 1:00
1:52 will reset to 2:00
The compass shows your direction
of travel. It indicates eight directions.
Compass operation can be af f ected
by driving near power lines or
stations, across bridges, through
tunnels, over railroad crossings, past
large vehicles, or driving near large
objects that can cause a magnetic
disturbance.
It can also be af f ected by accessories
such as antennas and roof racks that
are mounted by magnets.The compass may need to be
manually calibrated af ter exposure to
a strong magnetic field. If the
compassseemstobecontinually
showing the wrong direction and is
not self -calibrating, do the f ollowing.
NOTE: You should do this procedure
in an open area, away from buildings,
power lines, and other vehicles.
The compass is self -calibrating. If
you see ‘‘ ’’ in the direction
display and ‘‘Calibrate’’ is blinking,
the compass is self -calibrating.
CONT INUED
Trip Computer
Compass Operation
Compass Calibration
Comf ort and Convenience Feat ures179
01/09/07 12:23:38 31S3V610_184
Page 184 of 372
�µ�µ
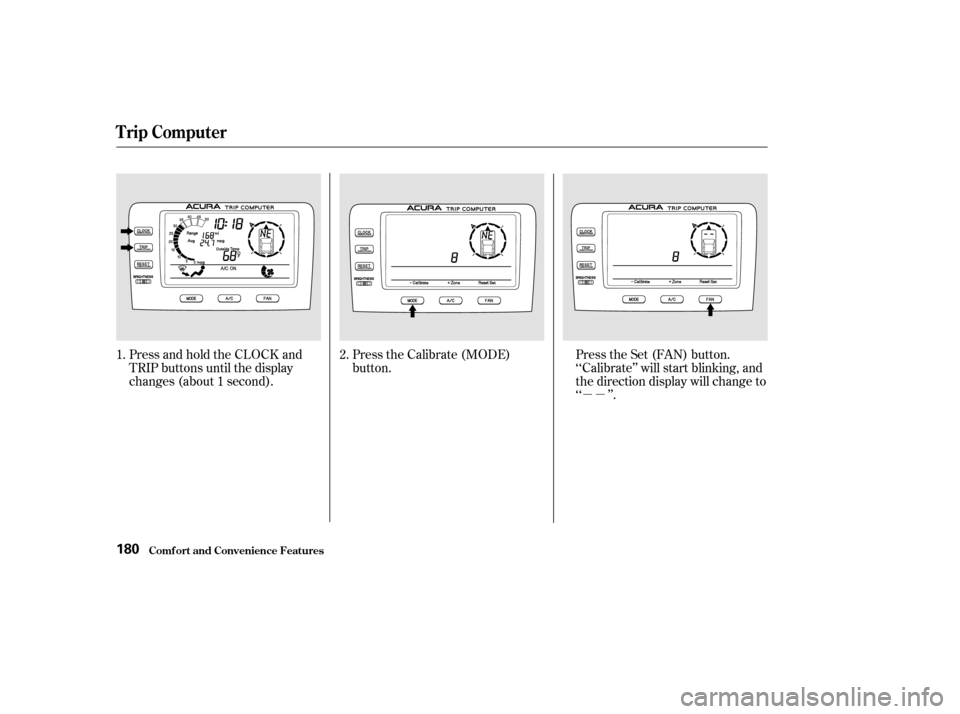
Press and hold the CLOCK and
TRIP buttons until the display
changes (about 1 second).
Press the Calibrate (MODE)
button.
Press the Set (FAN) button.
‘‘Calibrate’’ will start blinking, and
the direction display will change to
‘‘ ’’.
1. 2.
Trip Computer
Comf ort and Convenience Feat ures180
01/09/07 12:23:47 31S3V610_185
Page 185 of 372
�µ�µ
Drivethevehicleslowlyintwo
complete circles. In most areas, there is a variation
between magnetic north and true
north. Zone selection is required so
the compass can compensate f or this
variation. To check and select the
zone set into the compass, do the
f ollowing.
Press and hold the CLOCK and
TRIP buttons until the display
changes (about 1 second).
When the display goes f rom
‘‘ ’’ to an actual heading, the
unit is calibrated.
Press the CLOCK, TRIP, or
RESET button to complete the
calibration and return the display
to normal. 1.
CONT INUED
Trip Computer
Comf ort and Convenience Feat ures
Compass Zone Select ion
181
01/09/07 12:23:56 31S3V610_186
Page 186 of 372
If the zone is incorrect, press and
hold the MODE button to get the
number to count down, or the A/C
button to get the number to count
up. If the zone is correct, continue
to step 5.
Press the Set (FAN) button to set
the zone selection.
Press the CLOCK, TRIP or
RESET button to exit the zone
selection and return display to
normal.
Press the Zone (A/C) button. The
zone the compass is currently set
to is displayed.
Find the zone f or your area on the
map.
2.
3. 4.
5.
6.
Trip Computer
Comf ort and Convenience Feat ures182
01/09/07 12:24:05 31S3V610_187
Page 188 of 372
Always use a sof t cloth and mild
glass/plastic cleaner (such as
cleaners f or computer monitor
screens) to clean the display.
When you wipe the screen, some
black lines may appear because of
static electricity build-up. This is
normal. They will disappear in five to
ten minutes.
The Brightness control has seven
positions. In the middle f ive positions
the display will dim when you turn
on the parking lights or headlights.
Moving the control to the far left
position turns of f the display. It will
come back on f or several seconds if
you press any of the buttons.
In the f ar right (maximum
brightness) position, the display will
notdimwhenyouturnonthe
parking lights.
Trip Computer
Cleaning the Display
BRIGHT NESS control
Comf ort and Convenience Feat ures184
01/09/07 12:24:18 31S3V610_189


 to clean the display.
When you wipe the screen, some
black lines may appear because of
static e")