Page 81 of 124

07-10-2002
YOUR 206 CC IN DETAIL81
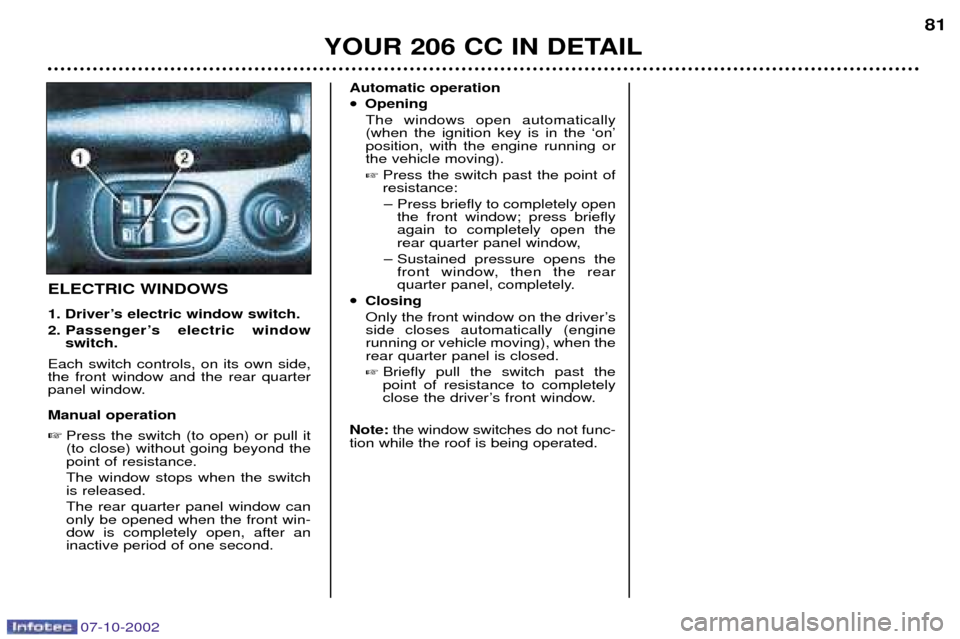
ELECTRIC WINDOWS
1. DriverÕs electric window switch.
2. PassengerÕs electric window
switch.
Each switch controls, on its own side, the front window and the rear quarter
panel window. Manual operation � Press the switch (to open) or pull it (to close) without going beyond thepoint of resistance. The window stops when the switch is released. The rear quarter panel window can only be opened when the front win-dow is completely open, after aninactive period of one second. Automatic operation
�Opening
The windows open automatically (when the ignition key is in the ÔonÕposition, with the engine running orthe vehicle moving). � Press the switch past the point of resistance:
Ð Press briefly to completely open the front window; press brieflyagain to completely open the
rear quarter panel window,
Ð Sustained pressure opens the front window, then the rear
quarter panel, completely.
�Closing
Only the front window on the driverÕs side closes automatically (enginerunning or vehicle moving), when therear quarter panel is closed. � Briefly pull the switch past the point of resistance to completely
close the driverÕs front window.
Note: the window switches do not func-
tion while the roof is being operated.
Page 84 of 124
07-10-2002
YOUR 206 CC IN DETAIL
84
AREAS FOR TOLL
CARDS/CAR PARK TICKETS The athermic windscreen has two non- reflective zones located either side of
the base of the interior mirror.
They are intended for affixing toll cards and/or car park tickets.
COURTESY LIGHT
Lights when one of the doorsis opened. In this position thecourtesy light flashes whenthe vehicle is moving, if a dooris not correctly closed.
Off Permanently on when the igni- tion key is in the accessoriesposition or the ignition is on. SUN VISOR The sun visors are fitted with a vanity
mirror, with a concealing flap on thedriver's side. FRONT ASHTRAY
To empty, close the cover. Pull the lug and release the ashtray upwards.
LIGHTER Press and wait a few minutes until it
springs out automatically. It is supplied with power with the igni- tion key in the accessories position (1 st
notch).
Page 90 of 124

YOUR 206 CC IN DETAIL
90
FRONT AIR BAGS
These are folded in the centre of the steering wheel for the driver and in the
fascia for the front passenger. They are
deployed simultaneously, except in caseswhere the passenger air bag is disarmed.
Front air bag fault If this warning light comes on, accompanied by an audiblesignal and the message
"Air
bag fault" on the multifunction dis-
play, contact a PEUGEOT dealer tohave the system checked.
AIR BAGS The air bags have been designed to maximise the safety of the occupantsin the event of serious collisions.They work in conjunction with theforce-limiting seat belts. The electronic detectors register and analyse any abrupt deceleration ofthe vehicle: if the triggering thresholdis reached, the air bags inflate instant-ly and protect the occupants of thevehicle. Immediately after the impact, the air bags deflate rapidly so that they do nothinder the visibility of the occupantsnor their exit if necessary from thevehicle. The air bags are not deployed in the case of collisions which are not seri-
ous, for which the seat belt is sufficient
to ensure maximum protection. Theseriousness of a collision depends onthe nature of the obstacle and thespeed of the vehicle at the moment ofthe collision. Air bags only operate when the ignition is switched on. Note:
the gas escaping from the air
bags can be a minor irritant. Disarming the passenger air bag*
To ensure the safety of your child, it is essential to disarm the passengerair bag when you install a rear-facingchild seat on the front passengerseat. �
With the ignition switched off, insert the key into the passenger air bagdisarming switch 1, turn it to the
"OFF" position, then remove the
key keeping the slot in this position.
The air bag warning light on
the instrument panel is litthroughout the disarmingprocess.
* According to destination.
07-10-2002
Page 97 of 124

PRACTICAL ASPECTS OF YOUR VEHICLE95
CHECKING LEVELS Engine Oil level check Carry out this check regularly and top up between oil changes
(the
maximum consumption is 0,5 litre per1,000 km). The check must be carried out with the vehicle level and the engine cold.
There are two levelmarks on the dipstick: A= maximum.
B = minimum. Viscosity grade selectionThe oil selected must always meet the
manufacturerÕs requirements. Oil filter Change the cartridge regularly in accordance with the recommenda-tions of the servicing schedule. Used oil
Avoid any prolonged contact of used oil with the skin. Do not discard used oil down drains or on the ground.
To maintain the reliability of the engines and emission control sys-tems, the use of additives in the oil isprohibited. Brake fluid reservoir
Ð The level must always be above the
DANGER mark on the tank.
Ð In the event of a significant drop in the level, contact a PEUGEOT dealer
immediately. Fluid change
Ð Always to be carried out at the inter-
vals given in the manufacturer's servicing schedule.
Ð Use fluids approved by the manu- facturer which comply with DOT4standard.
Coolant reservoir Use a coolant approved by the manu-
facturer. When the engine is warm, the coolant temperature is controlled by the
engine fan. As this fan can operatewith the ignition key removed andbecause the cooling circuit is pres-surised, wait at least an hour after
switching off the engine before carry-ing out any work. In the event of a breakdown and to avoid any risk of burns, unscrew thecap two turns to let the pressure drop.When the pressure has dropped,remove the cap and top up the level.
Oil change: in accordance with the
manufacturer's servicing schedule.
Ð Dipstick: never exceed the maximum mark A.
Ð Instrument panel gauge.
07-10-2002
Page 102 of 124

PRACTICAL ASPECTS OF YOUR VEHICLE
100
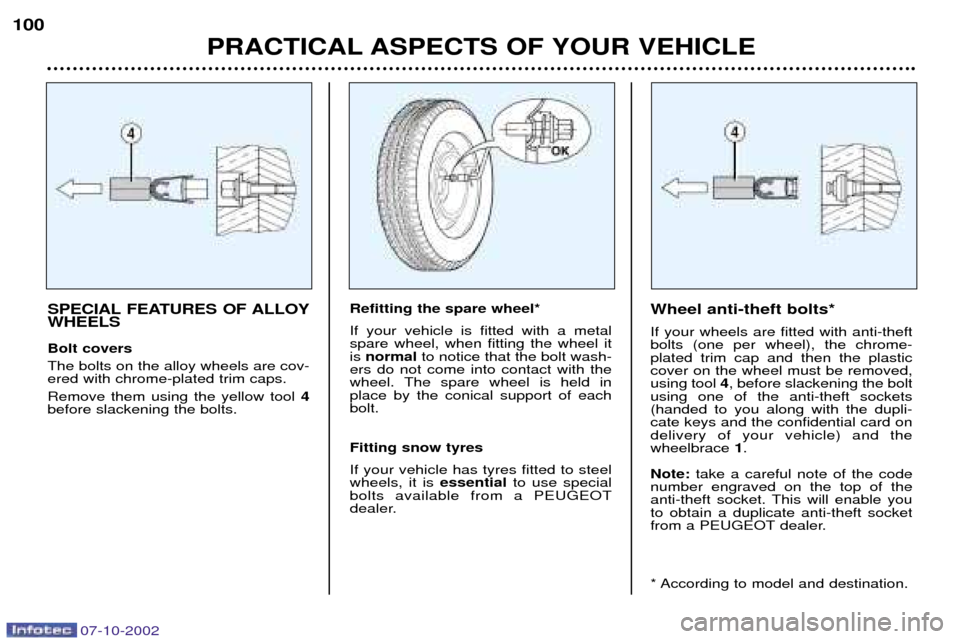
SPECIAL FEATURES OF ALLOY WHEELS Bolt covers The bolts on the alloy wheels are cov- ered with chrome-plated trim caps. Remove them using the yellow tool
4
before slackening the bolts. Refitting the spare wheel* If your vehicle is fitted with a metal spare wheel, when fitting the wheel itis
normal to notice that the bolt wash-
ers do not come into contact with the
wheel. The spare wheel is held inplace by the conical support of eachbolt. Fitting snow tyres If your vehicle has tyres fitted to steel wheels, it is essentialto use special
bolts available from a PEUGEOT
dealer. Wheel anti-theft bolts* If your wheels are fitted with anti-theft bolts (one per wheel), the chrome-plated trim cap and then the plasticcover on the wheel must be removed,using tool
4, before slackening the bolt
using one of the anti-theft sockets(handed to you along with the dupli-cate keys and the confidential card ondelivery of your vehicle) and thewheelbrace 1.
Note: take a careful note of the code
number engraved on the top of the
anti-theft socket. This will enable youto obtain a duplicate anti-theft socket
from a PEUGEOT dealer.
* According to model and destination.
07-10-2002
Page 112 of 124

07-10-2002
PRACTICAL INFORMATION109
BATTERY
To charge the battery using a battery charger:
Ð Disconnect the battery,
Ð Follow the instructions for use given by the battery charger manufacturer,
Ð Reconnect starting with the negative (Ð) terminal,
Ð Check that the terminals and connectors are clean. If they are covered with sul-
phate (white or greenish deposit), disconnect them and clean them.
To start the vehicle from another battery:
Ð Connect the red cable to the positive (+) terminals of the two batteries,
Ð Connect one end of the green or black cable to the negative (Ð) terminal of the slave battery,
Ð Connect the other end of the green or black cable to an earth point on the bro- ken down vehicle as far as possible from the battery,
Operate the starter, let the engine run.
Wait for the engine to return to idle, then disconnect the cables. ECONOMY MODE FUNCTION After the engine has stopped, with the key in the accessories position, cer-
tain functions (windscreen wiper, elec-tric windows, courtesy lights, audioequipment etc.) can only be used forthirty minutes, to prevent discharging
the battery.
Once the thirty minutes are over, the message
"Economy mode active"
appears on the multifunction displayand the active functions are put on
standby.
A flat battery will prevent the engine from starting.
Ð Never disconnect a terminal when the engine is running.
Ð Never charge a battery without first disconnecting the terminals.
Ð After every reconnection of the battery, switch on the ignition and wait
1 minute before starting to allow the electronic systems to be ini- tialised. If slight difficulties are experienced after this, please contact
a PEUGEOT dealer.
It is advisable to disconnect the battery if the vehicle is not
to be used for a period of more than one month.
Page 117 of 124
07-10-2002
PRACTICAL ASPECTS OF YOUR VEHICLE
114
Detachable
parcel shelf
Boot lid
Tailgate flap Manual pull cord for tailgate flapScreenAllen key
Roof hook(s)
Page 118 of 124

07-10-2002
PRACTICAL ASPECTS OF YOUR VEHICLE115
Manual operation of the roof (emergency mode) In the event of
electric or hydraulic
malfunction of the roof, it is possible
to close it manually.
Consult a PEUGEOT dealer to have the system checked. This is an emergency solution .
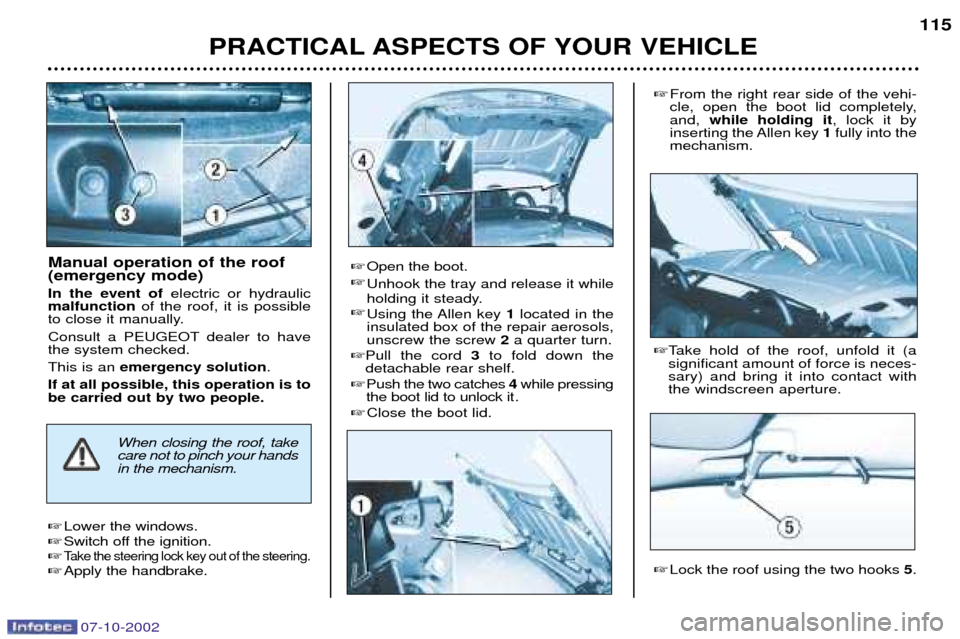
If at all possible, this operation is to be carried out by two people.� Open the boot.
� Unhook the tray and release it while
holding it steady.
� Using the Allen key 1located in the
insulated box of the repair aerosols, unscrew the screw 2a quarter turn.
� Pull the cord 3to fold down the
detachable rear shelf.
� Push the two catches 4while pressing
the boot lid to unlock it .
� Close the boot lid.
�From the right rear side of the vehi-
cle, open the boot lid completely,and, while holding it , lock it by
inserting the Allen key 1fully into the
mechanism.
� Lock the roof using the two hooks 5.
When closing the roof, take care not to pinch your handsin the mechanism.
�
Take hold of the roof, unfold it (a significant amount of force is neces-sary) and bring it into contact withthe windscreen aperture.
� Lower the windows.
� Switch off the ignition.
�
Take the steering lock key out of the steering.� Apply the handbrake.