Page 166 of 626

3 - 12
INSP
ADJ
AIR FILTER CLEANING
EC35G040
AIR FILTER CLEANING
NOTE:
Proper air filter maintenance is the biggest key
to preventing premature engine wear and
damage.
CAUTION:
Never run the engine without the air filter
element in place; this would allow dirt and
dust to enter the engine and cause rapid
wear and possible engine damage.
1. Remove:
lSeat
lFitting bolt 1
lWasher 2
lAir filter element 3
lFilter guide 4
2. Clean:
lAir filter element
Clean them with solvent.
NOTE:
After cleaning, remove the remaining solvent
by squeezing the element.
CAUTION:
lDo not twist the element when squeezing
the element.
lLeaving too much of solvent in the ele-
ment may result in poor starting.
3. Inspect:
lAir filter element
Damage ® Replace.
4. Apply:
lFoam-air-filter oil or engine oil to the ele-
ment.
NOTE:
Squeeze out the excess oil. Element should
be wet but not dripping.
5. Install:
lFilter guide 1
NOTE:
Align the projection a on filter guide with the
hole b in air filter element.
Page 168 of 626
3 - 13
INSP
ADJ
ENGINE OIL LEVEL INSPECTION
6. Apply:
lLithium soap base grease
On the matching surface a on air filter
element.
7. Install:
lAir filter element 1
lWasher
lFitting bolt
NOTE:
Align the projection a on filter guide with the
hole b in air filter case.
T R..2 Nm (0.2 m · kg, 1.4 ft · lb)
ENGINE OIL LEVEL INSPECTION
1. Stand the motorcycle on a level surface.
NOTE:
lWhen checking the oil level make sure that
the motorcycle is upright.
lPlace the motorcycle on a suitable stand.
WARNING
Never remove the oil tank cap just after
high speed operation. The heated oil could
spurt out. causing danger. Wait until the oil
cools down to approximately 70 ˚C (158 ˚F).
2. Idle the engine more than 3 minutes
while keeping the motorcycle upright.
Then stop the engine and inspect the oil
level.
3. Remove:
lOil tank cap 1
Page 172 of 626
3 - 15
INSP
ADJ
ENGINE OIL REPLACEMENT
5. Start the engine and let it warm up for
several minutes.
CAUTION:
When the oil tank is empty, never start the
engine.
6. Idle the engine more than 10 seconds
while keeping the motorcycle upright.
Then stop the engine and add the oil to
the maximum level.
7. Install:
lOil tank cap
ENGINE OIL REPLACEMENT
1. Start the engine and let it warm up for
several minutes.
2. Stop the engine and place an oil pan
under the drain bolt.
3. Remove:
lOil filler plug 1
lDrain bolt (with gasket) 2
lDrain bolt (with gasket) 3
lOil filter drain bolt (O-ring) 4
Drain the crankcase and oil tank
(frame) of its oil.
4. Remove:
lEngine skidplate
lEngine oil hose clamp 1
lBolt (engine oil hose) 2
lEngine oil hose 3
lOil strainer (frame) 4
5. Clean:
lOil strainer (frame)
Page 174 of 626

3 - 16
INSP
ADJ
ENGINE OIL REPLACEMENT
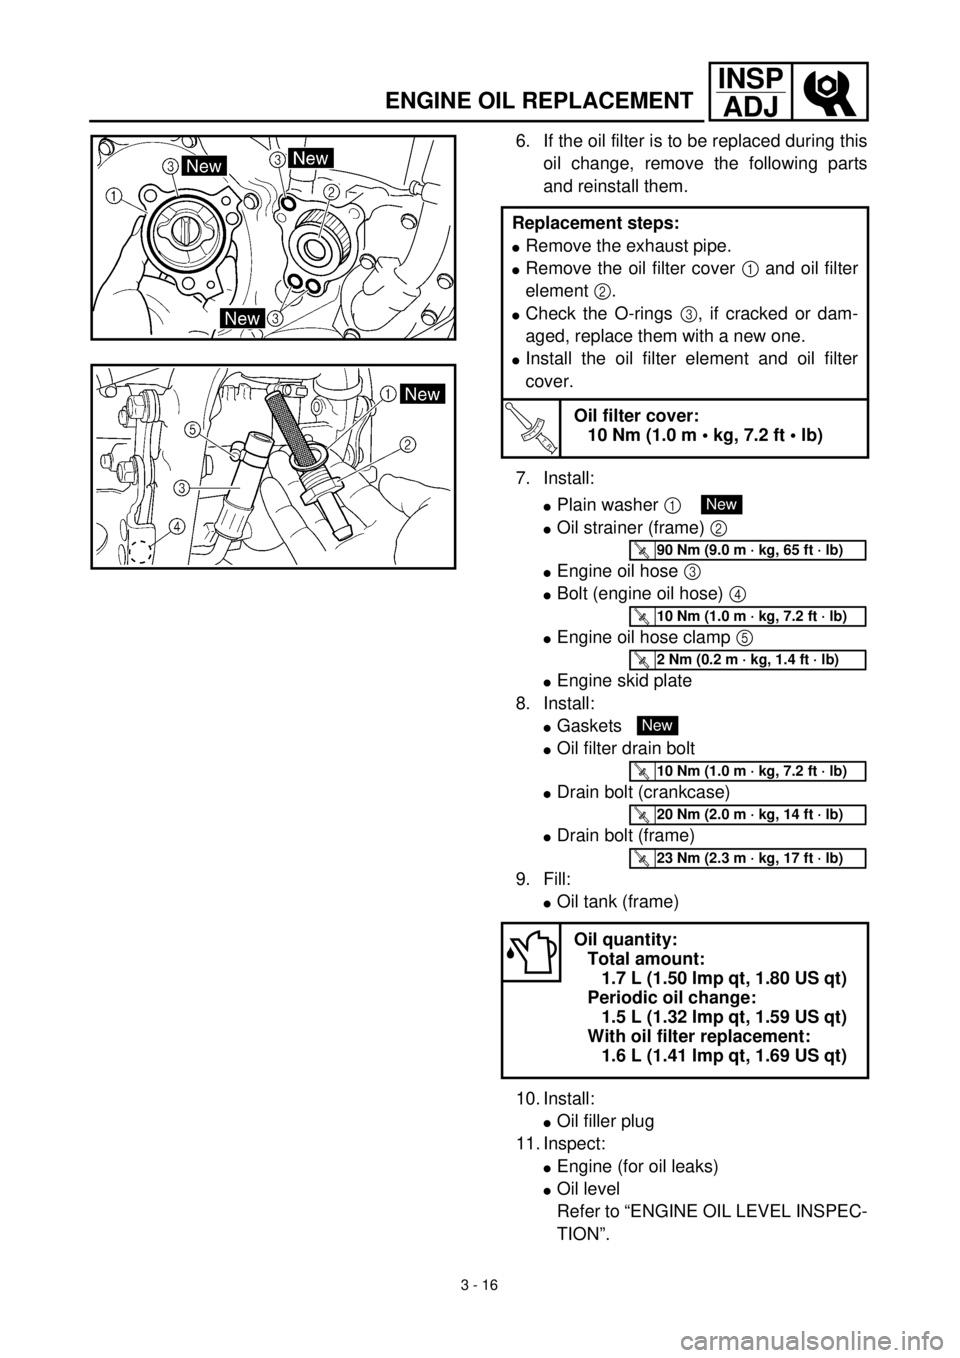
6. If the oil filter is to be replaced during this
oil change, remove the following parts
and reinstall them.
7. Install:
lPlain washer 1
lOil strainer (frame) 2
lEngine oil hose 3
lBolt (engine oil hose) 4
lEngine oil hose clamp 5
lEngine skid plate
8. Install:
lGaskets
lOil filter drain bolt
lDrain bolt (crankcase)
lDrain bolt (frame)
9. Fill:
lOil tank (frame)
10. Install:
lOil filler plug
11. Inspect:
lEngine (for oil leaks)
lOil level
Refer to “ENGINE OIL LEVEL INSPEC-
TION”. Replacement steps:
lRemove the exhaust pipe.
lRemove the oil filter cover 1 and oil filter
element 2.
lCheck the O-rings 3, if cracked or dam-
aged, replace them with a new one.
lInstall the oil filter element and oil filter
cover.
T R..
Oil filter cover:
10 Nm (1.0 m • kg, 7.2 ft • lb)
Oil quantity:
Total amount:
1.7 L (1.50 Imp qt, 1.80 US qt)
Periodic oil change:
1.5 L (1.32 Imp qt, 1.59 US qt)
With oil filter replacement:
1.6 L (1.41 Imp qt, 1.69 US qt)
New
T R..90 Nm (9.0 m · kg, 65 ft · lb)
T R..10 Nm (1.0 m · kg, 7.2 ft · lb)
T R..2 Nm (0.2 m · kg, 1.4 ft · lb)
New
T R..10 Nm (1.0 m · kg, 7.2 ft · lb)
T R..20 Nm (2.0 m · kg, 14 ft · lb)
T R..23 Nm (2.3 m · kg, 17 ft · lb)
Page 176 of 626

3 - 17
INSP
ADJ
PILOT SCREW ADJUSTMENT
12. Check:
lOil pressure
Checking steps:
lSlightly loosen the oil gallery bolt 1.
lStart the engine and keep it idling until oil
starts to seep from the oil gallery bolt. If no
oil comes out after one minute, turn the
engine off so it will not seize.
lCheck oil passages, oil filter and oil pump
for damage or leakage.
lStart the engine after solving the prob-
lem(s) and recheck the oil pressure.
lTighten the oil gallery bolt to specification.
T R..
Oil gallery bolt:
18 Nm (1.8 m • kg, 13 ft • lb)
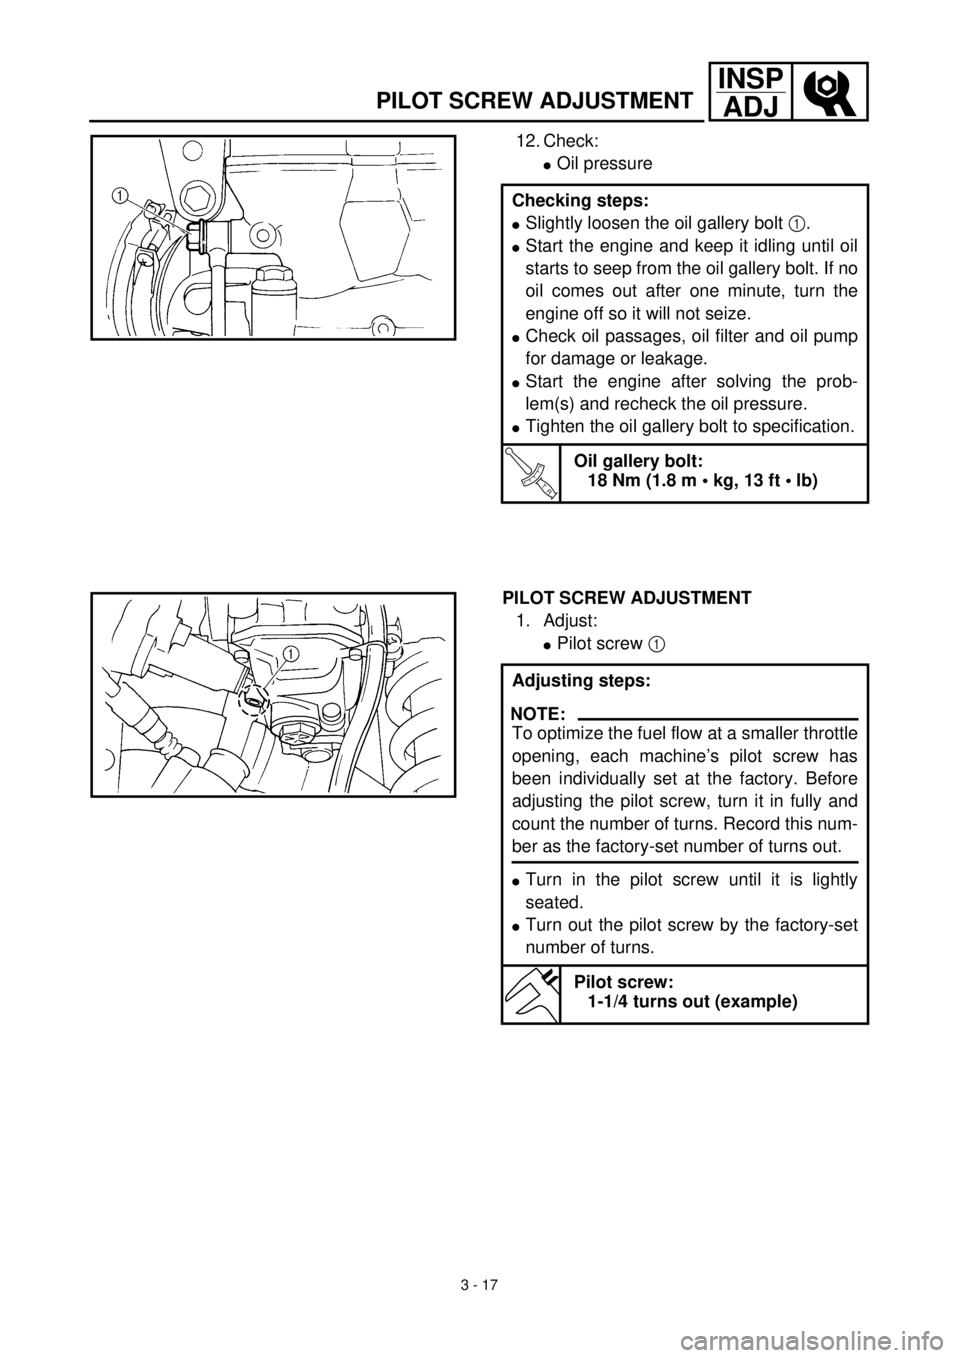
PILOT SCREW ADJUSTMENT
1. Adjust:
lPilot screw 1
Adjusting steps:
NOTE:
To optimize the fuel flow at a smaller throttle
opening, each machine’s pilot screw has
been individually set at the factory. Before
adjusting the pilot screw, turn it in fully and
count the number of turns. Record this num-
ber as the factory-set number of turns out.
lTurn in the pilot screw until it is lightly
seated.
lTurn out the pilot screw by the factory-set
number of turns.
Pilot screw:
1-1/4 turns out (example)
Page 340 of 626
4 - 52
ENG
OIL FILTER, WATER PUMP AND CRANKCASE COVER
(RIGHT)
OIL FILTER, WATER PUMP AND CRANKCASE COVER (RIGHT)
OIL FILTER, WATER PUMP AND CRANKCASE COVER (RIGHT)
Extent of removal:1 Oil filter removal2 Water pump removal
3 Crankcase cover (right) removal
Extent of removal Order Part name Q’ty Remarks
OIL FILTER, WATER PUMP
AND CRANKCASE COVER
(RIGHT) REMOVAL
Preparation for removal Drain the engine oil. Refer to “ENGINE OIL REPLACEMENT”
section in the CHAPTER 3.
Drain the coolant. Refer to “COOLANT REPLACEMENT”
section in the CHAPTER 3.
Exhaust pipe Refer to “EXHAUST PIPE AND
SILENCER” section.
Brake pedal Refer to “ENGINE REMOVAL” section.
Clutch cover Refer to “CLUTCH” section.
1 Oil filter cover 1
2 Oil filter 1
3 Coolant pipe 2 1
4 Water pump housing 1
5 Pin 2
6 Oil delivery pipe 1
1
2
3
Page 342 of 626
4 - 53
ENG
OIL FILTER, WATER PUMP AND CRANKCASE COVER
(RIGHT)
Extent of removal Order Part name Q’ty Remarks
7 Oil hose 1
8 Kick crank 1
9 Crankcase cover (right) 1
10 Gasket 1
11 Dowel pin/O-ring 4/2
12 Impeller 1
Refer to “REMOVAL POINTS”. 13 Plain washer 1
14 Impeller shaft 1
15 Oil seal 1 1
16 Oil seal 2 1
17 Bearing 1
2
3
2
Page 344 of 626
4 - 54
ENG
OIL FILTER, WATER PUMP AND CRANKCASE COVER
(RIGHT)
REMOVAL POINTS
EC4G3110
Impeller shaft
1. Remove:
lImpeller 1
lPlain washer 2
lImpeller shaft 3
NOTE:
Hold the impeller shaft on its width across the
flats a with spanners, etc. and remove the
impeller.
EC4G3210
Oil seal
NOTE:
It is not necessary to disassemble the water
pump, unless there is an abnormality such as
excessive change in coolant level, discolora-
tion of coolant, or milky transmission oil.
1. Remove:
lBearing 1
lOil seal 2
INSPECTION
EC444200
Impeller shaft
1. Inspect:
lImpeller shaft 1
Bend/wear/damage ® Replace.
Fur deposits ® Clean.