Page 26 of 558
1-1
GEN
INFO
DESCRIPTION
EC100000
GENERAL INFORMATION
EC110000
DESCRIPTION
1Clutch lever
2”ENGINE STOP” button
3Front brake lever
4Throttle grip
5Radiator cap
6Fuel tank cap
7Kick starter
8Fuel tank
9Radiator
0Coolant drain bolt
qCheck bolt (Transmission oil level)
wRear brake pedal
eValve joint
rFuel cock
tAir cleaner
yDrive chain
uShift pedal
iStarter knob
oFront fork
NOTE:
9The machine you have purchased may differ
slightly from those shown in the following.
9Designs and specifications are subject to
change without notice.
1
5MV-9-30-1A 6/19/00 1:11 PM Page 2
Page 123 of 558

3-2
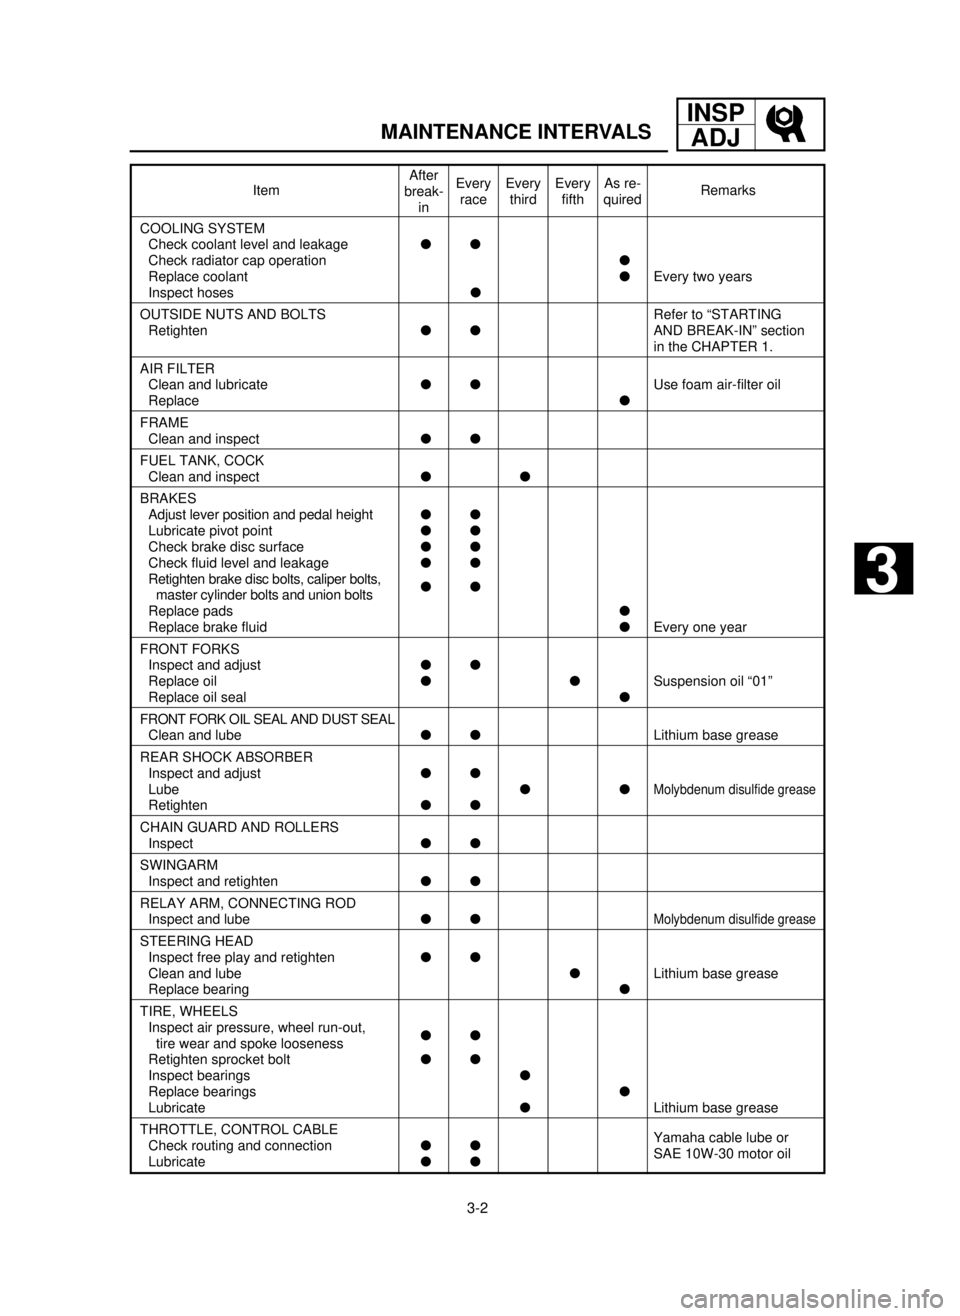
MAINTENANCE INTERVALS
INSP
ADJ
Item Remarks
COOLING SYSTEM
Check coolant level and leakagell
Check radiator cap operationl
Replace coolantlEvery two years
Inspect hosesl
OUTSIDE NUTS AND BOLTS Refer to “STARTING
RetightenllAND BREAK-IN” section
in the CHAPTER 1.
AIR FILTER
Clean and lubricatellUse foam air-filter oil
Replacel
FRAME
Clean and inspectll
FUEL TANK, COCK
Clean and inspectll
BRAKES
Adjust lever position and pedal heightll
Lubricate pivot pointll
Check brake disc surfacell
Check fluid level and leakagell
Retighten brake disc bolts, caliper bolts,
ll
master cylinder bolts and union bolts
Replace padsl
Replace brake fluidlEvery one year
FRONT FORKS
Inspect and adjustll
Replace oilllSuspension oil “01”
Replace oil seall
FRONT FORK OIL SEAL AND DUST SEAL
Clean and lubellLithium base grease
REAR SHOCK ABSORBER
Inspect and adjustll
Lube ll
Molybdenum disulfide grease
Retightenll
CHAIN GUARD AND ROLLERS
Inspectll
SWINGARM
Inspect and retightenll
RELAY ARM, CONNECTING ROD
Inspect and lubellMolybdenum disulfide grease
STEERING HEAD
Inspect free play and retightenll
Clean and lubelLithium base grease
Replace bearingl
TIRE, WHEELS
Inspect air pressure, wheel run-out,
ll
tire wear and spoke looseness
Retighten sprocket boltll
Inspect bearingsl
Replace bearingsl
LubricatelLithium base grease
THROTTLE, CONTROL CABLE
Check routing and connectionllYamaha cable lube or
LubricatellSAE 10W-30 motor oil
After
break-
inEvery
raceEvery
thirdEvery
fifthAs re-
quired
3
5MV-9-30-3A 6/19/00 1:52 PM Page 3
Page 134 of 558

3-4
PRE-OPERATION INSPECTION AND MAINTENANCE
INSP
ADJ
EC320000
PRE-OPERATION INSPECTION AND MAINTENANCE
Before riding for break-in operation, practice or a race, make sure the machine is in good operating
condition.
Before using this machine, check the following points.
EC321000
GENERAL INSPECTION AND MAINTENANCE
Item Routine Page
Coolant Check that coolant is filled up to the radiator filler cap.
Check the cooling system for leakage.P3-5~9
Fuel Check that a fresh mixture of oil and gasoline is filled in
the fuel tank. Check the fuel line for leakage.P1-12
Transmission oil Check that the oil level is correct. Check the crankcase
for leakage.P3-12~14
Gear shifter and clutch Check that gears can be shifted correctly in order and
that the clutch operates smoothly.P3-9
Throttle grip/Housing Check that the throttle grip operation and free play
are correctly adjusted. Lubricate the throttle grip and P3-10~11
housing, if necessary.
Brakes Check the play of front brake and effect of front and
rear brake.P3-17~23
Chain Check chain slack and alignment. Check that the chain
is lubricated properly.P3-24~26
Wheels Check for excessive wear and tire pressure. Check for
loose spokes and have no excessive play.P3-34~35
Steering Check that the handlebar can be turned smoothly and
have no excessive play.P3-35~36
Front forks and Check that they operate smoothly and there is no oil
rear shock absorber leakage.P3-26~33
Cables (wires) Check that the clutch and throttle cables move smooth-
ly. Check that they are not caught when the handlebars —
are turned or when the front forks travel up and down.
Muffler Check that the muffler is tightly mounted and has no
cracks.P3-15~16
Sprocket Check that the driven sprocket tightening bolt is
not loose.P3-24
Lubrication Check for smooth operation. Lubricate if necessary. P3-37
Bolts and nuts Check the chassis and engine for loose bolts and nuts. P1-16
Lead connectors Check that the CDI magneto, CDI unit, and ignition coil
are connected tightly.P1-6
Settings Is the machine set suitably for the condition of the
racing course and weather or by taking into account the
P7-1~24
results of test runs before racing? Are inspection and
maintenance completely done?
5MV-9-30-3A 6/19/00 1:52 PM Page 14
Page 138 of 558

3-5
INSP
ADJENGINE/COOLANT LEVEL INSPECTION/
COOLANT REPLACEMENT
EC350000
ENGINE
EC351011
COOLANT LEVEL INSPECTION
w
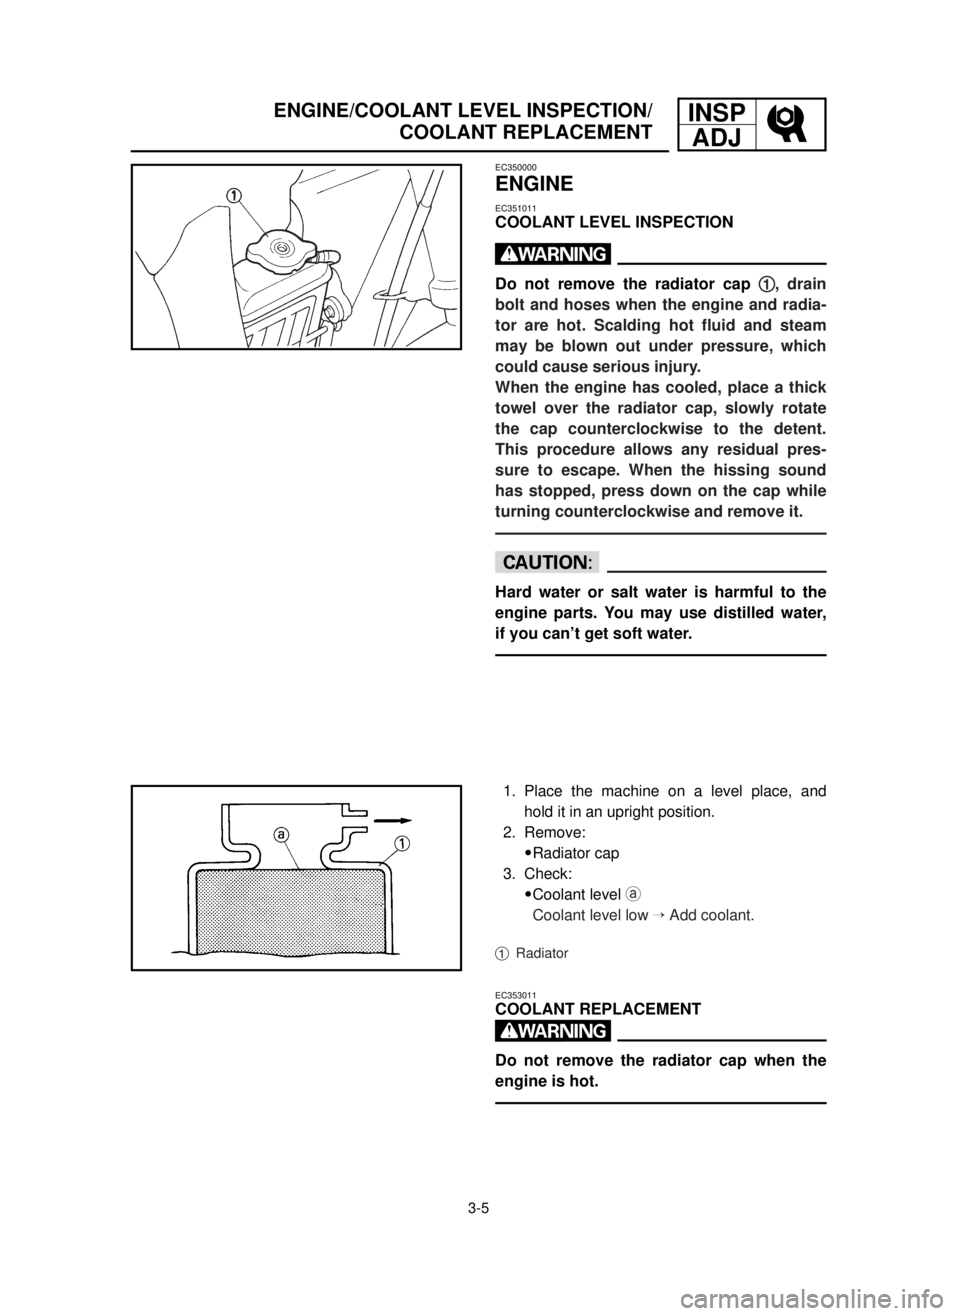
Do not remove the radiator cap 1 1
, drain
bolt and hoses when the engine and radia-
tor are hot. Scalding hot fluid and steam
may be blown out under pressure, which
could cause serious injury.
When the engine has cooled, place a thick
towel over the radiator cap, slowly rotate
the cap counterclockwise to the detent.
This procedure allows any residual pres-
sure to escape. When the hissing sound
has stopped, press down on the cap while
turning counterclockwise and remove it.
cC
Hard water or salt water is harmful to the
engine parts. You may use distilled water,
if you can’t get soft water.
1. Place the machine on a level place, and
hold it in an upright position.
2. Remove:
9Radiator cap
3. Check:
9Coolant level a
Coolant level low ÕAdd coolant.
1Radiator
EC353011
COOLANT REPLACEMENT
w
Do not remove the radiator cap when the
engine is hot.
5MV-9-30-3A 6/19/00 1:52 PM Page 18
Page 140 of 558
3-6
INSP
ADJ
COOLANT REPLACEMENT
cC
Take care so that coolant does not splash
on painted surfaces. If it splashes, wash it
away with water.
1. Place a container under the engine.
2. Remove:
9Coolant drain bolt 1
3. Remove:
9Radiator cap
Drain the coolant completely.
4. Clean:
9Cooling system
Thoroughly flush the cooling system with
clean tap water.
5. Install:
9Copper washer
9Coolant drain bolt
6. Fill:
9Radiator
9Engine
To specified level.
Recommended coolant:
High quality ethylene glycol
anti-freeze containing
anti-corrosion for
aluminum engine
Coolant 1 1
and water
(soft water) 2 2
mixing ratio:
50%/50%
Coolant capacity:
1.00 L (0.88 Imp qt, 1.06 US qt)
10 Nm (1.0 m•kg, 7.2 ft•lb)
5MV-9-30-3A 6/19/00 1:52 PM Page 20
Page 142 of 558
3-7
INSP
ADJ
RADIATOR CAP INSPECTION
cC
9Do not mix more than one type of ethyl-
ene glycol antifreeze containing corro-
sion inhibitors for aluminum engine.
9Do not use water containing impurities
or oil.
7. Install:
9Radiator cap
Start the engine and warm it up for a sev-
eral minutes.
8. Check:
9Coolant level
Coolant level low ÕAdd coolant.
EC355000
RADIATOR CAP INSPECTION
1. Inspect:
9Seal (radiator cap) 1
9Valve and valve seat 2
Crack/Damage ÕReplace.
Exist fur deposits 3ÕClean or replace.
Handling notes of coolant:
The coolant is harmful so it should be handled
with special care.
w
9When coolant splashes to your eye.
Thoroughly wash your eye with water
and see your doctor.
9When coolant splashes to your clothes.
Quickly wash it away with water and then
with soap.
9When coolant is swallowed.
Quickly make him vomit and take him to
a doctor.
5MV-9-30-3A 6/19/00 1:52 PM Page 22
Page 144 of 558
3-8
INSP
ADJRADIATOR CAP OPENING PRESSURE INSPECTION/
COOLING SYSTEM INSPECTION
EC356002
RADIATOR CAP OPENING PRESSURE
INSPECTION
1. Attach:
9Radiator cap tester 1and adapter 2
NOTE:
Apply water on the radiator cap seal.
3Radiator cap
2. Apply the specified pressure.
3. Inspect:
9Pressure
Impossible to maintain the specified pres-
sure for 10 seconds ÕReplace.
EC357003
COOLING SYSTEM INSPECTION
1. Inspect:
9Coolant level
2. Attach:
9Radiator cap tester 1and adapter 2
3. Apply the specified pressure.
Radiator cap tester:
YU-24460-01/90890-01325
Adapter:
YU-33984/90890-01352
Radiator cap tester:
YU-24460-01/90890-01325
Adapter:
YU-33984/90890-01352
Radiator cap opening pressure:
95~125 kPa (0.95~1.25 kg/cm
2,
13.5~17.8 psi)
Standard pressure:
180 kPa (1.8 kg/cm
2, 25.6 psi)
5MV-9-30-3A 6/19/00 1:52 PM Page 24
Page 308 of 558
4-50
ENGWATER PUMP
EC4G3000
REMOVAL POINTS
EC4G3110
Impeller shaft
1. Remove:
9Impeller 1
9Plain washer 2
9Impeller shaft 3
NOTE:
Hold the impeller shaft on its width across the
flats awith spanners, etc. and remove the im-
peller.
EC4G3210
Oil seal
NOTE:
It is not necessary to disassemble the water
pump, unless there is an abnormality such as
excessive change in coolant level, discoloration
of coolant, or milky transmission oil.
1. Remove:
9Bearing 1
2. Remove:
9Oil seal 1
EC4G4000
INSPECTIONEC444200
Impeller shaft
1. Inspect:
9Impeller shaft 1
Bend/Wear/Damage ÕReplace.
Fur deposits ÕClean.
5MV-9-30-4C 6/19/00 1:42 PM Page 26