Page 12 of 132
2-1
2
EAU00026
2-DESCRIPTION Left view1. Shift pedal (page 3-10)
2. Starter (choke) knob (page 3-14)
3. Fuel tank cap (page 3-11)
4. Fuel cock (page 3-13)
5. Battery (page 7-32)
6. Fuse box 2 (page 7-34)7. Side case (page 3-17)
8. Helmet holder (page 3-15)
9. License light (page 7-37)
10. Tail/brake light (page 7-36)
11. Rear turn signal lights (page 7-36)
E_5jc.book Page 1 Monday, January 22, 2001 12:12 PM
Page 13 of 132
DESCRIPTION
2-2
2
Right view12. Muffler
13. Owner’s tool kit (page 7-1)
14. Helmet holder (page 3-15)
15. Travel trunk (page 3-17)
16. Passenger seat
17. Shock absorber assembly air valve (page 3-20)
18. Rider seat (page 3-15)
19. Fuel tank (page 3-12)
20. Front fork air valve (page 3-19)21. Headlight (page 7-35)
22. Front turn signal lights (page 7-36)
23. Fuse box 1 (page 7-33)
24. Brake pedal (page 3-11)
25. Engine oil level check window (page 7-12)
26. Rider footrest
27. Coolant reservoir (page 7-15)
28. Passenger footrest
E_5jc.book Page 2 Monday, January 22, 2001 12:12 PM
Page 106 of 132

PERIODIC MAINTENANCE AND MINOR REPAIR
7-33
7To charge the battery
Have a Yamaha dealer charge the bat-
tery as soon as possible if it seems to
have discharged. Keep in mind that the
battery tends to discharge more quickly
if the motorcycle is equipped with op-
tional electrical accessories.
To store the battery
1. If the motorcycle will not be used
for more than one month, remove
the battery, fully charge it, and
then place it in a cool, dry place.
2. If the battery will be stored for
more than two months, check it at
least once a month and fully
charge it if necessary.
3. Fully charge the battery before in-
stallation.
4. After installation, make sure that
the battery leads are properly con-
nected to the battery terminals.
EC000102
CAUTION:@ l
Always keep the battery
charged. Storing a discharged
battery can cause permanent
battery damage.
l
To charge a sealed-type (MF)
battery, a special (constant-
voltage) battery charger is re-
quired. Using a conventional
battery charger will damage the
battery. If you do not have ac-
cess to a sealed-type (MF) bat-
tery charger, have a Yamaha
dealer charge your battery.
@
EAU01801*
Replacing the fuses The main fuse box is located behind
panel C. (See page 7-10 for panel re-
moval and installation procedures.)
Fuse box 1 is located behind cowling A.
(See page 7-6 for cowling removal and
installation procedures.)1. Cruise control fuse
2. Carburetor heater fuse
3. Auxiliary DC terminal fuse
4. Auxiliary DC jack fuse
5. Audio system fuse
6. Spare fuse (´ 2)
E_5jc.book Page 33 Monday, January 22, 2001 12:12 PM
Page 107 of 132

PERIODIC MAINTENANCE AND MINOR REPAIR
7-34
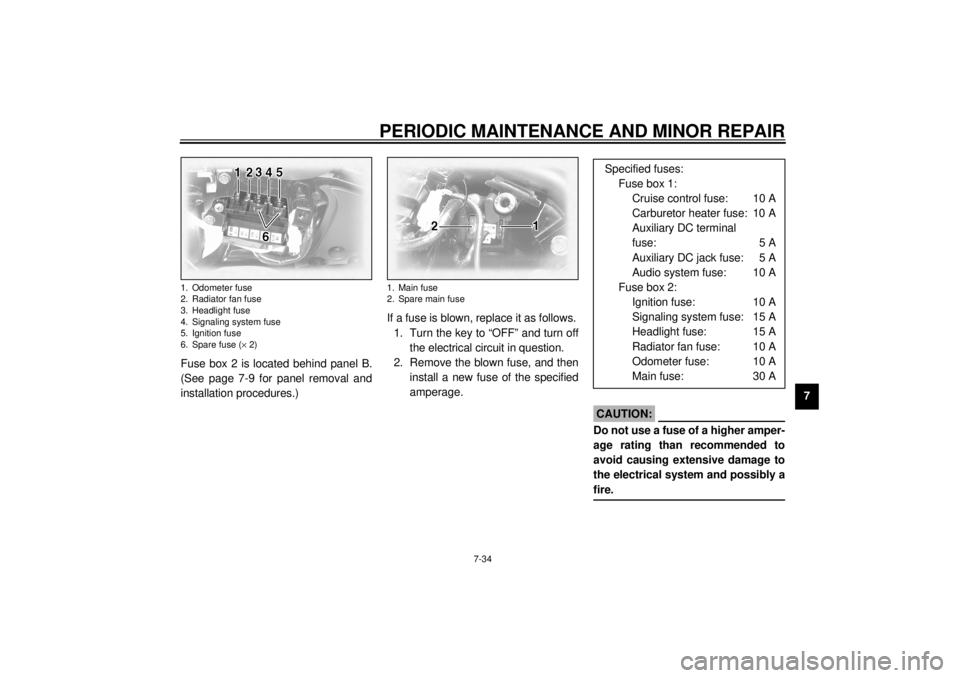
7 Fuse box 2 is located behind panel B.
(See page 7-9 for panel removal and
installation procedures.)If a fuse is blown, replace it as follows.
1. Turn the key to “OFF” and turn off
the electrical circuit in question.
2. Remove the blown fuse, and then
install a new fuse of the specified
amperage.
EC000103
CAUTION:@ Do not use a fuse of a higher amper-
age rating than recommended to
avoid causing extensive damage to
the electrical system and possibly a
fire. @
1. Odometer fuse
2. Radiator fan fuse
3. Headlight fuse
4. Signaling system fuse
5. Ignition fuse
6. Spare fuse (´ 2)
1. Main fuse
2. Spare main fuse
Specified fuses:
Fuse box 1:
Cruise control fuse: 10 A
Carburetor heater fuse: 10 A
Auxiliary DC terminal
fuse: 5 A
Auxiliary DC jack fuse: 5 A
Audio system fuse: 10 A
Fuse box 2:
Ignition fuse: 10 A
Signaling system fuse: 15 A
Headlight fuse: 15 A
Radiator fan fuse: 10 A
Odometer fuse: 10 A
Main fuse: 30 A
E_5jc.book Page 34 Monday, January 22, 2001 12:12 PM