2001 TOYOTA LAND CRUISER parking brake
[x] Cancel search: parking brakePage 4 of 142
’01 L/C U (L/O 0008)
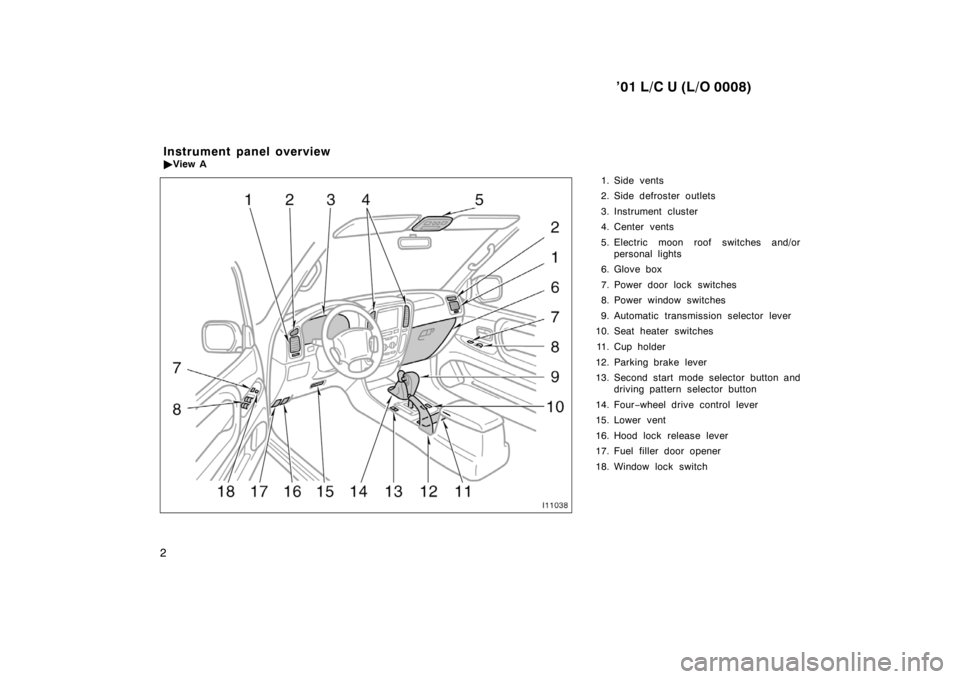
2 1. Side vents
2. Side defroster outlets
3. Instrument cluster
4. Center vents
5. Electric moon roof switches and/or
personal lights
6. Glove box
7. Power door lock switches
8. Power window switches
9. Automatic transmission selector lever
10. Seat heater switches
11 . C u p h o l d e r
12. Parking brake lever
13. Second start mode selector button and driving pattern selector button
14. Four −wheel drive control lever
15. Lower vent
16. Hood lock release lever
17. Fuel filler door opener
18. Window lock switch
Instrument panel overview �
View A
Page 34 of 142

’01 L/C U (L/O 0008)
11 4 OPERATION OF INSTRUMENTS AND
CONTROLS
Ignition switch, Transmission and Parking brake
Ignition switch with steering lock11 5
. . . . . . . . . . . . . . . . . . . . . . . . . . . . . .
Automatic transmission11 6
. . . . . . . . . . . . . . . . . . . . . . . . . . . . . . . . . . . . .
Four–wheel drive system120
. . . . . . . . . . . . . . . . . . . . . . . . . . . . . . . . . . . .
Parking brake123
. . . . . . . . . . . . . . . . . . . . . . . . . . . . . . . . . . . . . . . . . . . . . .
Cruise control123
. . . . . . . . . . . . . . . . . . . . . . . . . . . . . . . . . . . . . . . . . . . . . .
Active traction control system126
. . . . . . . . . . . . . . . . . . . . . . . . . . . . . . . .
Vehicle skid control system128
. . . . . . . . . . . . . . . . . . . . . . . . . . . . . . . . . . SECTION
1− 6
Page 36 of 142
’01 L/C U (L/O 0008)
11 6
Automatic transmission
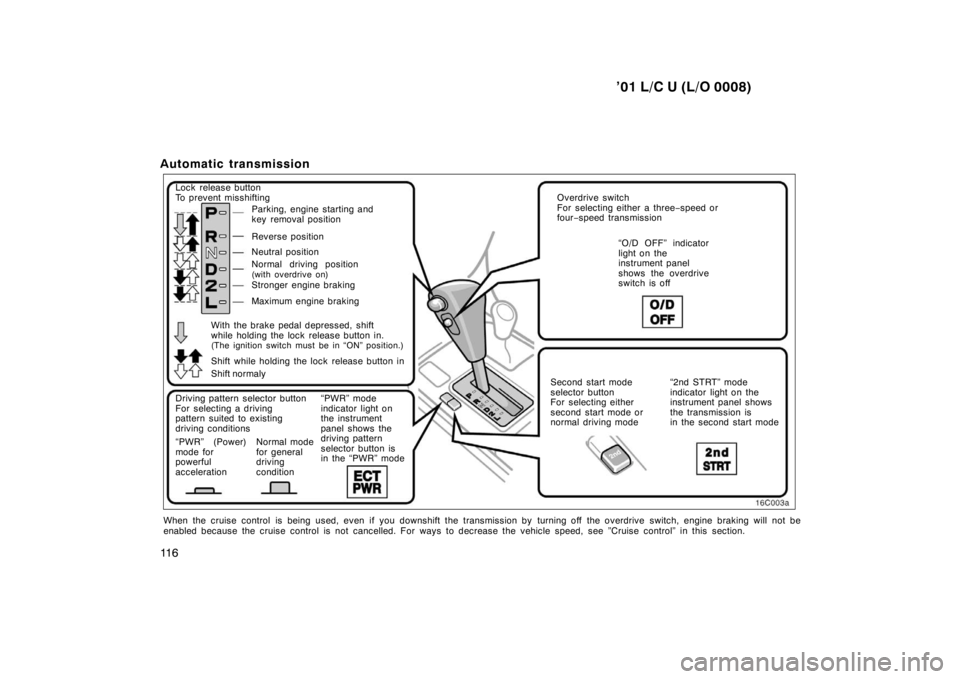
Lock release button
To prevent misshifting
Parking, engine starting and
key removal position
Reverse position
Neutral position
Normal driving position
(with overdrive on)
Stronger engine braking
Maximum engine braking
Driving pattern selector button
For selecting a driving
pattern suited to existing
driving conditions
“PWR” (Power)
mode for
powerful
acceleration Normal mode
for general
driving
condition“PWR” mode
indicator light on
the instrument
panel shows the
driving pattern
selector button is
in the “PWR” mode Overdrive switch
For selecting either a three
−speed or
four −speed transmission
“O/D OFF” indicator
light on the
instrument panel
shows the overdrive
switch is off
Second start mode
selector button
For selecting either
second start mode or
normal driving mode “2nd STRT” mode
indicator light on the
instrument panel shows
the transmission is
in the second start mode
Shift while holding the lock release button in
With the brake pedal depressed, shift
while holding the lock release button in.
(The ignition switch must be in “ON” position.)
Shift normaly
When the cruise control is being used, even if you downshift the transmis sion by turning off the overdrive switch, engine braking will not be
enabled because the cruise control is not cancelled. For ways to decrease t he vehicle speed, see ”Cruise control” in this section.
Page 38 of 142
’01 L/C U (L/O 0008)
11 8
CAUTION
Never put your foot on the accelerator
pedal while shifting.
3. Release the parking brake and brake pedal. Depress the accelerator pedal
slowly for smooth starting.
(c) Using engine braking
To use engine braking, you can downshift
the transmission as follows:
� Turn off the overdrive switch. The ”O/D
OFF” indicator light will come on and
the transmission will downshift to third
gear.
� Shift into the ”2” position. The trans-
mission will downshift to second gear
when the vehicle speed drops down to
or lower than following speed for se-
cond gear, and more powerful engine
braking will be enabled.
Four –wheel drive control lever
in ”H” 112 km/h (70 mph) . . . . . . . . . . .
Four –wheel drive control lever
in ”L” 39 km/h (24 mph) . . . . . . . . . . . �
Shift into the ”L” position. The trans-
mission will downshift to first gear
when the vehicle speed drops down to
or lower than following speed for ”L”
position and maximum engine braking
will be enabled.
Four –wheel drive control lever
in ”H” 57 km/h (35 mph) . . . . . . . . . . .
Four –wheel drive control lever
in ”L” 12 km/h (7 mph) . . . . . . . . . . .
When the cruise control is being used,
even if you downshift the transmission by
turning off the overdrive switch, engine
braking will not be enabled because the
cruise control is not cancelled.
For ways to decrease the vehicle speed,
see ”Cruise control” in this section.
CAUTION
Be careful when downshifting on a
slippery surface. Abrupt shifting could
cause the vehicle to spin or skid.
(d) Using ”2” and ”L” positions
The ”2” and ”L” positions are used for
strong engine braking as described pre-
viously. With the selector lever in ”2” or ”L”, you
can start the vehicle in motion as with the
lever in ”D”.
With the selector lever in ”2”, the vehicle
will start in first gear and automatically
shift to second gear.
With the selector lever in ”L”, the trans-
mission is engaged in first gear.
NOTICE
�
Be careful not to over-rev the en-
gine. Watch the tachometer to keep
engine rpm from going into the red
zone. The approximate maximum al-
lowable speed for each position is
given below for your reference:
km/h (mph)
Transmission Transfer L H
2 42 (26) 104 (65) . . . . . . .
L 23 (14) 57 (35) . . . . . . .
� Do not continue hill climbing or
hard towing for a long time in the
”2” or ”L” position. This may cause
severe automatic transmission dam-
age from overheating. To prevent
such damage, ”D” position should
be used in hill climbing or hard
towing.
Page 39 of 142
’01 L/C U (L/O 0008)11 9
(e) Backing up
1. Bring the vehicle to a complete stop.
2. With the brake pedal held down with your foot, shift the selector lever to the
”R” position.
NOTICE
Never shift into reverse while the ve-
hicle is moving.
(f) Parking
1. Bring the vehicle to a complete stop.
2. Pull the parking brake lever up fully to securely apply the parking brake.
3. With the brake pedal pressed down, shift the selector lever to the ”P” posi-
tion.
If the four–wheel drive control is in the
”N” position while the selector lever is in
the ”P” position, the transmission will
damage and the wheels will not lock.
CAUTION
While the vehicle is moving, never
attempt to move the selector lever
into ”P” position under any circum-
stances. Serious mechanical damage
and loss of vehicle control may re-
sult.
(g) Good driving practice
� If the transmission repeatedly shifts up
and down between third gear and over-
drive when climbing a gentle slope, the
overdrive switch should be turned off.
Be sure to turn the switch on immedi-
ately afterward.
� When towing a trailer, in order to main-
tain engine braking efficiency, do not
use overdrive.
CAUTION
Always keep your foot on the brake
pedal while stopped with the engine
running. This prevents the vehicle
from creeping.
NOTICE
Do not hold the vehicle on an up-
grade with the accelerator pedal. It
can cause the transmission to over-
heat. Always use the brake pedal or
parking brake.
(h) Rocking your vehicle if stuck
CAUTION
If your vehicle becomes stuck in
snow, mud, sand, etc., then you may
attempt to rock the vehicle free by
moving it forward and backward. Do
not attempt this procedure if people
or objects are anywhere near the ve-
hicle. During the rocking operation
the vehicle may suddenly move for-
ward or backward as it becomes un-
stuck, causing injury or damage to
nearby people or objects.
Page 43 of 142
’01 L/C U (L/O 0008)123
Parking brake
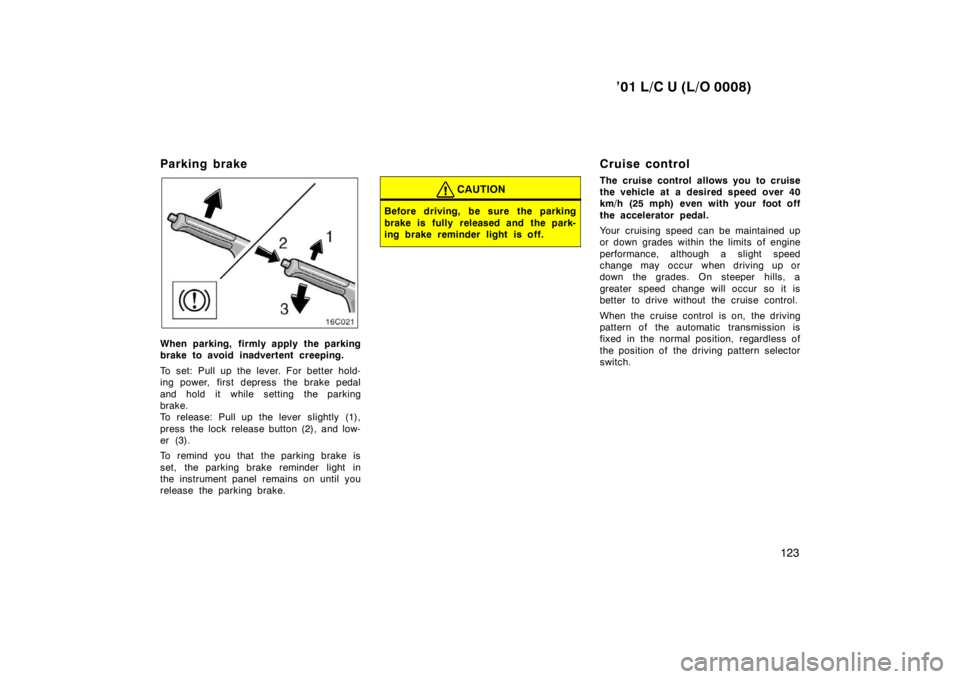
When parking, firmly apply the parking
brake to avoid inadvertent creeping.
To set: Pull up the lever. For better hold-
ing power, first depress the brake pedal
and hold it while setting the parking
brake.
To release: Pull up the lever slightly (1),
press the lock release button (2), and low-
er (3).
To remind you that the parking brake is
set, the parking brake reminder light in
the instrument panel remains on until you
release the parking brake.
CAUTION
Before driving, be sure the parking
brake is fully released and the park-
ing brake reminder light is off.
Cruise control
The cruise control allows you to cruise
the vehicle at a desired speed over 40
km/h (25 mph) even with your foot off
the accelerator pedal.
Your cruising speed can be maintained up
or down grades within the limits of engine
performance, although a slight speed
change may occur when driving up or
down the grades. On steeper hills, a
greater speed change will occur so it is
better to drive without the cruise control.
When the cruise control is on, the driving
pattern of the automatic transmission is
fixed in the normal position, regardless of
the position of the driving pattern selector
switch.
Page 94 of 142
’01 L/C U (L/O 0008)
186
DRUM
−IN −DISC TYPE PARKING BRAKE
SYSTEM
Your vehicle has a drum −in −disc type
parking brake system. This type of brake
system n eeds bedding −down of the brake
shoes periodically or whenever the parking
brake shoes and/or drums are replaced.
Have your Toyota dealer perform the bed-
ding −down.
BRAKE ASSIST SYSTEM
When you slam the brakes on, the
brake assist system judges as an emer-
gency stop and provides more powerful
braking for a driver who cannot hold
down the brake pedal firmly.
When you slam the brakes on, more pow-
erful braking will be applied. At this time,
you may hear a sound in the engine
compartment and feel the vibrations of the
brake pedal. This does not indicate a mal-
function.
The brake assist system becomes opera-
tive after the vehicle has accelerated to
a speed in excess of approximately 10
km/h (6 mph). It stops operating when the
vehicle decelerates to a speed below
approximately 5 km/h (3 mph). The brake assist system may not work for
about 60 seconds after the engine is
started.
For an explanation of this system’s warn-
ing light, see “Service reminder indicators
and warning buzzers” in Section 1
−5. Brake pad wear limit indicators
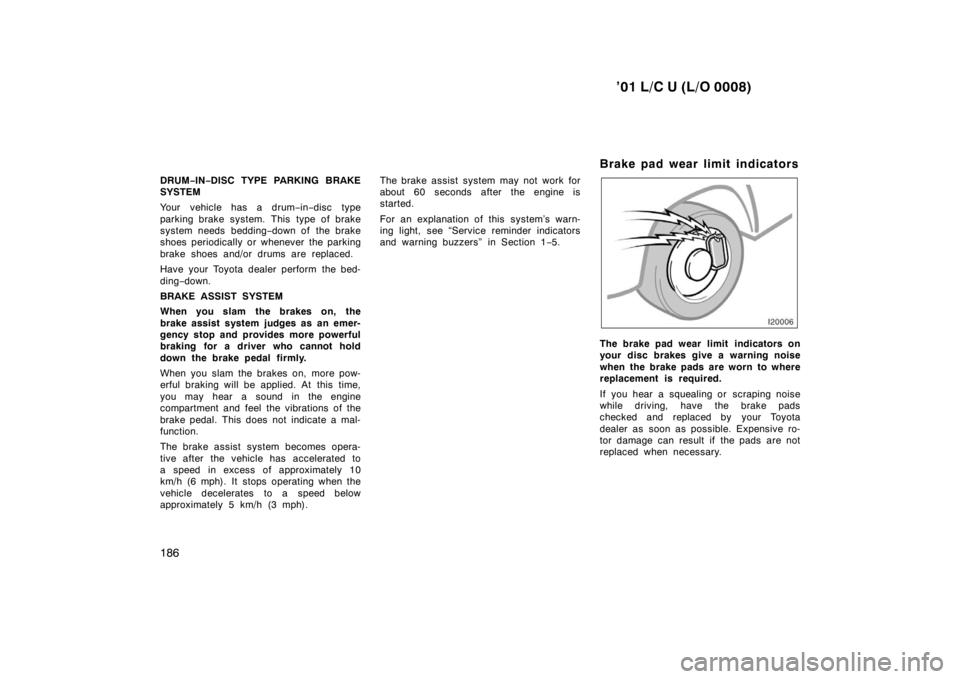
The brake pad wear limit indicators on
your disc brakes give a warning noise
when the brake pads are worn to where
replacement is required.
If you hear a squealing or scraping noise
while driving, have the brake pads
checked and replaced by your Toyota
dealer as soon as possible. Expensive ro-
tor damage can result if the pads are not
replaced when necessary.
Page 109 of 142

’01 L/C U (L/O 0008)
238
INSIDE THE VEHICLE
Items listed below should be checked
regularly, e.g. while performing periodic
services, cleaning the vehicle, etc.
Lights
Make sure the headlights, stop lights, tail
lights, turn signal lights, and other lights
are all working. Check headlight aim.
Service reminder indicators and warning
buzzers
Check that all service reminder indicators
and warning buzzers function properly.
Steering wheel
Be alert for changes in steering condition,
such as hard steering or strange noise.
Seats
Check that all front seat controls such as
seat adjusters, seatback recliner, etc. op-
erate smoothly and that all latches lock
securely in any position. Check that the
head restraint move up and down smooth-
ly and that the locks hold securely in any
latched position. For folding
−down rear
seatbacks, swing −up rear seat cushions
and detachable third seats, check that the
latches lock securely. Seat belts
Check that the seat belt system such as
buckles, retractors and anchors operate
properly and smoothly. Make sure the belt
webbing is not cut, frayed, worn or dam-aged.
Accelerator pedal
Check the pedal for smooth operation and
uneven pedal effort or catching.
Brake pedal
Check the pedal for smooth operation and
that the pedal has the proper clearance.
Check the brake booster function.
Brakes
At a safe place, check that the brakes do
not pull to one side when applied.
Parking brake
Check that the lever has the proper travel
and that, on a safe incline, your vehicle
is held securely with only the parking
brake applied.
Automatic transmission ”Park” mecha-
nism
Check the lock release button of the se-
lector lever for proper and smooth opera-
tion. On a safe incline, check that your
vehicle is held securely with the selector
lever in ”P” position and all brakes re-
leased.
IN THE ENGINE COMPARTMENT
Items listed below should be checked
from time to time, e.g. each time when
refueling.
Washer fluid
Make sure there is sufficient fluid in the
tank. See Section 7
−3 for additional in-
formation.
Engine coolant level
Make sure the coolant level is between
the ”FULL” and ”LOW” lines on the see −
through reservoir when the engine is cold.
See Section 7 −2 for additional information.
Battery electrolyte level
Make sure the electrolyte level of all bat-
tery cells is between upper and lower lev-
el lines on the case. Add only distilled
water when replenishing. See Section 7 −3
for additional information.