Page 4 of 142
’01 L/C U (L/O 0008)
2 1. Side vents
2. Side defroster outlets
3. Instrument cluster
4. Center vents
5. Electric moon roof switches and/or
personal lights
6. Glove box
7. Power door lock switches
8. Power window switches
9. Automatic transmission selector lever
10. Seat heater switches
11 . C u p h o l d e r
12. Parking brake lever
13. Second start mode selector button and driving pattern selector button
14. Four −wheel drive control lever
15. Lower vent
16. Hood lock release lever
17. Fuel filler door opener
18. Window lock switch
Instrument panel overview �
View A
Page 27 of 142
’01 L/C U (L/O 0008)25
BACK DOOR CHILD−PROTECTOR
Move the lock lever to the ”LOCK”
position as shown on the label.
This feature allows you to lock a back
door so it can be opened from the outside
only, not from inside. We recommend us-
ing this feature whenever small children
are in the vehicle.
CAUTION
Before driving, be sure that the back
door is closed and locked, especially
when small children are in the ve-
hicle. Along with the proper use of
seat belts, locking the doors helps
prevent the driver and passengers
from being thrown out from the ve-
hicle during an accident. It also helps
prevent the doors from being opened
unintentionally.
Hood
To open the hood: 1. Pull the hood lock release lever. The hood will spring up slightly.
CAUTION
Before driving, be sure that the hood
is closed and securely locked. Other-
wise, the hood may open unexpected-
ly while driving and an accident may
occur.
Page 28 of 142

’01 L/C U (L/O 0008)
26
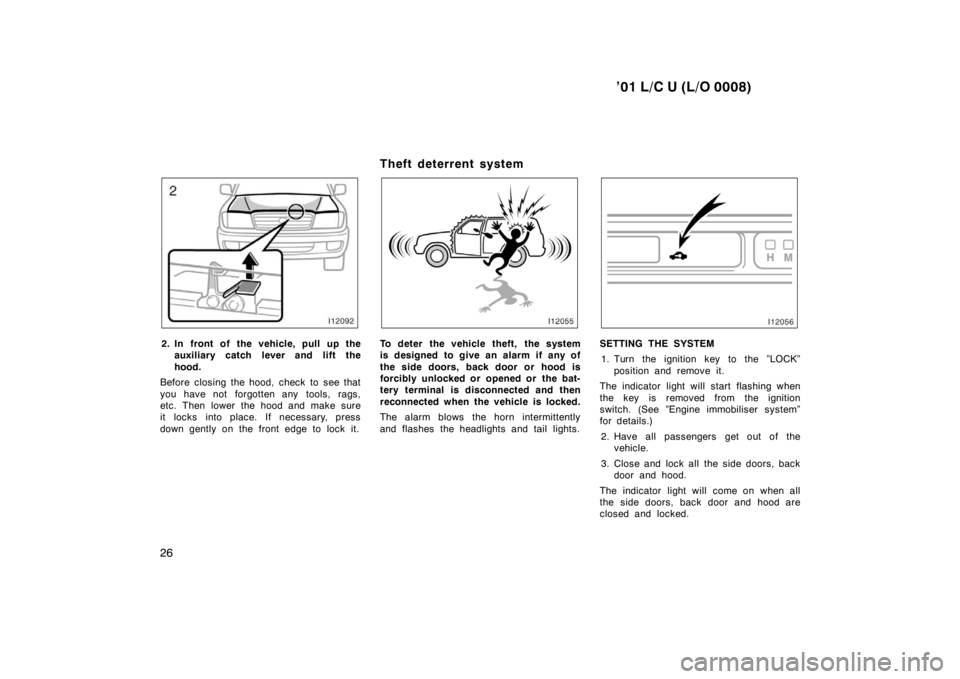
2. In front of the vehicle, pull up the auxiliary catch l ever and lift the
hood.
Before closing the hood, check to see that
you have not forgotten any tools, rags,
etc. Then lower the hood and make sure
it locks into place. If necessary, press
down gently on the front edge to lock it. Theft deterrent systemTo deter the vehicle theft, the system
is designed to give an alarm if any of
the side doors, back door or hood is
forcibly unlocked or opened or the bat-
tery terminal is disconnected and then
reconnected when the vehicle is locked.
The alarm blows the horn intermittently
and flashes the headlights and tail lights.SETTING THE SYSTEM
1. Turn the ignition key to the ”LOCK” position and remove it.
The indicator light will start flashing when
the key is removed from the ignition
switch. (See ”Engine immobiliser system”
for details.)
2. Have all passengers get out of the vehicle.
3. Close and lock all the side doors, back door and hood.
The indicator light will come on when all
the side doors, back door and hood are
closed and locked.
Page 29 of 142

’01 L/C U (L/O 0008)27
The system will automatically be set after
30 seconds. When the system is set, the
indicator light will start flashing again.
4. After making sure the indicator light starts flashing, you may leave the ve-
hicle.
Never leave anyone in the vehicle when
you set the system, because unlocking
from the inside will activate the system.
WHEN THE SYSTEM IS SET
Activating the system
The system will give the alarm under the
following conditions: � If any of the side doors is unlocked or
opened without the key or wireless re-
mote control key, or if the back door
or hood is forcibly opened
� If the battery terminal is disconnected
and then reconnected
The indicator light will come on when the
system is activating. If any of the side door or back door is
unlocked without the key or wireless re-
mote control key and the key is not in the
ignition switch, all the side doors and
back door will be automatically locked
again.
After one minute, the alarm will automati-
cally stop and the indicator light will starts
flashing again.
Reactivating the alarm
Once set, the system automatically resets
the alarm after the alarm stops.
The alarm will activate again under the
same circumstances described in
”Activating the system”.
Stopping the alarm
The alarm will be stopped by the following
two ways:
� Turn the ignition key from the ”LOCK”
to ”ON” position.
� Unlock any of the side doors or back
door with the key or wireless remote
control key.
These ways cancel the system at the
same time. TESTING THE SYSTEM
1. Open all the windows.
2. Set the system as described above. The side doors and back door should
be locked with the key or wireless re-
mote control key. Be sure to wait until
the indicator light goes off or starts
flashing.
3. Unlock any side door or back door from the inside. The system should ac-
tivate the alarm.
4. Stopping the alarm as described above.
5. Repeat this operation for the other doors, back door and hood. When test-
ing on the hood, also check that the
system is activated when the battery
terminal is disconnected and then re-
connected.
If the system does not work properly,
have it checked by your Toyota dealer.
Page 108 of 142

’01 L/C U (L/O 0008)237
If you are a skilled do
−it−yourself
mechanic, the Toyota service manuals are
recommended. Please be aware that do −it−yourself maintenance can affect your
warranty coverage. See ”Owner ’s Warranty
Information Booklet” or ”Owner ’s Manual
Supplement” for the details. General maintenance
Listed below are the general maintenance
items that should be performed as fre-
quently as specified. In addition to check-
ing the items listed, if you notice any
unusual noise, smell or vibration, you
should investigate the cause or take your
vehicle to your Toyota dealer or a quali-
fied service shop immediately. It is recom-
mended that any problem you notice be
brought to the attention of your dealer or
the qualified service shop for their advice.
CAUTION
Make these checks only where ade-
quate ventilation can be obtained if
you run the engine.
OUTSIDE THE VEHICLE
Items listed below should be performed
from time to time, unless otherwise
specified.
Tire pressure
Check the pressure with a gauge every
two weeks, or at least once a month. See
Section 7
−2 for additional information. Tire surface and wheel nuts
Check the tires carefully for cuts, damage
or excessive wear. See Section 7
−2 for
additional information. When checking the
tires, make sure no nuts are missing, and
check the nuts for looseness. Tighten
them if necessary.
Tire rotation
Rotate the tires according to the mainte-
nance schedule. (For scheduled mainte-
nance information, please refer to the
”Scheduled Maintenance Guide” or ”Own-
er ’s Manual Supplement”.) See Section 7 −2 for additional information.
Fluid leaks
Check underneath for leaking fuel, oil, wa-
ter or other fluid after the vehicle has
been parked for a while. If you smell fuel
fumes or notice any leak, have the cause
found and corrected immediately.
Doors and engine hood
Check that all doors and back door oper-
ate smoothly and all latches lock securely.
Make sure the engine hood secondary
latch secures the hood from opening when
the primary latch is released.
Page 125 of 142
’01 L/C U (L/O 0008)267
Light bulbs
Bulb
No.WTy p e
Rear turn signal
lights744021D
Stop/tail lights744321/5D
Back −up lights744021D
License plate lights—5D
Interior lights—8E
Personal lights
Ty p e A
Ty p e B
— —5 8F
E
Glove box light—1.4D
Door courtesy
lights—3D
Vanity lights—1.5E
A : HB3 halogen bulbs
B : HB4 halogen bulbs
C : Single end bulbs (amber)
D : Wedge base bulbs
E : Double end bulbs
F : Single end bulbs —Headlights
1. Open the hood.
LEFT–HAND HEADLIGHT: Remove the
washer inlet.
Be careful not to spill the washer fluid
over the ”NORMAL” level.
Do not place the washer inlet on the en-
gine or battery.2. Turn the bulb base counterclockwise to the front of the vehicle as shown.