Page 886 of 2572
I39088
- DIAGNOSTICSNAVIGATION SYSTEM
05-1807
1997 Author�: Date�:
2005 HIGHLANDER REPAIR MANUAL (RM1144U)
DISPLAY DOES NOT DIM (NIGHT SCREEN) WITH TAIL SWITCH
ON
INSPECTION PROCEDURE
1 CHECK SYSTEM
(a) Turn the light control switch to the TAIL or HEAD position.
Check if the illumination of the switches such as on the radio receiver assy comes on.
OK: Illumination of the switches comes on.
NG GO TO COMBINATION METER SYSTEM (SEE
PAGE 05-1868)
OK
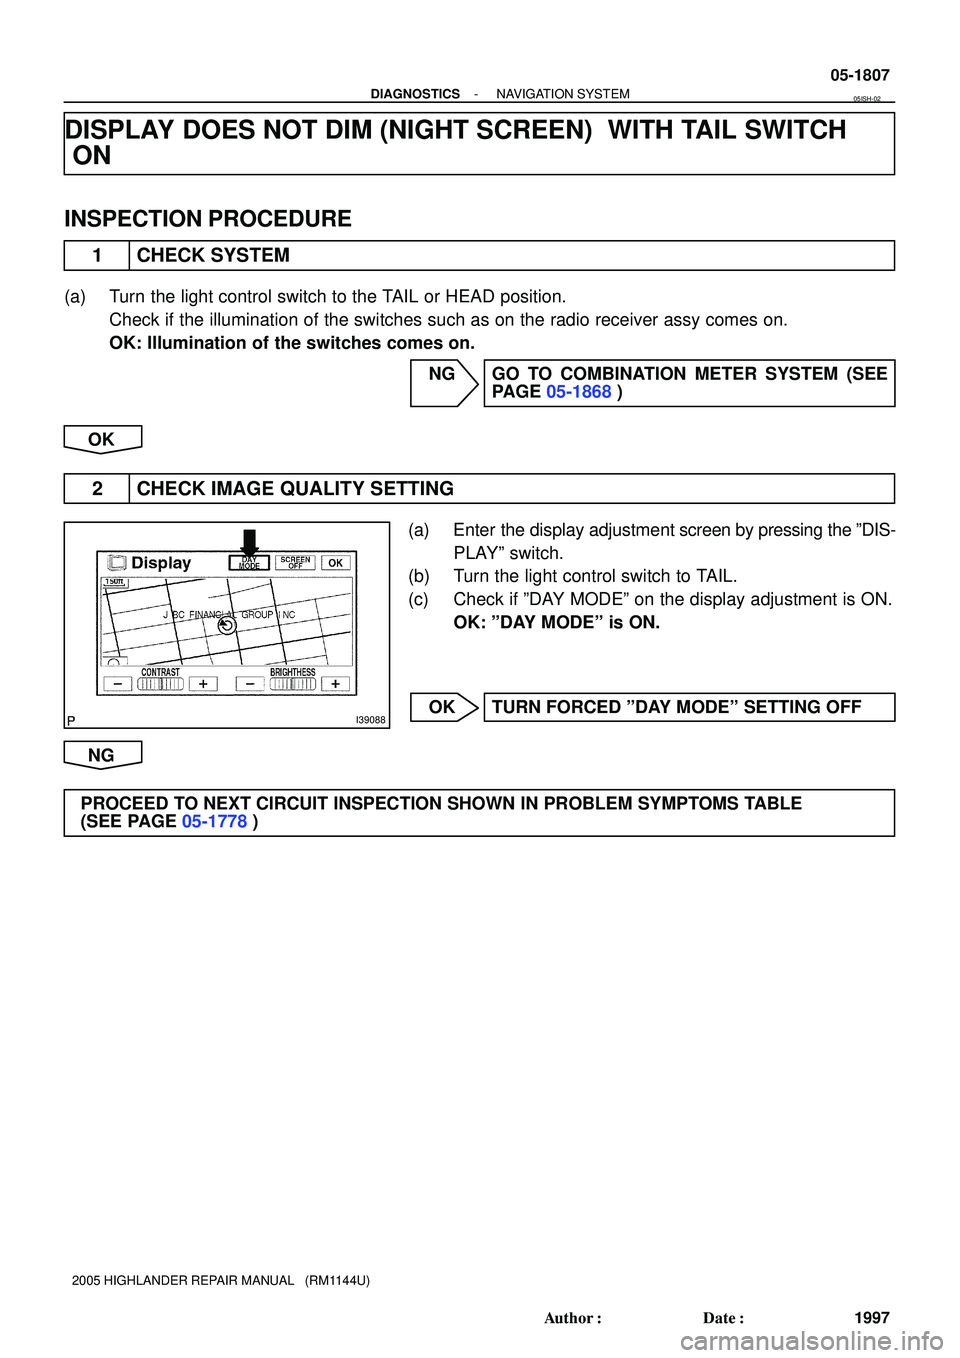
2 CHECK IMAGE QUALITY SETTING
(a) Enter the display adjustment screen by pressing the ºDIS-
PLAYº switch.
(b) Turn the light control switch to TAIL.
(c) Check if ºDAY MODEº on the display adjustment is ON.
OK: ºDAY MODEº is ON.
OK TURN FORCED ºDAY MODEº SETTING OFF
NG
PROCEED TO NEXT CIRCUIT INSPECTION SHOWN IN PROBLEM SYMPTOMS TABLE
(SEE PAGE 05-1778)
05ISH-02
Page 1379 of 2572

DIAGNOSIS DISPLAY DETAILED DESCRIPTION
HINT:
�This section contains")
05IS7-02
I38587*1
*2*1
*2*3
*4
05-1768
- DIAGNOSTICSNAVIGATION SYSTEM
1958 Author�: Date�:
2005 HIGHLANDER REPAIR MANUAL (RM1144U)
DIAGNOSIS DISPLAY DETAILED DESCRIPTION
HINT:
�This section contains a detailed description of displays within diagnostic mode.
�Illustrations may differ from the actual vehicle depending on the device settings and options. There-
fore, some detailed areas may not be shown exactly the same as on the actual vehicle.
1. System Check
(a) System Check Mode Display
Device Names and Hardware Address/*1
HINT:
�Registered device names are displayed below.
�If a device name is unknown to the system, its physical address is shown instead.
Address No.NameAddress No.Name
11 0EMV120AV X
1281DIN TV140AV N
144G-BOOK178NAVI
17CMONET190AUDIO H/U
1ACCAMERA-C1B0Rr-TV
1C0Rr-CONT1C2TV-TUNER2
1C4PANEL1C6G/W
1C8FM-M-LCD1D8CONT-SW
1ECBody1F0RADIO TUNER
1F1XM1F2SIRIUS
230TV-TUNER240CD-CH2
250DVD-CH280CAMERA
360CD-CH13A0MD-CH
17DTEL440DSP-AMP
530ETC5C8MAYDAY
1A0DVD-P1C6CLOCK
1F4RSA1F6RSE
480AMP
Page 2033 of 2572

SOUND QUALITY IS BAD ONLY WHEN PLAYING TAPE
INSPECTION PROCEDURE
1 REPL")
N17398
HeadCapstan
Pinch Roller
05-1686
- DIAGNOSTICSAUDIO SYSTEM
1876 Author�: Date�:
2005 HIGHLANDER REPAIR MANUAL (RM1144U)
SOUND QUALITY IS BAD ONLY WHEN PLAYING TAPE
INSPECTION PROCEDURE
1 REPLACE CASSETTE TAPE WITH ANOTHER AND RECHECK
(a) Replace the cassette tape with another one and recheck.
(1) Replace the cassette tape with another normal one to see if the same trouble occurs again.
OK: Malfunction disappears.
OK CASSETTE TAPE FAULTY
NG
2 CHECK FOR ANY FOREIGN OBJECT
(a) Check for foreign objects.
(1) Check that no foreign objects or defects are detected in the cassette tape player.
OK: No foreign objects or defects are detected.
NG REMOVE FOREIGN OBJECT
OK
3 CLEAN HEAD AND CHECK OPERATION
(a) Head cleaning
(1) Raise the cassette door with your finger. Using a
pencil or similar object, push in the guide.
(2) Using a cleaning pen or cotton applicator soaked in
cleaner, clean the head surface, pinch rollers and
capstans.
(3) Check if the same trouble occurs again.
OK: Malfunction disappears.
NG REPLACE RADIO RECEIVER ASSY
(SEE PAGE 67-6)
OK
HEAD DIRTY
055LU-12
Page 2034 of 2572
- DIAGNOSTICSAUDIO SYSTEM
05-1673
1863 Author�: Date�:
2005 HIGHLANDER REPAIR MANUAL (RM1144U)
SOUND QUALITY IS BAD IN ALL MODES (VOLUME IS TOO LOW)
INSPECTION PROCEDURE
1 ADJUST SOUND QUALITY
(a) Adjust the sound quality.
(1) Operate the radio receiver assy to adjust the sound quality.
OK: Malfunction disappears.
OK BAD SOUND QUALITY
NG
2 COMPARE IT WITH ANOTHER VEHICLE OF SAME MODEL
(a) Compare it with another vehicle of the same model.
(1) Compare it with the vehicle of the same type which does not have a trouble to see if there is any
difference in the sound quality.
OK: No difference is found.
OK SETTING
NG
PROCEED TO NEXT CIRCUIT INSPECTION SHOWN IN PROBLEM SYMPTOMS TABLE
(SEE PAGE 05-1632)
05CL8-04
Page 2049 of 2572

CASSETTE TAPE CANNOT BE EJECTED
INSPECTION PROCEDURE
1 PRESS ºEJECTº AND CHECK OPERATION
(a) Press º")
- DIAGNOSTICSAUDIO SYSTEM
05-1685
1875 Author�: Date�:
2005 HIGHLANDER REPAIR MANUAL (RM1144U)
CASSETTE TAPE CANNOT BE EJECTED
INSPECTION PROCEDURE
1 PRESS ºEJECTº AND CHECK OPERATION
(a) Press ºEJECTº and check the operation.
(1) Press the cassette tape EJECT switch of the radio receiver assembly for 2 seconds or more and
check that the cassette tape is ejected.
OK: The cassette tape is ejected.
NG REPLACE RADIO RECEIVER ASSY
(SEE PAGE 67-6)
OK
2 CHECK CASSETTE TAPE
(a) Check the cassette tape.
(1) Check that the ejected cassette tape does not have a peeled label, a cassette body deformation
or any other defects.
OK: No fault on the cassette tape.
NG CASSETTE TAPE FAULTY
OK
3 REPLACE CASSETTE TAPE WITH ANOTHER AND RECHECK
(a) Replace the cassette tape with another and recheck.
(1) Replace the cassette tape with another normal one to see if the same trouble occurs again.
OK: Malfunction disappears.
NG REPLACE RADIO RECEIVER ASSY
(SEE PAGE 67-6)
OK
CASSETTE TAPE FAULTY
05ASK-06
Page 2050 of 2572
05-1684
- DIAGNOSTICSAUDIO SYSTEM
1874 Author�: Date�:
2005 HIGHLANDER REPAIR MANUAL (RM1144U)
CASSETTE TAPE CANNOT BE INSERTED OR PLAYED
INSPECTION PROCEDURE
1 CHECK FOR ANY FOREIGN OBJECT
(a) Check for any foreign objects.
(1) Check that no foreign objects or defects are detected in the cassette tape player of the radio re-
ceiver assembly.
OK: No foreign objects or defects are detected.
NG REMOVE FOREIGN OBJECT
OK
2 CHECK CASSETTE TAPE
(a) Check the cassette tape.
(1) Check that the cassette tape is a normal tape with music or voice recorded.
OK: Proper cassette tape with music or voice recorded.
NG CASSETTE TAPE FAULTY
OK
3 REPLACE CASSETTE TAPE WITH ANOTHER AND RECHECK
(a) Replace the cassette tape with another one and recheck.
(1) Replace the cassette tape with another normal one to see if the same trouble occurs again.
OK: The function returns to be normal.
NG REPLACE RADIO RECEIVER ASSY
(SEE PAGE 67-6)
OK
CASSETTE TAPE FAULTY
05ASJ-06
Page 2051 of 2572

TAPE IS TANGLED DUE TO INCORRECT TAPE SPEED OR
AUTO-REVERSE MALFUNCTION")
N17398
HeadCapstan
Pinch Roller
- DIAGNOSTICSAUDIO SYSTEM
05-1687
1877 Author�: Date�:
2005 HIGHLANDER REPAIR MANUAL (RM1144U)
TAPE IS TANGLED DUE TO INCORRECT TAPE SPEED OR
AUTO-REVERSE MALFUNCTION
INSPECTION PROCEDURE
1 CHECK FOR ANY FOREIGN OBJECT
(a) Check for any foreign objects.
(1) Check that no foreign objects or defects are detected in the cassette tape player of the radio re-
ceiver assy.
OK: No foreign objects or defects are detected.
NG REMOVE FOREIGN OBJECT
OK
2 REPLACE CASSETTE TAPE WITH ANOTHER AND RECHECK(BELOW 90 MIN.)
(a) Replace the cassette tape with another one and recheck.
(1) Replace the cassette tape with another normal one (90
minutes. or less) to see if the same
trouble occurs again.
OK: Malfunction disappears.
OK CASSETTE TAPE FAULTY
NG
3 CLEAN HEAD AND CHECK OPERATION
(a) Head cleaning
(1) Raise the cassette door with your finger. Using a
pencil or similar object, push in the guide.
(2) Using a cleaning pen or cotton applicator soaked in
cleaner, clean the head surface, pinch rollers and
capstans.
(3) Check if the same trouble occurs again.
OK: Malfunction disappears.
NG REPLACE RADIO RECEIVER ASSY
(SEE PAGE 67-6)
OK
HEAD DIRTY
055LV-12
Page 2095 of 2572
Multi-display
controller
Sub-assyAVC-LAN Example:
- DIAGNOSTICSAUDIO SYSTEM
05-1613
1803 Author�: Date�:")
N17398
Example:
HeadCapstan
Pinch Roller
BE4331
I39082
Radio Receiver Assy
(Resister 60 to 80 W)Multi-display
controller
Sub-assyAVC-LAN Example:
- DIAGNOSTICSAUDIO SYSTEM
05-1613
1803 Author�: Date�:
2005 HIGHLANDER REPAIR MANUAL (RM1144U)
6. MAINTENANCE
Tape Player/Head Cleaning:
(a) Raise the cassette door with your finger.
Using a pencil or similar object, push in the guide.
(b) Using a cleaning pen or cotton applicator soaked in clean-
er, clean the head surface, pinch rollers and capstans.
7. MAINTENANCE
CD Player/Disc Cleaning:
If the disc gets dirty, clean the disc by wiping the surface from
the center to outside in the radial directions with a soft cloth.
NOTICE:
Do not use a conventional record cleaner or anti-static pre-
servative.
8. AVC-LAN Description
(a) What is AVC-LAN?
AVC-LAN, an abbreviation for ºAudio Visual Communication Local Area Networkº, is a united standard
developed by the manufacturers in affiliation with Toyota Motor Corporation. This standard pertains
to audio and visual signals as well as switch and communication signals.
(b) Purpose:
Recently, car audio systems have rapidly developed and the functions vastly changed. The conven-
tional car audio system is being integrated with multi-media interfaces similar to those in navigation
systems. At the same time, customers are demanding higher quality from their audio systems. This
is merely an overview of the standardization background. The specific purposes are as follows.
(1) To solve sound problems, etc. caused by using components of different manufacturers through
signal standardization.
(2) To allow each manufacturer to concentrate on developing products they do best. From this, rea-
sonably priced products can be produced.
HINT:
�If a +B or GND short is detected in the AVC-LAN circuit, communication is interrupted and the audio
system will stop functioning.