Page 607 of 2572
Explanation of Maintenance Items
39
Steering Linkage and Boots
With the vehicle stopped, check for excessive freeplay in the steering wheel.
Inspect the linkage for bending and damage and the dust boots for deterioration,
cracks and damage. Replace any damaged parts. A qualified technician should
perform these operations.
Timing Belt
Replace every 90,000 miles. A qualified technician should perform this operation.
Tire Rotation
Tires should be rotated at specified intervals according to the instructions in the
Owner’s Manual. When rotating tires, check for damage and uneven wear.
Replace if necessary.
Transfer Case Oil
Inspect or replace at specified intervals. When performing inspections, check for
signs of leakage. If you discover any leakage, have it repaired by a qualified tech
nician immediately.
Wheel Bearing and Drive Shaft Bushing Grease
Repack the wheel bearings with wheel bearing grease and the drive shaft
bushing with molybdenumdisulfide lithiumbase chassis grease. A qualified
technician should perform these operations.
Page 679 of 2572
'05 HIGHLANDER_U (L/O 0409)
377
2005 HIGHLANDER from Nov. '04 Prod. (OM48570U)
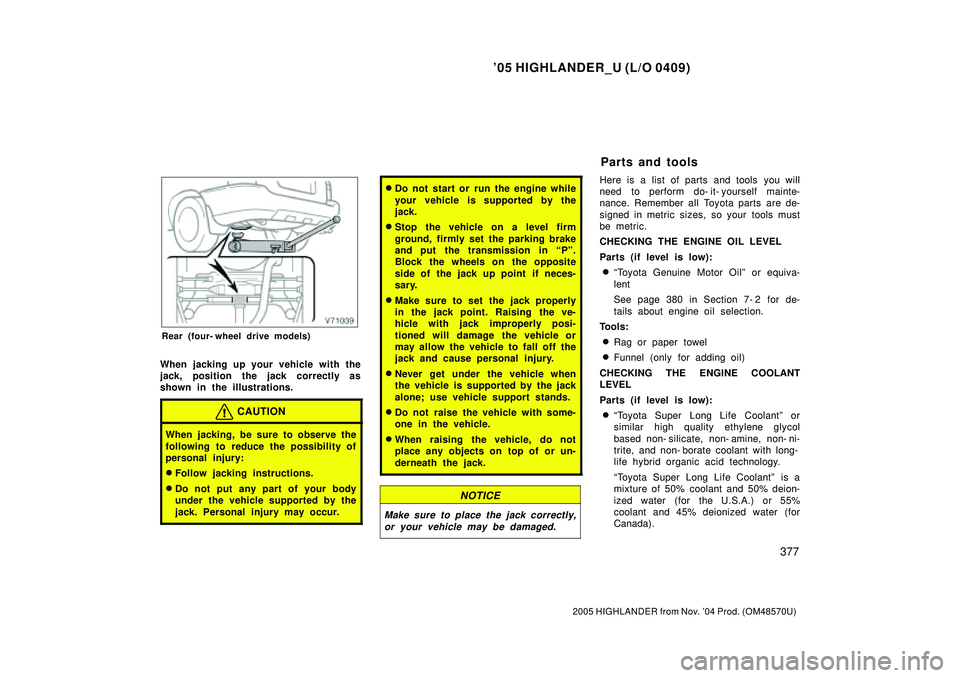
Rear (four- wheel drive models)
When jacking up your vehicle with the
jack, position the jack correctly as
shown in the illustrations.
CAUTION
When jacking, be sure to observe the
following to reduce the possibility of
personal injury:
�Follow jacking instructions.
�Do not put any part of your body
under the vehicle supported by the
jack. Personal injury may occur.
�Do not start or run the engine while
your vehicle is supported by the
jack.
�Stop the vehicle on a level firm
ground, firmly set the parking brake
and put the transmission in Pº.
Block the wheels on the opposite
side of the jack up point if neces-
sary.
�Make sure to set the jack properly
in the jack point. Raising the ve-
hicle with jack improperly posi-
tioned will damage the vehicle or
may allow the vehicle to fall off the
jack and cause personal injury.
�Never get under the vehicle when
the vehicle is supported by the jack
alone; use vehicle support stands.
�Do not raise the vehicle with some-
one in the vehicle.
�When raising the vehicle, do not
place any objects on top of or un-
derneath the jack.
NOTICE
Make sure to place the jack correctly,
or your vehicle may be damaged.
Here is a list of parts and tools you will
need to perform do- it- yourself mainte-
nance. Remember all Toyota parts are de-
signed in metric sizes, so your tools must
be metric.
CHECKING THE ENGINE OIL LEVEL
Parts (if level is low):
�Toyota Genuine Motor Oilº or equiva-
lent
See page 380 in Section 7- 2 for de-
tails about engine oil selection.
Tools:
�Rag or paper towel
�Funnel (only for adding oil)
CHECKING THE ENGINE COOLANT
LEVEL
Parts (if level is low):
�Toyota Super Long Life Coolantº or
similar high quality ethylene glycol
based non- silicate, non- amine, non- ni-
trite, and non- borate coolant with long-
life hybrid organic acid technology.
Toyota Super Long Life Coolantº is a
mixture of 50% coolant and 50% deion-
ized water (for the U.S.A.) or 55%
coolant and 45% deionized water (for
Canada).
Parts and tools
Page 681 of 2572
'05 HIGHLANDER_U (L/O 0409)
379
2005 HIGHLANDER from Nov. '04 Prod. (OM48570U)
DO- IT- YOURSELF MAINTENANCE
Engine and Chassis
Checking the engine oil level380 . . . . . . . . . . . . . . . . . . . . . . . . . . . . . . . . .
Checking the engine coolant level383 . . . . . . . . . . . . . . . . . . . . . . . . . . . .
Checking the radiator and condenser384 . . . . . . . . . . . . . . . . . . . . . . . . .
Checking brake fluid384 . . . . . . . . . . . . . . . . . . . . . . . . . . . . . . . . . . . . . . . .
Checking power steering fluid385 . . . . . . . . . . . . . . . . . . . . . . . . . . . . . . . .
Checking tire inflation pressure385 . . . . . . . . . . . . . . . . . . . . . . . . . . . . . .
Checking and replacing tires388 . . . . . . . . . . . . . . . . . . . . . . . . . . . . . . . . .
Rotating tires390 . . . . . . . . . . . . . . . . . . . . . . . . . . . . . . . . . . . . . . . . . . . . . . .
Installing snow tires and chains390 . . . . . . . . . . . . . . . . . . . . . . . . . . . . . .
Replacing wheels392 . . . . . . . . . . . . . . . . . . . . . . . . . . . . . . . . . . . . . . . . . . .
Aluminum wheel precautions393 . . . . . . . . . . . . . . . . . . . . . . . . . . . . . . . .
SECTION 7- 2
Page 682 of 2572
'05 HIGHLANDER_U (L/O 0409)
380
2005 HIGHLANDER from Nov. '04 Prod. (OM48570U)
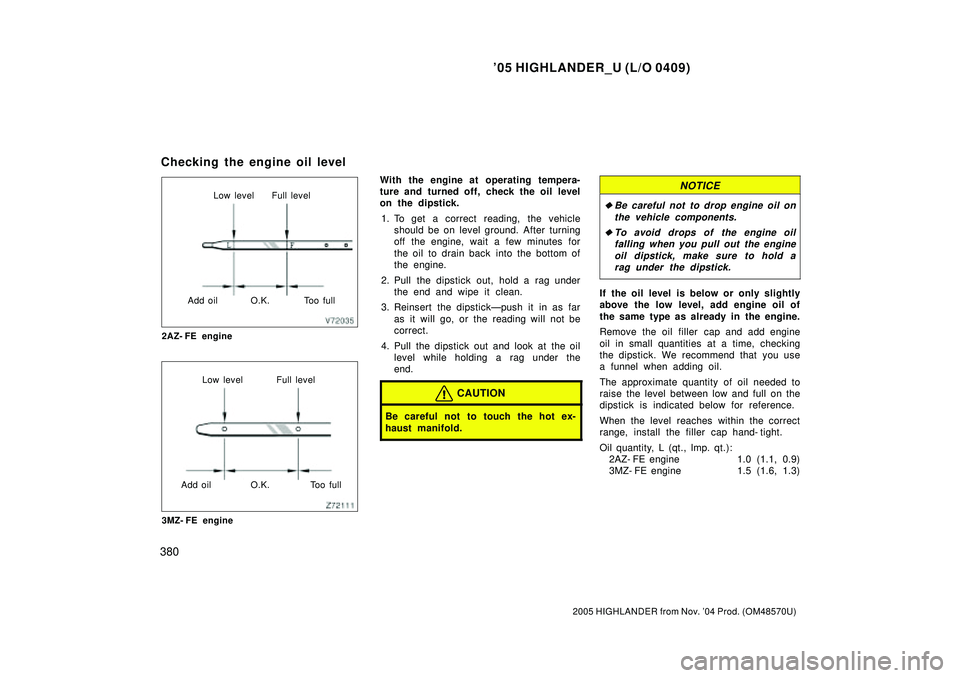
Low level Full level
Add oil O.K. Too full
2AZ- FE engine
Low level Full level
Add oil O.K. Too full
3MZ- FE engine
With the engine at operating tempera-
ture and turned off, check the oil level
on the dipstick.
1. To get a correct reading, the vehicle
should be on level ground. After turning
off the engine, wait a few minutes for
the oil to drain back into the bottom of
the engine.
2. Pull the dipstick out, hold a rag under
the end and wipe it clean.
3. Reinsert the dipstickÐpush it in as far
as it will go, or the reading will not be
correct.
4. Pull the dipstick out and look at the oil
level while holding a rag under the
end.
CAUTION
Be careful not to touch the hot ex-
haust manifold.
NOTICE
�Be careful not to drop engine oil on
the vehicle components.
�To avoid drops of the engine oil
falling when you pull out the engine
oil dipstick, make sure to hold a
rag under the dipstick.
If the oil level is below or only slightly
above the low level, add engine oil of
the same type as already in the engine.
Remove the oil filler cap and add engine
oil in small quantities at a time, checking
the dipstick. We recommend that you use
a funnel when adding oil.
The approximate quantity of oil needed to
raise the level between low and full on the
dipstick is indicated below for reference.
When the level reaches within the correct
range, install the filler cap hand- tight.
Oil quantity, L (qt., lmp. qt.):
2AZ- FE engine 1.0 (1.1, 0.9)
3MZ- FE engine 1.5 (1.6, 1.3)
Checking the engine oil level
Page 683 of 2572
'05 HIGHLANDER_U (L/O 0409)
381
2005 HIGHLANDER from Nov. '04 Prod. (OM48570U)
NOTICE
�Be careful not to spill engine oil on
the vehicle components.
�Avoid overfilling, or the engine
could be damaged.
�Check the oil level on the dipstick
once again after adding the oil.
ENGINE OIL SELECTION
Toyota Genuine Motor Oilº is used in
your Toyota vehicle. Use Toyota approved
Toyota Genuine Motor Oilº or equivalent
to satisfy the following grade and
viscosity.
Oil grade:
API grade SL Energy- Conservingº or
ILSAC multigrade engine oil
Recommended viscosity:
SAE 5W- 30
Outside temperature
SAE 5W- 30 is the best choice for good
fuel economy and good starting in cold
weather.
If SAE 5W- 30 is not available, SAE
10W- 30 may be used. However, it
should be replaced with SAE 5W- 30 at
the next oil change.
Page 698 of 2572
'05 HIGHLANDER_U (L/O 0409)
396
2005 HIGHLANDER from Nov. '04 Prod. (OM48570U)
CAUTION
BATTERY PRECAUTIONS
The battery produces flammable and
explosive hydrogen gas.
�Do not cause a spark from the bat-
tery with tools.
�Do not smoke or light a match near
the battery.
The electrolyte contains poisonous
and corrosive sulfuric acid.
�Avoid contact with eyes, skin or
clothes.
�Never ingest electrolyte.
�Wear protective safety glasses when
working near the battery.
�Keep children away from the bat-
tery.
EMERGENCY MEASURES
�If electrolyte gets in your eyes,
flush your eyes with clean water
immediately and get immediate
medical attention. If possible, con-
tinue to apply water with a sponge
or cloth while en route to the medi-
cal office.
�If electrolyte gets on your skin,
thoroughly wash the contact area. If
you feel pain or burning, get medi-
cal attention immediately.
�If electrolyte gets on your clothes,
there is a possibility of its soaking
through to your skin, so immediate-
ly take off the exposed clothing and
follow the procedure above, if nec-
essary.
�If you accidentally swallow electro-
lyte, drink a large quantity of water
or milk. Follow with milk of magne-
sia, beaten raw egg or vegetable
oil. Then go immediately for emer-
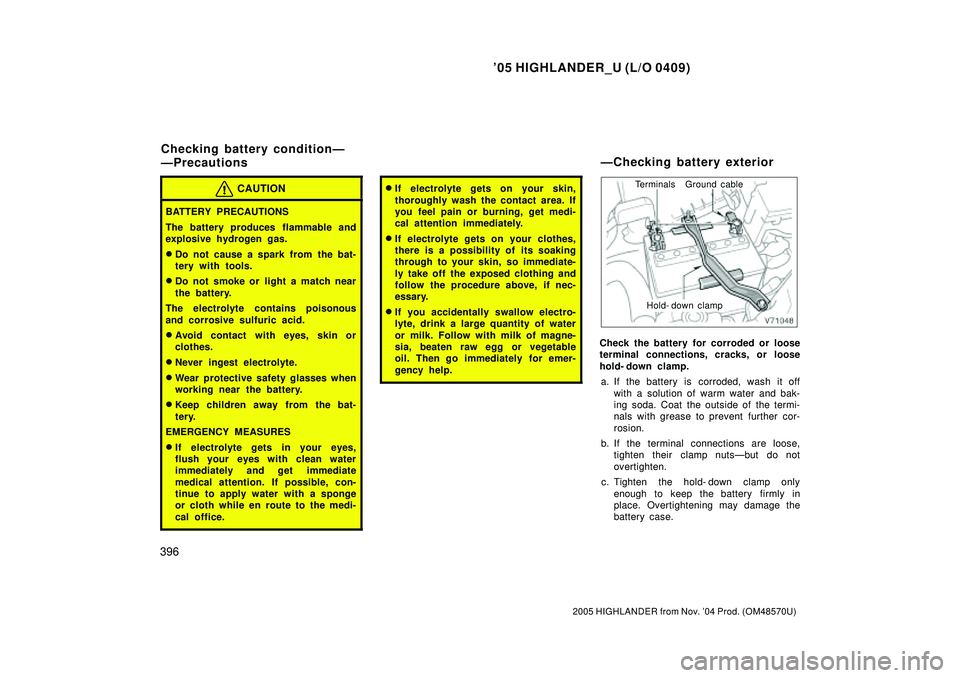
gency help.Hold- down clamp
Terminals Ground cable
Check the battery for corroded or loose
terminal connections, cracks, or loose
hold- down clamp.
a. If the battery is corroded, wash it off
with a solution of warm water and bak-
ing soda. Coat the outside of the termi-
nals with grease to prevent further cor-
rosion.
b. If the terminal connections are loose,
tighten their clamp nutsÐbut do not
overtighten.
c. Tighten the hold- down clamp only
enough to keep the battery firmly in
place. Overtightening may damage the
battery case.
Checking battery conditionÐ
ÐPrecautionsÐChecking battery exterior
Page 731 of 2572
141P2-01
A94204
Timing Marks
Groove
Timing Marks
A53043
No. 1 Cylinder TDC/Compression
EX
IN
A52469
14-6
- ENGINE MECHANICALVALVE CLEARANCE (2AZ-FE)
2499 Author�: Date�:
2005 HIGHLANDER REPAIR MANUAL (RM1144U)
VALVE CLEARANCE (2AZ-FE)
ADJUSTMENT
1. REMOVE FRONT WHEEL RH
2. REMOVE FRONT FENDER SPLASH SHIELD FRONT RH
3. REMOVE FRONT FENDER APRON SEAL RH
4. REMOVE ENGINE COVER SUB-ASSY NO.1
5. REMOVE IGNITION COIL ASSY
6. REMOVE SPARK PLUG
7. DISCONNECT VENTILATION HOSE
8. DISCONNECT VENTILATION HOSE NO.2
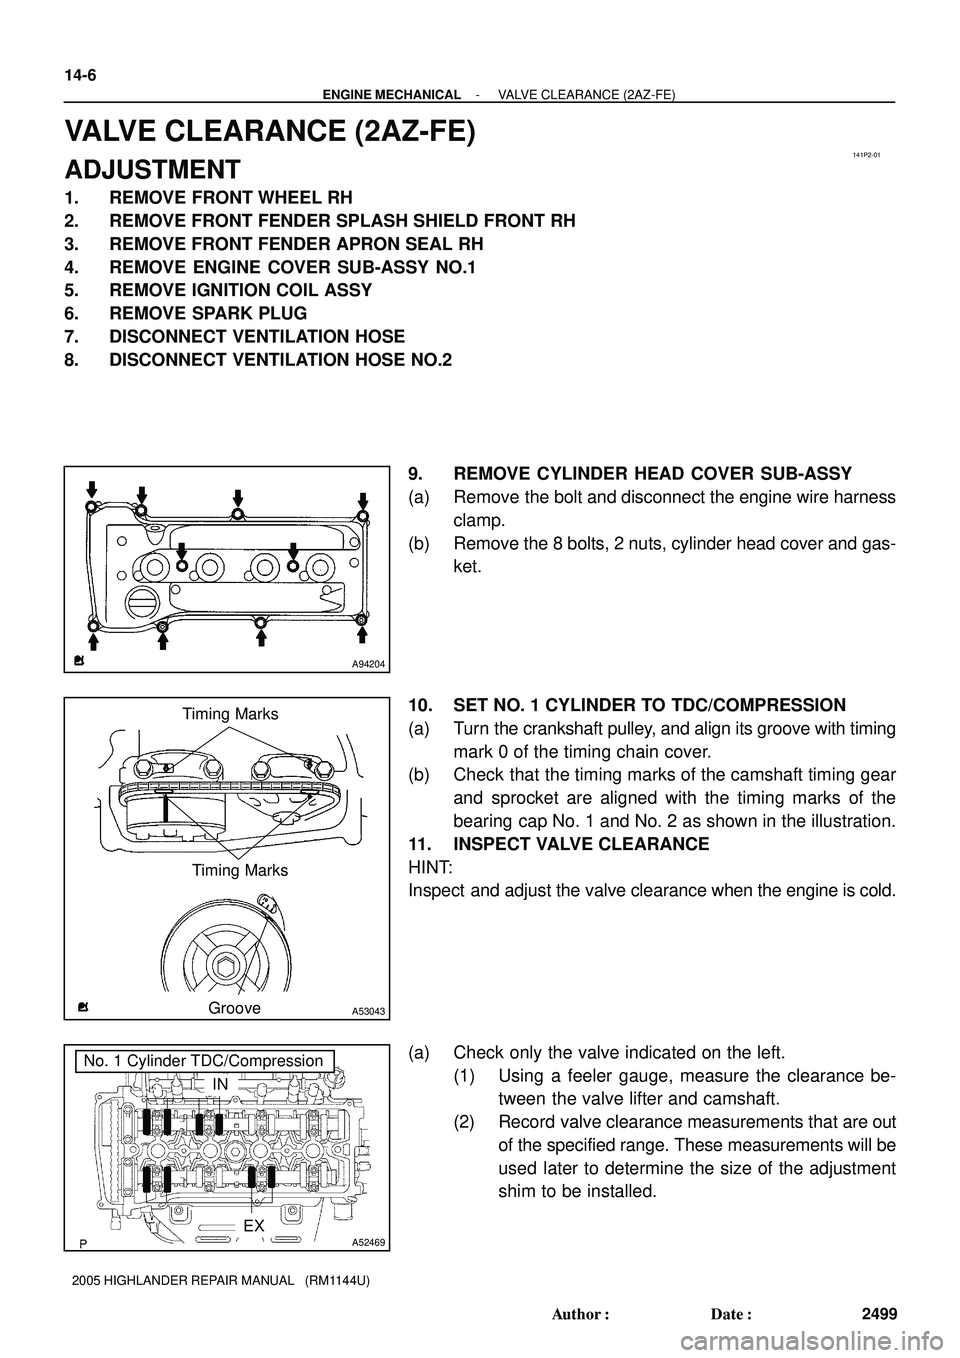
9. REMOVE CYLINDER HEAD COVER SUB-ASSY
(a) Remove the bolt and disconnect the engine wire harness
clamp.
(b) Remove the 8 bolts, 2 nuts, cylinder head cover and gas-
ket.
10. SET NO. 1 CYLINDER TO TDC/COMPRESSION
(a) Turn the crankshaft pulley, and align its groove with timing
mark 0 of the timing chain cover.
(b) Check that the timing marks of the camshaft timing gear
and sprocket are aligned with the timing marks of the
bearing cap No. 1 and No. 2 as shown in the illustration.
11. INSPECT VALVE CLEARANCE
HINT:
Inspect and adjust the valve clearance when the engine is cold.
(a) Check only the valve indicated on the left.
(1) Using a feeler gauge, measure the clearance be-
tween the valve lifter and camshaft.
(2) Record valve clearance measurements that are out
of the specified range. These measurements will be
used later to determine the size of the adjustment
shim to be installed.
Page 739 of 2572
A93972
Disconnect
HookPin
Turn
A93973
Plunger
Push
Turn
Seal Packing
A53051
NutNutA61989
A
B A
A
A
A
AB 14-14
- ENGINE MECHANICALVALVE CLEARANCE (2AZ-FE)
2507 Author�: Date�:
2005 HIGHLANDER REPAIR MANUAL (RM1144U)
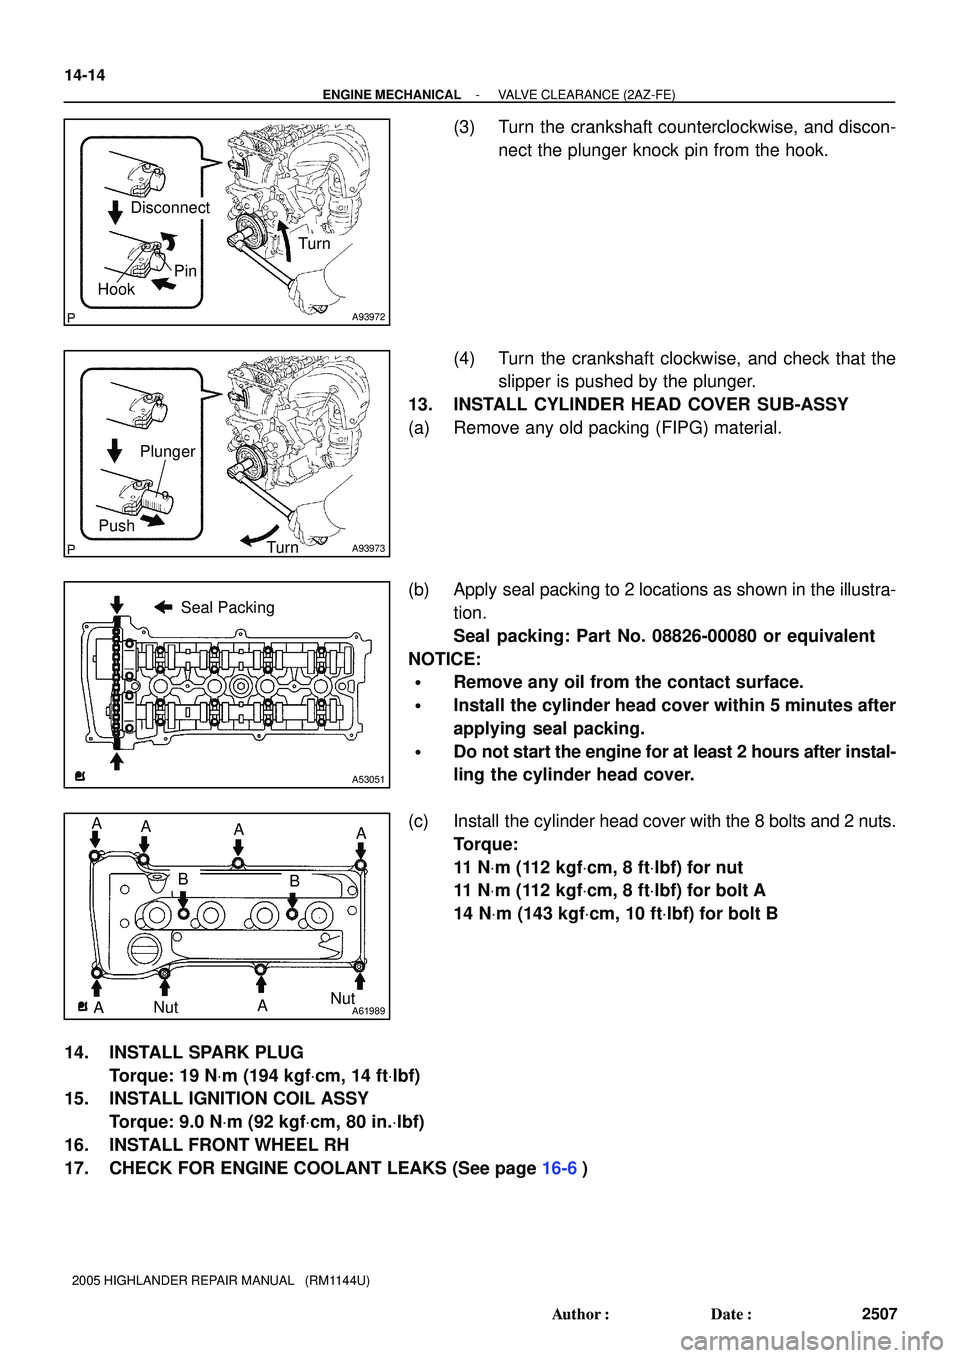
(3) Turn the crankshaft counterclockwise, and discon-
nect the plunger knock pin from the hook.
(4) Turn the crankshaft clockwise, and check that the
slipper is pushed by the plunger.
13. INSTALL CYLINDER HEAD COVER SUB-ASSY
(a) Remove any old packing (FIPG) material.
(b) Apply seal packing to 2 locations as shown in the illustra-
tion.
Seal packing: Part No. 08826-00080 or equivalent
NOTICE:
�Remove any oil from the contact surface.
�Install the cylinder head cover within 5 minutes after
applying seal packing.
�Do not start the engine for at least 2 hours after instal-
ling the cylinder head cover.
(c) Install the cylinder head cover with the 8 bolts and 2 nuts.
Torque:
11 NVm (112 kgfVcm, 8 ftVlbf) for nut
11 NVm (112 kgfVcm, 8 ftVlbf) for bolt A
14 NVm (143 kgfVcm, 10 ftVlbf) for bolt B
14. INSTALL SPARK PLUG
Torque: 19 NVm (194 kgfVcm, 14 ftVlbf)
15. INSTALL IGNITION COIL ASSY
Torque: 9.0 NVm (92 kgfVcm, 80 in.Vlbf)
16. INSTALL FRONT WHEEL RH
17. CHECK FOR ENGINE COOLANT LEAKS (See page 16-6)