Page 217 of 272

217 Car care and technical information
Fuse panel in instrument panel
# Amp Function
A 30 Trailer lights
B 10 Automatic transmission
C 7,5 Electric door mirrors; DICE
1 15 Brake lights; shift-lock override
2 15 Reversing lights
3 10 Parking lights, left
4 10 Parking lights, right
5 7,5 DICE / TWICE
6 30 Electric windows, right
6B 5 Stop lights, trailer
7 10 Fuel injection
8 15 Trunk lighting; trunk lock; door lighting; SID; car
phone
9 15 Audio System; diagnostic instrument; CD changer
10 15 Memory function, door mirrors; heating, rear seat
11 30 Central locking; electrically adjusted passenger seat
12 7,5 Automatic transmission
13 20 Audio System, amplifier
14 30 Ignition system, engine
15 15 Preheated oxygen sensor (catalytic converter)
16 20 DICE (direction indicators)
16B – –
17 20 Engine-management system
18 7,5 Door-mirror heating
19 20 Fuel pump
20 15 ACC; interior lighting; rear fog light
21 10 Audio System; rear-view mirror with auto dimming
function; telematics
22 40 Interior fan; air pump (3.0t V6 only)
23 15 Sunroof
24 40 Rear-window heating
25 30 Electrically adjustable driver’s seat; fuel-filler flap
26 7,5 ABS brakes; ACC
27 10 Engine-management system
28 7,5 Airbag (SRS)
29 7,5 Automatic transmission
IB530
BC123456 A
14
121110987
13
6B
1516
2324
222120191817
16B
5425262728293031
3635343332
39383755525356
ProCarManuals.com
Page 218 of 272
218 Car care and technical informationRelay panel under instrument panel Relay panel under instrument panel (cont.)30 7,5 Starter motor
31 7,5 Cruise control; water valve; fog lights, front
32 15 Ventilated front seats
33 7,5 Direction-indicator switch
34 30 Cigarette lighter
35 15 Daytime running light
36 30 Electric windows, left
37 30 Windshield wipers; rain sensor
38 30 Electric heating, front seats
39 20 Limp-home solenoid (automatic transmission)
52-5
6Spare fuses
# Function
A
B Electric heating of rear seat
C
D
E Main relay (engine management system)
F Fuel filler flap
G Fuel pump
H Ignition switch
I Rear-window / door mirrors heating
J Reversing lights
KStarter relay
L Limp-home function
IB531
A
BC
D
GEF
HI
KL J
ProCarManuals.com
Page 219 of 272
219 Car care and technical information
Fuse box under hood
Fuses
# Amp Function
1 60 ABS (Maxi fuse)
2––
315Horn
4 10 Rear window wiper (9-5 Wagon)
5 15 Fog lights (front spoiler)
6 30 Radiator fan, high speed
7 15 Low beam headlight, right
8 15 High beam headlight, right
9 15 Low beam headlight, left
10 15 High beam headlight, left
11 10 Headlight beam-length adjustment (certain markets
only); headlight washers / wipers
12 Spotlights (accessory)
13 15 High beam flasher
14 10 A/C; car alarm siren
15 30 Radiator fan
16 – –
17 – –
18 – –
IB532
18171615
14131211
10987
654312
10.1
3
5.2
5.12
9
8
7
11
12
13
ProCarManuals.com
Page 220 of 272
220 Car care and technical informationRelays
# Function
1 Washer, front/rear
2 Low beam headlight
3 High beam headlight
4 Extra lights (accessory)
5.1 Horn
5.2 Rain sensor
6 Wiper, rear (9-5 Wagon)
7 Radiator fan, low speed
8 Radiator fan, high speed, left fan
9 A/C-compressor
10.1 Front fog lights
10.2 Headlight wipers
11 Windshield wipers
12 Radiator fan, high speed, right fan
13 Autochecking of headlights
ProCarManuals.com
Page 225 of 272

225 Car care and technical information
Compact spare wheelThe compact spare is light and easy to
handle when changing the tire. Its use is
only permitted when a standard tire has sus-
tained a puncture. The maximum life of the
tire is only 2000 miles (3,500 km).
Do not exceed 50 mph (80 km/h) with the
compact spare fitted.
The compact spare should be inflated to
60 psi (420 kPa). Carry the punctured tire in
the spare-wheel well under the luggage-
compartment floor.
Have the standard tire repaired and refitted
as soon as possible (see also page 180).The spare wheel, together with the jack and
jack handle, front towrope attachment eye
and toolkit, is stowed away underneath a
panel in the luggage-compartment floor.
If you need to change a wheel, remove the
tool kit first and then the spare wheel.
The panel over the spare wheel can be held
open by hooking the handle onto the rubber
seal.
In the Saab 9-5 Sedan, there is a holder for
a warning triangle in the luggage compart-
ment trim. In the Saab 9-5 Wagon, there is
space for a warning triangle underneath the
panel in the luggage compartment floor.
NOTETo avoid damaging a punctured alloy
wheel it can be placed outside up in the
spare-wheel well but only while driving to
the closest workshop.
A general rule is that all heavy loads must
be well secured in the luggage compart-
ment, see page 136 and 139.
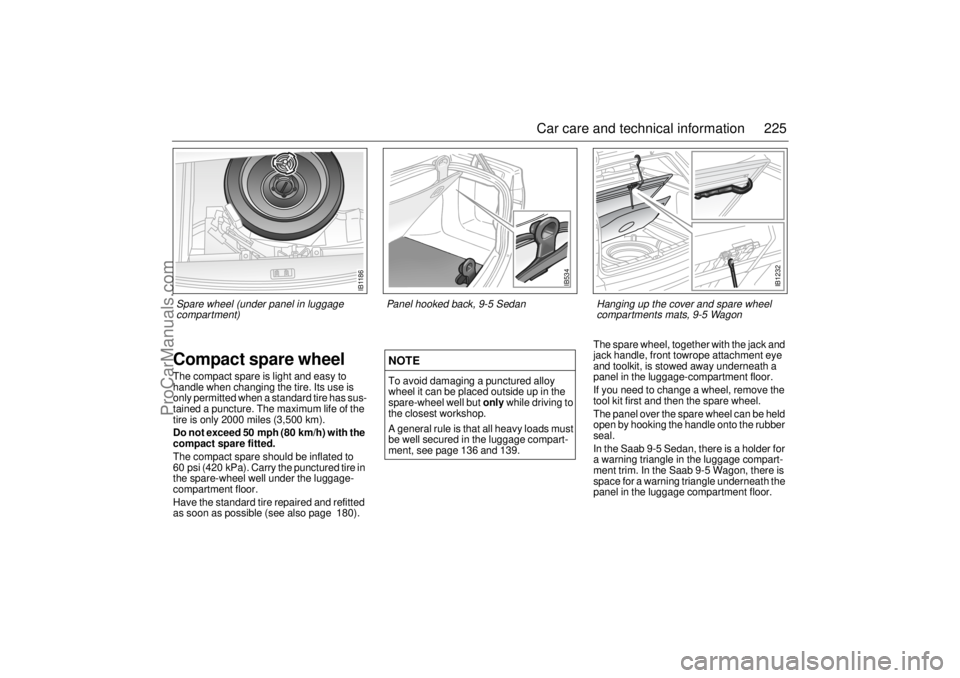
IB534
Panel hooked back, 9-5 Sedan
IB1232
Hanging up the cover and spare wheel
compartments mats, 9-5 Wagon
IB1186
Spare wheel (under panel in luggage
compartment)
ProCarManuals.com
Page 226 of 272

226 Car care and technical informationChanging a wheel
WARNING
The car jack is designed solely for use
in changing a wheel or fitting snow
chains. It must not be used to support
the car during repair work or servicing.
Never crawl under a car that is
supported only by a jack.
Special care must be taken if the car is
on a slope – use wheel chocks!
Position chocks, one ahead and one
behind, the wheel that is diagonally
opposite to the one to be changed.
Switch on the hazard warning lights if
the car is on a road.
Apply the parking brake and leave the
car in gear (1st or reverse). Automatic
transmission: move selector to the
P position.
Ensure that everybody is out of the car
before jacking it up.
Never start the engine while the car is
jacked up.
The jack must stand on a firm, level
surface.
Stow the jack in the place provided for
it under the panel in the floor of the lug-
gage compartment. Secure it properly
to avert injury to passengers in the
event of an accident.
Do not use the jack for any purpose
other than for jacking up the car.
ProCarManuals.com
Page 228 of 272

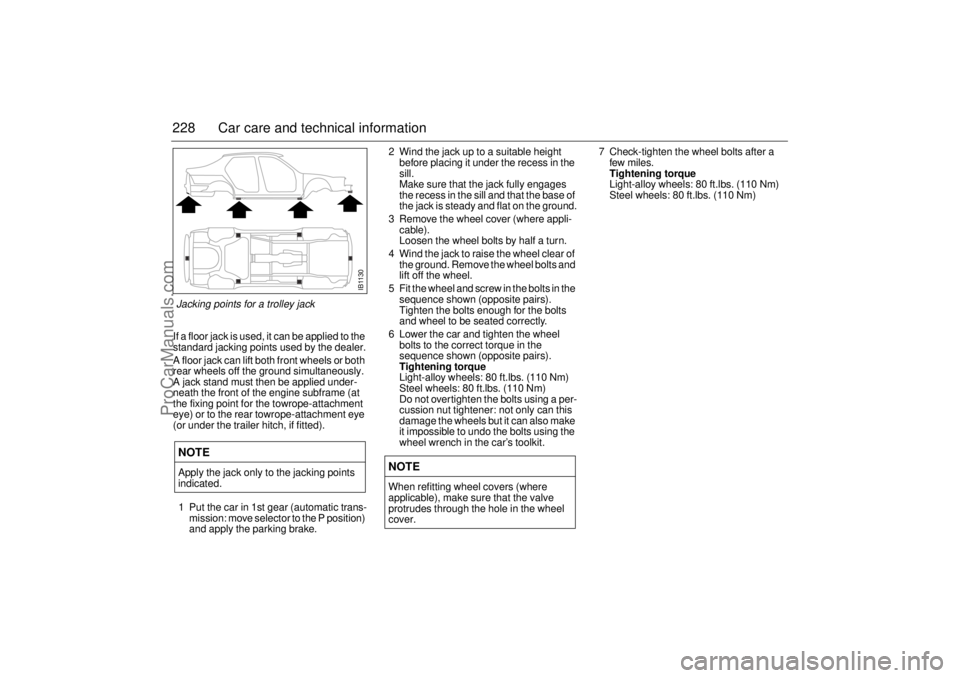
228 Car care and technical informationIf a floor jack is used, it can be applied to the
standard jacking points used by the dealer.
A floor jack can lift both front wheels or both
rear wheels off the ground simultaneously.
A jack stand must then be applied under-
neath the front of the engine subframe (at
the fixing point for the towrope-attachment
eye) or to the rear towrope-attachment eye
(or under the trailer hitch, if fitted).
1 Put the car in 1st gear (automatic trans-
mission: move selector to the P position)
and apply the parking brake.2 Wind the jack up to a suitable height
before placing it under the recess in the
sill.
Make sure that the jack fully engages
the recess in the sill and that the base of
the jack is steady and flat on the ground.
3 Remove the wheel cover (where appli-
cable).
Loosen the wheel bolts by half a turn.
4 Wind the jack to raise the wheel clear of
the ground. Remove the wheel bolts and
lift off the wheel.
5 Fit the wheel and screw in the bolts in the
sequence shown (opposite pairs).
Tighten the bolts enough for the bolts
and wheel to be seated correctly.
6 Lower the car and tighten the wheel
bolts to the correct torque in the
sequence shown (opposite pairs).
Tightening torque
Light-alloy wheels: 80 ft.lbs. (110 Nm)
Steel wheels: 80 ft.lbs. (110 Nm)
Do not overtighten the bolts using a per-
cussion nut tightener: not only can this
damage the wheels but it can also make
it impossible to undo the bolts using the
wheel wrench in the car’s toolkit. 7 Check-tighten the wheel bolts after a
few miles.
Tightening torque
Light-alloy wheels: 80 ft.lbs. (110 Nm)
Steel wheels: 80 ft.lbs. (110 Nm)NOTEApply the jack only to the jacking points
indicated.
NOTEWhen refitting wheel covers (where
applicable), make sure that the valve
protrudes through the hole in the wheel
cover.
IB1130
Jacking points for a trolley jack
ProCarManuals.com
Page 231 of 272

231 Car care and technical information
Safety beltsRegularly check the function of the safety
belts as follows:
Hold the diagonal strap and pull it sharply.
The safety belt should lock and it should
not be possible to withdraw it further.
Check the anchorage points in the floor.
They must not have suffered rust damage.
There must be no frayed threads in the web-
bing.
Safety belts must not come into contact with
substances such as polishes, oils or other
chemicals. If the straps are dirty, wash them
with warm water and a detergent or have
them replaced.
Upholstery and trimTo remove fluff or hairs from the seat uphol-
stery or headlining, use a moist, lint-free
cloth or a special lint remover (brush or
roller). Remove any dirty marks using a
cloth moistened with lukewarm soapy
water.
When using a stain remover, always work
from the outside towards the center to avoid
leaving a ring. If a soiled ring or spot should
remain, it can usually be removed using
lukewarm soapy water or water alone.
Wet patches left by spilt soft drinks or thin oil
must be wiped off immediately using an
absorbent material, such as kitchen paper,
and treated with stain remover.
Alcohol is recommended for removing
grease or oil stains, and a semi-stiff brush
may also be used.
Cleaning and caring for leather
upholsteryThe principal reason for treating leather
upholstery is to maintain its elegant appear-
ance and to provide it with a protective film.
Discoloration caused by dust and wear
mainly affects the lighter shades, although
this is not detrimental to the leather –
indeed, the patina resulting from use is often
considered desirable in leather. But if the
leather is allowed to become too grubby, it
can start to look shabby.
It is a good idea to clean and recondition the
leather twice a year – in conjunction with a
general spring-cleaning of the car – after the
winter and in the autumn, for instance. In
hot, dry climates, the leather will need to be
treated more frequently.
Moisten a soft cloth in a mild soap solution.
Carefully apply this damp (not wet) cloth to
the leather, working in light, circular move-
ments until the leather is clean. Repeat the
procedure using clean water and then leave
the leather to dry thoroughly. Finally, treat
the leather with a leather conditioner.
WARNING
If the car is involved in a collision, the
safety belts, belt pretensioners and other
components must be inspected by an
authorized Saab dealer.
Never make any alterations or repairs to
the safety belt yourself but visit an autho-
rized Saab dealer.
ProCarManuals.com