Page 5 of 373
Table of Contents (cont'd)
Defensive Driving
Drunken Driving
Control of a Vehicle
Braking
SteeringDriving Tips for Various Road Conditions
Recreational Vehicle Towing
Loading Your Vehicle
Towing a Trailer Heating and Air Conditioning
Setting the Radio Clock
Radio/Cassette Player/CD PlayerRadio Theft-Deterrent Feature
Steering Wheel Controls (If Equipped)
Hazard Warning Flashers
Jump Starting
Towing Your VehicleEngine Overheating
Changing a Flat Tire
If You're Stuck
Problems on the Road
Section
3
Section
4
Section
5
Your Driving and the Road Comfort Controls and Audio Systems
iii
Page 135 of 373

2-66
OnStar� System (If Equipped)
OnStar is a vehicle communications system that offers a
variety of services and provides a hands
-free
communication link between you and the OnStar Center.
A service subscription agreement and fee are required in
order to receive OnStar service. Services are available
24 hours a day, 7 days a week. For more information,
call 1
-888-ONSTAR-7 (1-888-667-8277).
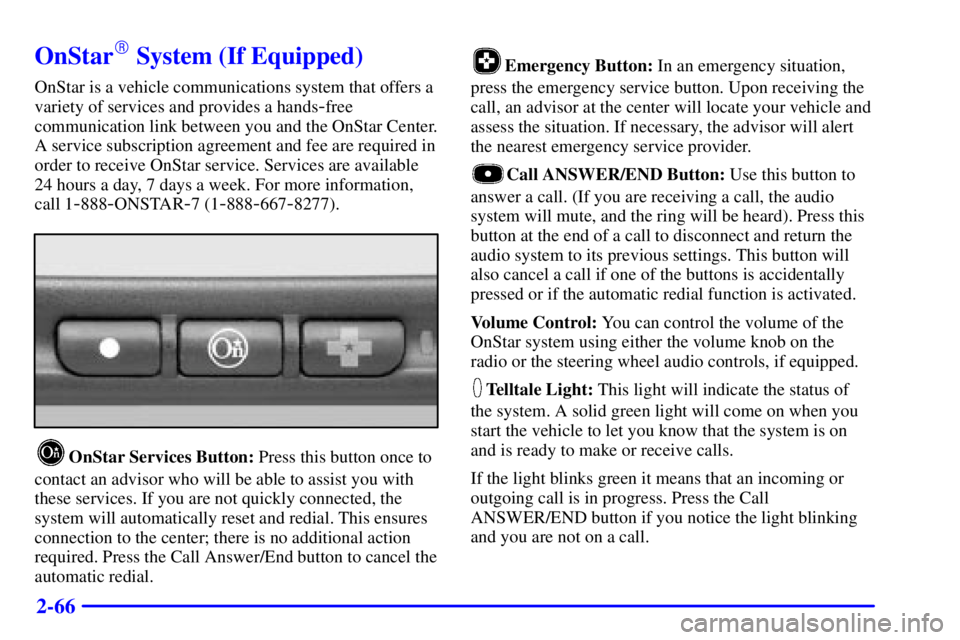
OnStar Services Button: Press this button once to
contact an advisor who will be able to assist you with
these services. If you are not quickly connected, the
system will automatically reset and redial. This ensures
connection to the center; there is no additional action
required. Press the Call Answer/End button to cancel the
automatic redial.
Emergency Button: In an emergency situation,
press the emergency service button. Upon receiving the
call, an advisor at the center will locate your vehicle and
assess the situation. If necessary, the advisor will alert
the nearest emergency service provider.
Call ANSWER/END Button: Use this button to
answer a call. (If you are receiving a call, the audio
system will mute, and the ring will be heard). Press this
button at the end of a call to disconnect and return the
audio system to its previous settings. This button will
also cancel a call if one of the buttons is accidentally
pressed or if the automatic redial function is activated.
Volume Control: You can control the volume of the
OnStar system using either the volume knob on the
radio or the steering wheel audio controls, if equipped.
Telltale Light: This light will indicate the status of
the system. A solid green light will come on when you
start the vehicle to let you know that the system is on
and is ready to make or receive calls.
If the light blinks green it means that an incoming or
outgoing call is in progress. Press the Call
ANSWER/END button if you notice the light blinking
and you are not on a call.
Page 162 of 373

2-93
The HUD also shows the following lights when they are
lit on the instrument panel cluster:
�Turn Signal Indicators
�High
-Beam Indicator Symbol
�Low Fuel Symbol
The HUD will display ªCHECK GAGEº when the
following items are lit on the instrument panel cluster:
�Oil Warning Symbol
�Coolant Temperature Symbol
�Charging System Symbol
When you sit straight in your seat, the HUD image will
appear straight ahead near the front bumper.
When the ignition key is turned to RUN, the HUD
image will come on. Then the Head
-Up Display will
operate normally.
NOTICE:
Although the HUD image appears to be near the
front of the vehicle, do not use it as a parking aid.
The HUD was not designed for that purpose.
If you try to use it that way, such as in a parking
lot, you may misjudge distance and run
into something.
When the HUD is on, the speedometer reading will be
displayed continually. The current radio station or CD
track number will only be displayed for three seconds
after the radio or CD track status changes. This will
happen whenever one of the radio controls is pressed,
either on the radio itself or on the optional steering
wheel controls.
Page 165 of 373
3-
3-1
Section 3 Comfort Controls and Audio Systems
In this section, you'll find out how to operate the comfort control and audio systems offered with your vehicle.
Be sure to read about the particular systems supplied with your vehicle.
3
-2 Comfort Controls
3
-2 Dual Climate Control System
3
-5 Rear Window Defogger
3
-6 Ventilation System
3
-6 Audio Systems
3
-6 Setting the Clock
3
-7AM-FM Stereo with Cassette Tape Player
3
-11 AM-FM Stereo with Compact Disc
Player (Option)
3
-14 AM-FM Stereo with Compact Disc Player
and Equalizer (If Equipped)3
-17 Theft-Deterrent Feature
3
-19 Audio Steering Wheel Controls (If Equipped)
3
-20 Understanding Radio Reception
3
-20 Tips About Your Audio System
3
-21 Care of Your Cassette Tape Player
3
-22 Care of Your Compact Discs
3
-22 Care of Your Compact Disc Player
3
-22 Backglass Antenna
Page 172 of 373

3-8
Setting the Tone
BASS: Slide the lever to the right or left to increase or
decrease bass.
TREBLE: Slide the lever to the right or left to increase
or decrease treble. If a station is weak or noisy, you may
want to decrease the treble.
Adjusting the Speakers
BAL: Press this knob lightly so it extends.
Turn this knob to move the sound to the left or right
speakers. The middle position balances the sound
between the speakers.
FADE: Press this knob lightly so it extends.
Turn this knob to move the sound to the front or rear
speakers. The middle position balances the sound
between the speakers.
Push these knobs back into their stored positions when
you're not using them.Playing a Cassette Tape
Your tape player is built to work best with tapes that are
up to 30 to 45 minutes long on each side. Tapes longer
than that are so thin they may not work well in this player.
While the tape is playing, use the VOL, FADE, BAL,
BASS and TREB controls just as you do for the radio.
The display will show an arrow to show which side of
the tape is playing. When the down indicator arrow is
lit, selections listed on the bottom side of the cassette are
playing. When the up arrow is lit, selections listed on the
top side of the cassette are playing. The tape player
automatically begins playing the other side when it
reaches the end of the tape.
If E and a number appear on the radio display, the tape
won't play because of an error.
�E10: The tape is tight and the player can't turn the
tape hubs. Remove the tape. Hold the tape with the
open end down and try to turn the right hub
counterclockwise with a pencil. Turn the tape over
and repeat. If the hubs do not turn easily, your tape
may be damaged and should not be used in the
player. Try a new tape to make sure your player is
working properly.
Page 183 of 373

3-19 Audio Steering Wheel Controls
(If Equipped)
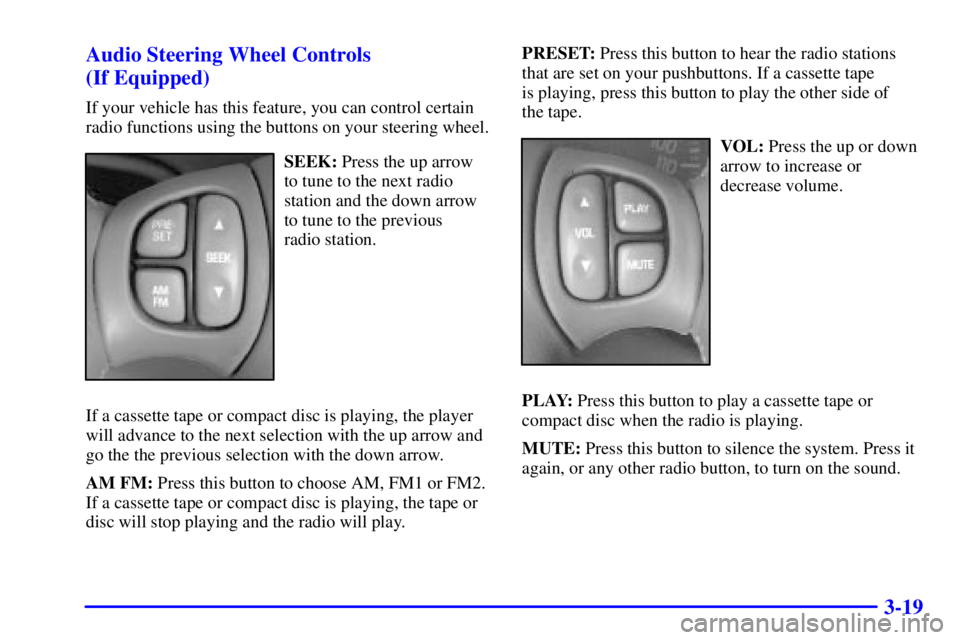
If your vehicle has this feature, you can control certain
radio functions using the buttons on your steering wheel.
SEEK: Press the up arrow
to tune to the next radio
station and the down arrow
to tune to the previous
radio station.
If a cassette tape or compact disc is playing, the player
will advance to the next selection with the up arrow and
go the the previous selection with the down arrow.
AM FM: Press this button to choose AM, FM1 or FM2.
If a cassette tape or compact disc is playing, the tape or
disc will stop playing and the radio will play.PRESET: Press this button to hear the radio stations
that are set on your pushbuttons. If a cassette tape
is playing, press this button to play the other side of
the tape.VOL: Press the up or down
arrow to increase or
decrease volume.
PLAY: Press this button to play a cassette tape or
compact disc when the radio is playing.
MUTE: Press this button to silence the system. Press it
again, or any other radio button, to turn on the sound.