Page 244 of 373
5-18 How to Add Coolant to the Radiator
NOTICE:
Your engine has a specific radiator fill procedure.
Failure to follow this procedure could cause your
engine to overheat and be severely damaged.
The radiator pressure cap is located on the passenger's
side in the front of the engine compartment, near the
battery and the diagonal cross brace. See ªEngine
Compartment Overviewº in the Index for more
information on location.
1. You can remove the radiator pressure cap when
the cooling system, including the radiator pressure
cap and upper radiator hose, is no longer hot.
Turn the pressure cap slowly counterclockwise until
it first stops. (Don't press down while turning
the pressure cap.)
If you hear a hiss, wait for that to stop.
A hiss means there is still some pressure left.
Page 245 of 373
5-19
2. Then keep turning the pressure cap, but now push
down as you turn it. Remove the pressure cap.
CAUTION:
You can be burned if you spill coolant on hot
engine parts. Coolant contains ethylene glycol
and it will burn if the engine parts are hot
enough. Don't spill coolant on a hot engine.
3. If you have the 3800 V6 engine, remove the 3800
Series II V6 engine cover shield to access the bleed valve.
A. Clean the area around the engine oil fill tube and cap
before removing. Twist the oil fill tube, with cap
attached, counterclockwise and remove it.
B. If you have the supercharged engine, remove the nut
in the center of the cover shield.
C. Lift the engine cover shield at the front, slide the
catch tab out of the engine bracket and remove the
cover shield.
D. Put the oil fill tube, with cap attached, in the valve
cover oil fill hole until you're ready to replace the
cover shield.
Page 246 of 373
5-20
Thermostat Bypass
Tube (3100 V6)Thermostat Housing
(3100 V6)
4. After the engine
cools, open the
coolant air bleed
valve or valves.
Thermostat Housing
(3800 V6)
3100 V6 engine: There are two bleed valves. One is
located on the thermostat housing. The other is
located on the thermostat bypass tube.
3800 V6 engine: There is one bleed valve.
It is located on the thermostat housing.
Page 247 of 373
5-21
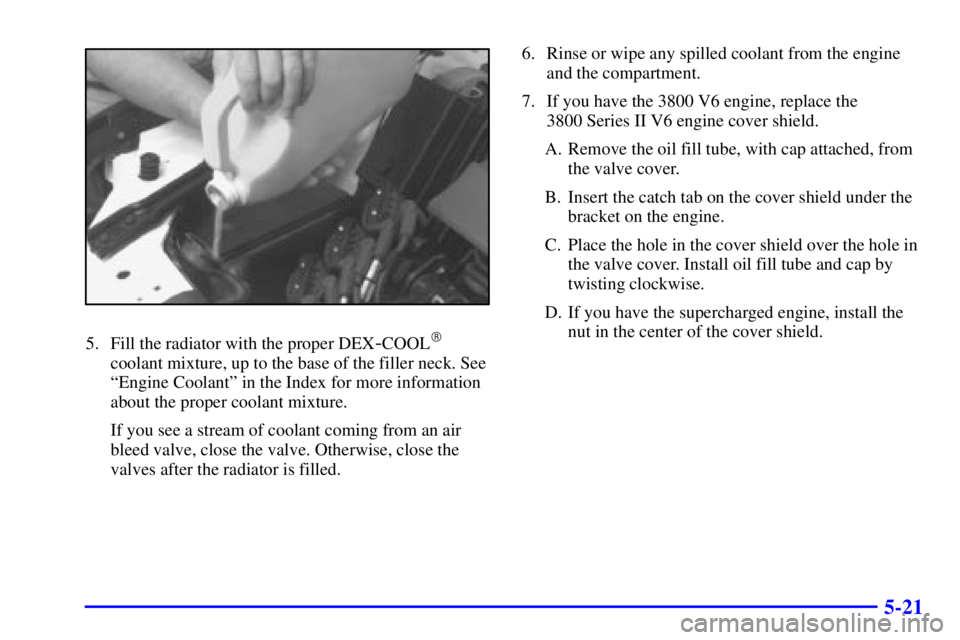
5. Fill the radiator with the proper DEX-COOL�
coolant mixture, up to the base of the filler neck. See
ªEngine Coolantº in the Index for more information
about the proper coolant mixture.
If you see a stream of coolant coming from an air
bleed valve, close the valve. Otherwise, close the
valves after the radiator is filled.6. Rinse or wipe any spilled coolant from the engine
and the compartment.
7. If you have the 3800 V6 engine, replace the
3800 Series II V6 engine cover shield.
A. Remove the oil fill tube, with cap attached, from
the valve cover.
B. Insert the catch tab on the cover shield under the
bracket on the engine.
C. Place the hole in the cover shield over the hole in
the valve cover. Install oil fill tube and cap by
twisting clockwise.
D. If you have the supercharged engine, install the
nut in the center of the cover shield.
Page 248 of 373
5-22
8. Then fill the coolant recovery tank to the
COLD mark.
9. Put the cap back on the coolant recovery tank, but
leave the radiator pressure cap off.10. Start the engine and let it run until you can feel the
upper radiator hose getting hot. Watch out for the
engine cooling fans.
11. By this time, the coolant level inside the radiator
filler neck may be lower. If the level is lower, add
more of the proper DEX
-COOL� coolant mixture
through the filler neck until the level reaches the
base of the filler neck.
Page 249 of 373

5-23
12. Then replace the pressure cap. At any time during
this procedure if coolant begins to flow out of the
filler neck, reinstall the pressure cap. Be sure the
arrows on the pressure cap line up like this.
13. Check the coolant in the recovery tank. The level in
the coolant recovery tank should be at the HOT mark
when the engine is hot or at the COLD mark when
the engine is cold.
If a Tire Goes Flat
It's unusual for a tire to ªblow outº while you're driving,
especially if you maintain your tires properly. If air goes
out of a tire, it's much more likely to leak out slowly.
But if you should ever have a ªblowout,º here are a few
tips about what to expect and what to do:
If a front tire fails, the flat tire will create a drag that
pulls the vehicle toward that side. Take your foot off the
accelerator pedal and grip the steering wheel firmly.
Steer to maintain lane position, and then gently brake to
a stop well out of the traffic lane.
A rear blowout, particularly on a curve, acts much like a
skid and may require the same correction you'd use in a
skid. In any rear blowout, remove your foot from the
accelerator pedal. Get the vehicle under control by
steering the way you want the vehicle to go. It may be
very bumpy and noisy, but you can still steer. Gently
brake to a stop
-- well off the road if possible.
If a tire goes flat, the next part shows how to use your
jacking equipment to change a flat tire safely.
Page 263 of 373

6-
6-1
Section 6 Service and Appearance Care
Here you will find information about the care of your vehicle. This section begins with service and fuel information,
and then it shows how to check important fluid and lubricant levels. There is also technical information about your
vehicle, and a part devoted to its appearance care.
6
-2 Service
6
-3 Fuel
6
-5 Fuels in Foreign Countries
6
-5 Filling Your Tank
6
-8 Filling a Portable Fuel Container
6
-8 Checking Things Under the Hood
6
-13 Engine Oil
6
-20 Engine Air Cleaner/Filter
6
-21 Supercharger Oil
6
-22 Automatic Transaxle Fluid
6
-26 Engine Coolant
6
-29 Radiator Pressure Cap
6
-30 Power Steering Fluid
6
-32 Windshield Washer Fluid
6
-33 Brakes
6
-37 Battery
6
-38 Bulb Replacement
6
-46 Windshield Wiper Blade Replacement
6
-47 Tires6
-55 Appearance Care
6
-55 Cleaning the Inside of Your Vehicle
6
-57 Care of Safety Belts
6
-59 Cleaning the Outside of Your Vehicle
6
-60 Cleaning Aluminum or Chrome-Plated
Wheels (If Equipped)
6
-60 Cleaning Tires
6
-61 Sheet Metal Damage
6
-61 Finish Damage
6
-61 Underbody Maintenance
6
-61 Chemical Paint Spotting
6
-62 GM Vehicle Care/Appearance Materials
6
-63 Vehicle Identification Number (VIN)
6
-63 Service Parts Identification Label
6
-64 Electrical System
6
-70 Replacement Bulbs
6
-70 Capacities and Specifications
6
-71 Normal Maintenance Replacement Parts
Page 270 of 373

6-8
Filling a Portable Fuel Container
CAUTION:
Never fill a portable fuel container while it is in
your vehicle. Static electricity discharge from the
container can ignite the gasoline vapor. You can
be badly burned and your vehicle damaged if this
occurs. To help avoid injury to you and others:
�Dispense gasoline only into
approved containers.
�Do not fill a container while it is inside a
vehicle, in a vehicle's trunk, pickup bed or
on any surface other than the ground.
�Bring the fill nozzle in contact with the
inside of the fill opening before operating
the nozzle. Contact should be maintained
until the filling is complete.
�Don't smoke while pumping gasoline.
Checking Things Under the Hood
CAUTION:
An electric fan under the hood can start up and
injure you even when the engine is not running.
Keep hands, clothing and tools away from any
underhood electric fan.
CAUTION:
Things that burn can get on hot engine parts and
start a fire. These include liquids like gasoline,
oil, coolant, brake fluid, windshield washer and
other fluids, and plastic or rubber. You or others
could be burned. Be careful not to drop or spill
things that will burn onto a hot engine.


Thermostat Housing
(3100 V6)
4. After the engine
cools, open the
coolant air bleed
valve or valves.
Thermostat Housing
(3800 V6)
3100 V6 engine: There are two blee")