Page 3 of 341
2001 Pontiac Grand Am
Owner's Manual
Litho in U.S.A.
Part Number 22628053 A First Edition© Copyright General Motors Corporation 2000
All Rights Reserved
i
Page 8 of 341
vi
GENERAL MOTORS, GM, the GM Emblem,
PONTIAC, the PONTIAC Emblem and the name
GRAND AM are registered trademarks of General
Motors Corporation.
This manual includes the latest information at the time
it was printed. We reserve the right to make changes
after that time without further notice. For vehicles first
sold in Canada, substitute the name ªGeneral Motors of
Canada Limitedº for Pontiac Division whenever it
appears in this manual.
Please keep this manual in your vehicle, so it will be
there if you ever need it when you're on the road. If you
sell the vehicle, please leave this manual in it so the new
owner can use it.
We support voluntary
technician certification.
For Canadian Owners Who Prefer a
French Language Manual:
Aux propri‡taires canadiens: Vous pouvez vous
procurer un exemplaire de ce guide en fran†ais chez
votre concessionaire ou au:
Helm, Incorporated
P.O. Box 07130
Detroit, MI 48207
Page 49 of 341
1-37
CAUTION:
Children who are up against, or very close to, any
air bag when it inflates can be seriously injured
or killed. Air bags plus lap
-shoulder belts offer
outstanding protection for adults and older
children, but not for young children and infants.
Neither the vehicle's safety belt system nor its air
bag system is designed for them. Young children
and infants need the protection that a child
restraint system can provide.
Q:What are the different types of add-on
child restraints?
A:Add-on child restraints, which are purchased by the
vehicle's owner, are available in four basic types.
Selection of a particular restraint should take into
consideration not only the child's weight, height
and age but also whether or not the restraint will be
compatible with the motor vehicle in which it will
be used.
For most basic types of child restraints, there are
many different models available. When purchasing
a child restraint, be sure it is designed to be used in
a motor vehicle. If it is, the restraint will have a
label saying that it meets federal motor vehicle
safety standards.
The restraint manufacturer's instructions that come
with the restraint state the weight and height
limitations for a particular child restraint. In
addition, there are many kinds of restraints
available for children with special needs.
Page 51 of 341
1-39
Restraint Systems for Children
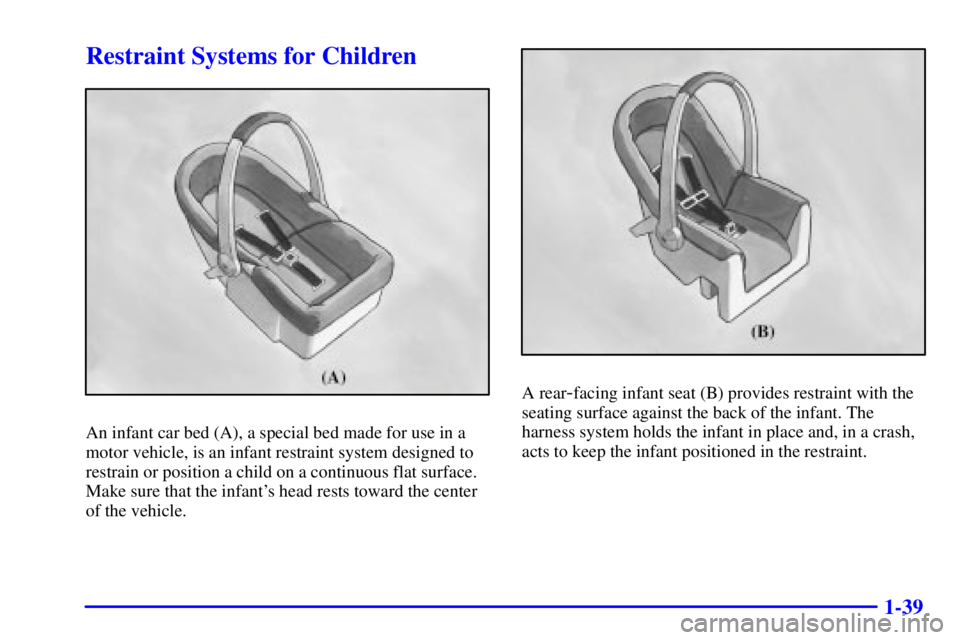
An infant car bed (A), a special bed made for use in a
motor vehicle, is an infant restraint system designed to
restrain or position a child on a continuous flat surface.
Make sure that the infant's head rests toward the center
of the vehicle.
A rear-facing infant seat (B) provides restraint with the
seating surface against the back of the infant. The
harness system holds the infant in place and, in a crash,
acts to keep the infant positioned in the restraint.
Page 53 of 341

1-41
Q:How do child restraints work?
A:A child restraint system is any device designed for
use in a motor vehicle to restrain, seat, or position
children. A built
-in child restraint system is a
permanent part of the motor vehicle. An add
-on
child restraint system is a portable one, which is
purchased by the vehicle's owner.
For many years, add
-on child restraints have used
the adult belt system in the vehicle. To help reduce
the chance of injury, the child also has to be
secured within the restraint. The vehicle's belt
system secures the add
-on child restraint in the
vehicle, and the add
-on child restraint's harness
system holds the child in place within the restraint.
One system, the three
-point harness, has straps that
come down over each of the infant's shoulders and
buckle together at the crotch. The five
-point
harness system has two shoulder straps, two hip
straps and a crotch strap. A shield may take the
place of hip straps. A T
-shaped shield has shoulder
straps that are attached to a flat pad which rests low
against the child's body. A shelf
- or armrest-type
shield has straps that are attached to a wide,
shelf
-like shield that swings up or to the side.When choosing a child restraint, be sure the child
restraint is designed to be used in a vehicle. If it is,
it will have a label saying that it meets federal motor
vehicle safety standards.
Then follow the instructions for the restraint. You may
find these instructions on the restraint itself or in a
booklet, or both. These restraints use the belt system in
your vehicle, but the child also has to be secured within
the restraint to help reduce the chance of personal injury.
When securing an add
-on child restraint, refer to the
instructions that come with the restraint which may be
on the restraint itself or in a booklet, or both, and to this
manual. The child restraint instructions are important, so
if they are not available, obtain a replacement copy from
the manufacturer.
Page 54 of 341
1-42 Where to Put the Restraint
Accident statistics show that children are safer if they
are restrained in the rear rather than the front seat.
General Motors, therefore, recommends that child
restraints be secured in the rear seat including an infant
riding in a rear
-facing infant seat, a child riding in a
forward
-facing child seat and an older child riding in a
booster seat. Never put a rear
-facing child restraint in
the front passenger seat. Here's why:
CAUTION:
A child in a rear-facing child restraint can be
seriously injured or killed if the right front
passenger's air bag inflates. This is because the
back of the rear
-facing child restraint would be
very close to the inflating air bag. Always secure
a rear
-facing child restraint in a rear seat.
You may secure a forward-facing child restraint
in the right front seat, but before you do, always
move the front passenger seat as far back as it
will go. It's better to secure the child restraint in
a rear seat.
Wherever you install it, be sure to secure the child
restraint properly.
Keep in mind that an unsecured child restraint can move
around in a collision or sudden stop and injure people in
the vehicle. Be sure to properly secure any child
restraint in your vehicle
-- even when no child is in it.
Page 91 of 341

2-21 Manual Transaxle
The gear selector should be in NEUTRAL and the
parking brake engaged. Hold the clutch pedal to the
floor and start the engine. Your vehicle won't start if
the clutch pedal is not all the way down
-- that's a
safety feature.
1. With your foot off the accelerator pedal, turn your
ignition key to START. When the engine starts, let
go of the key. The idle speed will go down as your
engine warms up.
NOTICE:
Holding your key in START for longer than
15 seconds at a time will cause your battery to
be drained much sooner. And the excessive heat
can damage your starter motor. Wait about
15 seconds between each try to help avoid
draining your battery or damaging your starter.
2. If the engine doesn't start in 10 seconds, or if the
weather is very cold (below
-20� F or -29� C),
push the accelerator pedal about one
-quarter of the
way down while you turn the key to START. Do this
until the engine starts. As soon as it does, let go of
the key.
3. If your engine still won't start (or starts but then
stops), it could be flooded with too much gasoline.
Try pushing your accelerator pedal all the way to the
floor and holding it there as you hold the key in
START for a maximum of 15 seconds. This clears
the extra gasoline from the engine. If the engine still
won't start or starts briefly but then stops again, repeat
Step 1 or 2, depending on temperature. When the
engine starts, release the key and the
accelerator pedal.
NOTICE:
Your engine is designed to work with the
electronics in your vehicle. If you add electrical
parts or accessories, you could change the way
the engine operates. Before adding electrical
equipment, check with your dealer. If you don't,
your engine might not perform properly.
Page 108 of 341
2-38 Flash-to-Pass
This feature lets you use your high-beam headlamps to
signal a driver in front of you that you want to pass.
To use it, pull the turn signal/multifunction lever toward
you until the high
-beam headlamps come on, then
release the lever to turn them off.
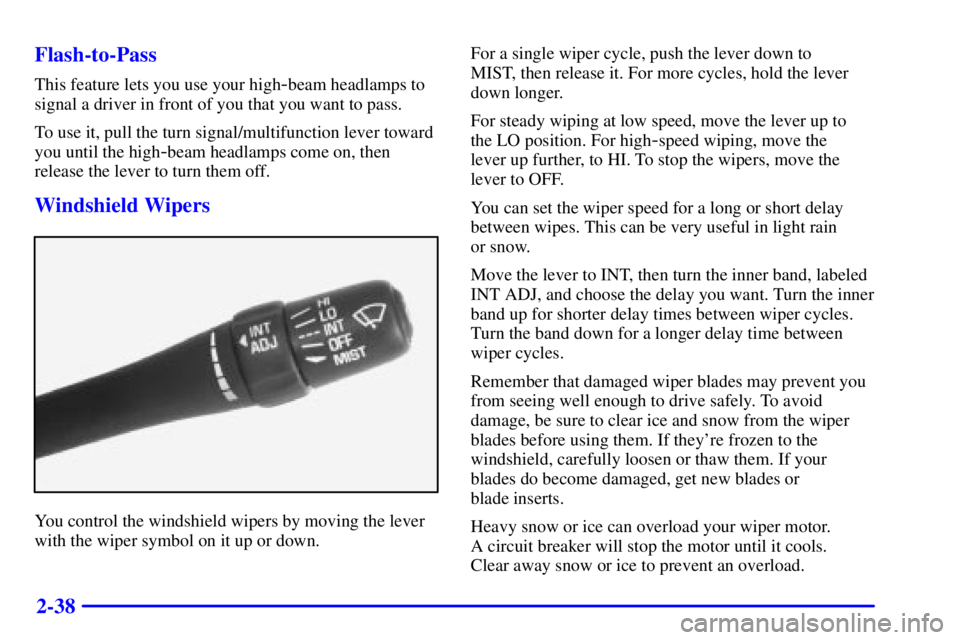
Windshield Wipers
You control the windshield wipers by moving the lever
with the wiper symbol on it up or down.For a single wiper cycle, push the lever down to
MIST, then release it. For more cycles, hold the lever
down longer.
For steady wiping at low speed, move the lever up to
the LO position. For high
-speed wiping, move the
lever up further, to HI. To stop the wipers, move the
lever to OFF.
You can set the wiper speed for a long or short delay
between wipes. This can be very useful in light rain
or snow.
Move the lever to INT, then turn the inner band, labeled
INT ADJ, and choose the delay you want. Turn the inner
band up for shorter delay times between wiper cycles.
Turn the band down for a longer delay time between
wiper cycles.
Remember that damaged wiper blades may prevent you
from seeing well enough to drive safely. To avoid
damage, be sure to clear ice and snow from the wiper
blades before using them. If they're frozen to the
windshield, carefully loosen or thaw them. If your
blades do become damaged, get new blades or
blade inserts.
Heavy snow or ice can overload your wiper motor.
A circuit breaker will stop the motor until it cools.
Clear away snow or ice to prevent an overload.