Page 6 of 341
Table of Contents (cont'd)
Maintenance Schedule Service and Appearance Care
Section
7
Section
6
Scheduled Maintenance
Owner Checks and Services
Periodic Maintenance InspectionsRecommended Fluids and Lubricants
Maintenance Records
Fuel
Checking Fluids and Lubricants
GM Oil Life System™
Engine Air Cleaner/Filter
Brakes
Bulb ReplacementWindshield Wiper Blade Replacement
Tires and Wheels
Appearance Care
Electrical System/Fuses and Circuit Breakers
Capacities and Specifications
Normal Maintenance Replacement Parts
iv
Page 106 of 341

2-36
Turn Signal/Multifunction Lever
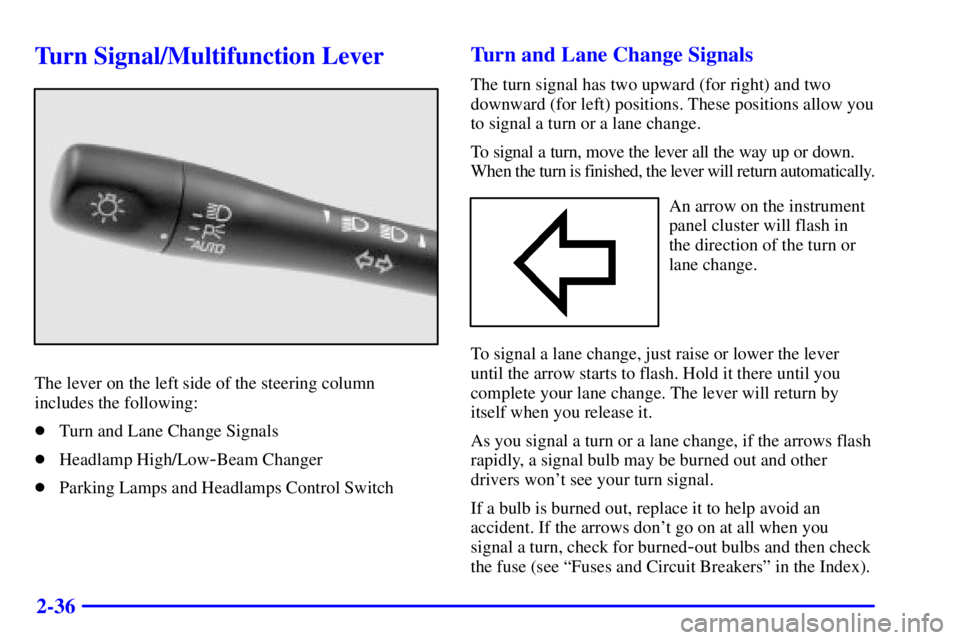
The lever on the left side of the steering column
includes the following:
�Turn and Lane Change Signals
�Headlamp High/Low
-Beam Changer
�Parking Lamps and Headlamps Control Switch
Turn and Lane Change Signals
The turn signal has two upward (for right) and two
downward (for left) positions. These positions allow you
to signal a turn or a lane change.
To signal a turn, move the lever all the way up or down.
When the turn is finished, the lever will return automatically.
An arrow on the instrument
panel cluster will flash in
the direction of the turn or
lane change.
To signal a lane change, just raise or lower the lever
until the arrow starts to flash. Hold it there until you
complete your lane change. The lever will return by
itself when you release it.
As you signal a turn or a lane change, if the arrows flash
rapidly, a signal bulb may be burned out and other
drivers won't see your turn signal.
If a bulb is burned out, replace it to help avoid an
accident. If the arrows don't go on at all when you
signal a turn, check for burned
-out bulbs and then check
the fuse (see ªFuses and Circuit Breakersº in the Index).
Page 136 of 341
2-66 Oil Pressure Light
If you have a low engine oil
pressure problem, this light
will stay on after you start
your engine, or come on
and you will hear a chime
when you are driving.
This indicates that your engine is not receiving enough
oil. The engine could be low on oil, or could have some
other oil problem. Have it fixed immediately.
When the ignition is on but the engine is not running,
the light will come on as a test to show you it is
working, but the light will go out when the engine is
running. If it doesn't come on with the ignition on, you
may have a problem with the fuse or bulb. Have it fixed
right away.CAUTION:
Don't keep driving if the oil pressure is low. If
you do, your engine can become so hot that it
catches fire. You or others could be burned.
Check your oil as soon as possible and have your
vehicle serviced.
NOTICE:
Damage to your engine from neglected oil
problems can be costly and is not covered by
your warranty.
Page 137 of 341

2-67 Low Oil Light (If Equipped)
If your vehicle is equipped
with a 3400 V6 engine, then
you will have a LOW OIL
light on your instrument
panel cluster.
This light will come on briefly when you start
your vehicle.
If the light stays on after starting your vehicle, or comes
on and chimes while you are driving, your engine oil
level should be checked.
Prior to checking the oil level, be sure your vehicle has
been shut off for several minutes and is on a level
surface. Check the oil level on your dipstick and bring it
to the proper level. See ªEngine Oilº in the Index.
A false LOW OIL light may be generated when parking
on steep grades.The oil level monitoring system only checks oil level
during the brief period between when the key is on and
the engine is cranking. It does not monitor engine oil
level when the engine is running. Additionally, an oil
level check is only performed if the engine has been
turned off for a considerable period of time allowing the
oil normally in circulation to drain back into the oil pan.
Change Oil Light
The CHANGE OIL light
should come on briefly as
a bulb check when you
start the engine. If the light
doesn't come on, have
it serviced.
If the CHANGE OIL light comes on and stays on after
you start the engine, have the oil changed.
For additional information, see ªEngine Oil, When to
Changeº in the Index. To reset the Oil Life Monitor, see
ªEngine Oil Life Monitorº in the Index.
Page 212 of 341

4-39 Turn Signals When Towing a Trailer
When you tow a trailer, your vehicle may need a
different turn signal flasher and/or extra wiring. Check
with your dealer. The arrows on your instrument panel
will flash whenever you signal a turn or lane change.
Properly hooked up, the trailer lamps will also flash,
telling other drivers you're about to turn, change lanes
or stop.
When towing a trailer, the arrows on your instrument
panel will flash for turns even if the bulbs on the trailer
are burned out. Thus, you may think drivers behind you
are seeing your signal when they are not. It's important
to check occasionally to be sure the trailer bulbs are
still working.
Driving On Grades
Reduce speed and shift to a lower gear before you start
down a long or steep downgrade. If you don't shift
down, you might have to use your brakes so much that
they would get hot and no longer work well.
On a long uphill grade, shift down and reduce your
speed to around 45 mph (70 km/h) to reduce the
possibility of engine and transaxle overheating.
Parking on Hills
CAUTION:
You really should not park your vehicle, with a
trailer attached, on a hill. If something goes
wrong, your rig could start to move. People can
be injured, and both your vehicle and the trailer
can be damaged.
But if you ever have to park your rig on a hill, here's
how to do it:
1. Apply your regular brakes, but don't shift into
PARK (P) for an automatic transaxle or into gear for
a manual transaxle, yet. When parking uphill, turn
your wheels away from the curb. When parking
downhill, turn your wheels into the curb.
2. Have someone place chocks under the trailer wheels.
3. When the chocks are in place, release the regular
brakes until the chocks absorb the load.
Page 242 of 341

6-
6-1
Section 6 Service and Appearance Care
Here you will find information about the care of your vehicle. This section begins with service and fuel information,
and then it shows how to check important fluid and lubricant levels. There is also technical information about your
vehicle, and a part devoted to its appearance care.
6
-2 Service
6
-3 Fuel
6
-5 Fuels in Foreign Countries
6
-5 Filling Your Tank
6
-7 Filling a Portable Fuel Container
6
-8 Checking Things Under the Hood
6
-12 Engine Oil
6
-18 Engine Air Cleaner/Filter
6
-19 Automatic Transaxle Fluid
6
-20 Manual Transaxle Fluid
6
-20 Hydraulic Clutch
6
-21 Engine Coolant
6
-24 Power Steering Fluid
6
-25 Windshield Washer Fluid
6
-27 Brakes6
-30 Battery
6
-31 Bulb Replacement
6
-35 Windshield Wiper Blade Replacement
6
-36 Tires
6
-45 Appearance Care
6
-45 Cleaning the Inside of Your Vehicle
6
-47 Care of Safety Belts
6
-49 Cleaning the Outside of Your Vehicle
6
-51 Finish Damage
6
-52 GM Vehicle Care/Appearance Materials
6
-53 Vehicle Identification Number (VIN)
6
-54 Electrical System
6
-59 Replacement Bulbs
6
-60 Capacities and Specifications
6
-61 Normal Maintenance Replacement Parts
Page 272 of 341

6-31 Vehicle Storage
If you're not going to drive your vehicle for 25 days
or more, remove the black, negative (
-) cable from
the battery. This will help keep your battery from
running down.
CAUTION:
Batteries have acid that can burn you and gas
that can explode. You can be badly hurt if you
aren't careful. See ªJump Startingº in the Index
for tips on working around a battery without
getting hurt.
Contact your dealer to learn how to prepare your vehicle
for longer storage periods.
Also, for your audio system, see ªTheft
-Deterrent
Featureº in the Index.
Bulb Replacement
This section describes bulb changing procedures for
some of your interior and exterior lamps. For bulb sizes,
see ªReplacement Bulbsº in the Index. For any bulbs not
listed in this section, contact your service department.
Halogen Bulbs
CAUTION:
Halogen bulbs have pressurized gas inside and
can burst if you drop or scratch the bulb. You or
others could be injured. Be sure to read and
follow the instructions on the bulb package.
Page 273 of 341
6-32 Headlamps
1. Lift up on the two retaining clips which secure the
headlamp assembly.
2. Lift the headlamp assembly forward, out of the
mounting bracket.
3. Turn the bulb assembly retainer counterclockwise
one
-sixth of a turn and pull out the bulb assembly.
4. Unclip the bulb assembly from the wiring harness.
5. After replacing the bulb, reverse Steps 1 through 4 to
reinstall the bulb assembly and headlamp housing.